A package stores one or more programs required for the application to run. You can create a package for an application either immediately after creating the application or at a later point in time.
Note these considerations for creating a package:
-
When you create a package, you provide many details for the package such as name, storage, path, template, stage, and so on. A package stage indicates the state of delivery of a package. In App Volumes version 2606 and later, you can define a custom lifecycle stage as per your application lifecycle management requirements in addition to using the pre-defined lifecycle stages.
For information about the pre-defined package stages, see Pre-defined Lifecycle Stages of an App Volumes Package. For information about defining a custom lifecycle stage, see Create a Lifecycle Stage for an App Volumes Package. -
You can configure the delivery modes,
Classic and On-demand, for the package. For more information about the package delivery modes, see Understanding Package Delivery Modes in App Volumes. -
If you want to deliver an MSI-wrapped VHD to a Windows endpoint, you need to create a package in the
VHD + MSIformat. For more information about using the MSI-wrapped VHD package, see Using MSI-Wrapped VHD Package for App Volumes Delivery. For information about why this package is preferred when delivering applications to the Windows endpoint, see the Application Delivery Modes with App Volumes Manager section in the App Volumes Installation Guide at Omnissa Product Documentation. -
You can gather application usage feedback from your end users and use this data to effectively manage applications. This functionality can be enabled using the Prompt for Feedback toggle. For more information about this toggle, see Seek App Volumes Application Usage Feedback from Users.
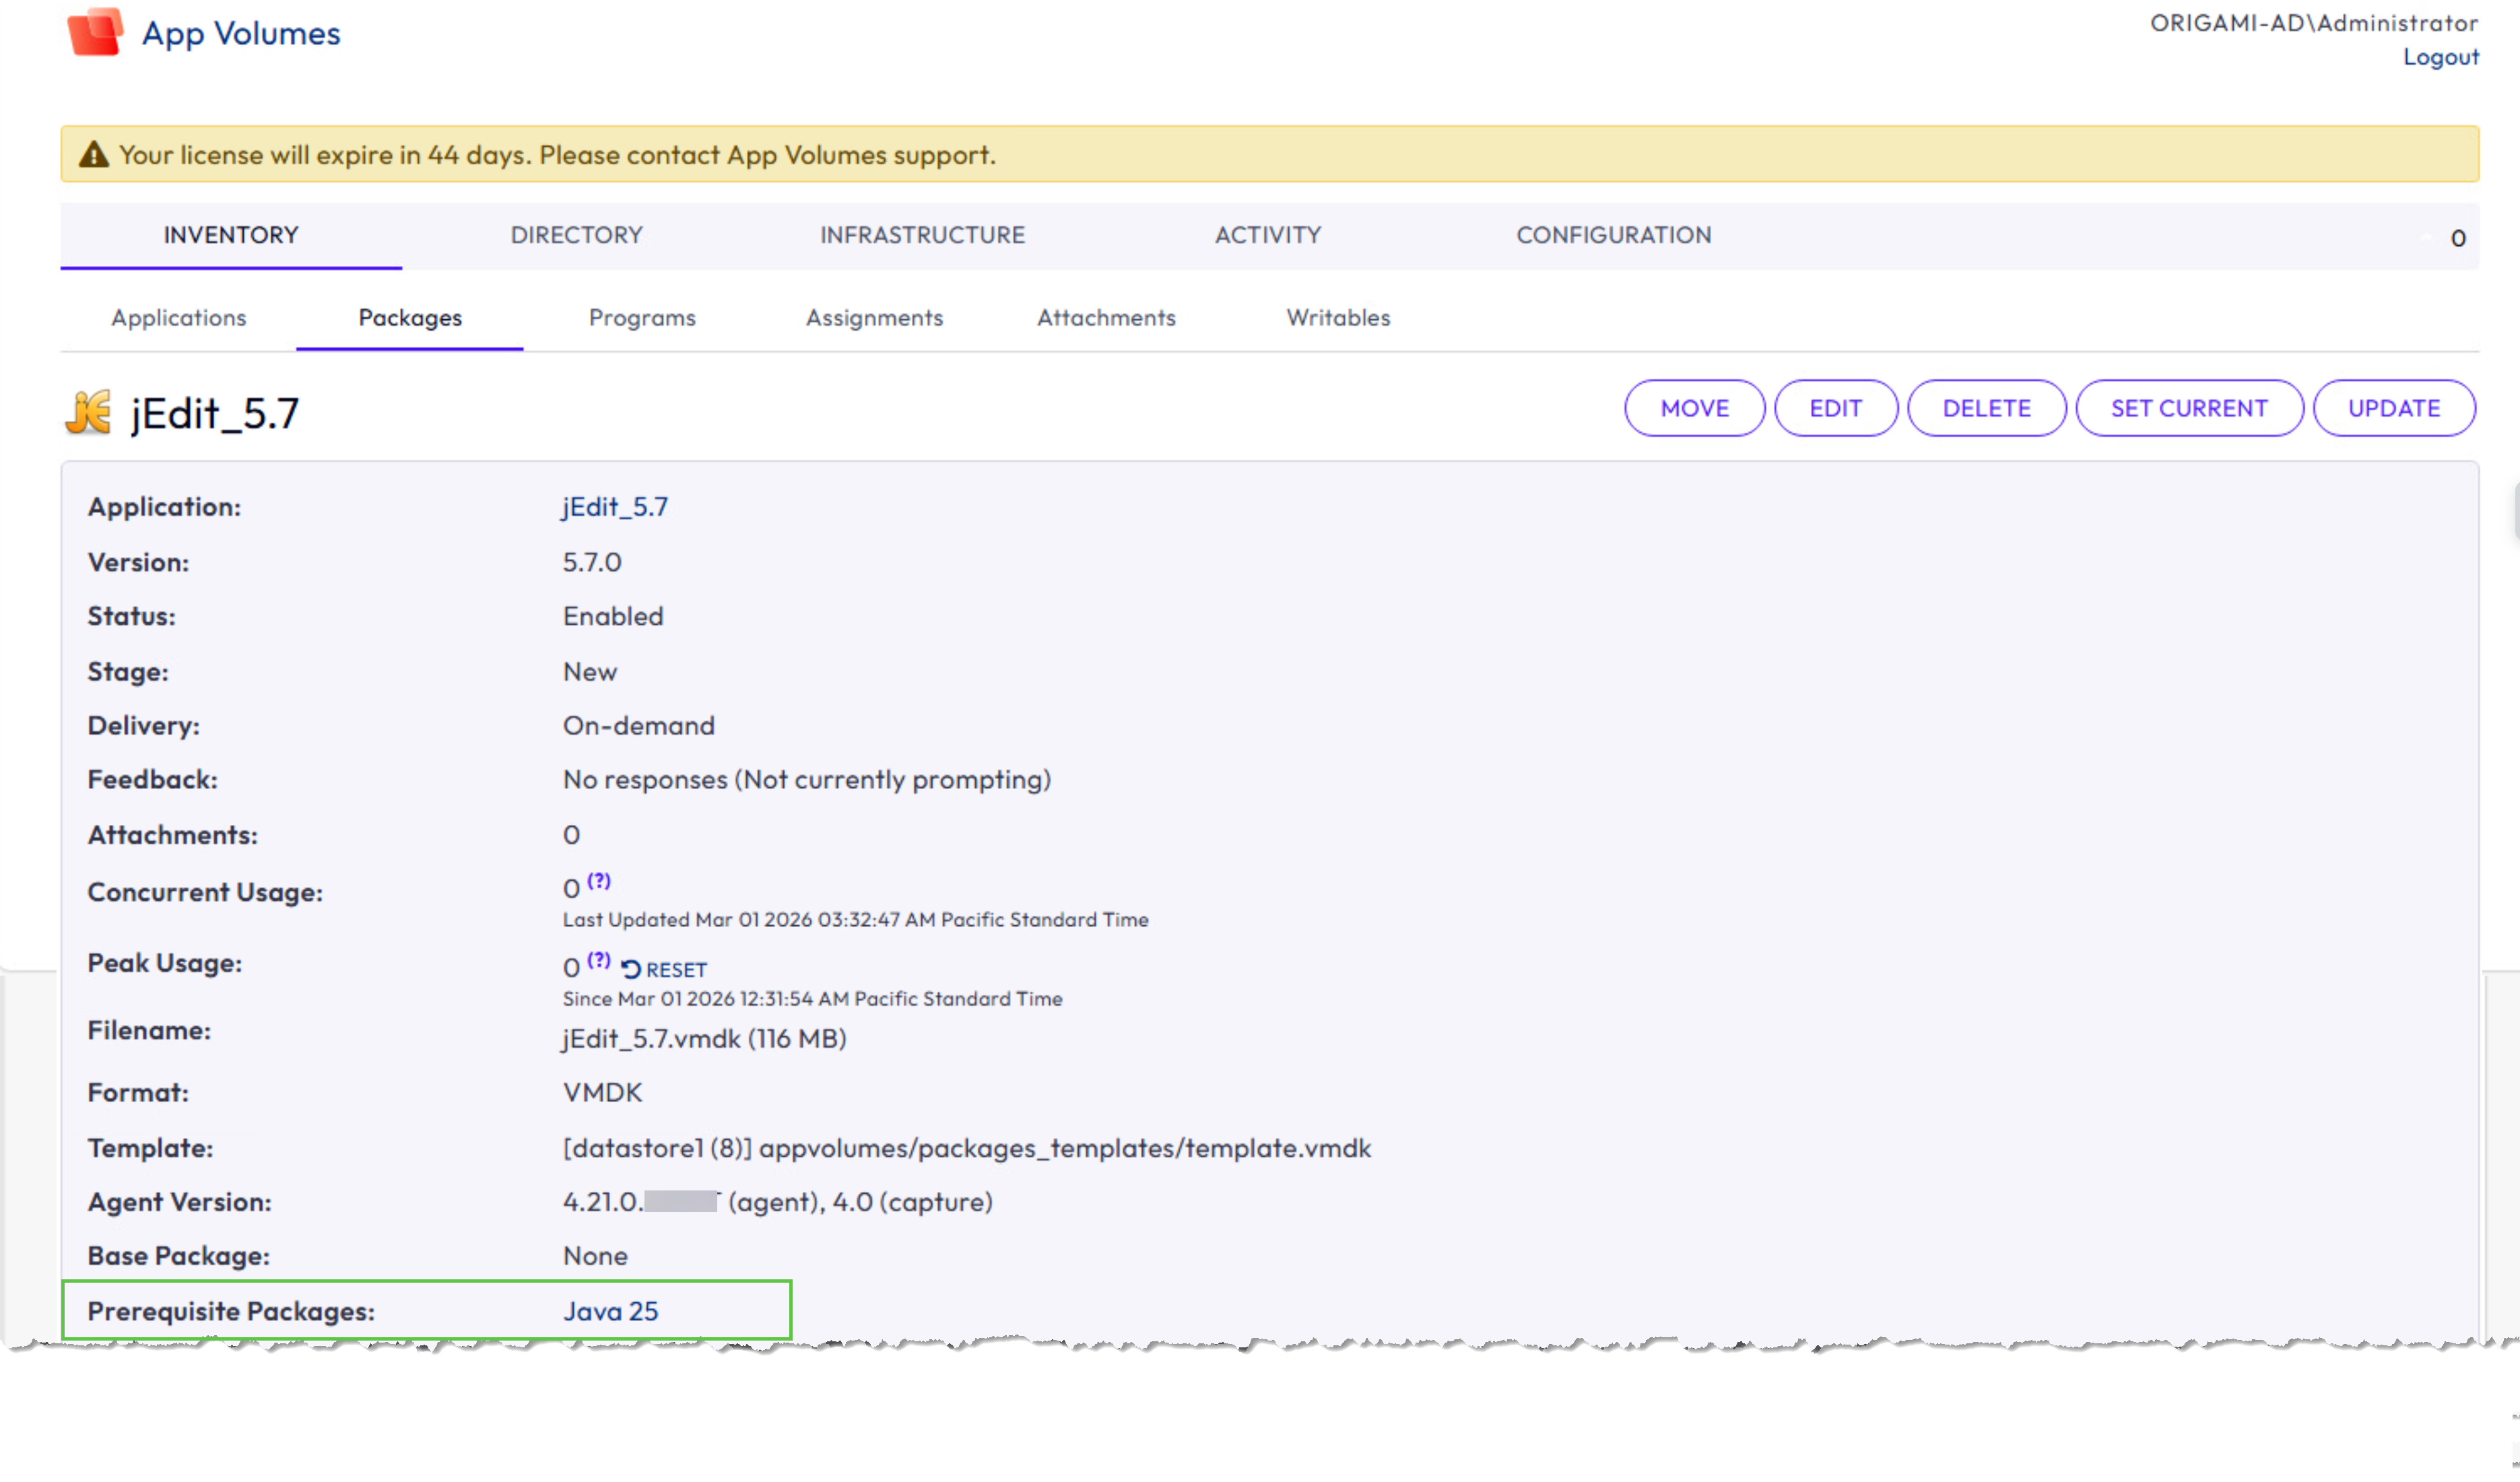
The following screenshot displays the package details page for jEdit_5.7pkg. Information such as path, template, delivery mode, stage, and description are displayed for jEdit_5.7pkg. Prerequisite Packages toggle is turned on and Java 25 is added as a prerequisite package for jEdit_5.7pkg. Feedback collection for this package is activated by turning on the Prompt for Feedback toggle.
Prerequisites
-
You must have already created an application.
To create an application, see Create an App Volumes Application.
-
You must have uploaded the template for packages to the datastore.
To upload a template, see Upload Templates.
-
If you want to configure the package delivery mode as
On-demand, ensure that you are aware of the required criteria and the behavior of the application package when delivered to the end user.For information about the criteria and characteristics, see Understanding Package Delivery Modes in App Volumes.
-
If you create a package in the
VHD + MSIformat, ensure that the Generate MSI when creating VHD package toggle is enabled. For more information about this setting, see App Volumes Manager Configuration Settings Page.Note: Turning on the toggle after package creation does not generate the package into the
VHD + MSIformat. This format is generated only at the time of package creation. -
When adding a prerequisite package, ensure that the package status is Enabled.
Prerequisite package can be added only when creating or updating a package.For an understanding of prerequisite package, see Understand the Role of Prerequisite Packages in Application Capture.
Procedure
-
From App Volumes Manager, go to INVENTORY > Applications.
-
Select an application and click Create Package.
-
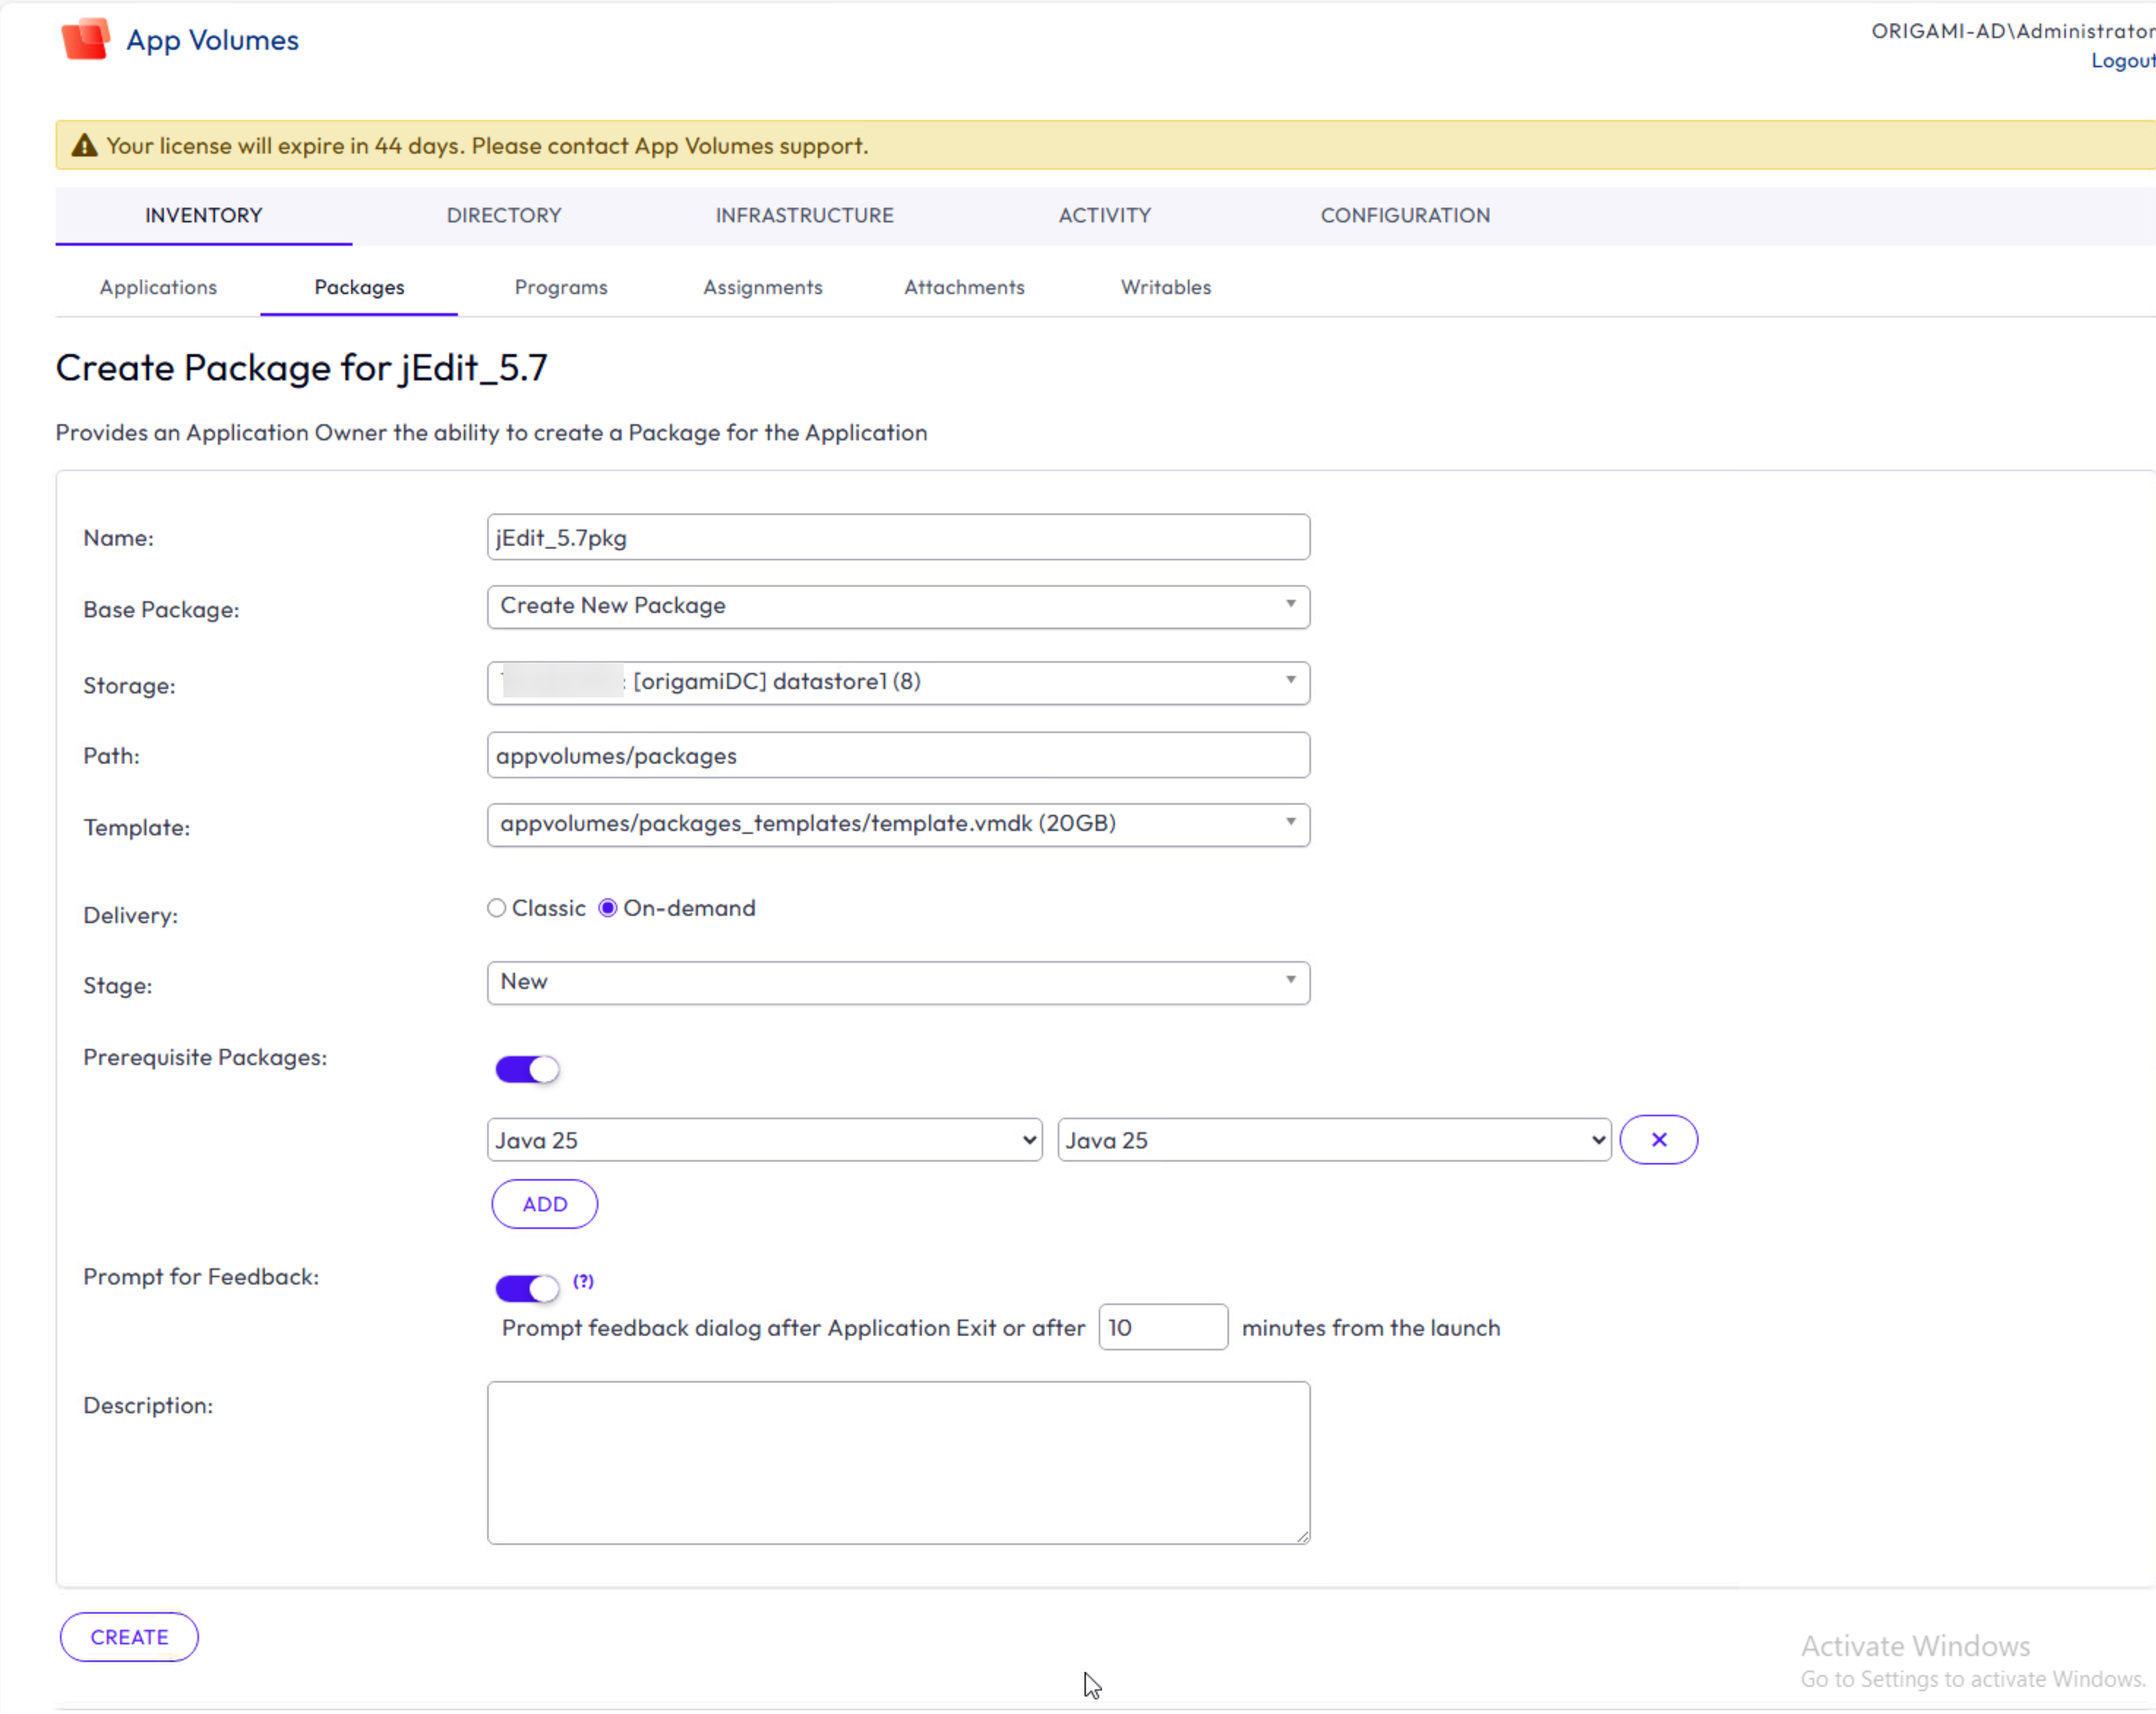
On the Create Package page, provide package details such as
Name,Base Package,Storage,Path,Template,Stage, andDescription.-
When a package is created, the filename of the volume created on the datastore is the same as the package name. Ensure that the volume filename is unique in the datastore directory.
-
Base package acts as reference when you opt to create a version of a package by using an existing version as base.
Note: You cannot use the Create functionality to create an MSIX app attach format in Omnissa App Volumes. As a result, this format is not listed in the
Base Packagedropdown box. -
-
Select the package Delivery mode.
-
By default, the package delivery mode is
Classic.If you select the default value, you cannot change the delivery mode to
On-demanduntil you complete package capture. -
If you configure the package delivery mode to
On-demand, you can edit the delivery mode toClassicregardless of the package status.When a package is delivered as on-demand, the attachment occurs only when the end user launches the application.
-
If you have selected the Do not deliver for these assignments at startup or login check box on the Assign Application page, then the assignment check box overrides the package delivery option selected in this task.
For more information about the command line delivery behavior, see Command-line Delivery of Applications in App Volumes.
-
-
Optional: To add a prerequisite package, turn on the Prerequisite Packages toggle.
-
In the Select Application drop-down, select the primary application that is required for this application capture.
-
In the Select Package drop-down, select the prerequisite package.
Note: Only Enabled packages are available in the drop-down.
-
Optional: To add another prerequisite package, click ADD.
After the package is created, a Prerequisite Packages field is generated in the package details page where the prerequisite packages are listed in the order of virtualization.
-
-
Optional: If you want a feedback dialog box prompted for an end user, turn on the Prompt for Feedback toggle.
Turning on the toggle activates the functionality and, by default, the feedback dialog box is prompted for the user either when the user closes the application or at the configured time after application launch.
- In the text box, enter the time interval (in minutes).
-
Click Create.
-
On the Confirm Create Package window, select one of the options and click Create.
Option Action Perform in the background The package gets created for the application in the background and you can perform other tasks. Note: Status of the package is Creating.Wait for completion You must wait until the package is created for the application. You cannot perform any other tasks until the package gets created.
Results
The newly created package details are displayed in the Packages tab.
As soon as a package is created, a Launch Links table is displayed in the application details page. This table is empty until the application is packaged successfully. For more information about this table, see Launch an App Volumes Application with an App Link.
What to do next
Was this page helpful?