Work in Omnissa Connect to get your Omnissa purchased subscriptions up and running. Receive a Welcome email with an activation link for your purchased subscription. This link takes you to the Omnissa Connect initial onboarding process where you join or create an organization. After joining or creating an organization, you can review next steps like adding users and federating your organization.
Purchase Omnissa Services
As a new or existing Omnissa Connect user, you can onboard a subscription by purchasing an Omnissa subscription.
- Purchase a subscription from Omnissa Sales.
- Purchase a subscription from an Omnissa partner reseller.
If your enterprise already uses Omnissa services, you can onboard yourself in an existing organization by requesting access to the organization. The procedure for requesting and receiving first-time access to an Omnissa Connect organization can differ based on your account, federated (existing organization) or non-federated (no existing organization, create a new one).
After purchase, use the Welcome email from Omnissa to onboard yourself.
Log in to the Omnissa Connect console
- Read your Welcome email.
- After you make your subscription purchase (either through Sales or through an Omnissa partner), the system sends you a Welcome email using the email ID associated with the order.
- Your Welcome email includes your unique subscription activation link.
- If you haven't seen the email, check your spam messages or corporate spam filter. The unique subscription activation directs you to the Omnissa Connect console.
- You must use this subscription activation link when you log in to the Omnissa Connect console for the first time.
- If you still cannot find the email, ask your Sales Specialist to resend the email or to provide you with the subscription activation link.
- Select the subscription activation link provided in the Welcome email.
- Use the email and password from your Omnissa account to log in.
- If you do not have an Omnissa account, the system prompts you to create one.
You are ready to join your subscription to an organization.
Join your subscription to an organization
An Omnissa Connect organization is a container for your subscriptions that Omnissa Connect uses to control access. To access a subscription, you must belong to an organization and join your subscription to that organization. You can join an existing organization or create a new one.
How to choose
- Join an existing organization
- You can combine multiple Omnissa subscriptions into a single view.
- Joining reduces the number of organizations you manage in Omnissa Connect.
- By selecting an existing organization that includes other Omnissa subscriptions, the subscriptions you are currently adding combine with subscriptions in the existing subscription. You now have a single view of your Omnissa subscriptions.
- For example, if there is an existing subscription for Horizon and Access subscriptions and you have a new subscription for UEM, then selecting the organization that includes Horizon and Access to use for the new UEM subscription combines all subscriptions. The organization now includes Horizon, Access, and UEM in a single view.
- Create a new organization
- This subscription is your first Omnissa subscription.
- The new subscription requires its own admin management experience.
- Some Omnissa subscriptions are managed by independent admin groups.
- Your admin groups require separate and independent Omnissa consoles for the subscriptions they manage.
- You want to keep the new subscription segregated for support or billing reasons.
Option 1: Join an existing organization
Before you add your current subscription to an existing one, view the listed considerations to see if this process meets your needs.
- For those instances that must have their Omnissa subscriptions managed separately, create a new organization, and do not use an existing one.
- If your new subscription is for Omnissa Workspace ONE UEM, you cannot select an existing organization if it already has a UEM subscription. Omnissa Connect organizations support only one UEM tenant.
- You cannot select an existing organization that is associated with an expired Omnissa subscription. Contact Customer Connect to help with an expiration issue.
- You cannot select an existing organization that is associated with a different region from your region. Contact Customer Connect to help with product region issues.
Procedure
- Continue from your activation link in the Welcome email or log into the Omnissa Connect console.
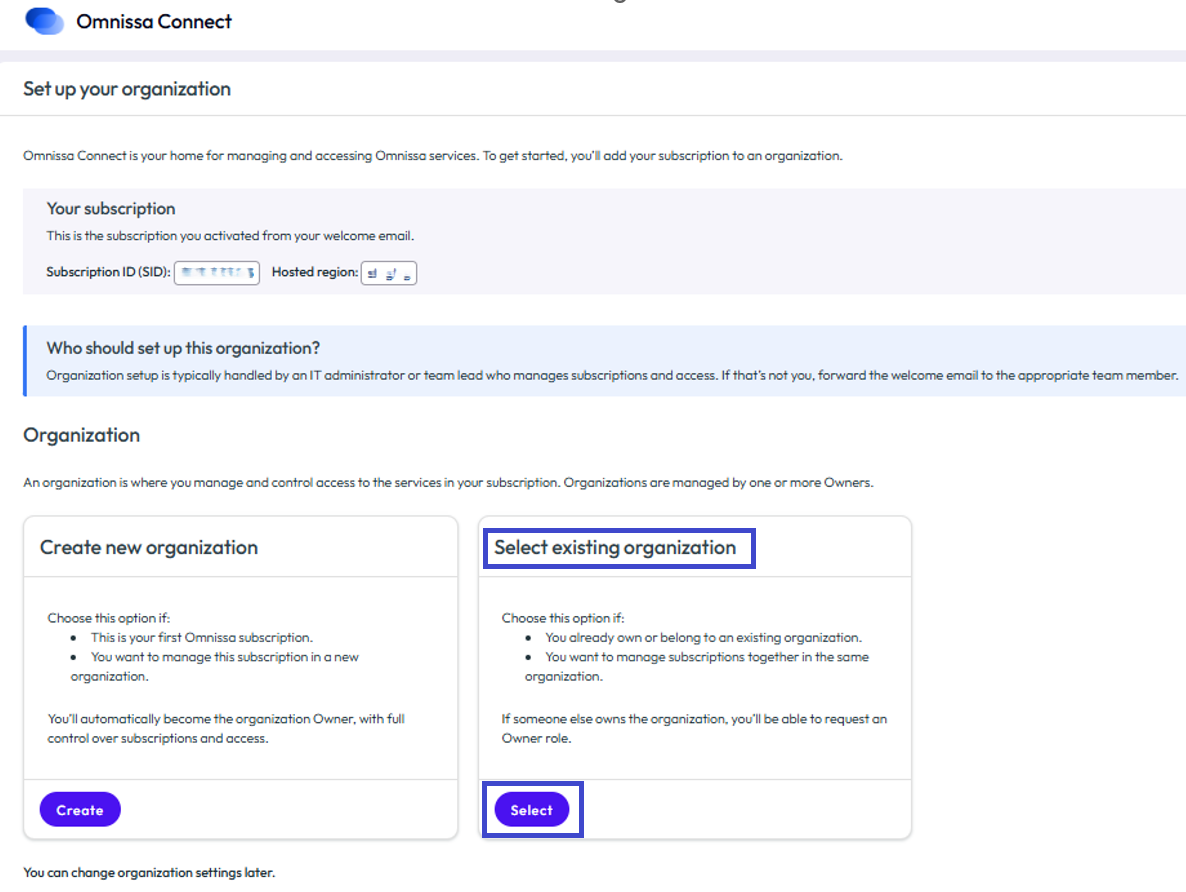
- In the Set up your organization widget, choose Select in the Select existing organization tile.
 .
.
On the next page, see two tabs with lists of organizations to which you can join your subscription.- Organizations You Own: This tab lists the organizations you own, and you can join your subscription to one of these organizations.
- Other Organizations: If you are part of a federated domain, this tab lists available organizations of which you are not an owner. You can reach out to the respective Owners if you want to join your Omnissa subscription to their organization.
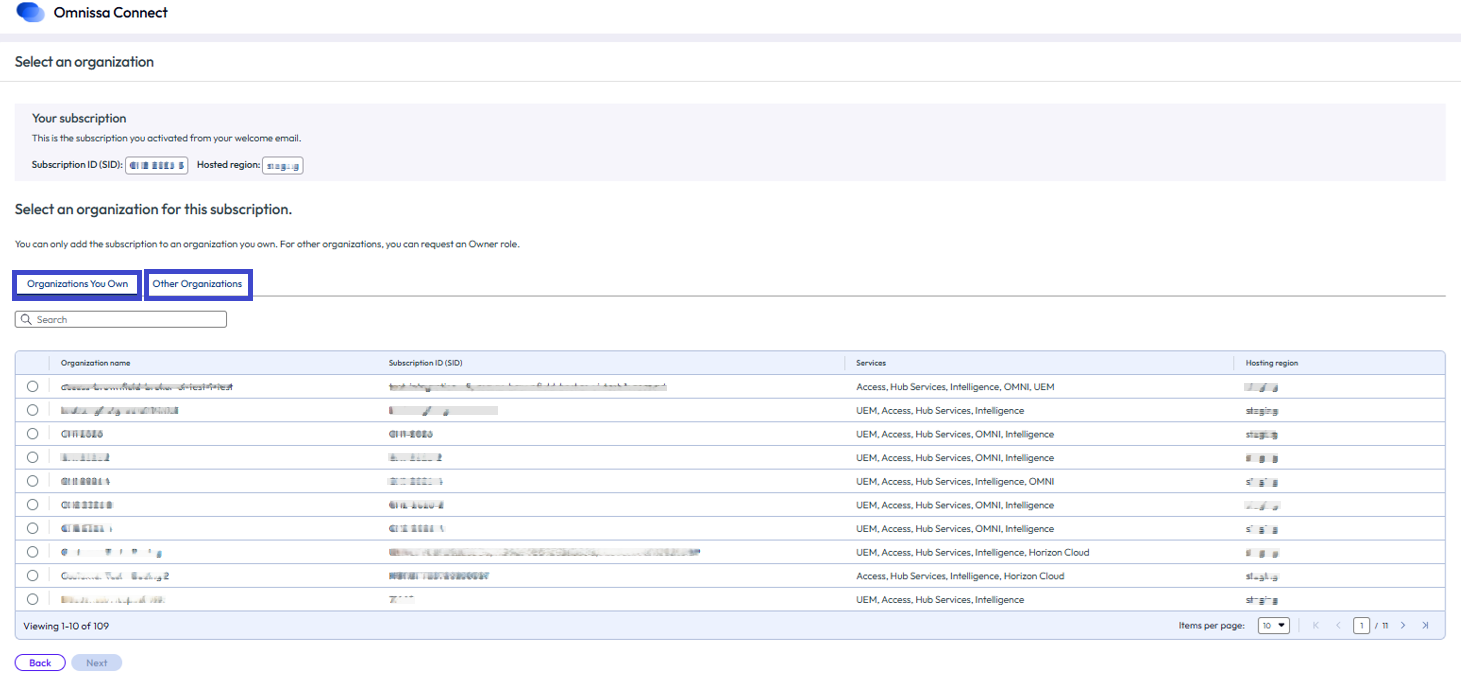
- On the Organizations You Own tab, select an organization to which you want to join your subscription and select Next.
You completed the joining process and you can move on to the next steps.
Option 2: Create a new organization
Use this workflow if this is the first Omnissa subscription, it requires its own admin management experience, or you want to keep the new subscription segregated for support or billing reasons.
Procedure
- Continue from your activation link in the Welcome email or log into the Omnissa Connect console.
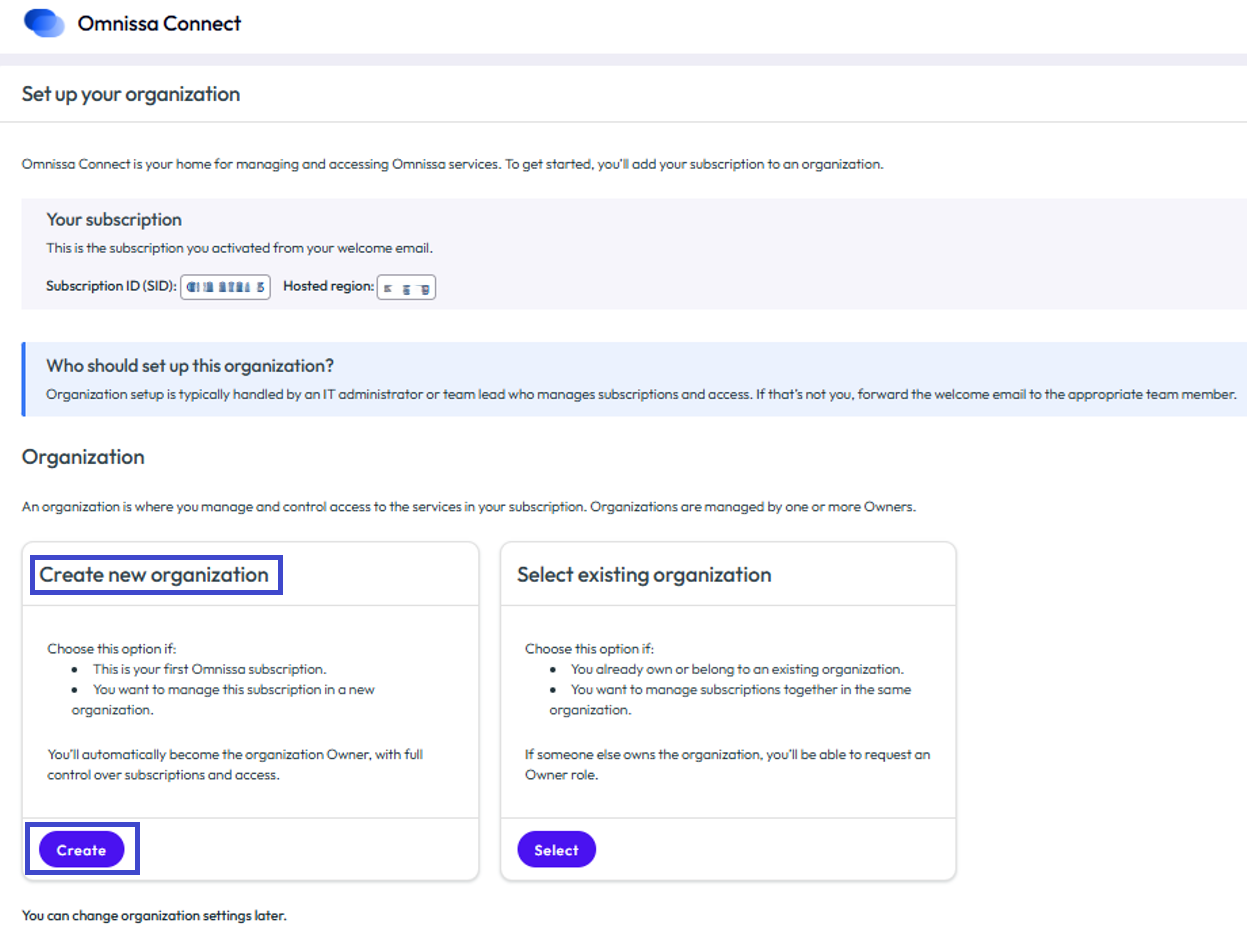
- In the Set up your organization widget, select Create on the Create a new organization tile.
- Enter a name for the organization.
- Agree to the terms of service.
- Select Save.
The console directs you to your subscription in the new organization in Omnissa Connect. You can move on to next steps.
Next steps
Now that you can access your Omnissa subscription in an Omnissa Connect organization, you can now add admins and federate your organization, if applicable.
Customizing the Access URL
If you want to customize your Omnissa Access URL, consider customizing it as soon as you onboard services to an organization. This method is preferable because this tenant is not yet configured, so it is easier to create a new tenant with the customized URL without risking possible loss of data.
Important: If you decide to customize the Access URL later, make this change before you start using your Access tenant.
Procedure
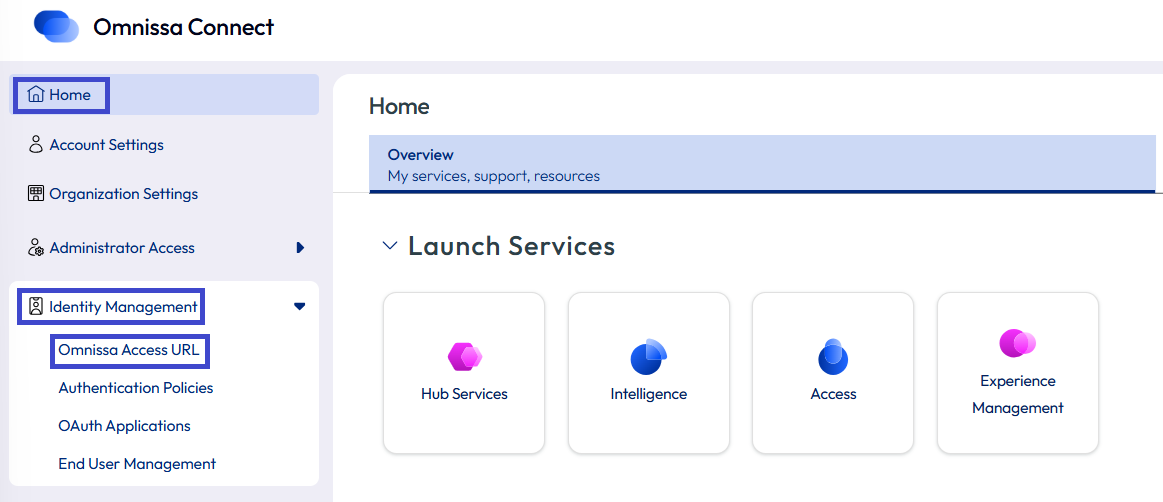
- In Omnissa Connect, on the Home page in left navigation, select Identity Management > Omnissa Access URL.
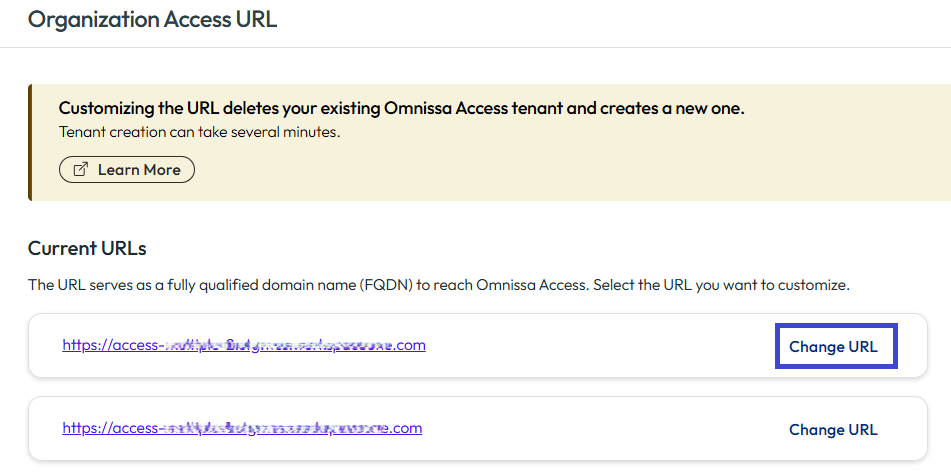
- On the Organization Access URL page, find the tenant you want to change and select Change URL.
- Enter your preferred tenant name in the text field. Follow the rules provided to ensure your chosen name is valid and use Verify URL to check the validity.
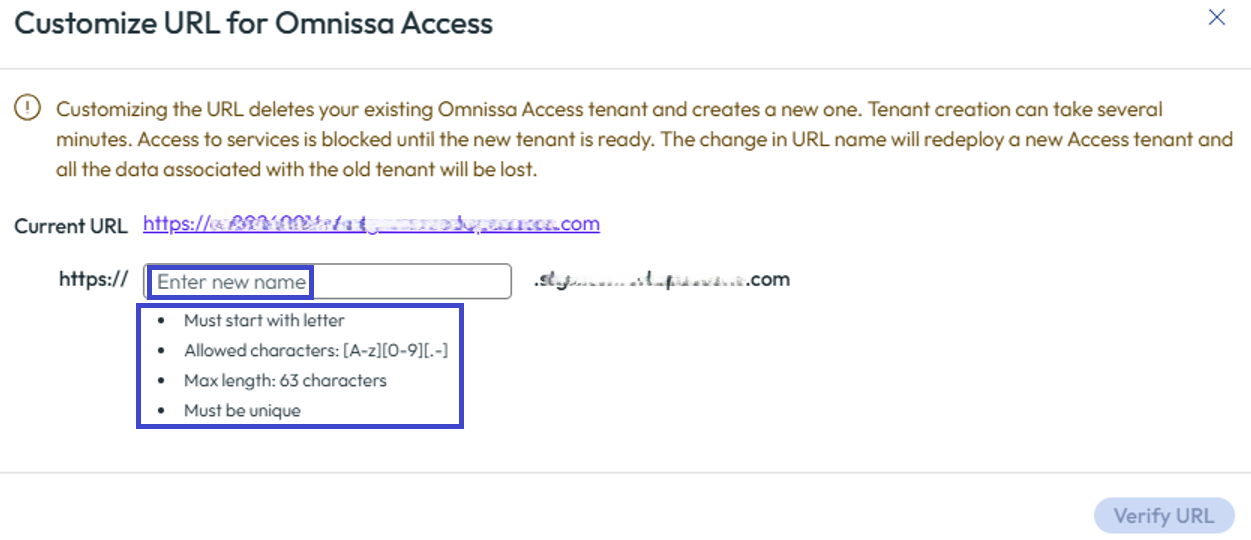
- The system verifies the name to make sure it meets all the conditions and verifies that the name is not already in use.
- Tenant names must be unique.
- If verification fails, you can reenter a different name.
- After successful verification, submit your preferred name.
- The operation takes a minute or two to complete. You can refresh the page to see the status of the operation.
Omnissa Connect displays a message that the submission was successful.
Invite new admins (users) and assign them Organization and Service roles
When you select the initial activation link and join your subscription to a new or existing organization, the system creates an account for you with an Owner role.
As an Owner, you can invite additional admins (users) to your organization and assign them Organization and Service roles.
- Organization roles activate admins as members of the organization. You can also assign them additional Organization roles if applicable.
- Assigning a Service role controls the access permissions the admin has to the organization and to the Omnissa subscriptions within the organization.
Detailed documentation
For details on how to add users, called Administrators in the console, see the topic Administrators.
Federate user access
You can activate single sign-on (SSO) for your users to access Omnissa Connect by federating multiple corporate domains. Use a self-service workflow to configure federation with Omnissa Connect. The workflow supports integration with SAML 2.0 based identity providers.
Detailed documentation
For detailed steps on federating organizations using the Enterprise Federation dashboard, follow the processes in the Enterprise Federation topics.
Enterprise Administrator
Setting up Enterprise Federation is a highly secure task so Omnissa Connect created a special role for this task. It is called the Enterprise Administrator role. As an Owner, you must invite and assign someone to fill the Enterprise Administrator role. This person must have permissions to manage your corporate Active Directory or identity provider system. You can invite yourself if that person is you.
Procedure outline
- An Owner creates the Management Organization.
- This process activates access to the Enterprise Federation workflow and dashboard.
- During this process, the Owner enters the email address of the person who manages your corporate Active Directory or identity provider system.
- The system invites this person to join the organization and act as the Enterprise Administrator.
- The person who manages your corporate Active Directory or identity provider system accepts the invitation and is now the Enterprise Administrator.
- The Enterprise Administrator can start the federation flow following these general steps.
- Verifying domains and sub-domains.
- Installing a connector that connects to your on-premises Active Directory system.
- Syncing users and groups.
- Configuring your identity provider.
- Validating and finish set up.
Your admin users can use your corporate identity to access Omnissa Connect.
Was this page helpful?