As the admin of a Workspace ONE UEM on-premises environment, you can protect devices with Mobile Threat Defense (MTD) by placing them all in the same organization group (OG). The configuration for MTD activation is applied at the OG level and MTD becomes activated on all devices in this OG.
If you are in a SaaS or dedicated SaaS environment, the best practice is to integrate MTD with UEM using smart groups.
STEP 1 Create a Child Organization Group

-
Log in to the Workspace ONE UEM console using your administrator account.
-
Using the OG selector at the top of the console screen, move to the OG you want to make as the parent OG for Mobile Threat Defense. This is the parent OG for all the child OGs you make dedicated to managing devices that you intend to protect with Mobile Threat Defense.
-
Navigate to Groups & Settings > Groups > OG Details and then observe the Type textbox, which is normally grayed out or read only. Once you have identified the top-most OG of this "customer" type, move to this OG to begin the integration process.
From this customer type OG that you are currently in, you can create a child organization group (OG) from which you manage all the devices that you intend to protect with Mobile Threat Defense.
-
While still on the OG Details page, select the Add Child Organization Group tab.
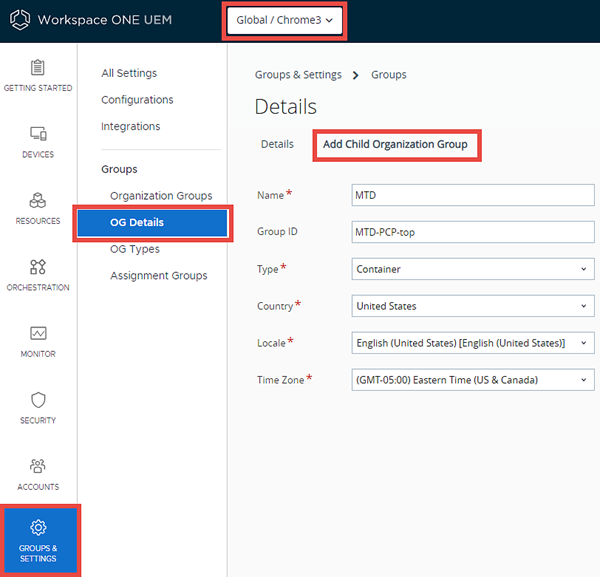
Complete the following settings.
Setting Description Name Enter a name for the child organization group (OG) to be displayed. Use alphanumeric characters only. Do not use odd characters. Group ID This required OG identifier is used by end users during device login and during the enrollment of group devices to the appropriate OG.
Ensure that users sharing devices receive the Group ID as it might be required for the device to log in depending on your Shared Device configuration.Type Select "Container". You cannot create a "Customer" child OG of a "Customer" parent OG. Country Select the country where the OG is based. Locale Select the language classification for the selected country. Customer Industry Select from the list of Customer Industries. Time Zone Select the time zone for the OG's location. -
Select Save. This is the OG that manages devices you intend to protect with Mobile Threat Defense.
-
(Optional) You can create multiple OGs and assign different levels of MTD protection to each OG based on the specific policy group / enrollment code you get from the Mobile Threat Defense Console. You can then promote or demote the appropriate level of MTD protection simply by moving devices from one OG to another.
If you intend to create mutiple levels of MTD protection and assign them to multiple OGs, you must create your OGs with the following hierarchy.
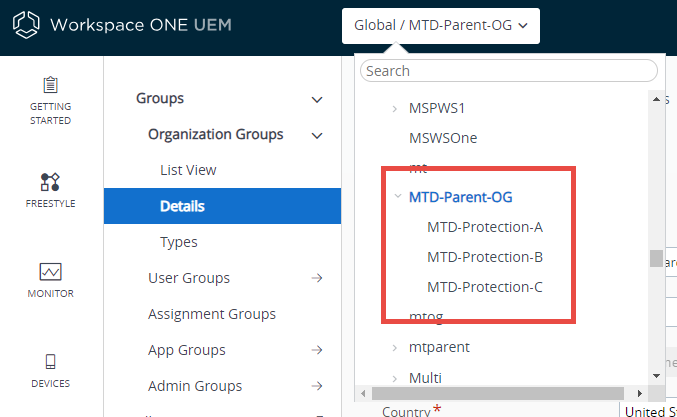
You can have as many child OGs as you want (and you can name them whatever you want) but they all must have the same parent OG.
Later, in substep 12 of STEP 6 Set Up Workspace ONE Mobile Threat Defense Console, you will be presented with the option to create multiple policy groups. You get a unique enrollment code for each policy group. Each organization group is assigned a unique enrollment code which effectively applies individual group policies to specific OGs.
STEP 2 Create an API Role and Assign it to an Admin
-
Log in to the Workspace ONE UEM console using your administrator account.
-
Ensure that you are in the parent organization group (OG) you created in STEP 1 Create Organization Group. If not, then move to this parent OG using the OG selector.
-
Navigate to Accounts > Administrators > Roles.
-
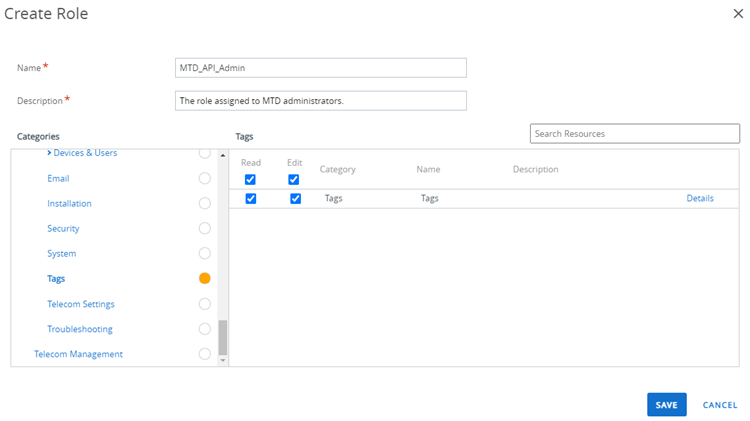
Select the Add Role button. The Create Role page displays.
-
Enter the role name
MTD_API_Adminand a description. -
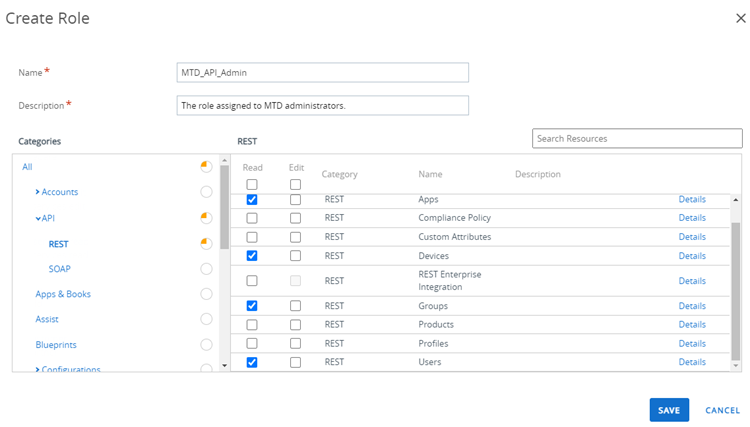
Under the Categories column to the left, expand API and select Rest. Enable the Read check boxes for each of the following permissions.
- Admins
- Apps
- Devices
- Groups
- Users
-
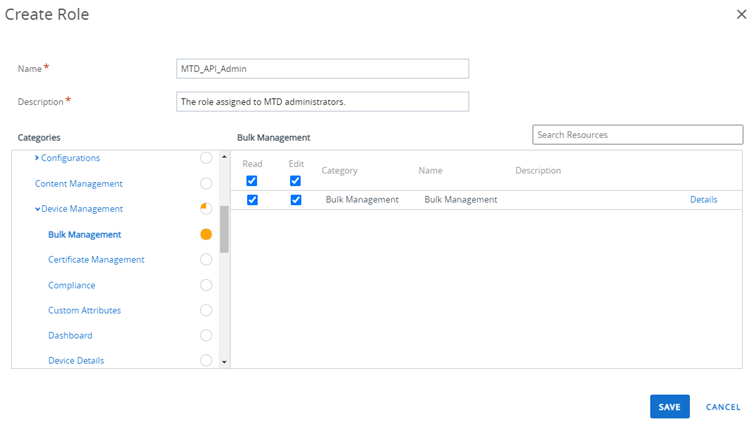
Under the Categories column to the left, expand Device Management and select Bulk Management. Enable the Edit check box for the Bulk Management permission.
-
Under the Categories column to the left, scroll down and expand Settings, then select Tags and enable the Edit check box for the Tags permission.
-
Select the Save button to save the role.
-
Navigate to Accounts > Administrators > List View.
-
Select the Add button and select Add Admin. The Add/Edit Admin page displays.
-
On the Basic tab, enter the Username and values for all other required (*) fields for this Mobile Threat Defense admin.
-
Switch to the Roles tab and select the Select Role text box. In the drop down menu that displays, scroll down to the role you created earlier,
MTD_API_Admin -
In the Select Organization Group field, select the name of the organization group you created in the previous step.
-
Select Save to assign the role to the admin.
STEP 3 Create an API Key
-
Log in to the Workspace ONE UEM console using your administrator account.
-
Ensure that you are in the parent organization group (OG) you created in STEP 1 Create Organization Group. If not, then move to this parent OG using the OG selector.
-
Navigate to Groups & Settings > All Settings > System > Advanced > API > REST API. The REST API configuration page displays.
-
For the Enable API Access option, select Enabled.
-
Select the Add button. A blank key entry displays at the bottom of the listing. Add the Service Name
WS1-MTDwith an Account Type of Admin. This generates an API key which is used to configure the Workspace ONE Mobile Threat Defense console. -
Select the generated key from the API Key text box for
WS1-MTD. -
Copy the key to clipboard with Ctrl-C (on Windows) or Command-C (on macOS).
NOTE: This key will be pasted to the API Token in the STEP 6 Set Up Workspace ONE Mobile Threat Defense Console step, later in this workflow.
-
Select Save.
STEP 4 Create the Tags
The Workspace ONE UEM feature, Device Tags, is used extensively in Mobile Threat Defense. Take the following steps to create your device tags.
-
Ensure that you are in the parent organization group (OG) you created in STEP 1 Create Organization Group. If not, then move to this parent OG using the OG selector.
-
Navigate to Groups & Settings > All Settings > Devices & Users > Advanced > Tags.
-
Select Create Tag. The Create Tag dialog displays.
-
In the Name text box, enter the Tag Name from the table.
Tag Name Description MTD - Activated Activated devices MTD - Deactivated Deactivated devices MTD - Disconnected Devices that have lost connectivity with Mobile Threat Defense MTD - Pending Devices that have not activated Mobile Threat Defense yet MTD - Unreachable Devices that are unreachable by Mobile Threat Defense MTD - Threats Present Compromised devices MTD - Secured Secured devices MTD - Low Risk Low risk devices MTD - Medium Risk Medium risk devices MTD - High Risk High risk devices -
Select Save.
-
Repeat Steps 3-5 to create each tag from the table.
You can also make customized tags based on specific threats such as "Denylisted App", "PCP Disabled", and any other customized tag you want. When you reach STEP 6 Set Up Workspace ONE Mobile Threat Defense Console, you can assign these customized tags to their own Risk Classification in the State Sync section of the MTD Console.
STEP 5 Create Smart Group
When you create a smart group, whatever organization group (OG) you are in at the time you create it becomes the home OG of that smart group. So if you want to include the maximum number of devices in your smart group, you must first move to the OG you made in STEP 1 Create Organization Group.
- In the Workspace ONE UEM console, move to the organization group (OG) that manages all the devices you want to protect with Mobile Threat Defense. This is the OG you created in STEP 1 Create Organization Group. (Optional) If you are configuring multiple OGs with differing levels of MTD protection, then ensure that you are in the parent OG.
- Move OGs by clicking the OG selector button in Workspace ONE UEM. Do not create a smart group from the Global OG.
- Navigate to Groups & Settings > Groups > Assignment Groups.
- Select the Add Smart Group button. The Create New Smart Group screen displays.
- In the Name text box, enter a name for the smart group, such as
Devices in Customer OG. - Select which devices belong in the smart group by taking one or both of the following steps.
- In the Organization Group section, the name of the OG you moved to in STEP 1 displays. Enable this check box to include all devices in this OG for the smart group. All devices in this OG are protected with MTD provided you apply the MTD Custom Settings referenced in substep 18 of the next step, STEP 6 Set Up Workspace ONE Mobile Threat Defense Console.
- Optionally, in addition to the OG you selected, select the User Group section and Add user groups. This action includes all the devices in these user groups in the Mobile Threat Defense smart group.
- You can include or exclude devices by filling out the Additions and Exclusions sections. For more information, see Create a Smart Group
- Select Save.
STEP 6 Set Up Workspace ONE Mobile Threat Defense Console
-
Log in to the Mobile Threat Defense console.
Navigate to https://omnissa.lookout.com (SSO enabled) or https://omnissa.lookout.com/a/ (bypassing SSO). An MTD tenant is provisioned at the time of MTD purchase and your designated contact person is created as an admin. You can select Forgot Password on the login page to reset your password. Once you are logged into the MTD console, you can create additional administrators by navigating to System > Manage Admins > Add Admin.
-
In the left panel, select Integrations.
-
Under Choose a product to set up, select the Workspace ONE button.
-
Under Connector Settings, complete the following options.
Setting Description Label for this MDM connection This optional entry identifies and differentiates between all your integrations. Workspace ONE URL Enter your Workspace ONE server URL, for example, https://asXXXX.awmdm.com API Token Paste the API Key you copied in the STEP 3 Create an API Key step. Ctrl-V (for Windows) and Command-V (for macOS). Authentication Certificate Authentication (Recommended): Upload a Workspace ONE UEM certificate and select a passphrase.
Basic Authentication: Enter the same username and password as the admin to which you assigned theMTD_API_Adminin STEP 1. If you select Basic Authentication, you must update the connector configuration each time the API admin's password expires.
The alternative to this limitation is to set the API Admin password to never expire.
Configure this setting in Workspace ONE UEM by navigating to Accounts > Administrators > List View, find the admin in the listing, select the Edit ( ) icon, in the Basic tab of the Add/Edit Admin screen, set the Require password change at next login option to Disabled.
 -
Select Create Integration in the top-right corner. A banner notification displays indicating a successful integration and additional sections display.
-
Scroll down to the Enrollment Management section and complete the following options.
Setting Description Automatically drive Lookout for Work enrollment on Workspace ONE managed devices Set to ON. Use the following Workspace ONE smart groups to identify devices that should be enrolled in Lookout for Work: Select the smart group you created in STEP 5. In this workflow example, that smart group name is Devices in Customer OGbut you must select the smart group you created.How often should Lookout check for new devices? Set to 5 to sync newly enrolled devices and unenrolled devices from UEM every 5 minutes. Automatically send activation emails to Workspace ONE managed devices Set to OFF. For an MDM integration, you should drive enrollment through your MDM, not via Mobile Threat Defense Console invitation emails. Delete device on unenrollment Set to ON to delete devices in Mobile Threat Defense when they are unenrolled from Workspace ONE UEM. -
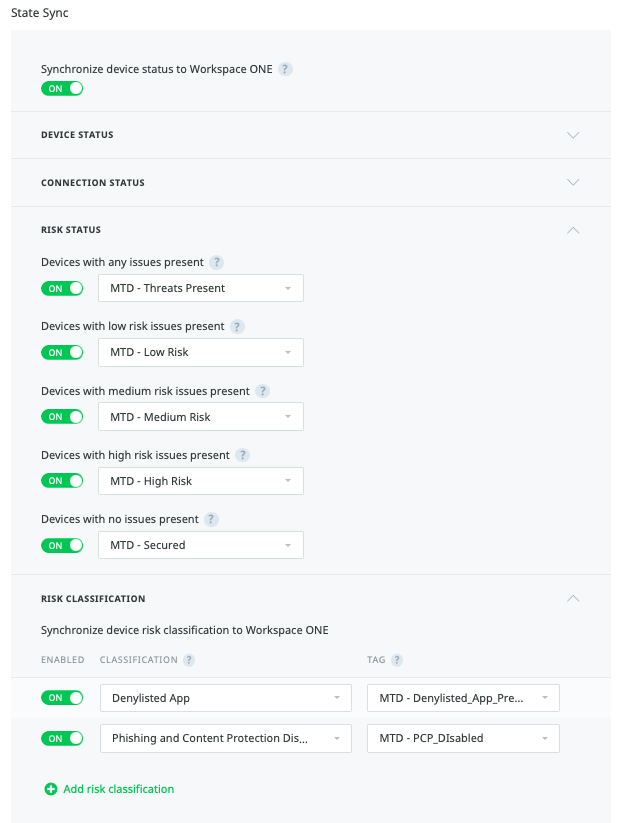
Scroll down to the State Sync section and enable the option Synchronize device status to Workspace ONE.
-
Select and assign the tags you created in STEP 4 per the following table. If you opt not to synchronize a specific device state to Workspace ONE, then leave the corresponding toggle off/null.
Option Value Device Status: Devices that have not activated Mobile Threat Defense yet MTD - Pending Devices with Mobile Threat Defense activated MTD - Activated Devices with Mobile Threat Defense deactivated MTD - Deactivated Connection Status: Devices that are unreachable by MTD MTD - Unreachable Devices that have lost connectivity with MTD MTD - Disconnected Risk Status: Devices with any issues present MTD - Threats Present Devices with low risk issues present MTD - Low Risk Devices with medium risk issues present MTD - Moderate Risk Devices with high risk issues present MTD - High Risk Devices with no issues present MTD - Secured Risk Classification: (optional) add your customized Risk Classifications and assign them to specific custom tags you created in STEP 4, enable or disable them per your preferences.
Please note that the following are EXAMPLE Risk Classifications and are not required. They are meant to demonstrate that you can make any device tag with any label you want.Classification Tag Denylisted App MTD - Denylisted App Phishing and Content Protection Disabled MTD - PCP Disabled -
Scroll down to the Error Management section and enter an email address to which errors are reported.
-
Scroll up and select Save Changes in the top-right corner. You can review connector settings from the Integrations at any time.
-
(Optional for Workspace ONE UEM On-Premises Customers) You can configure specific IP addresses in the network definitions and rules which are enforced by firewall and proxy configurations for outbound web requests. As an admin of an on-premises environment for Workspace ONE UEM, you must include the following IP addresses needed by Lookout in an allowlist. This makes outbound service calls from the Lookout cloud to the Workspace ONE UEM server possible. The following IP addresses must be allowlisted.
- 52.11.153.147
- 52.11.153.253
- 54.153.102.83
- 54.153.102.84
In the event IP addresses must be updated, Lookout provides 6 weeks advance notice to all system admins of the MTD console, giving you time to update your allowlist and avoid any interruption or inconsistency of service. Lookout makes every attempt to limit IP address updates to only once per year.
-
(Optional) Configure Multiple Group Policies for the purpose of applying them to multiple OGs. You can configure multiple organization groups in UEM, assigning each one with their own unique policy group. This means you can promote or demote a level of MTD protection simply by moving devices from one OG to another. Take the following substeps to create mulitple group policies in the MTD Console.
a. In the Mobile Threat Defense Console, navigate to Devices > Device Policy Groups. You can see the Default Group in the listing. This is the policy group that comes with each new integration.
b. To create a new policy group, select the Create Group button to the right. The Create a new group screen displays.
c. Enter the Name and Description of the new group.
d. Select the Create Group button. The Device Policy Groups list view displays featuring your new group in the listing.
e. Hover your pointer over the new group and select the View Protections link, which takes you to the Protections panel. When you create a new group, all enabled protections are inherited from the Default Group.
f. You can customize Policies; change the risk levels, change the response, disable selected policies, enable others, and so forth.
g. You can even customize the Alert device messages received by device end users when their device is placed in harm's way.
h. You can customize Phishing and Content Protection; change deployment types, change mandate levels, add domains, change allowlists and denylists.
i. You can customize On-Device Threat Protection; change remediation, change blocked domains, and so forth.
j. Select the Save changes button for each round of customizations.
k. For each Policy Group you want to create, repeat steps b. through j.
-
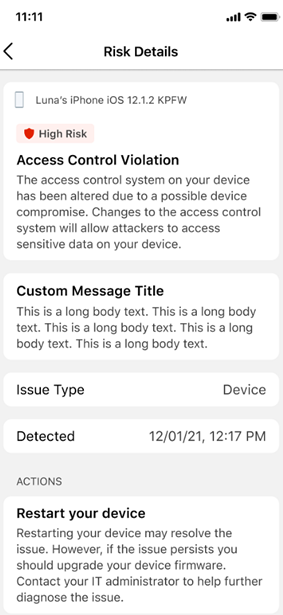
(Optional) Configure custom messages per policy or accept the default custom message. You can configure a custom notification message that appears to your device end users if their device comes under attack. You can configure this custom message for selected policies or you can accept the default custom message.
a. Navigate to the Protections main menu item and then the Policies tab.
b. Select the Default custom message link to review the existing default message and to make changes per your preferences. This verbatim message displays to users for each policy violation that is set to inherit the default parent message.
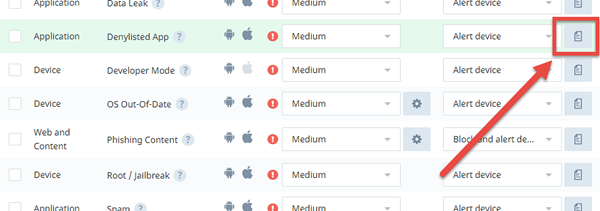
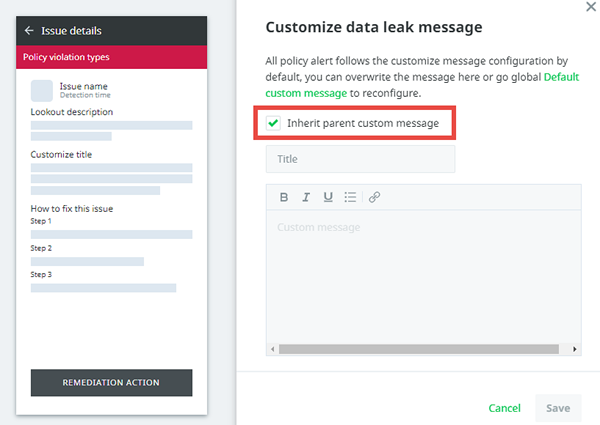
c. If you do not want to use the same message, you can create a customized message tailored for each policy. Do this by selecting the message button next to the Alert device response for the policy you want to target, clearing the check from the Inherit parent custom message checkbox, then drafting your own policy-specific message.
d. If you prefer, you can also use the default parent custom message. Opt for this by enabling the Inherit parent custom message checkbox.
e. Select Save when you are finished with your messaging customizations. Note that custom message settings might take up to 24 hours after saving before they start displaying on the device.
f. This custom message is presented to the user in the threat's details page in the Omnissa Workspace ONE Intelligent Hub app whenever the specified policy is violated.
-
While still logged into the Mobile Threat Defense console, navigate to Devices > Device Policy Groups, then select and copy the enrollment code (Ctrl-C in Windows, Command-C in macOS). Each policy group in the listing has its own unique enrollment code.
-
Log into Workspace ONE UEM.
-
Move to the OG that holds the devices you want to protect with Workspace ONE Mobile Threat Defense. This is the OG you created in STEP 1 Create Organization Group. (Optional) If you created multiple OGs, move to the next OG that is not yet configured with an MTD policy group.
STEP 7 Deploy the Workspace ONE Intelligent Hub App
Follow this step only if you have devices that lack the Workspace ONE Intelligent Hub app.
-
For all devices you intend to protect with Workspace ONE Mobile Threat Defense, whether you want the Phishing and Content Protection option or not, direct your end users to the following website using their device.
-
Direct end users to download and install this app. When the end user selects the above link from their device, the resulting website checks to see what kind of device it is. The website then supplies the correct installer for that device. For a mobile device like iOS or Android, the app installation process is no different than any other app installation process.
Next Steps
If you want to implement the optional phishing and content protections, then proceed to STEP 8 Phishing and Content Protection.
Otherwise, the integration is complete. You may also want to review these topics.
- Monitor Enrollment and Activation
- Configure and Enforce Compliance
- Integrate with Workspace ONE Trust Network
STEP 8 Deploy Workspace ONE Mobile Threat Defense by Organization Group
-
Navigate to Groups & Settings > All Settings > Apps > Settings and Policies > Settings.
-
Enable Override if settings are unavailable.
-
In the Custom Settings text box, insert the following code, making sure to include the enrollment code that you copied earlier in STEP 6, substep 14, replacing ENROLLMENT CODE GOES HERE.
(Optional) If you are configuring multiple organization groups, each with their own unique policy group as described in STEP 6, substep 12, then make sure you select the correct enrollment code that corresponds to the policy group you want to apply, then include that enrollment code in the Custom Settings text box.
Note: To activate MTD on your devices, ensure you enter the complete enrollment code in the MTD configuration within Workspace ONE UEM. The complete code includes the hyphen and any suffixes, such as EU or US.
{
   "mtdSettings":{
         "isEnabled":true, "enrollmentCode":"ENROLLMENT CODE GOES HERE"
   }
}
For example
{
   "mtdSettings":{
         "isEnabled":true, "enrollmentCode":"RHDOWG"
   }
}
- Select the Save button.
STEP 9: (Optional) Implement Dual Enrollment
For more information, see Dual Enrollment.
- While logged into Workspace ONE UEM as an administrator, navigate to the organization group (OG) that serves as the enrollment OG for all Android devices with a personal profile that you intend to dual enroll into Mobile Threat Defense.
- Next, navigate to Groups & Settings > All Settings > Apps > Settings and Policies > Settings.
- From the Custom Settings text box, make note of the existing Enrollment Code.
- Copy the following chunk of code and paste it in the Custom Settings text box. Replace the "ENROLLMENT CODE GOES HERE" with the enrollment code you noted in the previous step.
{
    "mtdSettings": {
        "isEnabled":true,
        "enrollmentCode":"ENROLLMENT CODE GOES HERE",
        "dualEnrollmentRequired":true
    }
}
- Select the Save button. The new custom settings are pushed to all applicable devices in a few minutes. Workspace ONE Mobile Threat Defense, including dual enrollment, are now enabled on the device.
- The end user receives a Hub notification to activate Workspace ONE MTD in their personal profile. They also see an info icon alerting them of the same in the device details page in Intelligent Hub.
- Select the Dual Enrollment information icon or select the Enroll for Personal Profile tab to display the steps to activate MTD in the personal profile. Read and follow these steps.
- Copy to clipboard the activation code that displays. This activation code is required to complete Dual Enrollment. If copy and paste restrictions are enabled, then the activation code must be entered in the personal profile manually.
- In the personal profile, launch the Google Play Store and download Lookout for Work (https://play.google.com/store/apps/details?id=com.lookout.enterprise).
- Launch the application and paste the activation code copied from Intelligent Hub (or input the code manually). This activates Lookout for Work.
- Accept the terms & conditions and required permissions for Mobile Threat Defense.
- Follow the prompts and steps provided to enable phishing and content protection in the personal profile.
- Devices configured for Dual Enrollment reflect an overall pending status in the Workspace ONE Mobile Threat Defense console until MTD is activated in both the work and personal profile.
- In the device details page, the work profile displays as Activated, and the personal profile displays as Pending until the activation is complete in the personal profile.
- The MTD console displays a higher risk level between the work profile and personal profile in the Devices overview page.
- Select the device to view the device details and observe the risk-threat status for both the work profile and personal profile.
- As the administrator, you can create tags in Workspace ONE UEM to be applied to the device based on the MTD activation and/or risk status in the work and personal profiles. Accomplish this by taking the following steps.
- Create the relevant tags in Workspace ONE UEM (for example,
MTD-Pending-Personal Profile,MTD-High-Risk-Personal-Profile). - Navigate to the relevant UEM MDM connector in the Integrations page in the Workspace ONE MTD console and enable the option to synchronize advanced details from users’ work and personal profile under State Sync.
- This action enables the tabs for Work Profile and Personal Profile. Enable the required status and use the dropdown to select the relevant tags created in Workspace ONE UEM.
- Create the relevant tags in Workspace ONE UEM (for example,
.
Next Steps
If you want to implement the optional phishing and content protections, then proceed to Configure Phishing and Content Protections in the MTD Console.
Otherwise, the integration is complete. You may also want to review these topics.
Was this page helpful?