In product provisioning for Workspace ONE UEM, there are Event Actions, or rules you make to trigger an action when an event occurs. The 'event' occurs followed by the prescribed 'action'. The Event Actions wizard guides you through creating the conditions and actions together.
In cases where you want to perform a device action only when certain conditions are met, event actions allow you to control the timing of these actions. For example, your devices might need new files download to them but only until the device is not in use. A device event can wait until the device is connected to its charger before installing files. In another example, you can set a connectivity condition to wait for the device to connect to Wi-Fi before sending in a device check-in.
Event actions act as a device-based "if-this-then-that" configuration which controls the recurrence of actions on a device. A product only processes once on a device. Event actions, however, process any time the conditions are met.
Push event actions to devices as a component of a product. When you edit an Event-Action, the changes can filter down to Active Products. For more information, see What Happens If You Change a Product, Component, or Condition?
Create an Event Action, Android and WinRugg
You can create event actions that run on a device when certain conditions are met.
-
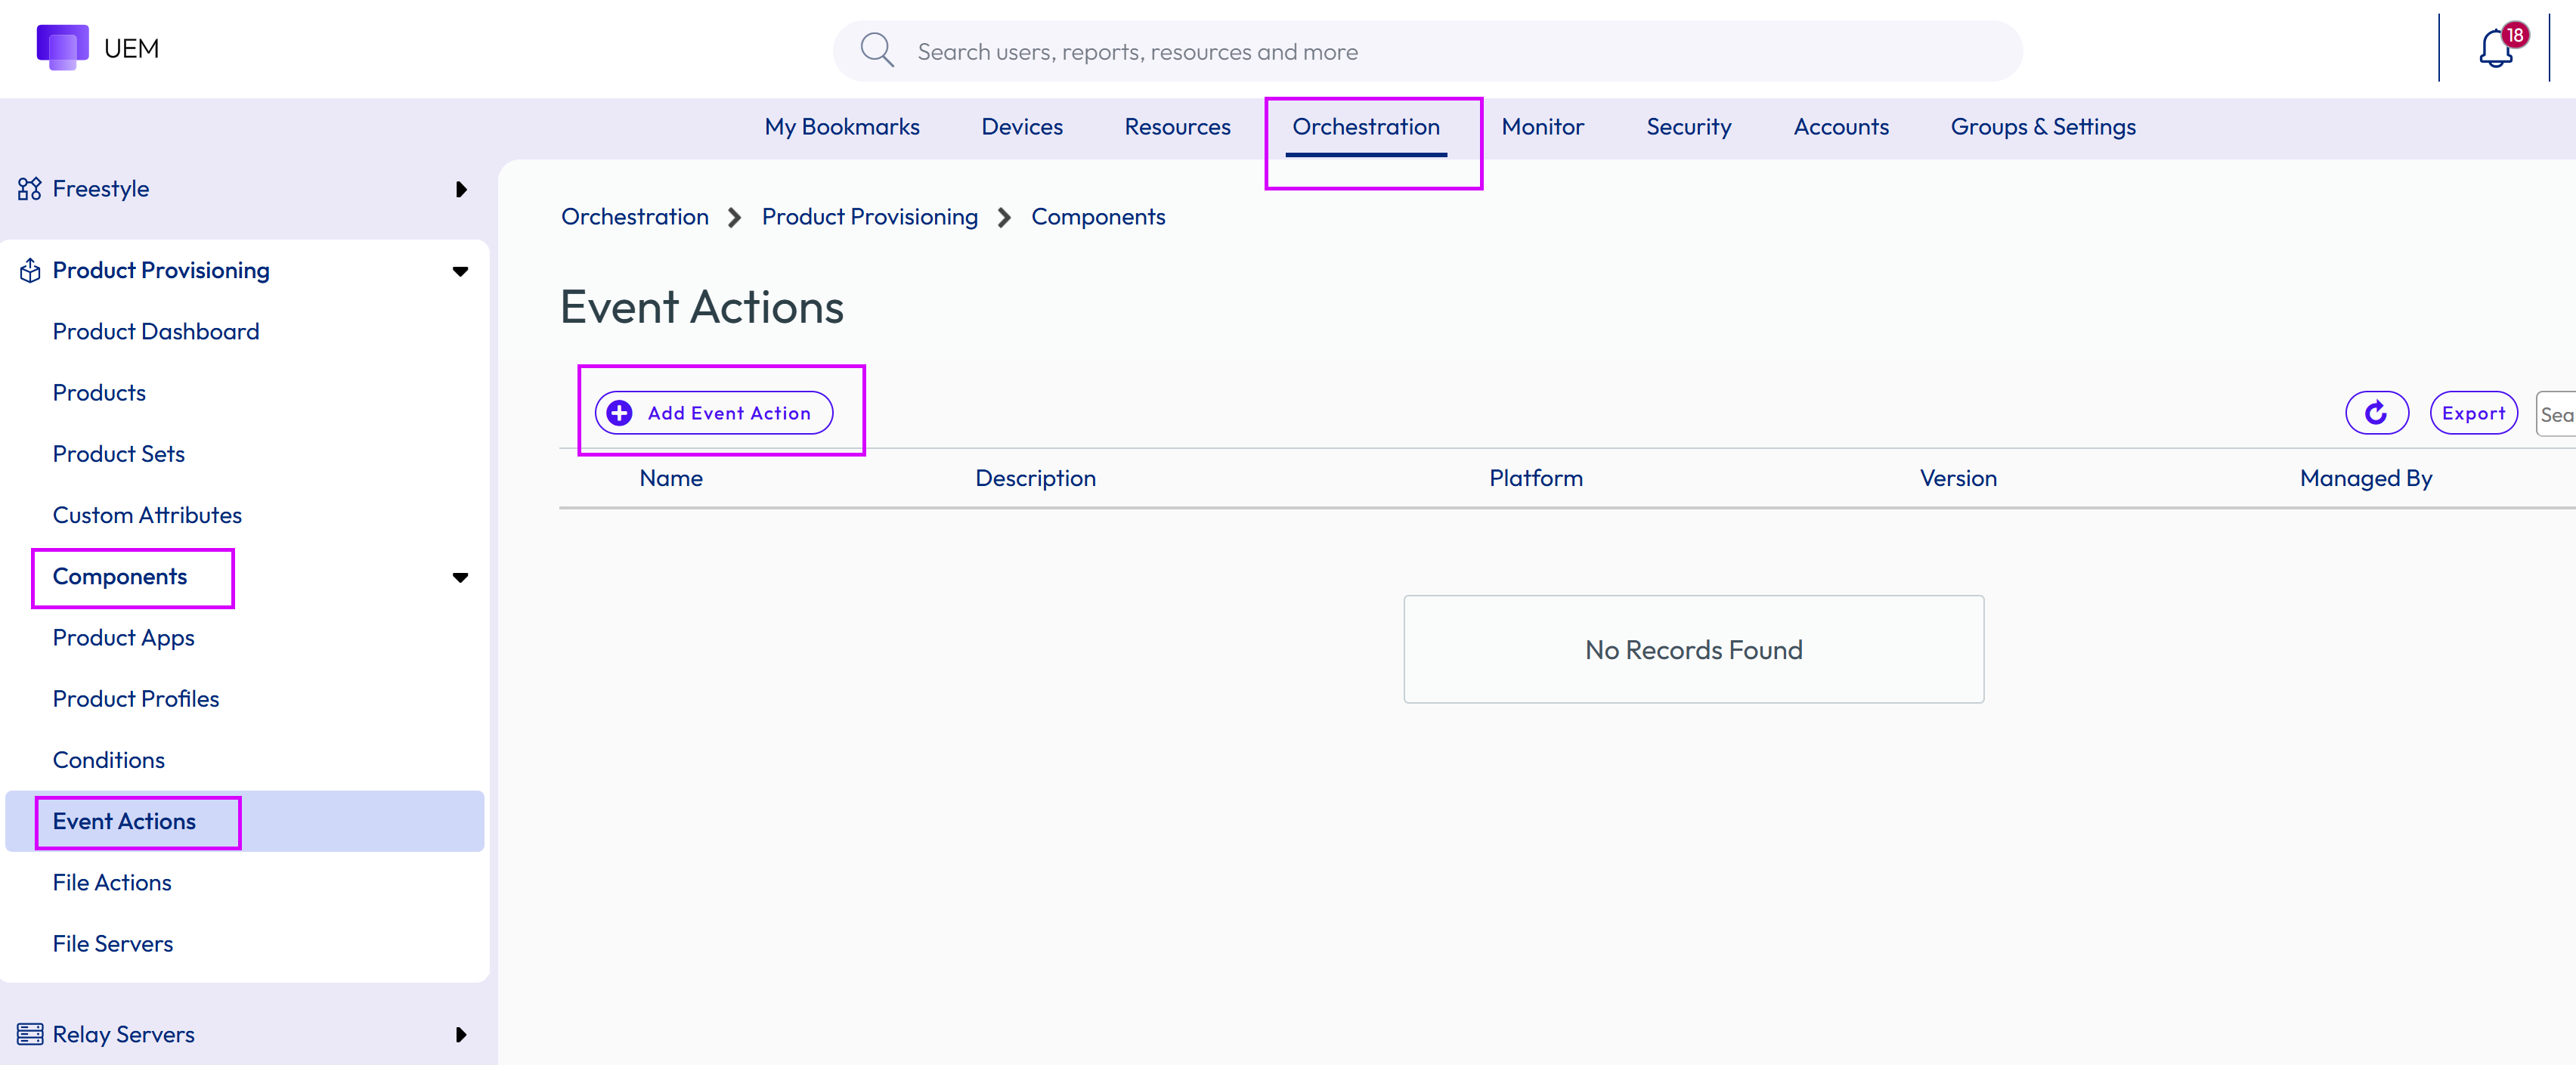
Navigate to Devices > Provisioning > Components > Event Actions and select the Add Event Action button.
The Add Event Action wizard displays.
-
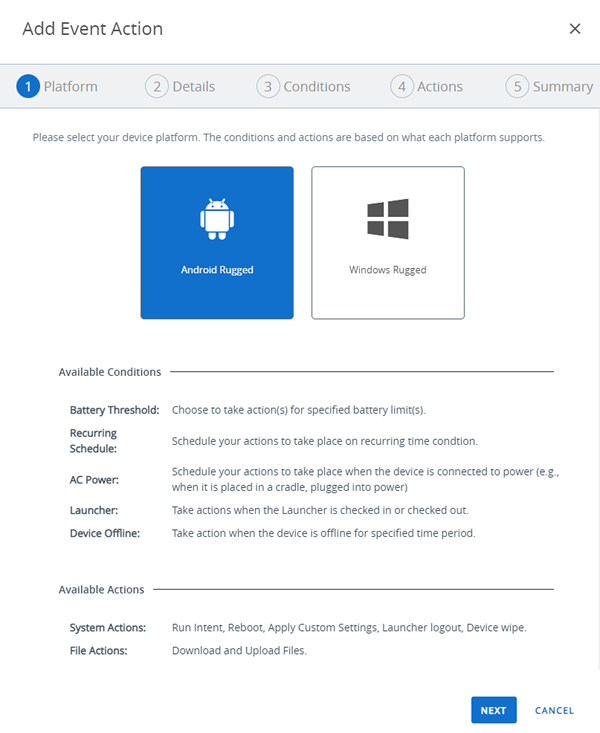
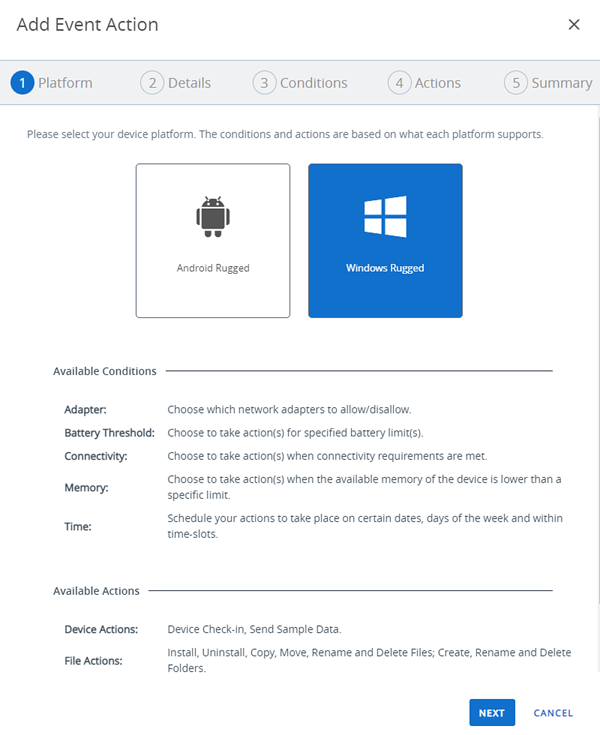
Select your device platform.
The available conditions and available actions for the platform display.
-
Select Next.
-
Complete the Details settings and select Next when complete.
Settings Descriptions Name Enter a name for the event action. The name cannot be longer than 255 characters. Description Enter a short description for the event action. Managed By Select the organization group that can edit the event action. -
Select a Condition that triggers the device action.
You can select a previously created condition from the drop-down menu or create a new one.
- To create a condition, select Create Condition from the drop-down menu.
- Select Next when complete.
Condition Android WinRugg Description Adapter ✓ Detects network adapters, enabling you to select which to allow/disallow. Battery Threshold ✓ ✓ Detects battery charge, enabling you to direct the device as it reaches prescribed battery levels. Connectivity State ✓ Detects connectivity, enabling you to take action when certain requirements are met. Device Offline ✓ Detects when the device fails to check in longer than the number of days specified. Launcher ✓ Detects when Launcher on the device is checked in or checked out. Memory Threshold ✓ Detects memory levels, enabling you to take actions when it reaches certain levels. Power ✓ Detects when the device is connected to an AC adapter. Recurring Schedule ✓ Enables you to schedule your actions on a recurring basis. Time ✓ Enables you to schedule your actions to take place on certain dates, days of the week, and within time-slots. For more information, see Create a Condition.
-
Complete the required option (Android only) Minimum Time Between Actions (hours) which limits the number of times the action is run when triggered by the prescribed event.
This option is not available when Recurring Schedule is included in the selected conditions.
You can select zero hours for this option but only for AC Power conditions.
-
Select an Action. The actions available depend on the device platform.
Action Android WinRugg Description Apply Custom Settings ✓ Apply custom, OEM-specific device settings based on the selected XML file, which must be delivered to the device through a separate File/Action.
If the file entered in the File Path text box is not found, then the Event Action does not run. However, the Event Action remains active, making attempts to run the custom setting XML file each time the condition is met.
Supported Devices:
- Android MSI devices with the Android Hub v7.1+
- Upload the ZIP file created by MSI.
- Android Zebra devices with the Android Hub v7.2+
- Upload the XML configuration file created by the Zebra Stage Now program.Copy Files ✓ Copy files from one location to another on the WinRugg device. Create Folder ✓ Create a folder on the WinRugg device. Delete Files ✓ Delete folders from the WinRugg device. Device Check-in ✓ Command the Omnissa Workspace ONE Intelligent Hub to check in the WinRugg device for updates. Device Wipe ✓ Removal of all corporate and personal content, returning the device to its factory state. Download Files ✓ ✓ You can download a file from the selected File Server source path onto the selected Destination folder of your Android or Windows Rugged device.
For details, see the section on this page entitled Configure Download and Upload Actions for Event Actions.Install ✓ Install files on the Windows Rugged device. You must use the Run manifest action to install files or applications by using command lines. Supports the following file types: .reg, .cab, and .xml Launcher Logout ✓ Checks-in the device, making it ready for another end user. Move Files ✓ Move files from one location to another on the WinRugg device. Reboot ✓ Restart the Android device. Remove Folder ✓ Remove a folder from the WinRugg device. Rename File ✓ Rename a file on the WinRugg device. Rename Folder ✓ Rename a folder located in the WinRugg device. Run ✓ Run command lines and arguments on the WinRugg device.
If you want to install executable files (EXE), then you must use the Run manifest action on Windows Rugged devices. This is accomplished using command lines. The Run command must use the syntax of "\[full file path]". For example, \program files\program.exe.Run Intent ✓ Run command lines and arguments on the Android device. See RunIntent Action, File-Action Android for more information. Send Sample Data ✓ Send the WinRugg device data sample to the Workspace ONE UEM console. Terminate ✓ End a process or application running on the WinRugg device. Uninstall ✓ Uninstall a program or application on the WinRugg device. You must enter the application name.
The application name must match the name that appears in the Uninstall menu in the Control Panel.
Note: The Uninstall Manifest is for deleting files when a product is removed. If you remove a product from a device, any files installed remain on the device until uninstalled using an Uninstall Manifest.Upload Files ✓ You can upload a file from a source file path on your Android device to the selected File Server destination folder.
For details, see the section on this page entitled Configure Download and Upload Actions for Event Actions.Warm Boot ✓ Restart the WinRugg device. -
Select Update to add the action to the event action. You can add additional actions to the event action. Select Next.
-
Review the Summary and select Save.
What to do next: To push event actions to devices, add them as a component to a product. For more information, see Create a Product
Configure Download and Upload Actions for Event Actions
You must select a previously configured file server when you make Download Files or Upload Files the action of your Event Action. Making such a selection provides a source and destination for these files.
If you have not yet configured a file server for this purpose, see the section on this page entitled Add a File Server for Event Actions.
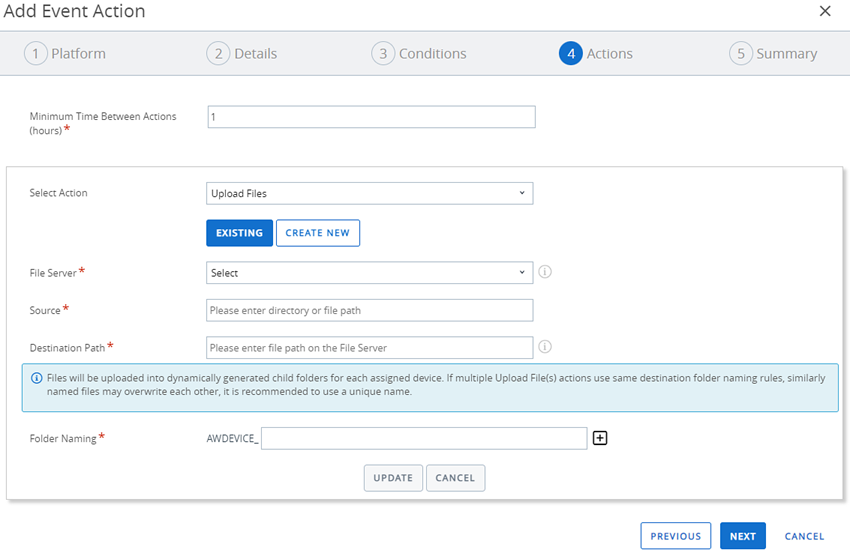
You can only see these options in the Actions tab of the Add Event Action screen, and only when you select as your action either Download Files or Upload Files.
-
Complete the following options to configure the Download Files or Upload Files action.
Setting Description Select Action This option is pre-populated with either Download Files or Upload Files. File Server Select from the list of Existing file servers you have configured previously. If no file servers are configured, select the Create New button followed by New File Server to add a file server. Source For Download Files, the source is a file on the file server. Enter the path on the file server where the file can be found.
For Upload Files, the source is a file on your device. Enter the directory or file path on your device where the file can be found.Destination Path For Download Files, the destination is your device. Enter the directory or file path on your device where the file is going.
For Upload Files, the destination is the file server. Enter the path on the file server where the file is going.Folder Naming This option is available only when Upload Files is the Select Action.
When multiple Upload Files actions use the same destination folder, there is a risk that identically named files might overwrite each other.
To reduce this risk, files can be uploaded into dynamically generated child folders for each assigned device. You can use a lookup value to give identically named files a unique folder name. When you review the uploaded files on the file server, the folder name identifies the user or device from which it came.
Select one or more of the following lookup values to make the destination folder name unique.
- DeviceAssetNumber
- DeviceUid
- DeviceFriendlyName
- User name
- UserEmailAddress
For more information, see Lookup Values. You can also perform a search on docs.omnissa.com. -
Select the Update button to save your configuration.
-
Continue with the Event Action configuration, either by selecting another action in the Select Action drop down menu or selecting Next to view the Event Action summary.
File Servers for Event Actions
You can configure a file server as a staging and provisioning component. This file server component is in support of the Upload File and Download File actions in Event Actions.
You can coordinate this file server with an organization group and content gateway in Workspace ONE UEM console.
Add a File Server for Event Actions
File servers are used as the source or destination of a download files or upload files event action.
-
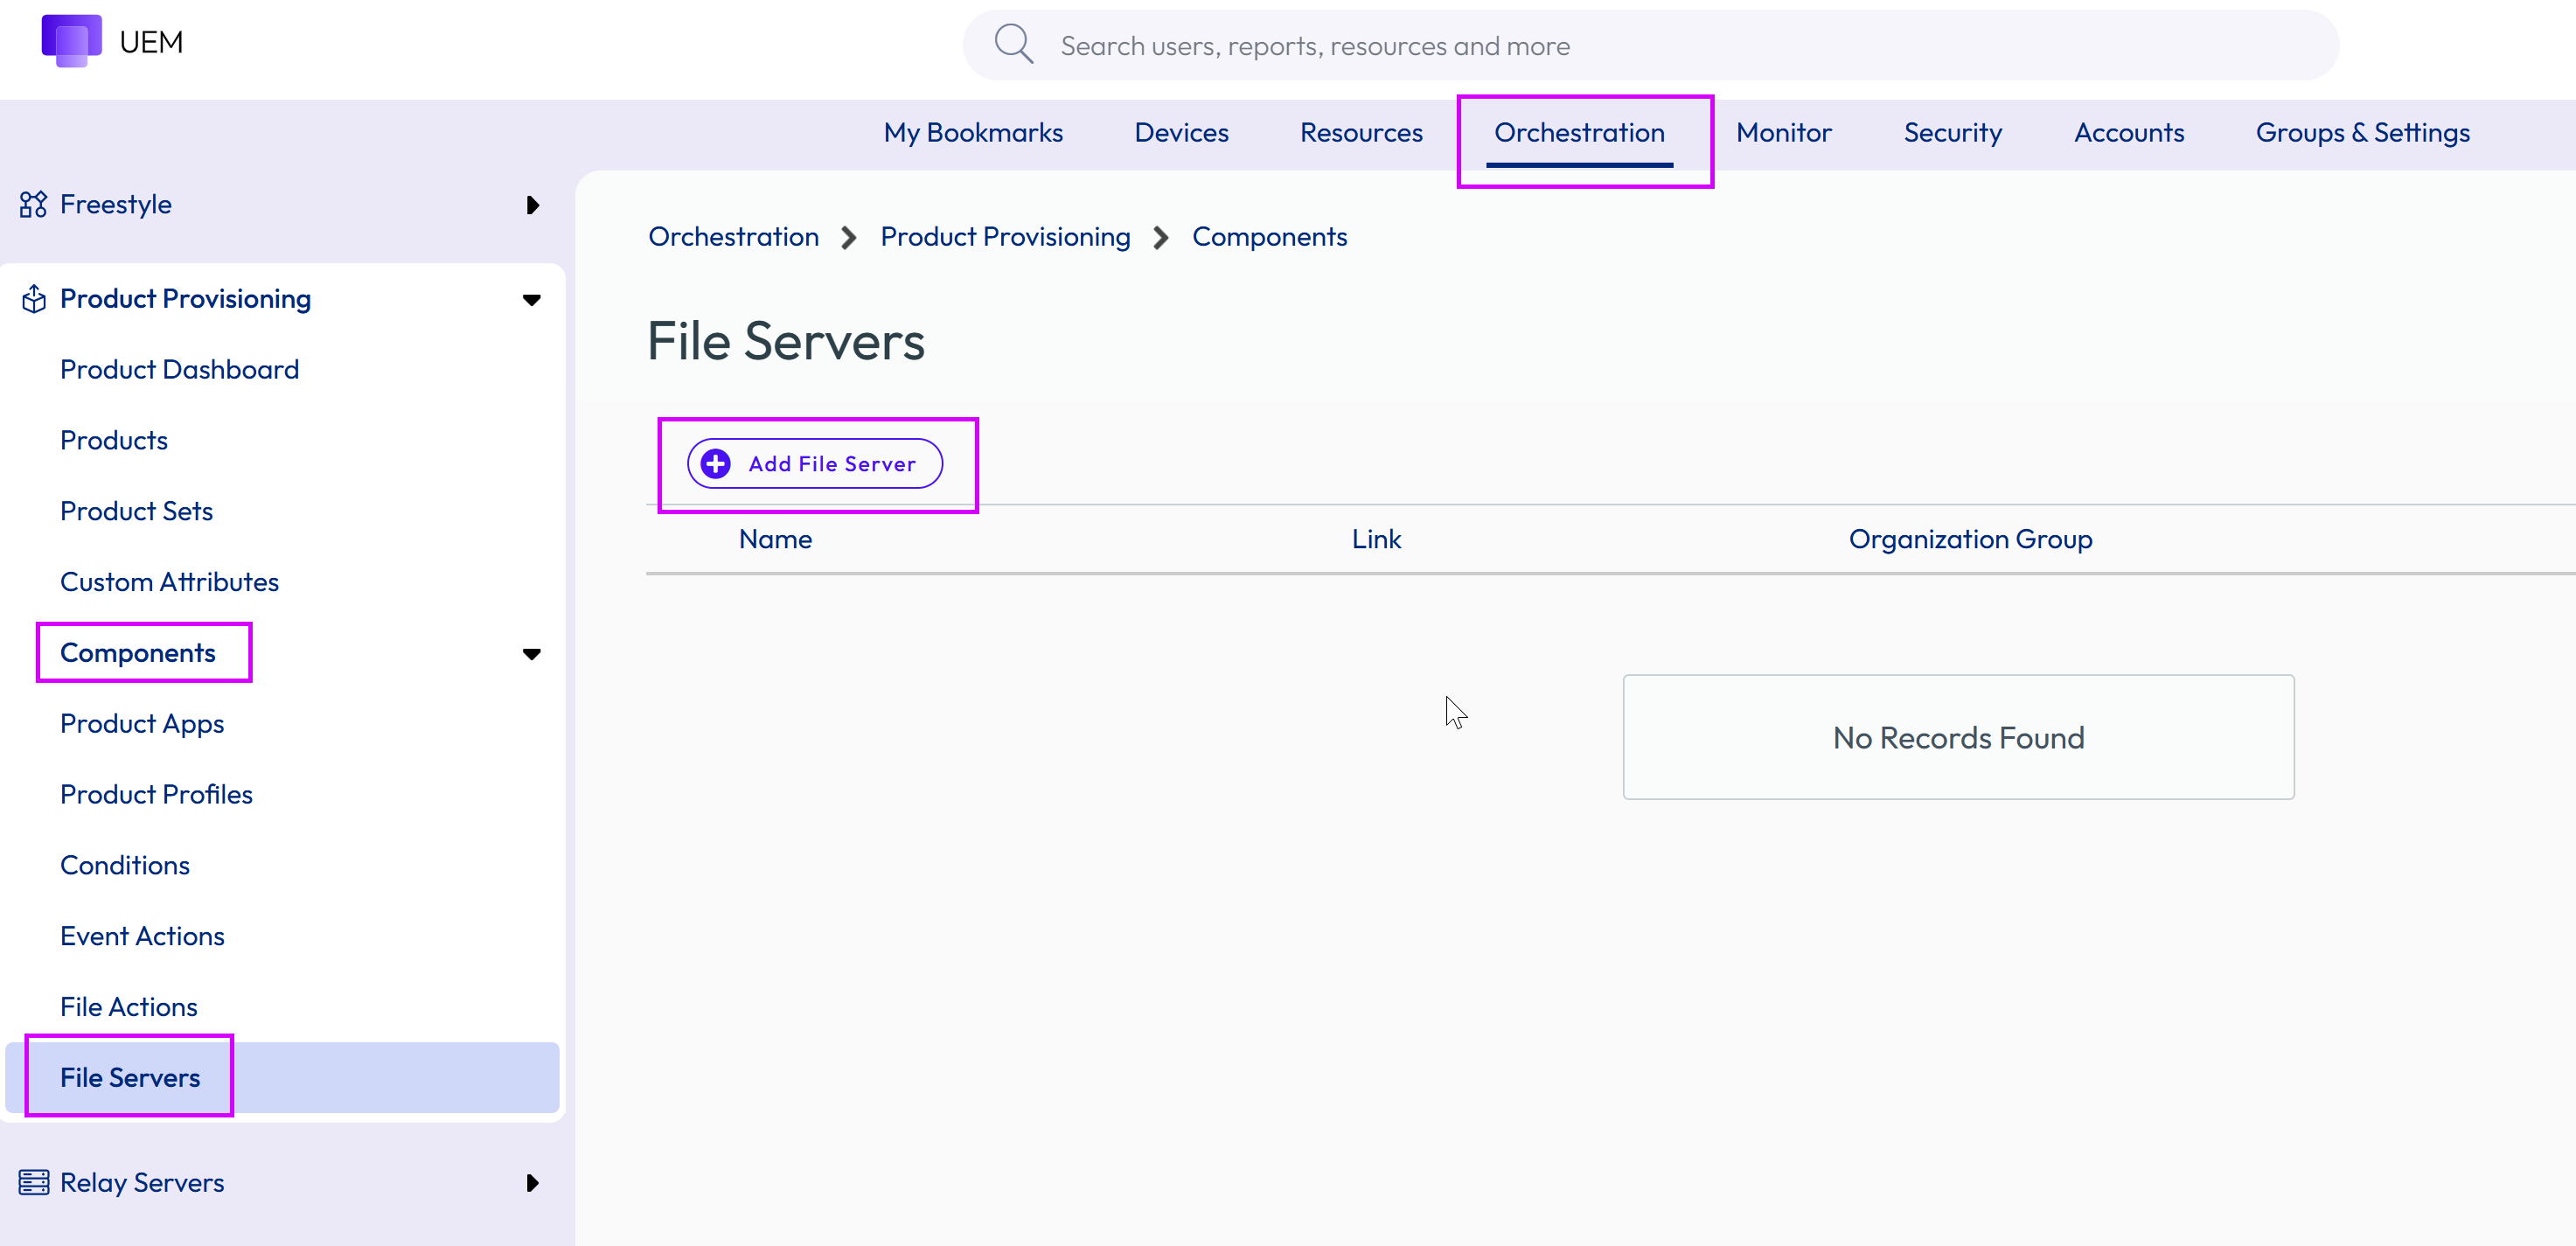
Navigate to Devices > Provisioning > Components > File Servers and then select Add File Server.
-
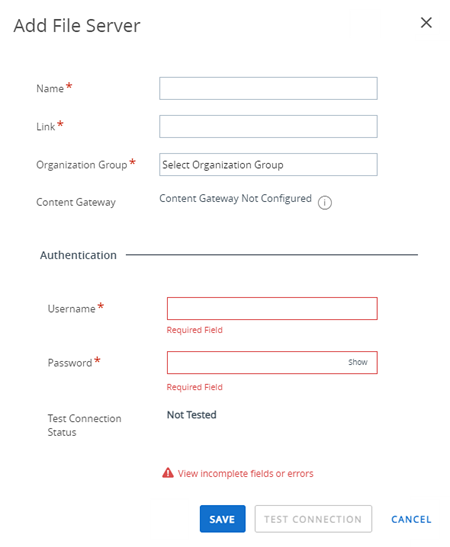
Complete all applicable settings in the tabs that are displayed.
| Setting | Description |
|---|---|
| Name | Enter a name for the file server. |
| Link | Enter the path of the source or destination of files. For example, \\home\NetworkFileShare |
| Organization Group | Enter the organization group you want to coordinate with for the File Server. |
| Content Gateway | Select the content gateway that is reachable from this resource. Only the Unified Access Gateway (UAG) version is supported. The selection of a content gateway is required. |
| User name | Enter the user name that is recognized by the file server. |
| Password | Enter the password that accompanies the user name. |
| Test Connection Status | Select the Test Connection button to test whether the file server can be connected to with the user name and password entered. |
Was this page helpful?