Product provisioning works by interpreting each item in a product as a different task or Job that the UEM server handles. As a product pushes to a device, Workspace ONE UEM updates the status of each job to display any errors or issues that are in process.
Product Job Logs
You can view more detail about product jobs by viewing the job logs.
Navigate to Devices > List View and select the friendly name of a device that provisions with a product. Next, select the More tab, select Products, then select the magnifying glass icon to the right of the Last Job Status column. This action displays the Jobs screen which provides access to the contents of the Job logs.
The Job logs provide a detailed history of events that have elapsed for the device in question as it pertains to the assigned product. This history includes timestamps, progress, error messages, and pause/resume history.
Each job follows a workflow and the statuses reflect the position in the process.
| Job Status | Description |
|---|---|
| Canceled | Job canceled while deferred or waiting. |
| Completed / Failed | Job processing complete. Complete means that the process was a success. Failed means that the process failed. |
| Deferred | Job download conditions not yet met. |
| Deleted | The job was canceled by the user on the device. |
| Delivered | Job initially delivered to device database. |
| Download Pending | The download remains in a pending state until download conditions are met. |
| Downloaded | The job downloaded to the device. |
| Install pending | The install is pending until install conditions are met. |
| Installed | The job installed on the device. |
| n/a | Not applicable, which can arise in a number of scenarios. If the job is more than 90 days old and purges, the job status becomes n/a. Also, if a product contains an application that the device already has installed, the job is not queued, the product status is Compliant, and the Job status is n/a. |
| Orphaned | Job being processed by device is incomplete when job is reprocessed. Job automatically restarts when able. |
| Paused | Job was previously started but a failure occurred. Jobs resume before other jobs process. |
| *Queued | The job is created and currently in line to be started. |
| Waiting | Job is processing on the device but the status of the job is not confirmed. |
Note: * If one or more relay servers are part of your product provisioning environment, you might see extended periods in which "Queued" is the official job status. While each relay server added to the processing chain serves to enhance greatly the performance of a busy provisioning environment, they also tend to delay the reporting of a conclusive product status.
You can use the following methods to troubleshoot and investigate a job status where relay servers are involved.
- Check Relay Server Advanced Info - Navigate to Devices > Provisioning > Relay Servers > List View and select the radio button to the left of the relay server name. Select the More Actions button that appears and lastly, select Advanced Info. This displays the Relay Server Advanced Information screen, where you can verify a product's Queued Count. Device commands for products are not sent to devices until any recently created product stops being reported in this text box. Once you see a zero value in this text box, then device commands can be sent.
- Check Relay Server Status. - Navigate to Devices > Provisioning > Product List View and select the radio button to the left of the product you want to research. Select the More Actions button and lastly, select Relay Server Status. You can monitor the specific status of the relay server by pointing your pointer over the displayed Relay Server icon.
Job Log Detail Level
You can set the amount of detail captured in the Job Log for Android and Windows Rugged devices only by navigating to
Groups & Settings > All Settings > Devices & Users > Android
or
Windows > Windows Rugged
...then continue on to Hub Settings then scroll down to the Product Provisioning section and select the Job Log Level you prefer.
Configure the Collection of Job Logs for Specific Devices
You can target individual devices to collect their provisioning job logs.
-
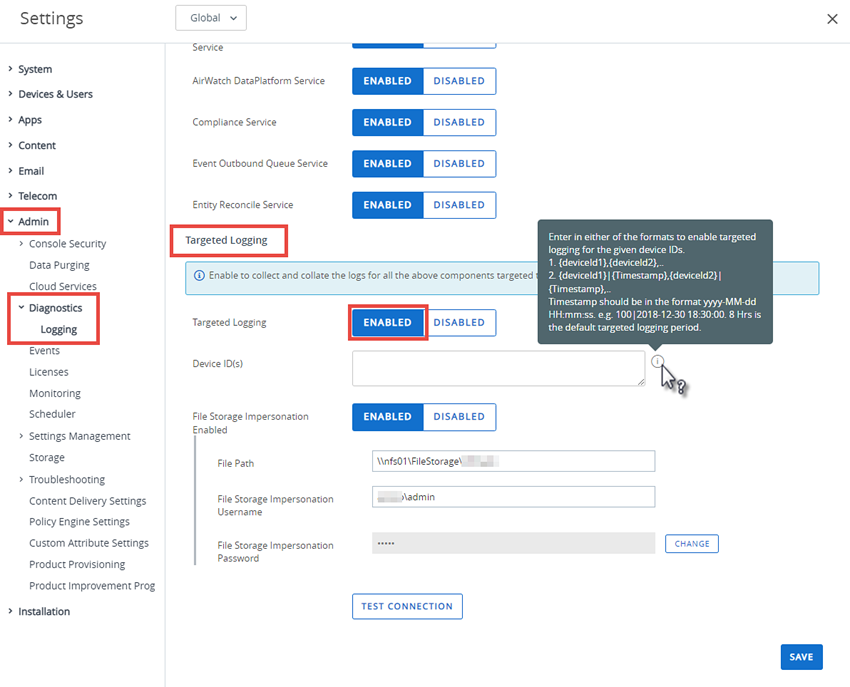
Navigate to Groups & Settings > All Settings > Admin > Diagnostics > Logging.
-
Select the Enabled slider for each component and Scheduled Services for which you want to collect data.
-
Scroll down to the Targeted Logging section, Enable the Targeted Logging slider, and complete the settings.
Setting Description Organization Groups Select the organization groups where the devices reside. Device IDs Enter the device IDs for which you want to enable targeted logging. Use commas to separate multiple device IDs. File Storage Impersonation Enabled Enable if you are using a file storage server to store these targeted logs and enter the appropriate authentication credentials. File Path Enter the path and filename of the LOG file where you want the data saved. File Storage Impersonation User Name This option appears only when File Storage Impersonation Enabled is selected.
Enter the user name of the storage server where your targeted logs are saved.File Storage Impersonation Password This option appears only when File Storage Impersonation Enabled is selected.
Enter the corresponding password of the user name of the storage server where you targeted logs are saved.Test Connection (button) This button tests various possible scenarios which the logging process uses and makes sure it is working as expected. -
Save to apply Targeted Logging.
What to do next: For Android and Windows Rugged only, you can target an individual device for troubleshooting purposes. See the section below, Target a Device Log Level for Troubleshooting Purposes.
Define How Much Data to Collect, Product Job Log
You can define the length of time job log data is collected. Define this timescale by taking the following steps.
-
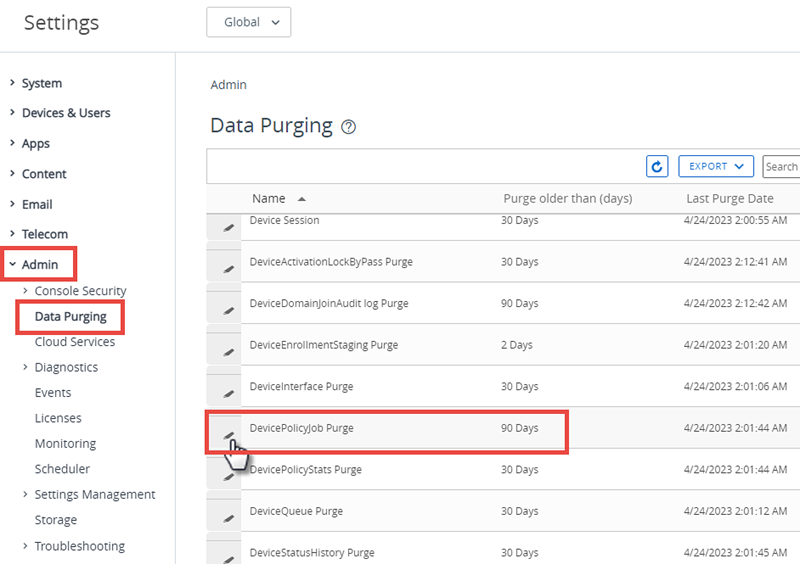
Navigate to Groups & Settings > All Settings > Admin > Data Purging.
-
Locate the purge module named DevicePolicyJobPurge and select the pencil icon (
 ) to open the Data Purging screen.
 -
Complete the Purge older than (days) setting with the length of time in days that you want to keep job log data.
-
Select Save.
Job logs older than the selected number of days are purged from the Workspace ONE UEM console.
Target a Device Log Level for Troubleshooting Purposes, Android and WinRugg
You can target an individual device and temporarily change its logging level for troubleshooting purposes.
- Navigate to Devices > List View, locate the device you want to troubleshoot and select the device-friendly name to display the Device Details.
- Click the More tab and select Targeted Logging.
- Select Create New Log and select the length of time you want the log to capture data.
- Select Start to begin the logging.
Was this page helpful?