As the first step in configuring SCIM user provisioning from Okta to Omnissa Access, complete the required prerequisite tasks in Omnissa Access. These tasks include creating an OAuth 2.0 client, generating an OAuth bearer token, and creating a directory of type Other.
Some of these tasks require you to use the Postman app, so download and install the app from https://www.getpostman.com before you begin.
Create OAuth 2.0 Client
In the Omnissa Access console, create an OAuth 2.0 client for the SCIM integration with Okta.
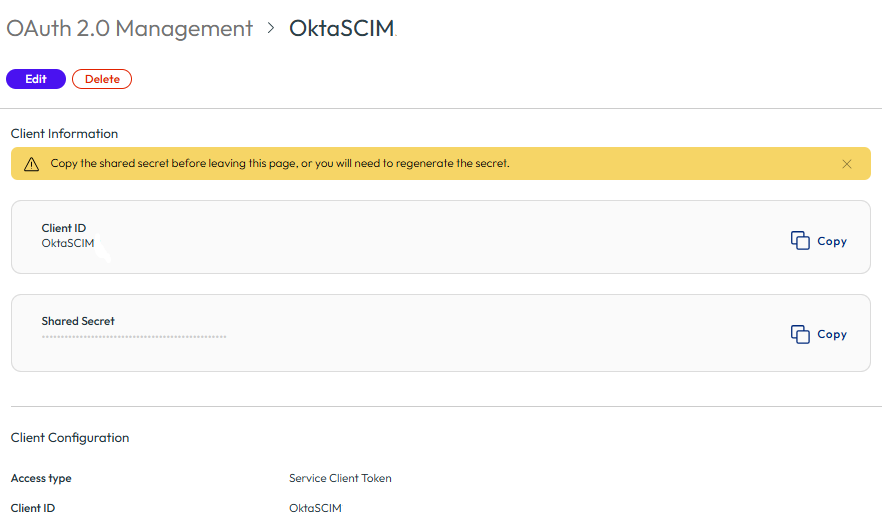
When you create the client, a shared secret is autogenerated. After creating the client, copy the shared secret. You need the secret later in the setup process.
Note: In the latest release of the Omnissa Access console, with the New Navigation toggle turned on, you cannot enter your own shared secret. You can only generate a shared secret.
Procedure
-
Log into the Omnissa Access console.
-
Select Settings > OAuth 2.0 Management.
-
In the Clients tab, click Add Client.
-
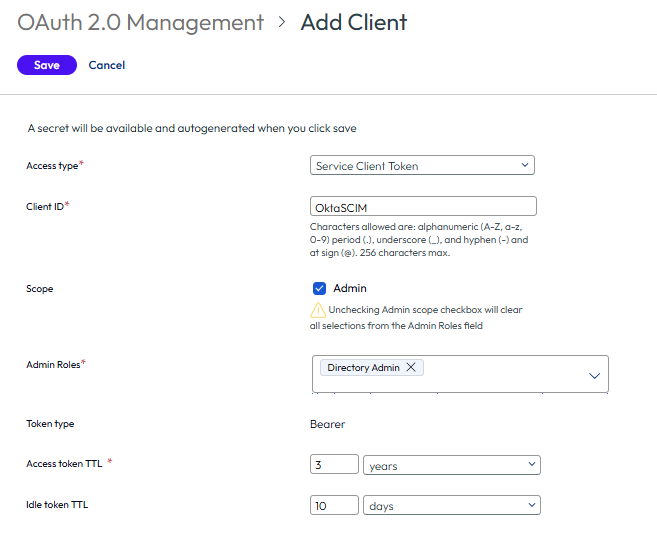
For Access type, select Service Client Token.
-
For Client ID, enter an ID, for example,
OktaSCIM.Make sure you follow the naming rules displayed on the page.
-
For Scope, select the Admin check box, then select the Directory Admin role.
-
Update the Access token time-to-live (TTL) setting to a longer time than the default.
Important: Setting the Access token time-to-live (TTL) setting to a longer time is important because you must update the Okta configuration with a new bearer token in that time. For example, if you choose one year, you must update the Okta configuration every year with a new bearer token.
-
Click Save.
The client is created and a shared secret is autogenerated.
-
Copy and save the shared secret before you leave the page.
Important: After you leave the page, the shared secret is no longer available. If you do not copy the shared secret before leaving the page, you will have to regenerate the secret.
Generate OAuth Bearer Token
After creating the OAuth 2.0 client in Omnissa Access, generate an OAuth bearer token.
Prerequisites
Download and install the Postman app. You can download Postman from https://getpostman.com.
Procedure
-
Open a new tab in the Postman app.
-
For the HTTP method, select POST.
-
For the URL, enter:
https://tenanturl/SAAS/jersey/manager/api/connectormanagement/otherdirectoryconfigurationsReplace tenanturl with your Omnissa Access URL. For example:
https://example.workspaceoneaccess.com/SAAS/jersey/manager/api/connectormanagement/otherdirectoryconfigurations -
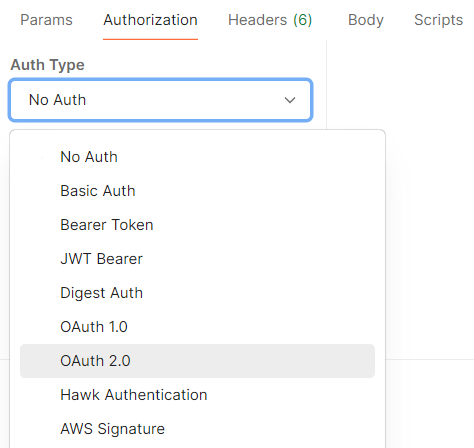
Click the Authorization tab and select OAuth 2.0 as the type.
-
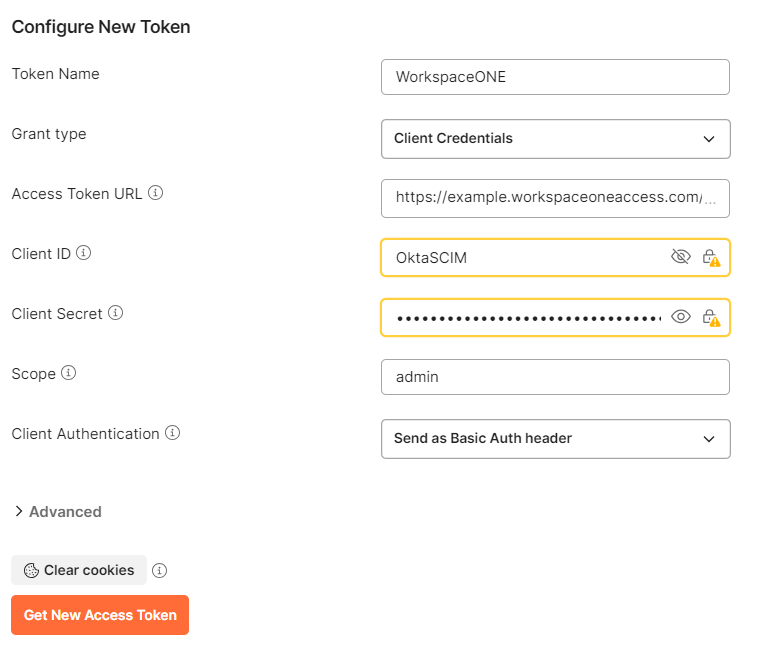
In the Configure New Token section, enter the required information.
-
For Token Name, enter a name, such as
WorkspaceONE. -
For Grant Type, select Client Credentials.
-
For Access Token URL, enter https
://tenantURL/SAAS/auth/oauthtoken, where tenantURL is your Omnissa Access tenant URL. For example:
https://example.workspaceoneaccess.com/SAAS/auth/oauthtokenNote: While this example uses the domain name workspaceoneaccess.com, your Omnissa Access domain name might be different. See Knowledge Base article 68035 for the complete list of Omnissa Access domains.
-
For Client ID, enter the Client ID that you set in Create OAuth 2.0 Client.
-
For Client Secret, enter the secret that was generated in Create OAuth 2.0 Client.
Note: If you did not copy the secret while creating the client, you can regenerate it. To regenerate the secret, go to the Settings > OAuth 2.0 Management page in the Omnissa Access console, select the client, and click Regenerate Secret on the client page. Then copy and paste the secret here.
-
For Scope, enter
admin.
For example:
-
-
Click Get New Access Token.
A token is generated and displayed.
-
Save the token in a text file, for use in a later task.
-
Click Use Token.
-
To verify that the bearer token was added, select the Headers tab and click the hidden headers.

Verify that the bearer token appears in an Authorization row.
-
If the bearer token was not added, return to the Authorization tab and select your token from the Available Tokens drop-down menu and check again.
Create a Directory of Type Other in Omnissa Access
Use the Postman app to create a directory of type Other in Omnissa Access for your Okta users.
Procedure
-
Under Headers, set the Content-Type to:
application/jsonTip: Start typing in
Content-Typein the Key column to select the Content-Type entry.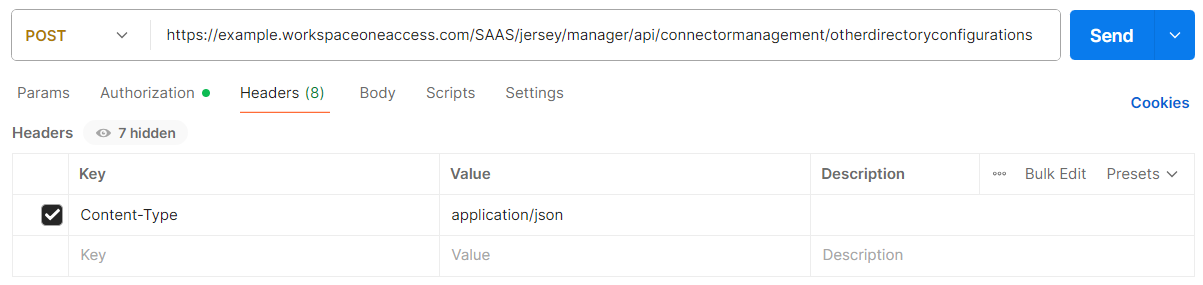
-
Select the Body tab.
-
Use the following as a sample and click Send.
{
"type":"OTHER_DIRECTORY",
"domains":["OKTA.COM"],
"name":"Okta Universal Directory"
}
Note: Make sure that your domain is unique within your tenant.
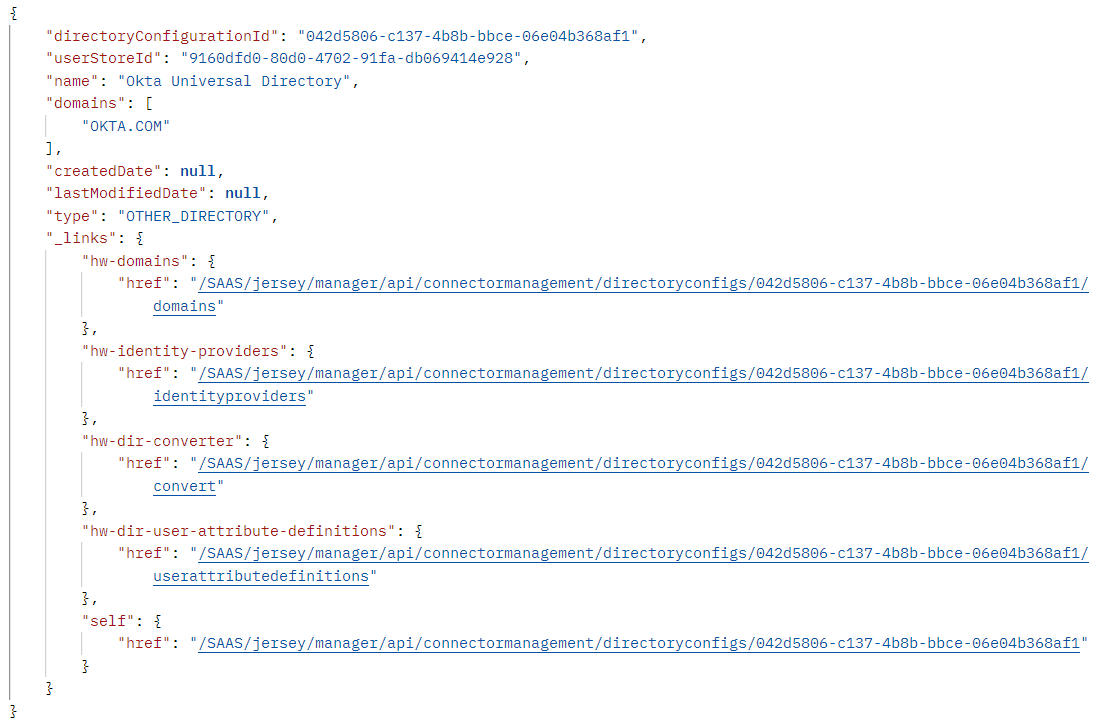
You should see a result similar to the following:
Was this page helpful?