As a Cloud Services Provider, you can group your organization's users into work groups to distribute the management of contractual resources based on selected contracts, sites, and end users in the Omnissa Commerce Portal. Work groups offer the flexibility to define the responsibilities of your users by restricting their visibility and management capabilities of contractual resources. Find out how to activate, create, preview, edit, remove, and deactivate work groups and see how to move users and change their work groups.
Every work group can have a set of designated work group items which restrict the visibility and management of contractual resources for all users in a work group. There are two categories of customizable work group items for Cloud Services Providers: contracts/sites and end users. Each work group can have multiple items assigned and access to resources is granted if the conditions of an item are met. Each item can have up to two restrictions set from each category. If an item has two restrictions from each category, then access to resources will be granted only if both conditions are met. Once in a work group, users can only view and manage contractual resources which meet the work group restrictions granted to their work group. Resources include:
-
Contracts in the Contracts menu.
-
Monthly billing orders (MBOs) in the Monthly Reporting menu.
-
Tasks awaiting action in the organization's task inbox.
-
Usage in a monthly report.
If a work group is restricted to only some sites or end users, users in the work group can only view and edit the usage of those sites and end users in a monthly report. The usage of sites and end users which are not assigned to the work group cannot be viewed or edited by members of the work group.
Users can only be part of one work group at a time. When the work group feature is initially enabled, the default All work group is created. This work group cannot be edited and has no restrictions on the visibility and management of resources.
Note:: As an Administrator user, it is recommended that you keep your user account in the All work group since moving it to a work group with restricted resources also restricts your access and work group management capabilities. If you want to test the restrictions of a certain work group, you can preview it instead.
How do I activate the work groups feature
Before you can start managing work groups for your organization, you must enable the work group feature from your organization settings.
You are logged in with an account that has the Administrator and Operations roles assigned.
-
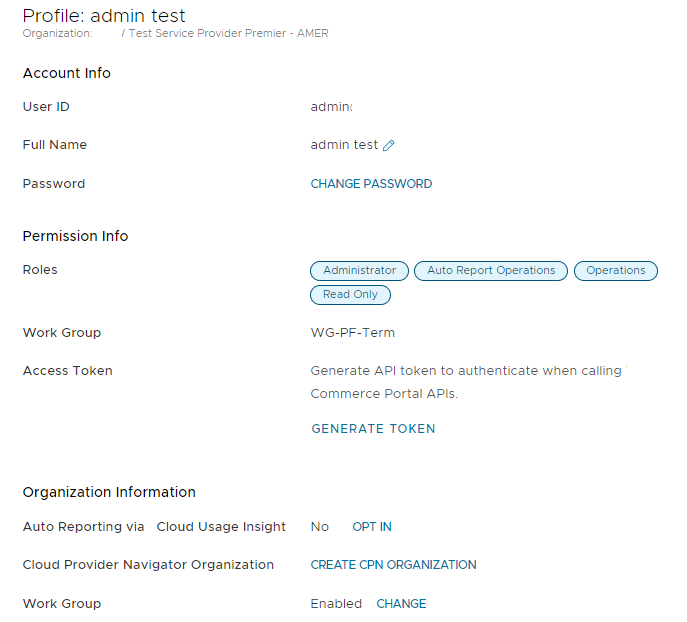
On the Commerce Portal toolbar, expand the drop-down menu next to your user name and click Profile.
-
Under Organization Information, click Change next to Work Group.
-
On the pop-up window that appears, click Change.
You have successfully enabled the work group feature for your organization.
All users in your organization are automatically added to the All work group, visible in the Users > Work Groups menu. The All work group grants full access to the contractual resources of your organization.
How do I create a work group
You create a work group and select its work group restrictions.
- You are logged in with an account that has the Administrator role assigned.
- The work groups feature is enabled for your organization.
-
On the Commerce Portal toolbar, click Users > Work Groups.
-
To create a new work group, click +New Work Group.
-
Enter a name for the work group.
-
To add a new work group item, click Add.
-
Expand the Configure Contracts / Sites tab and select which product families, contracts, or sites you want to assign to the work group.
-
Select the restriction category.
-
From the list of applicable items, select the ones you want to assign to the work group.
You can select multiple items at once by holding SHIFT or CTRL.
-
Use the arrow buttons to move items in or out of the Selected items list.
-
To add an item from a different restriction category, click Add and repeat these steps.
-
-
Expand the Configure End Users tab and select which end users or end user countries you want to assign to the work group.
-
Select the restriction category.
-
From the list of applicable items, select the ones you want to assign to the work group.
-
Use the arrow buttons to move items in or out of the Selected items list.
-
To add an item from a different restriction category, click Add and repeat these steps.
-
-
Repeat the previous steps to add another work group item.
-
To finalize the addition of the work group items, click Add.
-
To confirm the creation of the work group, click Add.
You have successfully created a new work group with a set of assigned work group items. The new work group appears in the Users > Work Groups menu.
If an assigned item has two restrictions from each category, then access to resources is granted only if both conditions of the item are met.
Users added to the work group have restricted access to resources based on the work group items that you assigned to the work group.
How do I preview a work group's restrictions
To ensure that a work group configuration is set properly, you can preview the visibility and access to resources of a work group. Upon preview, the resources displayed are identical to those which users part of the work group can view and access.
- You are logged in with an account that has the Administrator and Operations roles assigned.
- The work groups feature is enabled for your organization.
Alternatively, you can also preview a work group by expanding the drop-down menu next to your user name and clicking Work Group Preview.
-
On the Commerce Portal toolbar, click Users > Work Groups.
-
From the list of work groups on the left, select the work group that you want to preview and click Preview.
-
Proceed with reviewing the data in the Contracts, Monthly Reporting and task inbox menus, from the perspective of the selected work group.
If required, edit the work group's configuration
How do I move multiple users to a different work group
You can move users from one work group to another.
- You are logged in with an account that has the Administrator role assigned.
- The work groups feature is enabled for your organization.
When you first enable the work groups feature, all users are automatically moved to the default All work group. To assign users to a different work group, you move them from the All work group. Users can only be part of one work group at a time.
Note: As an Administrator user, it is recommended that you keep your user account in the All work group group since moving it to a work group with restricted resources also restricts your access and work group management capabilities. If you want to test the restrictions of a certain work group,you can preview it instead.
-
On the Commerce Portal toolbar, click Users > Work Groups.
-
From the list of work groups on the left, select the current work group of the users you want to move.
-
Click Members.
-
From the list of work group members, select one or more users.
You can select all users at once by selecting the check box in the table's leftmost column header. -
To move users to a different work group, click Move.
A pop-up window appears. -
To select a new work group for the users, enter strings in the search box or use the drop-down menu.
-
To confirm the move, click OK.
The users are successfully moved to the selected work group. Their access to contractual resources is adjusted based on the work group items assigned to the selected work group.
How do I change the work group of a user
You can change an individual user's work group assignment.
- You are logged in with an account that has the Administrator role assigned.
- The work groups feature is enabled for your organization.
-
On the Commerce Portal toolbar, click Users.
-
Find the user whose work group you want to change, click the vertical-ellipsis button in the left-most column of the table, and click Edit.
-
From the Work Group drop-down menu, select a new work group for the user.
-
To confirm the change, click OK.
The user is moved to the selected work group. Their visibility and management restrictions are updated based on the configuration of the work group.
How do I edit the configuration of a work group
You can rename a work group or change its assigned work group items.
- You are logged in with an account that has the Administrator role assigned.
- The work groups feature is enabled for your organization.
Note: The default All work group cannot be modified.
-
On the Commerce Portal toolbar, click Users > Work Groups.
-
From the list of work groups on the left, select the work group you want to edit.
-
Rename the work group.
-
Click Actions > Rename.
-
Enter a new name and click Save.
-
-
Edit the configuration of work group items.
-
Click Actions > Edit Configuration.
-
Click the note (
 ) icon.
-
-
Expand the Configure Contracts / Sites or Configure End Users tab and assign new work group items.
-
Select a new restriction category or use the currently selected one.
-
From the list of applicable items, select the ones you want to assign to the work group.
You can select multiple items at once by holding SHIFT or CTRL.
-
Use the arrow buttons to move items in or out of the Selected items list.
-
Click Save.
-
-
To confirm editing the work group, click Save.
Users who are part of the edited work group have their access to resources adjusted, based on the modified work group items.
If an assigned item has two restrictions from each category, then access to resources is granted only if both conditions of the item are met.
How do I remove a work group
If you no longer have to use a work group, you can remove it from your list of work groups.
- You are logged in with an account that has the Administrator role assigned.
- The work groups feature is enabled for your organization.
- The work group you want to remove has no members in it. To empty a work group, move users to a different group.
Note: The default All work group cannot be removed.
-
On the Commerce Portal toolbar, click Users > Work Groups.
-
Select the work group you want to remove from your list of work groups and click Actions > Delete.
If you cannot see the Delete option, make sure that the work group is empty and try again.
-
To confirm the removal, click Yes.
The work group is removed from your list of work groups.
How do I deactivate the work group feature
You can deactivate the work groups feature if you want to revert the contractual resource visibility and management capabilities of your users back to their ordinary state.
- You are logged in with an account that has the Administrator and Operations roles assigned.
- The work groups feature is enabled for your organization.
When you deactivate the work groups feature, your work group settings become inactive but are not deleted. If you decide to re-enable work groups later, all previous work group configurations become active again.
-
On the Commerce Portal toolbar, expand the drop-down menu next to your user name and click Profile.
-
Under Organization Information, click Change next to Work Group.
-
On the pop-up window that appears, click Change.
You have successfully disabled the work groups feature for your organization.
All users who previously had their access limited by work groups can now access all resources of your organization.
Was this page helpful?