Omnissa Connect uses OAuth 2.0 so that you can give your applications secure, delegated access to the protected resources in your organization. Omnissa Connect supports web application access where users of your app authorize access and server-to-server interactions where access tokens are issued directly to your app.
What is OAuth 2.0?
OAuth 2.0 is an authorization protocol that lets you grant your apps secure access to your resources. Your client is authorized through an access token. The access token has a scope which defines which resources the token can access. For information about OAuth 2.0, see the OAuth specification at https://tools.ietf.org/html/rfc6749.
How does OAuth 2.0 work with Omnissa Connect
Omnissa Connect supports app authorization using different grant types.
- Client Credentials for server-to-server apps
- Authorization Code for web apps
- Public Client with Authorization Code for native/mobile apps
Violation policies for OAuth apps documentation
For details on how to create access violation policies for OAuth apps, see the Governance topic.
Server-to-server OAuth app example
Let's say you are an Owner with access to an Omnissa service. You've developed an app that helps you trade in stocks. You call the app Trading 1.0. You want to run the app on virtual machines that are managed by another Omnissa service, but first, you must authorize your app with APIs and an automation script, which resides where ever your organization hosts scripts.
- You create an OAuth 2.0 app in Omnissa Connect.
- Think of this scenario as registering your Trading 1.0 app (that runs on Omnissa-managed virtual machines) with Omnissa Connect (the authorization server).
- In Connect, you initiate the app's creation by selecting Create New OAuth App in the Identity Management > OAuth Applications > Owned Apps tab and going through a series of steps.
- At the end of the process, Omnissa Connect issues client credentials that include a client secret and a client ID.
- You paste these credentials into your APIs within your automation script to request an access token from Connect.
- In Connect, give your app access to the Omnissa Connect organization.
- You grant access by adding the registered app, Trading 1.0, to the organization in Omnissa Connect. This is the final step in the addition process.
- This addition allows the app to access the services and resources in the organization.
- When you run your Trading 1.0 client app, it requests an access token from the authorization server, which is Omnissa Connect.
- When authorized, the authorization server, Omnissa Connect, sends an access token to the client app and your client app can request access to your Omnissa resources.
Who can create and manage OAuth apps?
As an Owner user, or a Member user with the Developer role (an IGA advanced feature), you can create and manage OAuth apps.
You can also manage the OAuth apps created or added by other Owners in your organization.
Server-to-server - Client Credentials
If your application requires direct access to another server without user authorization, you create a server-to-server app in Connect. This option is based on the OAuth 2.0 client credentials grant type. During this flow, your app uses its OAuth credentials to retrieve an access token from Omnissa Connect.
Scoping
Scoping has special importance in server-to-server apps. Scopes provide a way to implement control over what areas in an organization your client can access - specifically which role in an organization, what services, and the level of permissions.
As an Owner, you can add your server-to-server app to any of your organizations. So while you can specify a wide range of access for your app over many services, access is eventually determined by the services contained in an organization. You receive notification when you add an OAuth app to an organization that does not include the services included in the scope of the app.
Prerequisites
You must have the required permissions for adding and managing OAuth apps in the organization.
Procedure
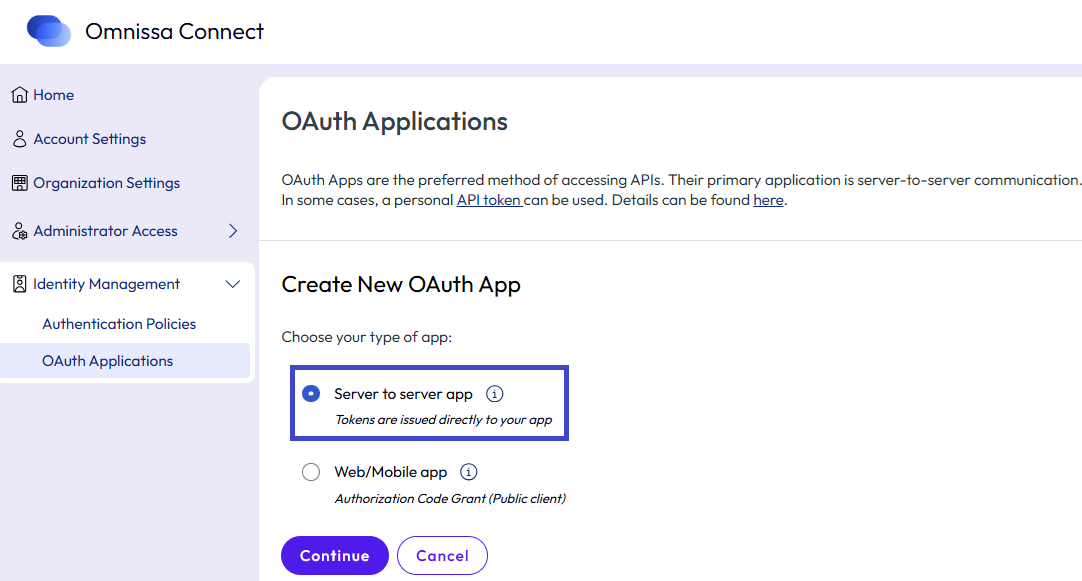
- Log in to Omnissa Connect and go to Identity Management > OAuth Applications.
- Select the Owned Apps tab, and then select Create New OAuth App.
- Select Server to server app and select Continue.
- Register your client by entering a name and description.
- Set the Access Token TTL value for the new OAuth app.
The Access Token time to live (TTL) defines the time period the access token is valid.- The default Access Token TTL time is 30 minutes.
- The maximum Access Token TTL time you can set is 300 minutes (five hours).
- The minimum Access Token TTL time you can set is 1 minute.
- Define scopes.
- Scopes provide a way to implement control over what areas in an organization your client can access - specifically which role in an organization, what services, and the level of permissions.
- Select Create to generate the client credentials.
- On the OAuth app created pop-up window, copy the credentials or download a JSON file and select Continue.
- You are responsible for storing your credentials in a safe place.
- Paste the credentials into the app's authentication APIs within your automation script or securely store the credential JSON file somewhere where the app can safely use it to retrieve the access token.
- The client app must validate the access token.
- After validation, the app can now request the access token to access resources.
- (Optional) In Connect, add the app to the active organization.
- This step allows the app to access the services and resources in the Connect organization.
- You can skip this step and add the app to this organization and other organizations later.
Web apps - Authorization Code
If your app is a regular web app that runs on a server, and requires user authorization, you create a web app in Connect. This option is based on the OAuth 2.0 authorization code grant type.
During this flow, users authorize your application before it accesses any resources through an authorization request URL that retrieves an authorization code. Your app exchanges the authorization code for an access token from Connect. With the access token, the user through the app can access Omnissa resources. The app can optionally retrieve a refresh token from Connect.
Prerequisites
You must have the required permissions for adding and managing OAuth apps in the organization.
Procedure
- Log in to Omnissa Connect and go to Identity Management > OAuth Applications.
- Select the Owned Apps tab, and then select Create New OAuth App.
- Select Web/Mobile app and select Continue.
- Register your app by entering the app details.
- Type a name and description for the new OAuth app.
- Enter at least one redirect URI.
- After a user authorizes your client, the authorization server redirects the user back to your client to the URI you specified with an access token.
- It is best practice to add more than one URI.
- Use the format http://acme.com.
- Specify a time span for your access token.
- The default Access Token time to live (TTL) setting is 30 minutes.
- The maximum value you can set is 300 minutes (five hours).
- The minimum value you can set is 1 minute.
- If you want your access token to authorize requests continuously, select the Issue a refresh token check box and set the Refresh Token TTL value.
- The default Refresh Token TTL is 30 minutes.
- The maximum value you can set is 300 minutes (five hours).
- The minimum value you can set is 1 minute.
- Define scopes.
- Scopes provide a way to implement control over what areas in your organization your client can access - specifically which of your services and the level of permission.
- Select the Open ID check box to get information about the users that authorize your app.
- Select Create to generate the client credentials.
- Copy the credentials or download a JSON file that contains your credentials.
- You are responsible for storing your credentials in a safe place.
- Paste the Connect client credentials into your app's authentication APIs or securely store the credential JSON file somewhere where the app can safely use it to retrieve the access and refresh tokens from Connect.
- Select Continue.
Mobile apps - Public Client with Authorization Code
Public clients such as native and mobile apps cannot maintain the confidentiality of a client secret. When using OAuth 2.0 for mobile apps, Omnissa Connect generates an app ID, and uses the Proof Key for Code Exchange (PKCE) to provide additional verification.
PKCE is a technique to secure public clients that don’t use a client secret. For details, see the OAuth specification Proof Key for Code Exchange by OAuth Public Clients at https://datatracker.ietf.org/doc/html/rfc7636.
During this flow, users authorize your application before it accesses any resources through an authorization request URL that must include the Connect-generated app ID to retrieve an authorization code. Your app exchanges the authorization code for an access token from Connect. With the access token, the user through the app can access Omnissa resources. The app can optionally retrieve a refresh token from Connect.
Prerequisites
You must have the required permissions for adding and managing OAuth apps in this organization.
Procedure
- Log in to Omnissa Connect and go to Identity Management > OAuth Applications.
- Select the Owned Apps tab, and then select Create New OAuth App.
- Select Web/Mobile app and select Continue.
- Register your app by entering the app details.
- Type a name and description for the new OAuth app.
- Enter at least one redirect URI.
- After a user authorizes your client, the authorization server redirects the user back to your client to the URI you specified with an access token.
- It is best practice to add more than one URI.
- Use the format http://acme.com.
- Specify a time span for your access token.
- The default Access Token time to live (TTL) setting is 30 minutes.
- The maximum value you can set is 300 minutes (five hours).
- The minimum value you can set is 1 minute.
- If you want your access token to authorize requests continuously, select the Issue a refresh token and set Refresh Token TTL value.
- The default Refresh Token TTL is 30 minutes.
- The maximum value you can set is 300 minutes (five hours).
- The minimum value you can set is 1 minute.
- Define scopes.
- Scopes provide a way to implement control over what areas in your organization your client can access - specifically which of your services and the level of permission.
- Select the Open ID check box to get information about the users that authorize your app.
- Select Create to generate the credentials.
- Copy the app ID or download a JSON file that contains the app ID.
- You are responsible for storing these credentials in a safe place.
- Put the app ID in your app's authentication APIs or securely store the app ID JSON file somewhere where the app can safely use it to retrieve the access and refresh tokens from Connect.
- Select Continue.
How to manage OAuth 2.0 apps
As an Owner, you create, view, and modify the details of the OAuth apps in your organization. You can also manage the OAuth apps created or added by other Owners in your organization. Grant access to apps created in any organization in which you hold the Owner role.
| To... | Do this... |
|---|---|
| View the OAuth apps that have access to your organization. | - Select Identity Management > OAuth Apps. - On the Role Assigned Apps tab, view the apps created in other organizations with access to your organization. |
| Add an OAuth app created in another organization. | 1. Select Identity Management > OAuth Apps and then the Role Assigned Apps tab. 2. Select Add OAuth App. 3. To identify the OAuth app you want to add, select Enter App ID or Search by Organization. 4. Select Continue. 5a. If you selected to identify the OAuth app using its ID, you are prompted to enter the OAuth app ID. 5b. If you selected to identify the OAuth app through the organization in which it was created, you are prompted to first select the organization name from the drop-down menu, and then select the OAuth app from the list of OAuth Apps available in that organization. The Organization drop-down menu shows only the organizations where you have Owner access. 6. Review the App Details and select Add. |
| Remove an OAuth app created in another organization that has access to your organization. | 1. Select Identity Management > OAuth Apps and then the Role Assigned Apps tab. 2. From the list of OAuth apps that displays, select the app you want to prevent from accessing your organization. 3. Select Remove. |
| To view the apps created in your organization. | Select Identity Management > OAuth Apps and then the Owned Apps tab. Here you can view all the apps that were created in your organization. |
| To create a new OAuth app in your organization. | 1. Go to Identity Management > OAuth Apps and then select the Owned Apps tab. 2. Select Create New OAuth App. 3. Select the type of app you want to add. |
| To manage the OAuth apps created in your organization. | Select Identity Management > OAuth Apps and then select the Owned Apps tab. Select the app you want to manage: - To modify the OAuth app, select Edit. Note: If you change the scoping of an app, your changes are not included to instances of the app located in other organizations. To update the scoping, Owners must remove the app from their organization, and add it again, or edit the app to reflect the updated scoping. - To remove an app, select Delete. Note: This action cannot be reverted. Any application using these client credentials will no longer be able to access protected resources and the credentials will be invalidated. - You add a server-to-server app that has been created in the organization but not yet given access to the organization by selecting the app and selecting Assign Roles. If needed, you modify the available organization and service roles allowed by the scope of the app, then select Add. - If you want to modify the scope of the app first, select Edit and make the required changes to the Organization and Service roles. When ready, select Add to This Org. Note: Web/Mobile apps cannot be added to organizations. |
Can you regenerate an app secret?
Yes, as Owner, you can regenerate the app secret of an OAuth app in your organization. This is useful if the Owner who created the OAuth app is no longer with your business enterprise and you want to continue running the app.
Can you use an API Token authentication instead of an OAuth app?
Yes, if an API mandates that a user is the authenticated entity in the authorization process, you must use an API token.
What Is the difference between OAuth apps and API tokens?
You can use both OAuth apps and API tokens to interact with the Omnissa Connect APIs. See API Tokens for details on this IGA feature in Connect.
Important: Before using OAuth apps of the server-to-server type for automated calls to your services, you must first consult the relevant API documentation.
API tokens are issued by users in an organization and are associated with the user’s account and the organization from which they generated the API token. Only the users who created the API tokens can manage them.
Once created by a user in an organization, OAuth apps act as entities in server-to-server interactions and can be used in multiple organizations. The owner of the OAuth app is the organization in which it was created, and can be managed by users who are Owners or Members with a Developer role. See the topic Requests for details on managing role requests.
You can use both OAuth apps and API tokens to automate processes that interact with APIs. The difference is that API tokens incorporate the user account in the access token while OAuth apps perform authorization without a user account. When you make a choice of using an API token or an OAuth app to make an API call, you must consider the specific requirements of the API service involved in the interaction.
Some APIs require a user account to be the authenticated entity while others don’t. For example, if you call an API to fetch subscription information for your organization in Omnissa Connect, you can use either an OAuth app of the server-to-server type or an API token to make calls to the API service as it does not require authentication through user credentials and accepts client credentials as well. If an API is used by the users of an organization to update their passwords, the API requires a user to act as the authenticating entity.
Was this page helpful?