Starting self-service federation with Omnissa Connect is performed in two phases by different Omnissa Connect roles. The Owner kicks off the process by creating the Management Organization and inviting the Enterprise Administrator and the Enterprise Administrator selects the type of federation setup, which determines the remaining federation process.
Role responsibilities
Each step in starting the self-service federation setup is carried out by a different role representing your enterprise.
Notes:
- Depending on the size of the organization and the skills used to set up federation, a single person can assume both roles by self invitation as an Enterprise Administrator.
- The Owner who kicked off the self-service federation workflow can access the special Management Organization and the federation workflow. Members of the Management Organization with the Enterprise Administrator role can access only the federation workflow.
| You need an... | To... | Completing this task results in: |
|---|---|---|
| Owner | Kick off self-service federation for your enterprise domain | - The Management Organization with federation dashboard for your domain is created. - One or more members of your enterprise are granted the Enterprise Administrator role. - The Enterprise Administrators receive an email invitation with a link to the federation dashboard in the Management Organization. |
| Enterprise Administrator | Start the self-service federation setup | - The type of self-service federation setup is selected. - The workflow to set up federation with your domain is activated and can be accessed in the federation dashboard in the Management Organization. |
Prerequisites
Before you begin, make sure that you have read and understand the prerequisites for setting up enterprise federation.
- Setting up federation through the self-service workflow requires Enterprise Administrator access.
- To see all the steps of the workflow correctly displayed in your browser, you must allow third-party cookies.
- When you work with the federation setup workflow, make sure you do not use your browser's incognito mode.
- Verify that you can access and modify the federated domains' DNS records for domain verification.
Attention: Your enterprise must own the domains you want to federate for access with Omnissa Connect and you must verify the ownership during the first step of the self-service workflow. You cannot federate domains that belong to a service provider. - The prerequisites for each federation setup method are different.
- Dynamic (connectorless) authentication setup
- Verify that you can access your identity provider (IdP) console.
- For SAML-based federation setup, verify you have access to the IdP metadata URL.
- Connector-based authentication setup
- Important: User passwords are never synced.
- Verify that you can access and modify the federated domains' DNS records for domain verification.
- Verify that your host machine has installed MS Windows Server 2012 R2 or later, and that you can access your enterprise directory.
- The host Windows machine must have a static IP address and a DNS resolvable FQDN.
- The connector must have network access to Active Directory on ports 389/636.
- Verify that your corporate firewall is configured to make an outbound connection from the Omnissa Access connector to Port 443 for interaction with the hosted tenant service.
- If you want to add domains to the allow list, you must add the
*.workspaceoneaccess.com*(Omnissa Access Production Tenant URL) domains to your list of allowed domains. - The host Windows server machine or virtual machine can be deployed on-premises, on an Omnissa Cloud on AWS, or can be an Elastic Compute Cloud instance. The host on which Omnissa Access connector is installed must be able to access your enterprise directory over LDAP/LDAPS.
- For additional information about installing the Omnissa Access connector, review the latest version of the Omnissa Access Connector Systems Requirements
- Verify that you have a user or service account with read permissions on Active Directory and a non-expiring password for AD Bind User DN/Name to sync groups and users. The service account must have the following attributes: firstname, lastname, displayname, and email address. The email address for the service account can be a placeholder value.
- If you use a service account with an expiring password policy and if a password expires before renewal, groups and admins cannot be synced unless you re-establish the connection between Active Directory and the Omnissa Access connector.
- The required attributes to sync admins for access to Omnissa Connect are first name, last name, email address, user name, and domain. If your enterprise uses User Principal Name (UPN) for authentication, it must be available as a user profile attribute.
- Dynamic (connectorless) authentication setup
1. Create the Management Organization
Owners of non-federated domains can kick off the federation setup from Omnissa Connect on behalf of their enterprise and can identify one or more Enterprise Administrators to complete the setup.
Procedure
Note: You can add more Enterprise Administrators after you create the Management Organization.
- In the left navigation in Omnissa Connect, select Home > Enterprise Management.
- Select Set Up.
- Identify one Enterprise Administrator to invite to complete the federation setup for your enterprise.
- Accept the Terms of Service and select Submit.
- To invite another Enterprise Administrator, select the Send Another Invitation link.
- Select Launch Management Organization.
Results
- A special Management Organization for your enterprise domain is created. This organization is identified with a shield icon in the organization list and the word
Management. The enterprise federation setup can be accessed from the Enterprise Federation menu in the Management Organization.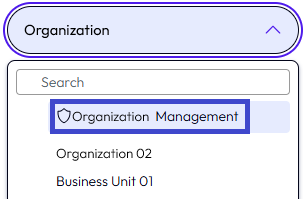
- The Enterprise Administrator you identified receives an email with a link. When they select the link and sign in to Omnissa Connect, they gain access to the special Management Organization and the enterprise federation setup.
What to do next
The Enterprise Administrator must initiate the self-service federation setup in the special Management Organization.
2. Select the federation setup method and configure it
To select the type of federation method as the Enterprise Administrator, you must first receive an email invitation with a link to the Enterprise Federation dashboard.
The Owner who sent you the invitation has identified you as an Enterprise Administrator and granted you the permissions to initiate and configure the federation setup for your enterprise domain.
Prerequisites
To access the special Management Organization and start the setup process, you must have an Omnissa Connect account with Enterprise Administrator permissions.
Procedure
Important: You cannot revert the integration method. To switch the option to a different one, you must file a support ticket.
- In the email invitation, select the link.
- If you don't have an Omnissa Connect account, the system prompts you to create one.
- Log in to Omnissa Connect.
- If you used the invitation link to log in, the Set up Enterprise Federation page is the first page you see.
- If you don't see the Set up Enterprise Federation page, select the Management Organization, and then select Identity Management > Enterprise Federation from the left navigation.
- Select Get Started.
The first screen of the self-service federation setup prompts you to commence the workflow by selecting the type of integration for your enterprise identity provider (IdP). - Select the type of integration to configure your enterprise IdP for federation with Omnissa Connect.
- Dynamic user and group provisioning (connectorless)
- This option leads you through a workflow that involves configuring your third-party SAML 2.0 or OIDC IdP with Omnissa Connect.
- Connector-based pre-provisioning
- This option leads you through several steps.
- Installing and configuring an on-premises instance of Omnissa Access connector.
- Creating an internal directory to store the admins and groups to sync from your Active Directory.
- (Optional) Configuring a third-party SAML 2.0 IdP.
- This option leads you through several steps.
- Dynamic user and group provisioning (connectorless)
- Select Continue.
- Review the prerequisite for the selected option, then select Continue.
Results
You now have access to the first step of the self-service federation workflow, verifying domains.
Was this page helpful?