Configuring the identity provider (IdP) in the Enterprise Federation workflow in Omnissa Connect includes working in both the provider and Omnissa Connect consoles, and this procedure outlines configuring Okta in the SAML (Security Assertion Markup Language) protocol or in the OIDC (OpenID Connect) protocol with SCIM (System for Cross-domain Identity Management) provisioning.
What is the role of Omnissa Access
The Omnissa Access tenant is provisioned automatically to help with this step. Omnissa Access acts a service provider and self-service federation provides a presentation layer to help simplify connecting your identity provider with your service provider.
What is the role of Omnissa Identity Service?
Enterprise federation uses Omnissa Identity Service for SCIM based user provisioning and management. The Omnissa Identity Service integrates Omnissa products and services with third-party cloud-based identity providers such as Okta for user provisioning and identity federation. Omnissa Identity Service offers centralized user management across the Omnissa platform.
Note: You must configure a separate instance of the Omnissa Identity Service app for enterprise federation. You cannot use a previously configured Omnissa Identity Service app.
Supported authentication protocols
Enterprise federation with SCIM provisioning supports both SAML and OpenID Connect (OIDC) based authentication protocols.
Okta documentation
This topic outlines using Okta as the identity provider, but if you want the latest Okta documentation, see the Okta documentation site.
Requirements
- You must complete the Verify Domains step before you can access the Configure identity provider area of the Set up Enterprise Federation widget in Omnissa Connect.
- You must have admin permissions to integrate apps in Okta.
SAML
To configure Okta in the SAML protocol for SCIM provisioning, work in both the Omnissa Connect console and in the Okta admin console. It is best to use two browser instances to facilitate copying and pasting values between the consoles.
Note: Although, you can create a custom app in Okta for the SAML setup, it is best to use the preconfigured Omnissa Identity Service app as the baseline to simplify configuration.
- Select your identity provider in Omnissa Connect.
- Open a browser instance and go to your Omnissa Connect console.
- Go to Set up Enterprise Federation > Configure identity provider and select Start.
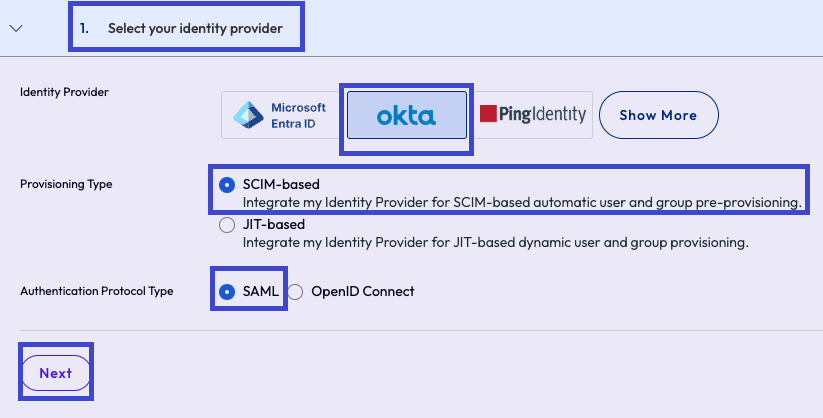
- On the Select your identity provider tab, select these settings and then select Next.
- Identity Provider: Okta
- Provisioning Type: SCIM-based
- Authentication Protocol Type: SAML
- Add Omnissa Identity Service app to your Okta app catalog. If you are using a custom app, it is best to follow the Okta documentation on how to add a custom app. For your convenience, the OIDC procedure on this page outlines how to create a custom app in Okta.
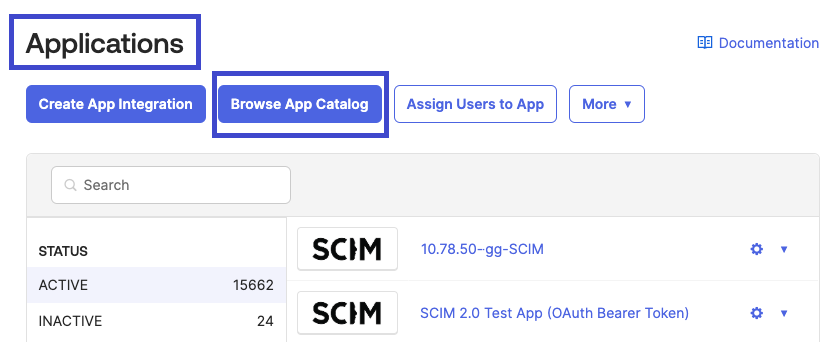
- Open another browser instance and go to your Okta console, go to Applications, and select the Browse App Catalog menu item.
- Keep your Omnissa Connect browser instance open for future copying and pasting.
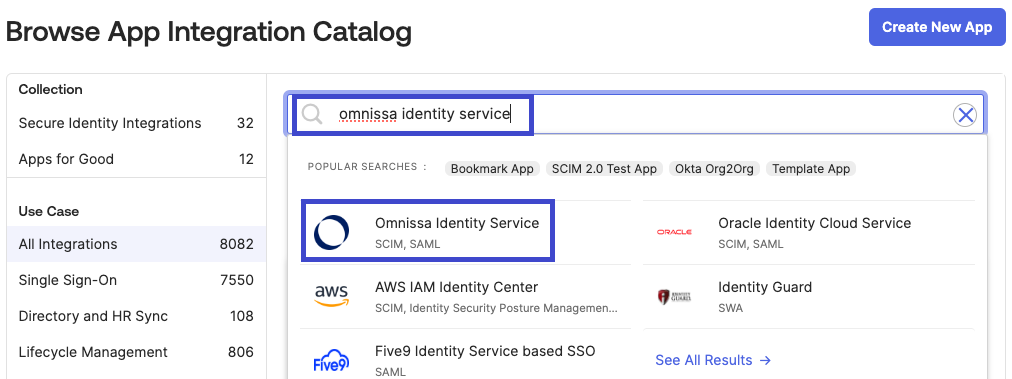
- In the Okta app catalog, search for Omnissa Identity Service and select the app.
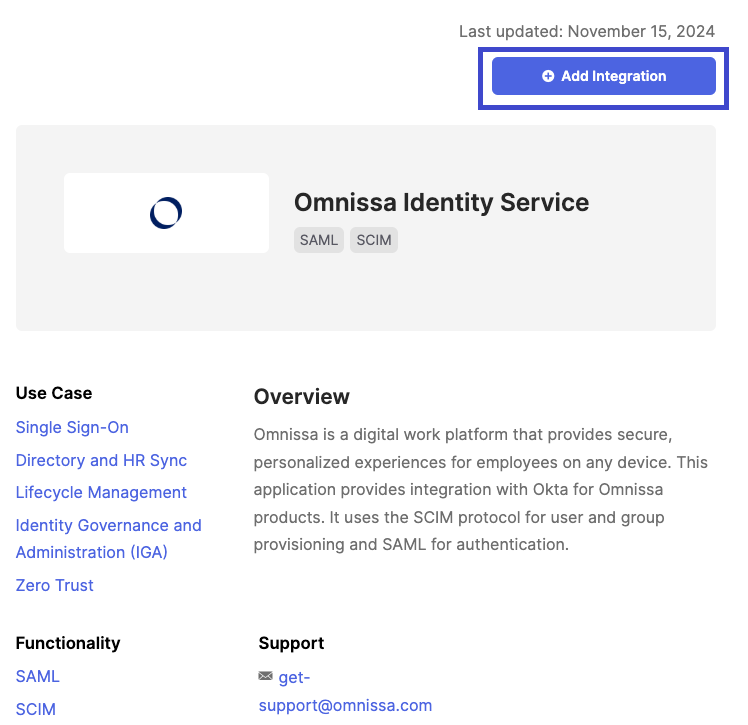
- Select to add the integration.
- In Okta, on the Add Omnissa Identity Service page, General Settings tab, enter a name for the app.
- You need the Omnissa Base Url.
- In the next step, you get this URL from Connect.
- Open another browser instance and go to your Okta console, go to Applications, and select the Browse App Catalog menu item.
- Set up Okta for SCIM provisioning.
- Go to the Connect console, and ensure you are on the Set up identity provider for SCIM provisioning tab.
- Copy the Tenant URL for pasting into Okta.
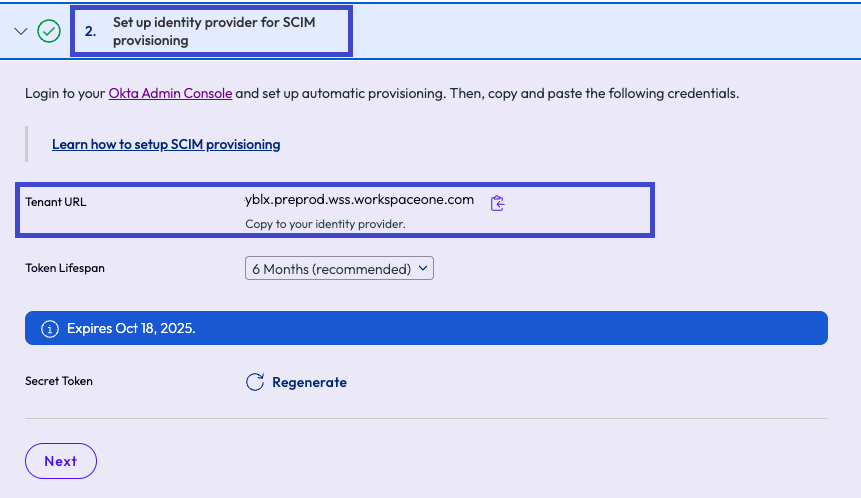
- Select to Generate the Secret Token menu option and record this secret for use for later in this process.
- If you should lose this secret, this page offers to Regenerate the Secret Token.
- Copy the Tenant URL for pasting into Okta.
- Go to your Okta instance and paste the copied Tenant URL into the Add Omnissa Identity Service page, General Settings tab, Omnissa Base Url field.
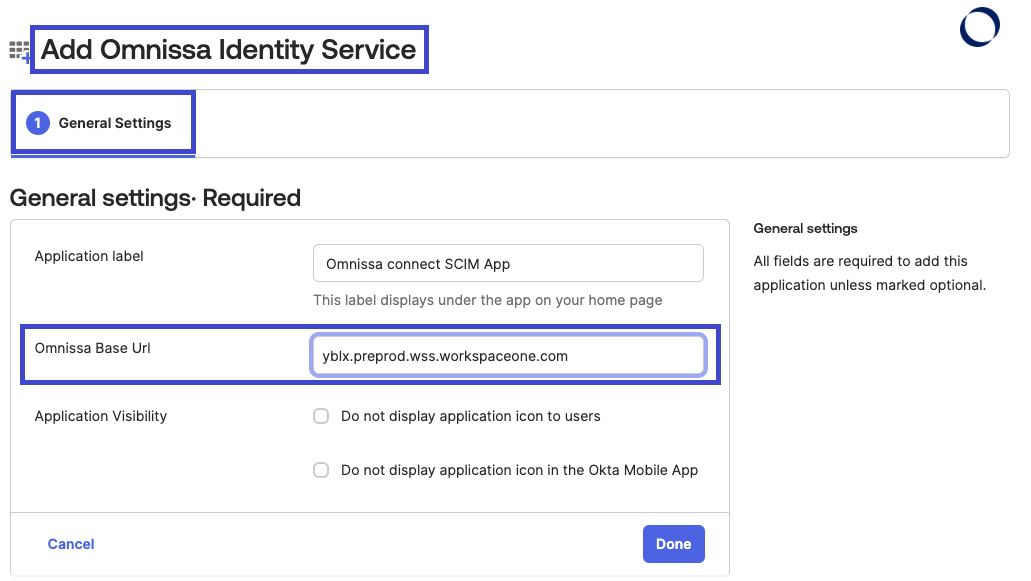
- In Okta, complete the other General Settings and select Done.
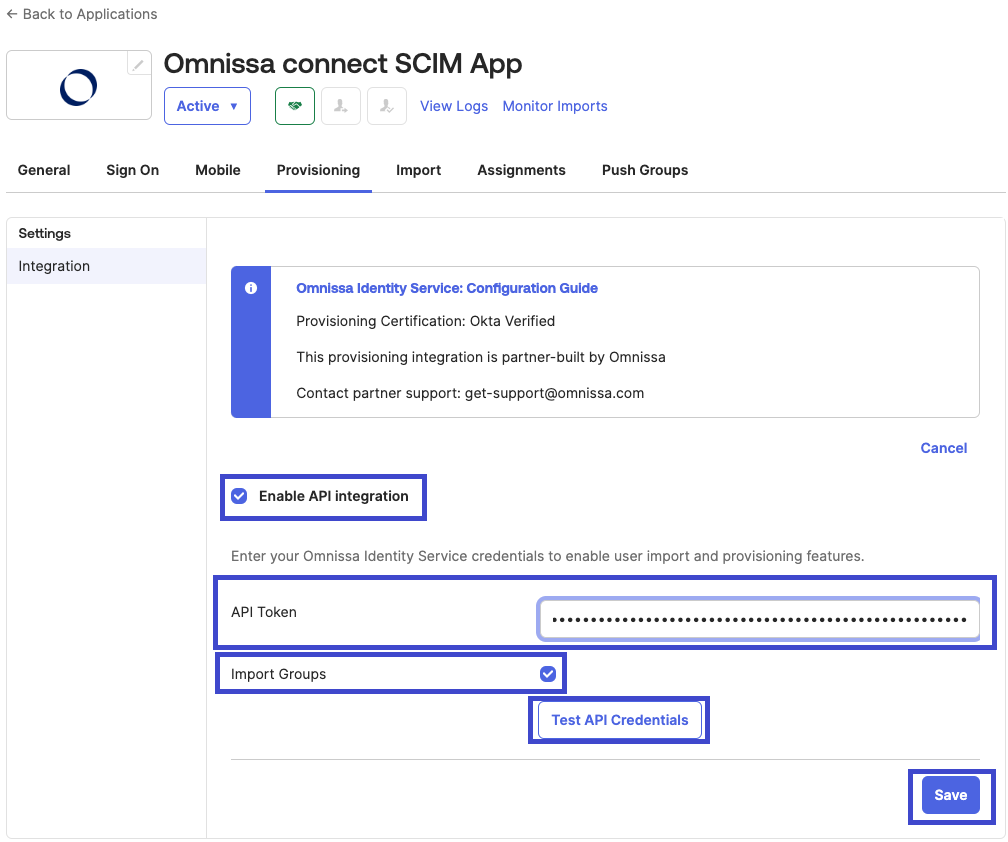
- Still in your Okta instance and working in the Identity Service app you've added, select the Provisioning tab.
- Select Configure API Integration.
- Activate the Enable API integration check box.
- In the API Token text field, paste the secret token you generated in Connect earlier in this process.
- Activate to Import Groups.
- Select Test API Credentials to ensure proper communication between the systems.
- Save your settings in Okta.
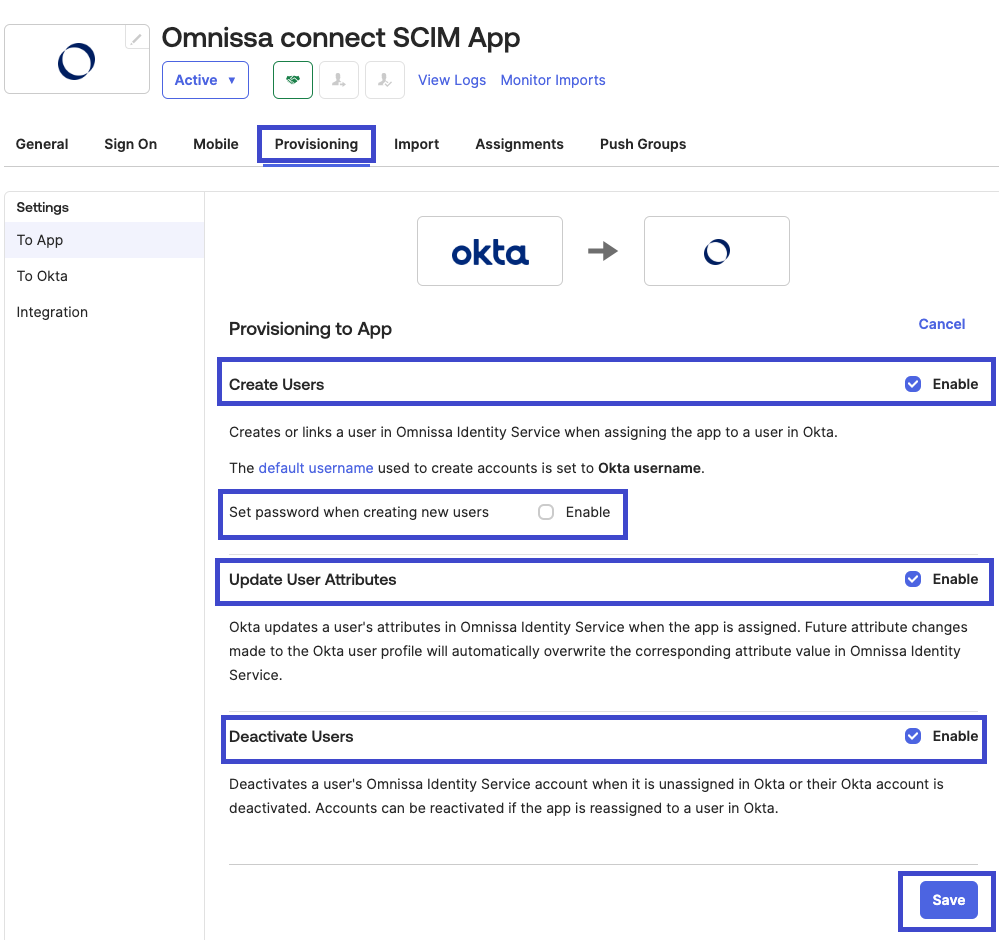
- Continue to work in your Okta instance, in the Identity Service app, and on the Provisioning tab. Edit the app to control user provisioning.
- Activate the Create Users check box.
- Decide whether to activate or deactivate Set password when creating new users depending on your needs.
- Activate the Update User Attributes check box.
- Activate the Deactivate Users check box.
- Save your edits.
- Go to the Connect console, and ensure you are on the Set up identity provider for SCIM provisioning tab.
- Set up SAML in Okta.
- Return to your Connect instance on the Set up SAML within your identity provider tab and perform one of the listed steps, which depends on if you are using the Identity Service app or creating a custom app in Okta.
- Identity Service app: Skip the Set up SAML within your identity provider tab by selecting Next.
- You do not need to copy these strings outlined in this widget.
- The Identity Service app has configured these values for you.
- Custom app: Follow the instructions outlined on the Set up SAML within your identity provider tab.
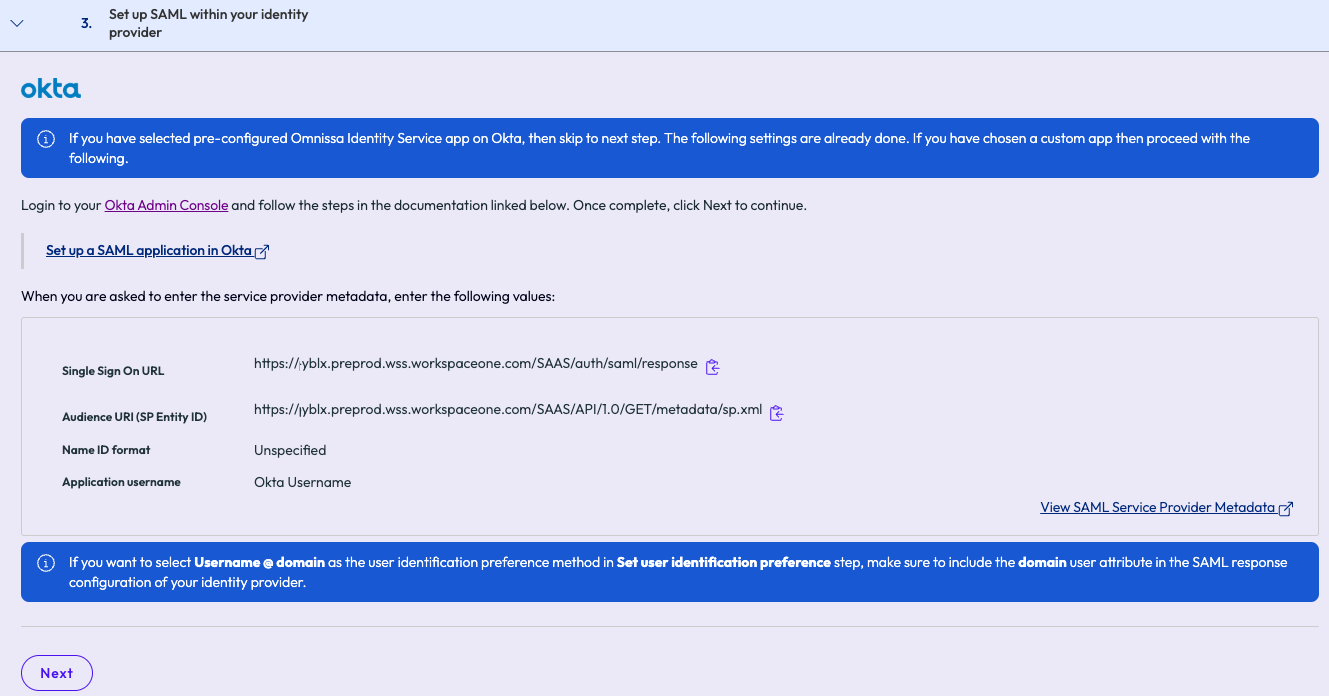
- Copy these URLs and put them into their corresponding fields in Okta.
- Select Next in Omnissa Connect when finished.
- Identity Service app: Skip the Set up SAML within your identity provider tab by selecting Next.
- Return to your Connect instance on the Set up SAML within your identity provider tab and perform one of the listed steps, which depends on if you are using the Identity Service app or creating a custom app in Okta.
- Configure user attributes in Okta.
- In Connect, on the User attributes tab, perform one of the listed steps, which depends on if you are using the Identity Service app or creating a custom app in Okta.
- Identity Service app: Skip the User attributes tab by selecting Next.
- The Identity Service app configures the user attributes for you.
- Custom app: Follow the instructions outlined on the User attributes tab and select Next in Omnissa Connect to move to the next tab.
- Identity Service app: Skip the User attributes tab by selecting Next.
- In Connect, on the User attributes tab, perform one of the listed steps, which depends on if you are using the Identity Service app or creating a custom app in Okta.
- Configure the identity provider in Omnissa Connect.
- Go to Okta, select the Sign On tab in your app, and copy the Metadata URL for pasting into Connect.
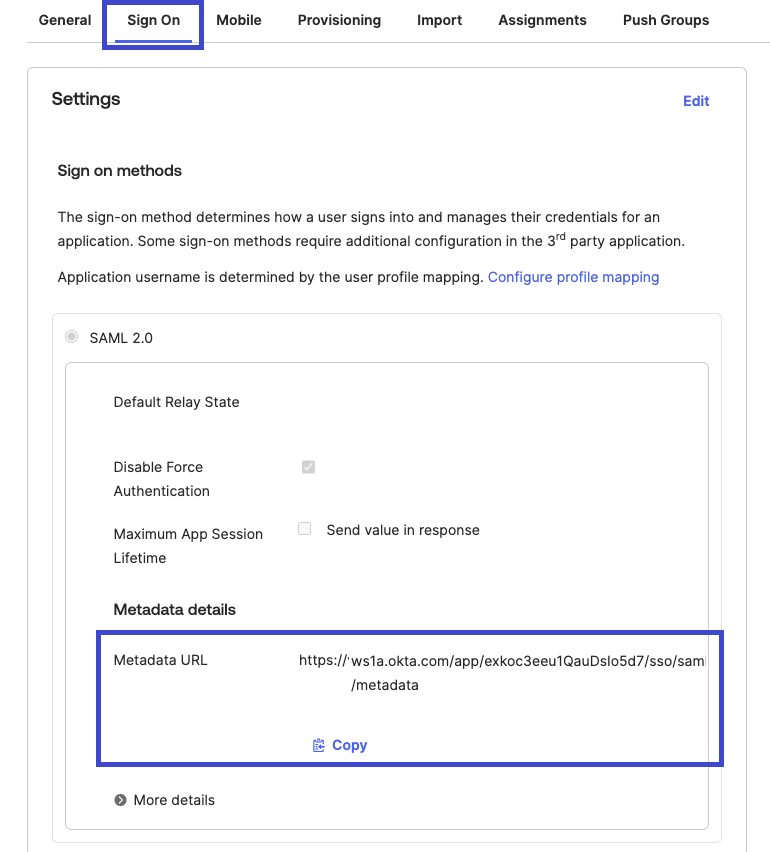
- Back in your Connect instance, configure the Configure your identity provider tab.
- Enter a name in the IdP Display Name text field. You could use Okta SCIM.
- Select the URL radio button for the Metadata menu option.
- Paste the Metadata URL you copied from Okta into the Metadata text field.
- The Name ID Format is preconfigured.
- The Name ID Value is preconfigured.
- Select Next to move to the next tab in Omnissa Connect.
- Go to Okta, select the Sign On tab in your app, and copy the Metadata URL for pasting into Connect.
- Configure user identification preference in Omnissa Connect.
- On the Set user identification preference tab, select how users of your enterprise are going to identify themselves when accessing Omnissa Connect from the Omnissa Connect discovery page.
- User identification is different from how the user authenticates against your enterprise identity provider.
- Follow the examples shown on the screen to choose the correct one.
- Consider that for all the options, the chosen value must end with @DomainName.com where domainName is the one you registered during the verification step.
- Select the preference that users use to sign in through your IdP into Omnissa Connect, their email or their corporate username.
- Select Configure to complete the process.
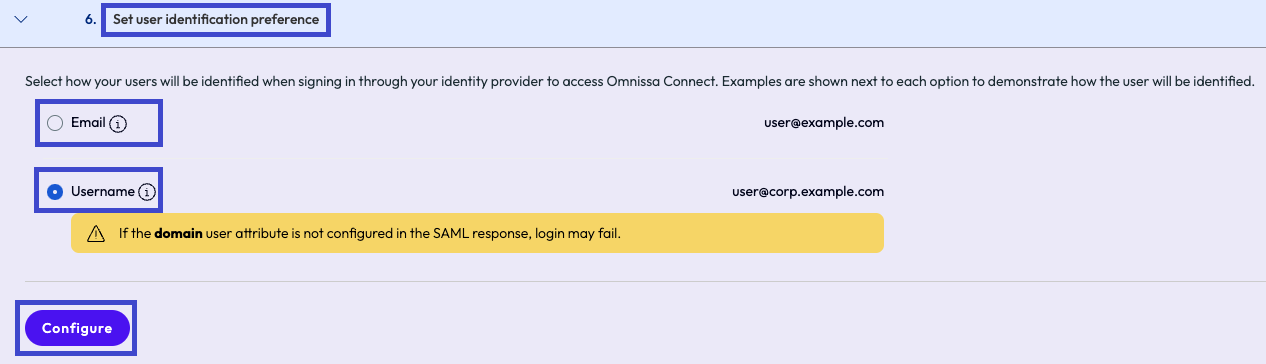
- On the Set user identification preference tab, select how users of your enterprise are going to identify themselves when accessing Omnissa Connect from the Omnissa Connect discovery page.
What to do next
In this step you configured Okta as the IdP, selected the SCIM based user provisioning and SAML user and group claims using preconfigured Identity Service app, and selected the value for user identification.
Move on to validating and activating your setup. After you validate your configuration, you assign users or groups in the Identity Service app so the app can use single sign-on in to Omnissa Connect using IdP credentials.
OIDC
To use OpenID Connect (OIDC) for authentication, you must use both the preconfigured Identity Service app and then create a custom app in Okta.
Prerequisite: Okta well-known endpoint URL
Get your Okta well-known endpoint URL for use when adding your custom app in Omnissa Connect. This URL is used for OIDC discovery and is constructed by combining your Okta domain with the /.well-known/openid-configuration path. The general format is https://<YOUR_OKTA_DOMAIN>.okta.com/.well-known/openid-configuration. To find your Okta well-known endpoint URL, follow the listed steps.
- Sign in to your Okta admin console.
- Locate the Okta domain by selecting your username (currently found in the top right corner of the console).
- Select the drop-down menu in your username information.
- Copy your Okta well-known endpoint URL and have it ready to enter into Omnissa Connect during the creation of the custom app in Okta.
Procedure
To configure Okta in the OpenID Connect (OIDC) protocol for SCIM provisioning, work in both the Omnissa Connect console and in the Okta admin console. It is best to use two browser instances to facilitate copying and pasting values between the consoles.
- Select your identity provider in Omnissa Connect.
- Open a browser instance and go to your Omnissa Connect console.
- Go to Set up Enterprise Federation > Configure identity provider and select Start.
- On the Select your identity provider tab, select these settings and then select Next.
- Identity Provider: Okta
- Provisioning Type: SCIM-based
- Authentication Protocol Type: OpenID Connect
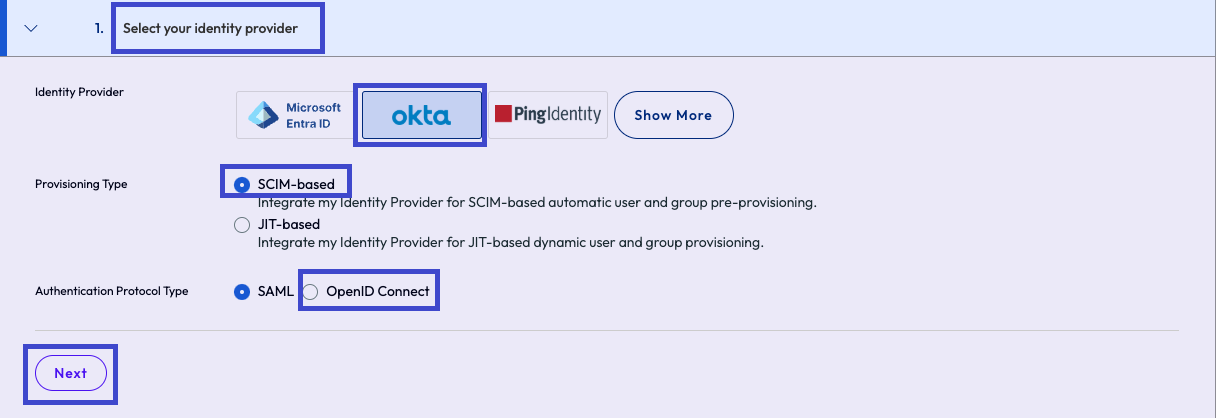
- Keep your Omnissa Connect browser instance open for copying values.
- Add Omnissa Identity Service app to your Okta app catalog.
- Add the preconfigured Identity Service app in Okta by opening another browser instance, going to your Okta console, going to Applications, and selecting the Browse App Catalog menu item.
- In the Okta app catalog, search for Omnissa Identity Service and select the app.
- Select to add the integration.
- In Okta, on the Add Omnissa Identity Service page, General Settings tab, enter a name for the app.
- On this tab, you need the Omnissa Base Url.
- In the next step, you get this URL from Omnissa Connect.
- Leave this Okta instance open.
- Add the preconfigured Identity Service app in Okta by opening another browser instance, going to your Okta console, going to Applications, and selecting the Browse App Catalog menu item.
- Set up Okta for SCIM provisioning with the Identity Servcie app.
- Go to the Connect console, and go to the Set up identity provider for SCIM provisioning tab.
- Copy the Tenant URL for pasting into Okta.
- Select to Generate the Secret Token menu option and record this secret for use for later in this process.
- If you should lose this secret, this page offers to Regenerate the Secret Token.
- Copy the Tenant URL for pasting into Okta.
- Go to your Okta instance and paste the copied Tenant URL into the Add Omnissa Identity Service page, General Settings tab, Omnissa Base Url field.
- In Okta, complete the other General Settings and select Done.
- Still in your Okta instance and working in the Identity Service app you've added, select the Provisioning tab.
- Select Configure API Integration.
- Activate the Enable API integration check box.
- In the API Token text field, paste the secret token you generated in Connect earlier in this process.
- Activate Import Groups check box.
- Select Test API Credentials to ensure proper communication between the systems.
- Save your settings.
- Continue to work in your Okta instance, in the Identity Service app, and on the Provisioning tab. Edit the app to control user provisioning.
- Activate the Create Users check box.
- Decide whether to activate or deactivate Set password when creating new users depending on your needs.
- Activate the Update User Attributes check box.
- Activate the Deactivate Users check box.
- Save your edits.
- Go to the Connect console, and go to the Set up identity provider for SCIM provisioning tab.
- Create the custom app in Okta.
- In Okta, go to Application and select Create App Integration.
- On the Create a new app integration page, set the listed configurations.
- Sign-in method: Select OIDC - OpenID Connect.
- Application type: Select Web Application.
- Select Next.
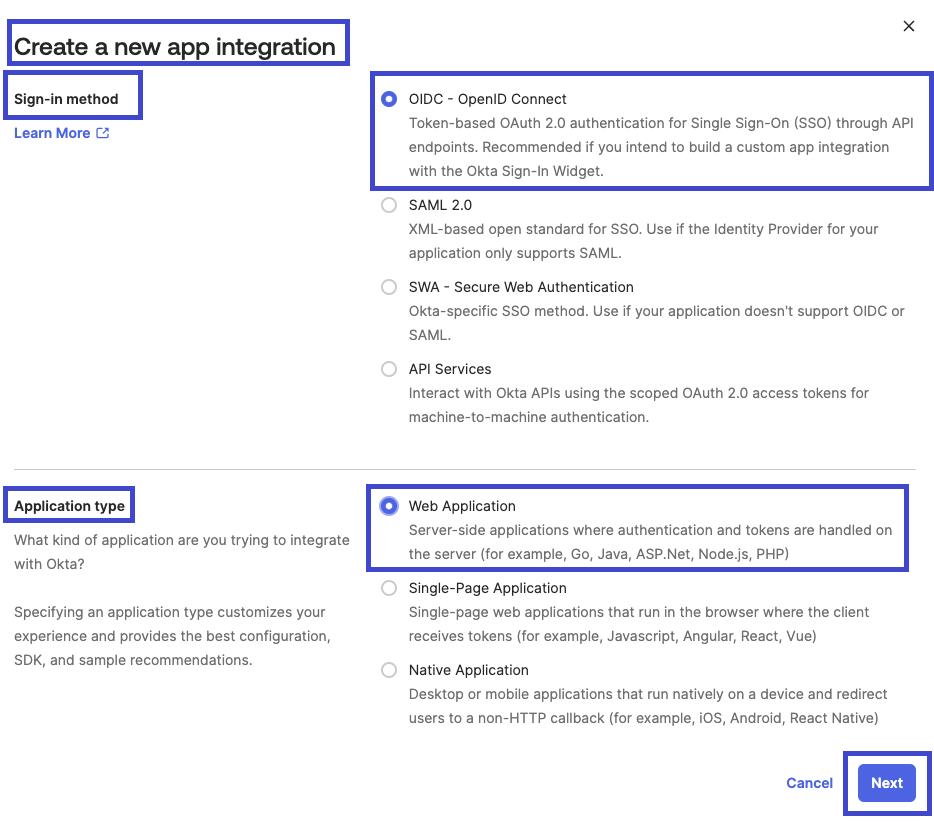
- After Okta creates the app, enter a name for the app.
- Okta prompts you for Sign-in redirect URIs.
- You can get a redirect URI from Omnissa Connect.
- Leave your Okta instance open.
- Configure OIDC in Okta.
- Go to your Connect instance, select the Set up Open ID Connect provider with Redirect URI tab, and copy the Redirect URI from Connect.
- After you copy the Redirect URI, you can select Next to move on to the User attributes tab in the Connect instance.
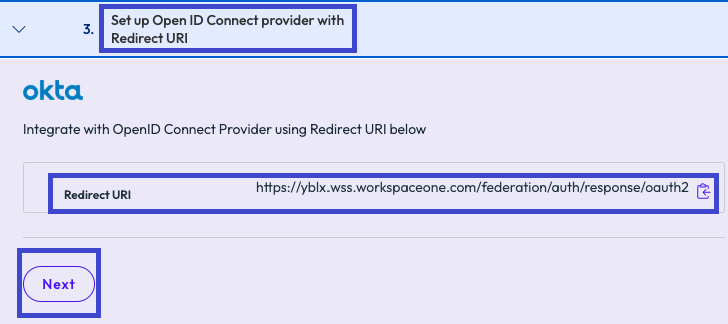
- After you copy the Redirect URI, you can select Next to move on to the User attributes tab in the Connect instance.
- Returning to Okta, paste the redirect URI you copied from Connect into the Sign-in redirect URIs text field and then complete the rest of the settings.
- Configure Sign-out redirect URIs.
- Configure the Assignments section.
- Save the settings.
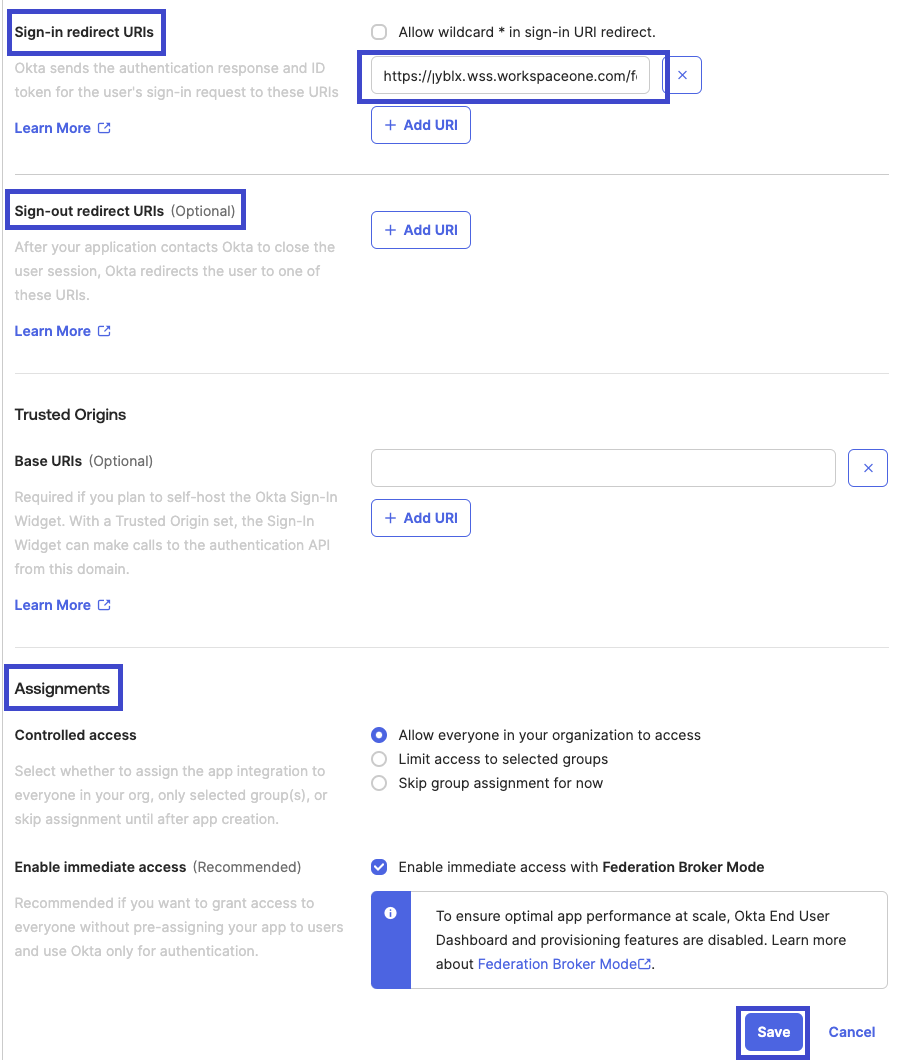
- Go to your Connect instance, select the Set up Open ID Connect provider with Redirect URI tab, and copy the Redirect URI from Connect.
- Configure user attributes in Okta.
- Return to Connect and skip the User attributes tab by selecting Next because the preconfigured Identity Service app already configured the required attributes.
- Configure your identity provider in Omnissa Connect.
- In Connect, in the Configure your identity provider tab, you need to add your Okta well-known endpoint URL in the Configuration URL text field (you retrieved this in the prerequisites).
- You also need your Okta custom app's Client ID and your Okta custom app's Client Secret.
- We'll get these from Okta after adding the well-known endpoint URL.
- Add your Okta well-known endpoint URL into the Configuration URL.
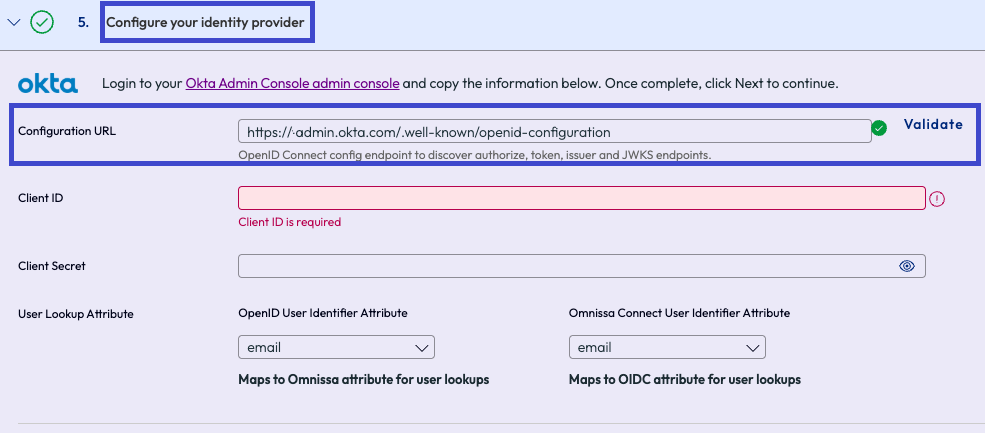
- Go to your Okta instance, go to your Okta custom app, select the General tab, and copy the client ID and client secret for entry into Connect.
- Copy the Client ID.
- Copy the Client Secret.
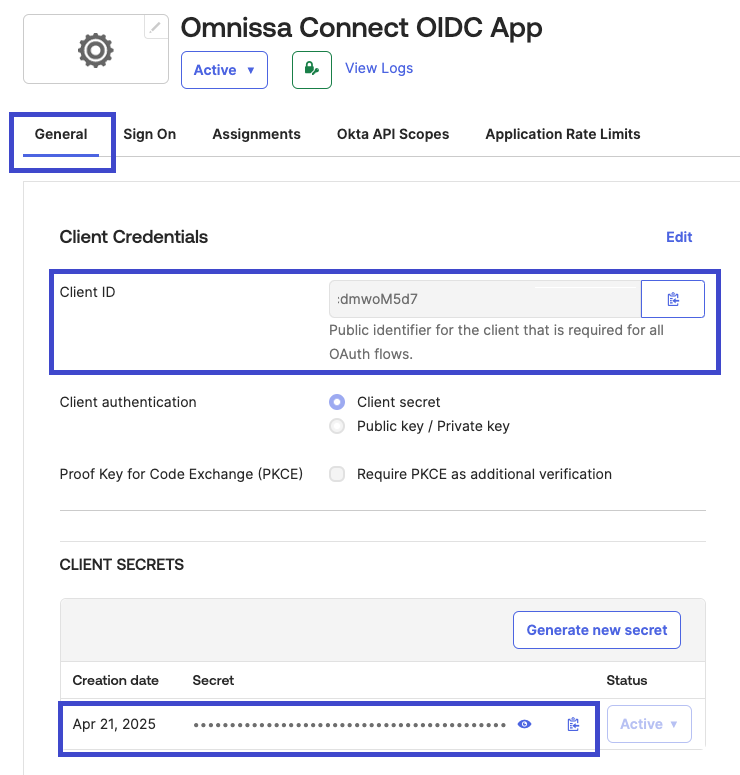
- Back in Connect, paste the Client ID and Client Secret in their respective text fields and then select Next.
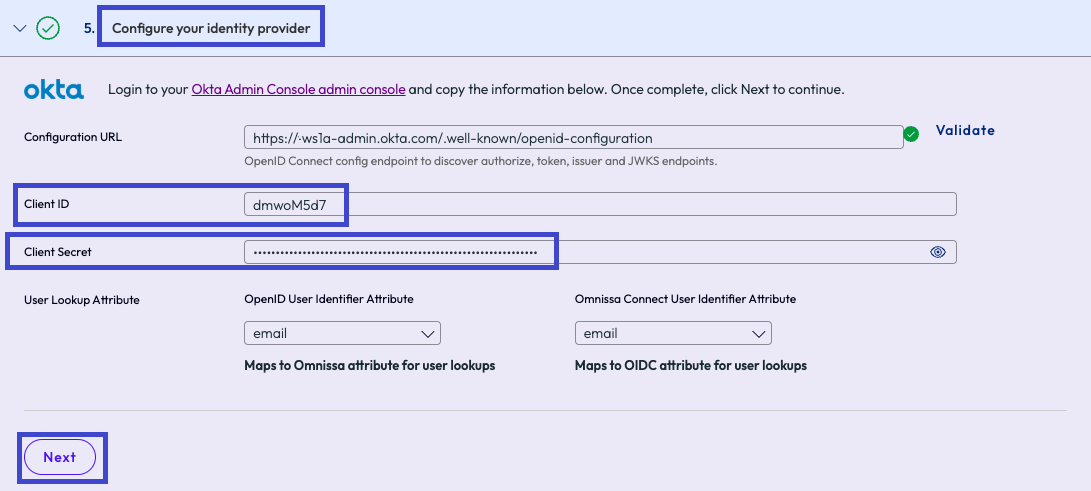
- In Connect, in the Configure your identity provider tab, you need to add your Okta well-known endpoint URL in the Configuration URL text field (you retrieved this in the prerequisites).
- Configure user identification preference in Omnissa Connect.
- On the Set user identification preference tab, select how users of your enterprise are going to identify themselves when accessing Omnissa Connect from the Omnissa Connect discovery page.
- User identification is different from how the user authenticates against your enterprise identity provider.
- Follow the examples shown on the screen to choose the correct one.
- Consider that for all the options, the chosen value must end with @DomainName.com where domainName is the one you registered during the verification step.
- Select the preference that users use to sign in through your IdP into Omnissa Connect, their email or their corporate username.
- Select Configure to complete the process.
- On the Set user identification preference tab, select how users of your enterprise are going to identify themselves when accessing Omnissa Connect from the Omnissa Connect discovery page.
What to do next
In this step you configured Okta as the IdP, selected the SCIM based user provisioning using the preconfigured Identity Service app, configured a custom App for OIDC authentication, and selected the value to be used for user identification.
Move on to validating and activating your setup.
Important: After you have validated your configuration, you assign users or groups in the Okta custom app and in the Identity Service app so that the apps can use single sign-on in to Omnissa Connect using IdP credentials.
Was this page helpful?