If your Omnissa Workspace ONE UEM service is onboarded, as a primary admin, you can complete the onboarding of Workspace ONE UEM and Intelligence to Omnissa Connect by following the listed steps.
1. Access your service and your organization.
- As a primary admin, select the activation link provided in the Welcome email or visit connect.omnissa.com to access your service.
- Only the specific, primary admins have initial access to the organization in Omnissa Connect.
- Logging in to Omnissa Connect, you may have access to multiple organizations, so ensure to access the appropriate services by choosing the corresponding organization.
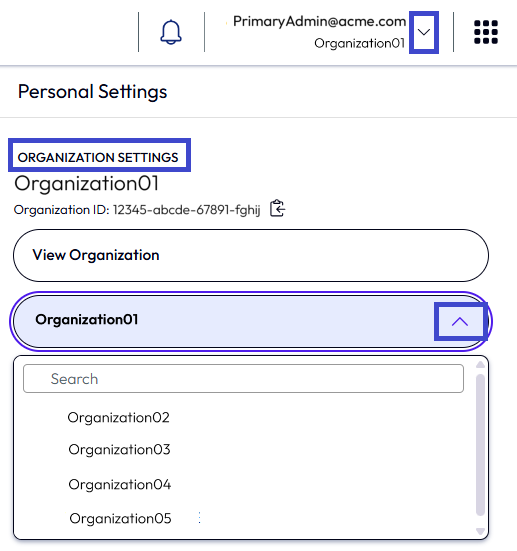
- To change the organization, select the dropdown by your name in the Omnissa Connect header.
- In the Organization Settings section, select the organization drop down.
- Select the organization that houses your Workspace ONE UEM product.
- You can select a default organization to always log in to from your Omnissa Connect Account Settings. This step is optional.
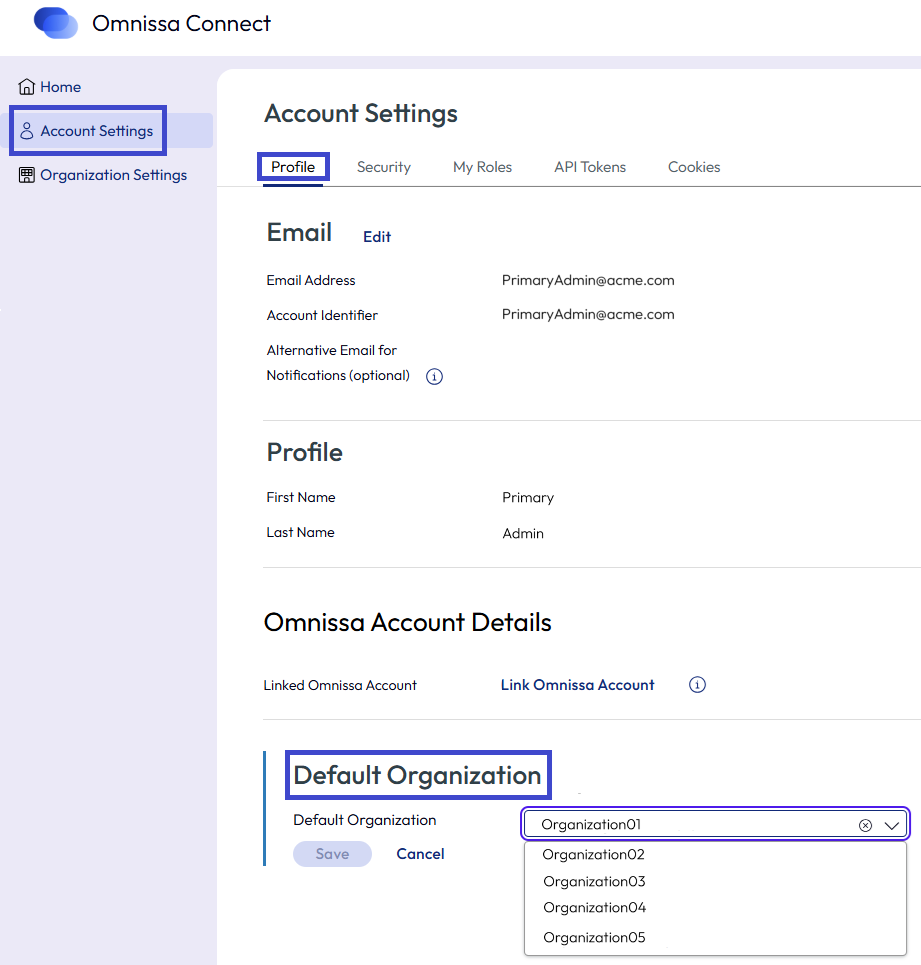
- In the left navigation in Omnissa Connect, select Account Settings.
- On the Profile tab, scroll to the Default Organization area and select Edit.
- Select the organization you want to use every time you log in to Omnissa Connect.
- Save your edit.
2. Launch your Workspace ONE UEM service.
As a primary admin, you must launch the Workspace ONE UEM service from Omnissa Connect to activate the UEM service in Connect.
- From the Home page, find your Workspace ONE UEM service in the Launch Services area.
- Select the UEM tile to launch UEM from Omnissa Connect.
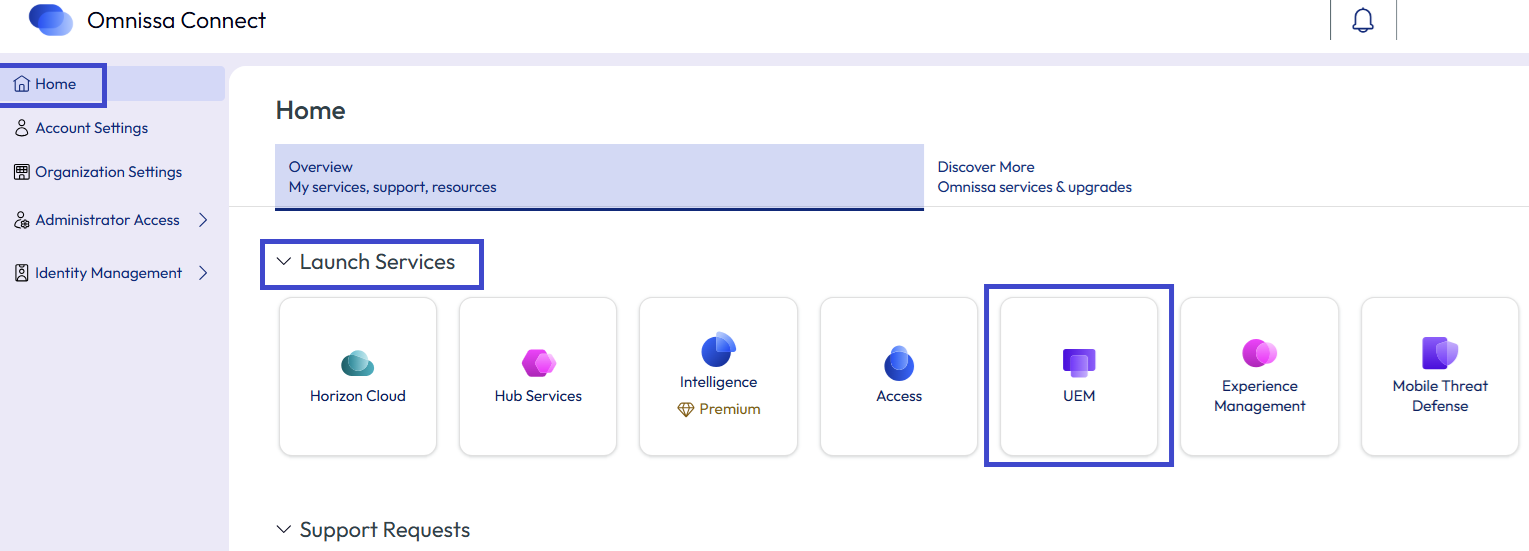
- Selecting UEM launches the UEM console and signs you in with your Omnissa Connect-based identity.
- This sign-in represents a new account and requires setup of a new PIN in UEM.
- You now have more than one account to access UEM, so consolidate your accounts, which is outlined later in this process.
3. Set up federation or multi-factor authentication in Omnissa Connect.
Set up an authentication method in Connect so that your secondary admins and users can securely access your Omnissa services.
Enterprise federation
Omnissa Connect supports enterprise federation. As a primary admin, the onboarding process gave you full Owner access to your organization.
If your organization uses an identity provider (IdP), your organization's domain is not yet federated in Connect, and you want to use enterprise federation, you can begin the enterprise federation self-service process as an Owner.
If you are setting up enterprise federation, perform this step before moving forward with adding secondary admins.
Multi-factor authentication
If you do not use enterprise federation, consider using multi-factor authentication so that admins that use basic authentication have a more secure experience.
4. Review organization and services roles (RBAC).
It is important to understand how Organization and Service roles work in Omnissa Connect to give the appropriate role-based access control (RBAC) to your secondary admins. Omnissa Connect offers a single control plane for RBAC across the Omnissa platform. It is possible to invite someone to Omnissa Connect with access to one or more services and with very specific roles within those services.
5. Add secondary admins to Omnissa Connect.
Admins who were not identified as primary admins are considered secondary admins. Pick a method to invite your secondary admins to Connect.
- Method 1: Invitations - For those organizations that are not federated and have small numbers of secondary admins, you can select to invite admins individually or using admin groups.
- Method 2: Onboarding wizard - For those organizations that are federated and have large numbers of secondary admins, use the onboarding wizard.
Method 1: Invitations
Primary admins invite secondary admins to the organization with the appropriate roles and service access, either individually or as part of admin groups.
The secondary admin receives a Welcome email to access Omnissa Connect. They can also visit connect.omnissa.com to access the service. After the secondary admin accesses the service in Connect, they have more than one account to access UEM and Intelligence. To consolidate accounts, they follow the steps outlined in the Consolidate your UEM and Omnissa Connect accounts section.
Method 2: Onboarding wizard
Primary admins can use the Omnissa Connect onboarding wizard to migrate up to 100 secondary admins at a time from Omnissa Workspace ONE UEM to Omnissa Connect.
See the topic Onboarding Wizard for prerequisites and details on how to use the wizard.
6. Consolidate your UEM and Omnissa Connect accounts.
In both the primary and secondary admins flows, the admin may initially have two separate accounts. One account is the UEM-based account and the other account is with Omnissa Connect. Potentially, each account can have unique Intelligence data associated with it. 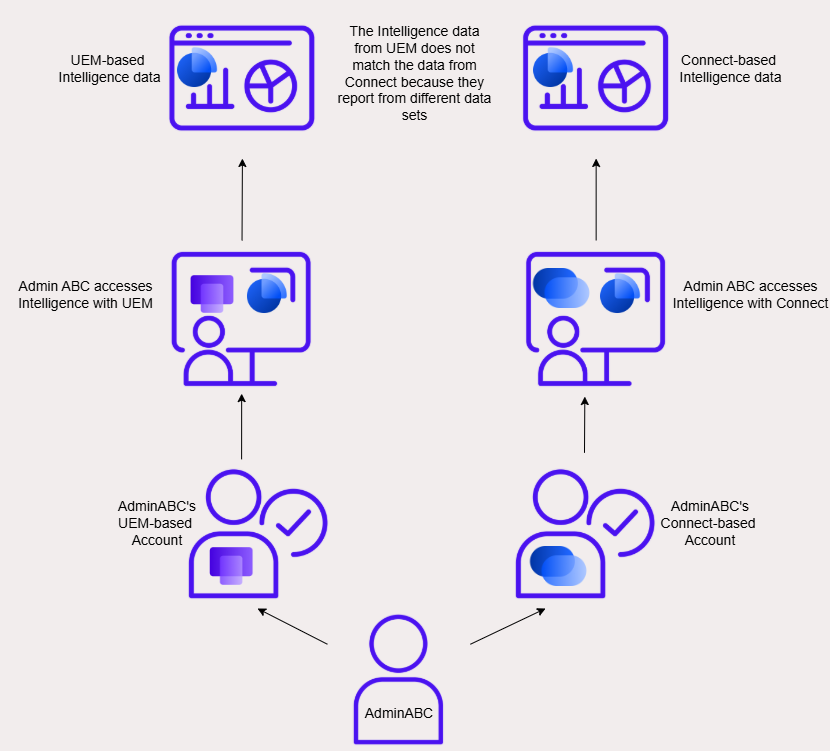
You can merge the UEM-Intelligence data with the Connect-Intelligence data.
What happens after you merge?
After you transfer your UEM-Intelligence account data to your Connect-Intelligence account, you still have two paths for logging into your UEM and Intelligence services, either through UEM or through Connect. However, both accounts are now associated with the same Intelligence data set. The UEM-based account and the Connect-based account share the same Intelligence dashboards and reports. 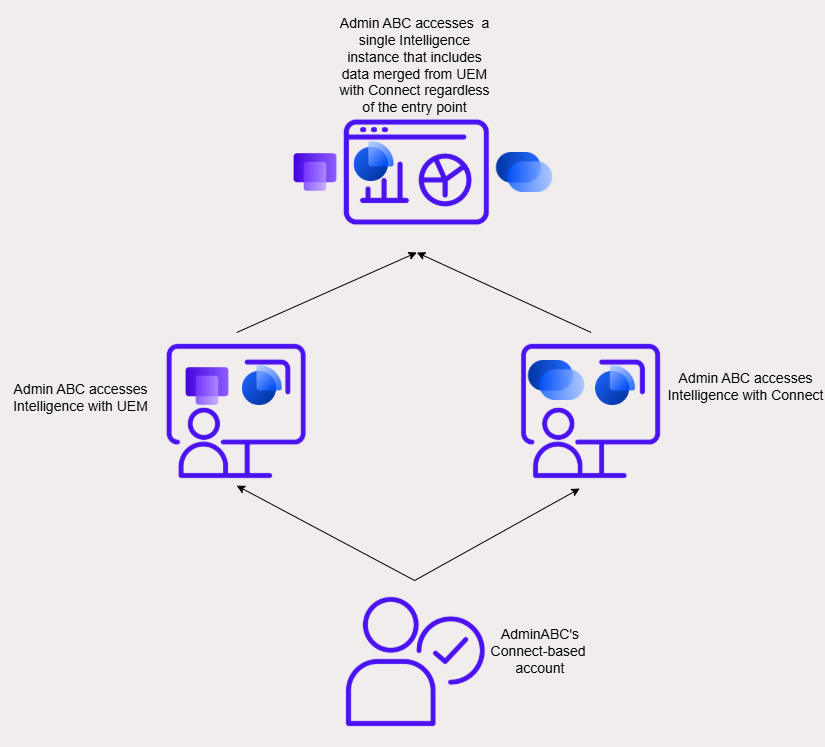
See the Considerations section for important details about what happens when you merge your UEM-Intelligence data with your Connect-Intelligence data.
Considerations
- You can only transfer UEM-Intelligence data to a single Connect account one time.
- If an Omnissa Connect account has Intelligence data, you can only merge the Intelligence data from one UEM account with the Intelligence data in this single Omnissa Connect account one time.
- You cannot merge or transfer Intelligence data from two or more UEM accounts with the Intelligence data in a single Omnissa Connect account.
- The dashboards and reports from your UEM-Intelligence account are brought over to your Omnissa Connect account.
- You can do this transfer or merge only once.
- After you consolidate your accounts, you cannot revert the consolidation.
- If there is no need to transfer Intelligence reports and dashboards to the new account, an admin can choose to bypass consolidation.
- Important: If you delete a UEM account and do not merge or transfer the Intelligence data to your Connect account, all the data associated with the UEM account is lost.
Procedure
To transfer or merge UEM-Intelligence dashboards and reports to an Omnissa Connect account, follow the listed steps.
The system prompts you to request an Omnissa Connect account when it identifies that you do not yet have one.
- Log in to Workspace ONE UEM with your UEM account.
- Launch Omnissa Intelligence.
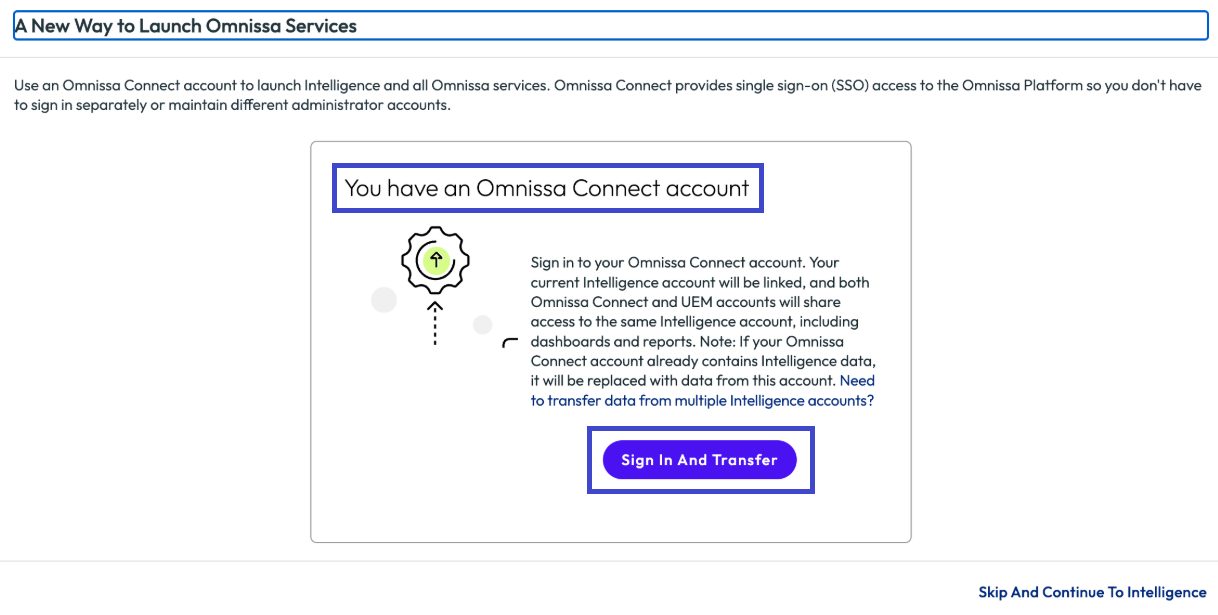
- You see one of the listed pop-up messages depending if you have an Omnissa Account or not.
- You have an Omnissa Connect account: Select to Sign In and Transfer and follow the widget to link your current UEM-Intelligence account data with your Omnissa Connect account.
- Request an Omnissa Connect Account: Request an invitation to your business's Connect organization by entering your email address and selecting Request Account.
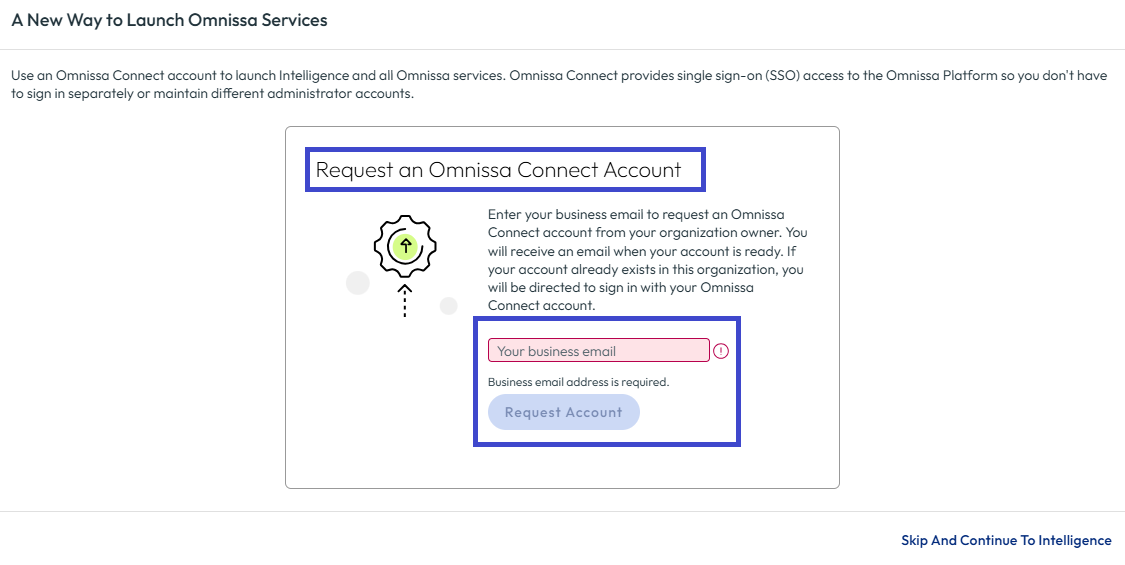
- The system notifies the Owner about your request.
- After the Owner approves the request, the system sends you a welcome email to use to access your Omnissa Connect account.
- You can then transfer your UEM-Intelligence data to the new Connect account following this procedure.
- You have an Omnissa Connect account: Select to Sign In and Transfer and follow the widget to link your current UEM-Intelligence account data with your Omnissa Connect account.
7. Clean up authentication paths and unnecessary admins.
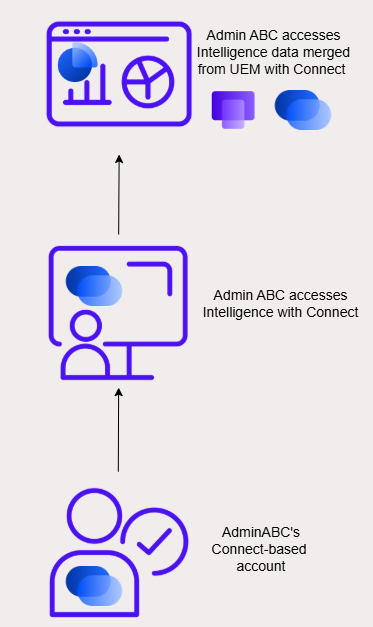
The goal is to have a single authentication path into the Omnissa platform.
After secondary admins have the appropriate access through Omnissa Connect, it is best to remove older, unnecessary UEM-based admin accounts. For details on how to deactivate or delete admins from UEM, see Admin Account List View.
Break glass account
Consider leaving a break glass account (emergency access account) in either Omnissa Connect or UEM.
- If federation has been configured for your domain, a break glass account will need to have a different domain.
- If using Omnissa Connect, use basic authentication for this account and secure the account with permissions and additional access policies like multi-factor authentication (MFA).
- If your emergency access account needs access to Intelligence, use Omnissa Connect.
- If using UEM, add a basic administrator and configure MFA.
- However, for UEM-based accounts, admins can only access UEM and can not launch Intelligence.
Next steps
Review the ways your admins can access Omnissa Intelligence depending on the onboarding status.
Was this page helpful?