When you plan to use a Public Windows Server Amazon Workspaces Core bundle, as the base of a single-session desktop, review the AWS prerequisites for using a Public Bundle.
-
On the AWS WorkSpaces screen, provision a Public bundle of Windows Server WorkSpaces Core instance as an Always On instance, or use the CLI to create a Manual instance.
- Always On - Billed per month based on calendar date.
- Manual/Power Optimized - Billed hourly and can be suspended when not in use.
-
The directory used for Server OS needs to be a shared directory (not dedicated for VDI).
Note: Use the UI to launch an Always On instance or use cloudshell to launch a Manual (hourly billing) or decoupled (no user) instance to customize.
Example of cloudshell command:
aws workspaces create-workspaces --workspaces DirectoryId=d-XXXXXXXX,UserName="'[UNDEFINED]'",BundleId=wsb-XXXXXXX,WorkspaceProperties={RunningMode=MANUAL},WorkspaceName=XXXXXXXXwhereDirectoryIDis the directory in which you want to place the WorkSpace instanceBundleIDis the bundle you want to make a copy of (the Windows Server OS)WorkSpaceNameis customizable
-
Use RDP to go to the WorkSpace instance and do the customizations.
-
While in the RDP of that instance, install the Horizon Agent as described in Prepare Windows Server Operating Systems for Desktop Use.
Note: You must do Step 5 in Prepare Windows Server Operating Systems for Desktop Use to configure the Horizon Console to treat Windows Servers as supported desktop operating systems so the Connection Server sees the server-based image as a single-session desktop.
-
Switch to the Horizon Console. Go to Registered Machines > Others UI, select the machine and Set Golden Image on that machine.
This Set Golden Image action registers the instance from Step 4 with the Connection Server. This action provides for the pairing of the Horizon Agent with the Connection Server.
Note: Before clicking Set Golden Image, verify the displayed DNS name matches the DNS name of the machine in the AWS console.
-
If the image hasn't been restarted after installing the Horizon Agent, switch back to the WorkSpaces instance from Step 4 and restart that instance.
-
On the WorkSpaces screen, navigate to that rebooted instance's details and then convert the instance to an AWS WorkSpaces image using the Workspaces UI's Create image action. This clones the now-paired instance that has the Horizon Agent to a WorkSpaces image. The Amazon WorkSpaces UI uses the Action Create image for this cloning process.
-
When the image from Step 7 has an Available status on the Workspaces screen, create a bundle from that image, which combines that image with your desired hardware type for the pool's machines.

The hardware type selected is dependent on the original hardware type selected for the bundle created in Step 2. The hardware type chosen here is the one that the pool's machines will have.
The following screenshot is an example of performing the Create bundle menu option on an image named TPCS02GP. In the New bundle UI, you select the hardware options for the bundle.
Tip: To distinguish the bundles that have the Horizon Agent installed from the other bundles in the WorkSpaces UI's Bundles list, use the bundle's description to keep notes. For example,
Horizon Agent installed.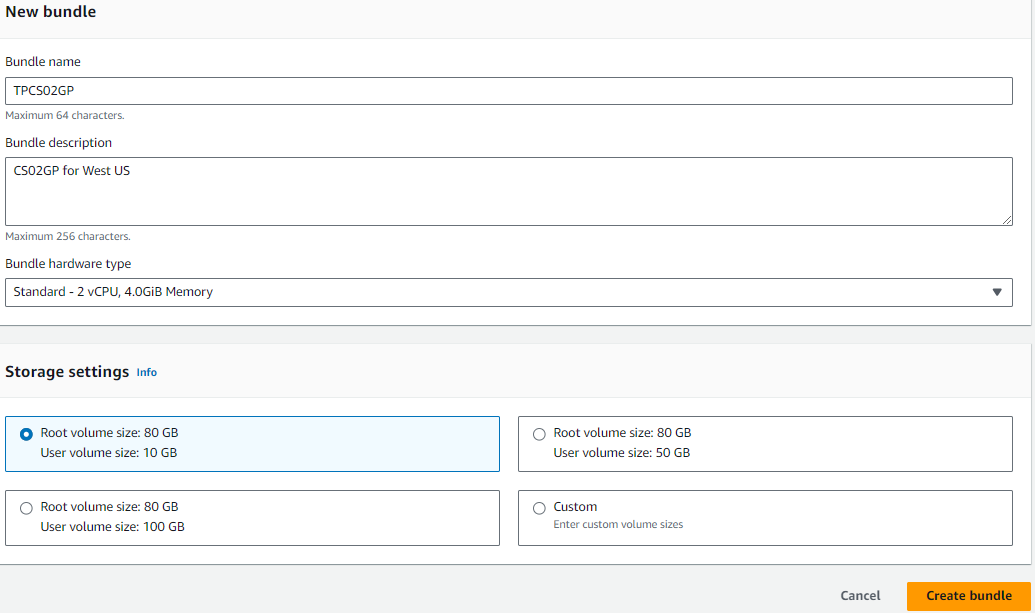
After the bundle is created, verify that the status is Available. The following image shows that the bundle with ID
wsb-xttnbll2jis Available.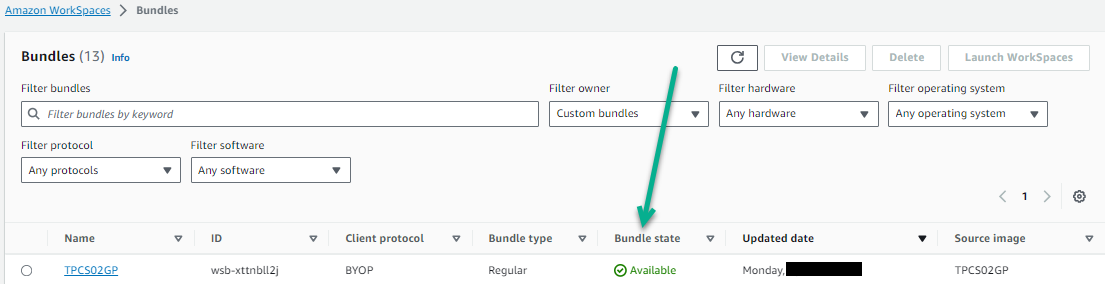
A bundle is created which is the combination of the golden image with Horizon Agent and the hardware type for the desktop pool.
-
In the Automated Desktop Pool wizard, select that bundle as the source of the pool's desktops.
Was this page helpful?