Workspace ONE UEM supports several different methods to enroll your Windows devices. Learn which enrollment workflow best services your needs based on your Workspace ONE UEM deployment, enterprise integrations, and device operating system.
Enrollment Basics
The enrollment methods use either the native MDM functionality of the Windows operating system, Workspace ONE Intelligent Hub for Windows, or Azure AD integration.
-
Workspace ONE Intelligent Hub for Windows Enrollment
The simplest enrollment workflow uses Workspace ONE Intelligent Hub for Windows to enroll Windows Desktop and Windows Server devices. Simply download Workspace ONE Intelligent Hub from getwsone.com and follow the prompts to enroll. This enrollment flow is supported on Windows Desktop and Windows Server devices. Consider using Workspace ONE Intelligent Hub for the Windows Enrollment workflow. Workspace ONE UEM supports additional enrollment flows that meet specific use cases.
-
Azure AD Integration Enrollment
Through integration with Microsoft Azure Active Directory, Windows devices automatically enroll into Workspace ONE UEM with minimal end-user interaction. Azure AD integration enrollment simplifies enrollment for both end users and admins. Azure AD integration enrollment supports three different enrollment flows: Join Azure AD, Out-of-Box-Experience enrollment, and Office 365 enrollment. All methods require configuring Azure AD integration with Workspace ONE UEM. This enrollment flow is supported on Windows Desktop devices only.
Before you can enroll your devices using Azure AD integration, you must configure Workspace ONE UEM and Azure AD.
-
Native MDM Enrollment
Workspace ONE UEM supports enrolling Windows Desktop devices using the native MDM enrollment workflow. The name of the native MDM solution varies based on the version of Windows. This enrollment flow changes based on the version of Windows. This enrollment flow is supported on Windows Desktop devices only.
Only users with local admin permissions on the device can enroll a device into Workspace ONE UEM and enable MDM.
-
Device Staging
If you want to configure device management on a Windows device before shipping it to your end user, consider using Windows Desktop device staging. This enrollment workflow allows you to enroll a device through Workspace ONE Intelligent Hub, install device-level profiles, and then ship the device to end users. The two methods of device staging are manual installation and command-line installation. Manual installation requires devices to be domain-joined to an Azure AD integration. Command-line installation works for all Windows devices. This enrollment flow is supported on Windows Desktop devices only.
-
Windows Desktop Auto-Enrollment
Workspace ONE UEM supports the auto-enrollment of specific Windows Desktop devices. Auto-enrollment simplifies the enrollment process by automatically enrolling registered devices following the Out-of-Box-Experience. This enrollment flow is supported on Windows Desktop devices only.
-
Bulk Provisioning and Enrollment
Bulk provisioning creates a pre-configured package that stages Windows Desktop devices and enrolls them into Workspace ONE UEM. Bulk provisioning requires downloading the Microsoft Assessment and Development Kit and installing the Imaging and Configuration Designer tool. This tool creates the provisioning packages used to image devices. This enrollment flow is supported on Windows Desktop devices only.
With the bulk provisioning workflow, you can include Workspace ONE UEM settings in the provisioning package so that provisioned devices automatically enroll during the initial Out-of-Box Experience.
-
Registered Mode Devices - Enroll Without OMA DM
To allow Windows Desktop devices to enroll into Workspace ONE UEM without OMA DM-based device management services, you can enable Registered Mode. Windows Server devices always enroll as Registered Mode devices as there is no OMA DM management agent on Windows Server. Simply assign this mode to an entire organization group and enroll Windows Server devices into that organization group. Alternatively, create smart groups that only include Windows Server devices and enroll Windows Server devices into that organization group. Smart group membership will be triggered for those devices and the enrollment mode applied.
-
Intelligent Hub Managed mode enrollment
A Windows enrollment mode that delivers full Intelligent Hub-based management for devices that cannot use native OMA DM management or is transitioning from another OMA DM-based management tool.
-
Focused Enrollment
Workspace ONE UEM supports Focused Enrollment for Windows devices, enabling IT administrators to restrict device access during the Post-Enrollment Onboarding (PEO) experience.
Workspace ONE Intelligent Hub for Windows Enrollment
Workspace ONE Intelligent Hub provides a single resource for enrollment and facilitates communication between the device and the Workspace ONE UEM console. Use Workspace ONE Intelligent Hub to enroll your Windows Desktop and Server devices with a simplified enrollment flow that is quick and easy.
If you have Workspace ONE configured, downloading Workspace ONE Intelligent Hub from https://getwsone.com/ also downloads the Workspace ONE app. When you finish enrolling a Windows Desktop device with Workspace ONE Intelligent Hub, the Workspace ONE app auto-launches and configures based on your Workspace ONE UEM deployment.
The Workspace ONE Intelligent Hub provides extra functionality to your Windows Desktop devices including location services.
AirWatch Cloud Messaging (AWCM) enables real-time policy and command delivery to Workspace ONE Intelligent Hub. Without AWCM, Workspace ONE Intelligent Hub only receives policy and command delivery during its normal check-in intervals set in the Workspace ONE UEM console. Consider using AWCM for real-time policy and command delivery to Windows Desktop devices.
Procedure to Enroll with the Workspace ONE Intelligent Hub
- On the Windows Desktop and/or Windows Server device, navigate to https://getwsone.com.
- Install Workspace ONE Intelligent Hub. When the installation is finished, start Workspace ONE Intelligent Hub.
- If using Windows Auto-Discovery, enter the email address and select Next.
- If you are not using Windows Auto-Discovery, complete the following settings.
- Enter the Server URL and select Next.
- Enter the Group ID and select Next.
- Enter the Username and Password.
- Accept the terms of use.
- Select Done.
- If enrolling a Windows Desktop and/or Windows Server devices, open Workspace ONE Intelligent Hub and complete the enrollment.
Intelligent Hub Application Version Control
This feature gives administrators control over which version of the Intelligent Hub is installed on Windows devices, including both Win32 and ARM platforms. Once enabled (available upon request via Omnissa Support or your Account Team), the setting Intelligent Hub Automatic Updates in the UEM Console (System Settings > Devices & Users > Microsoft > Windows > Intelligent Hub Application) is renamed to Use Intelligent Hub Version Control. A new section called Intelligent Hub Target Seeding appears, allowing version selection per Organizational Group (OG).
Administrators can assign a specific version to a production OG to ensure consistency, while using the latest available version in a test OG to validate new GA or Beta builds. Once testing is complete, the production OG can be updated to the new version. This setting applies immediately for newly enrolled devices (including OOBE and Autopilot), and existing devices running an older version will update automatically but that process may take up to 48 hours. Devices already running a newer version will not be downgraded, Intelligent Hub downgrades are not supported.
If Intelligent Hub Automatic Updates was enabled before the feature was activated, the new setting will also be enabled automatically, and the version will default to Latest available, maintaining the current behavior. If the original setting was disabled, the new version control setting will also remain disabled.
This feature enables Intelligent Hub updates to be deployed independently of Workspace ONE UEM updates. Administrators gain direct access to new GA and Beta versions without needing to wait for console upgrades. Additionally, Beta versions no longer require manual download and upload which makes testing significantly easier. The version control system supports both Intel/AMD (Win32) and ARM-based Windows devices, streamlining Hub deployment across all hardware types.
Workspace ONE UEM and Azure AD Integration
Through integration with Microsoft Azure Active Directory, you can automatically enroll your Windows devices into Workspace ONE UEM with minimal end-user interaction. Learn how Azure AD integration simplifies enrolling your Windows devices.
Note: A device is supported only if the device is joined to either Microsoft Entra ID or a local Active Directory domain. Switching between these states, such as joining Microsoft Entra ID and then later joining a local Active Directory domain, or vice versa is not supported.
Before you can enroll your devices using Azure AD Integration, you must configure Workspace ONE UEM and Azure AD. The configuration requires entering information into your Azure AD and Workspace ONE UEM deployments to facilitate communication. Setup is different depending on your environment. Follow the appropriate procedure for your SaaS or on-premises deployment.
Azure AD integration enrollment supports three different enrollment flows.
- Join Azure AD
- Out-of-Box Experience enrollment
- Office 365 enrollment
All methods require configuring Azure AD integration with Workspace ONE UEM.
Important: Enrollment through Azure AD integration requires Windows and Azure Active Directory Premium License.
SaaS Environments: Azure AD as an Identity Service
Before you can use Azure AD to enroll your Windows devices, you must configure Workspace ONE UEM to use Azure AD as an identity service. Enabling Azure AD requires entering data in both the Azure Management Portal and in Workspace ONE UEM. Use tabs in your browser to have both instances open to help with entering data in both consoles.
Prerequisites
- You must have a Premium Azure AD P1 or P2 subscription to integrate Azure AD with Workspace ONE UEM.
- Azure AD integration with Workspace ONE UEM must be configured at the tenant where Active Directory (such as LDAP) is configured. -If you have a custom domain name associated with your Saas instance, please refer to the next section (On-Premises Environments or SaaS Environment with a Custom Domain Name) for those specific instructions instead.
Important: Configure and Save LDAP First
If you are setting the Current Setting to Override on the Directory Services system settings page in Workspace ONE UEM, you must configure and save the LDAP settings before enabling Azure AD for identity services.
Procedure
- In Workspace ONE UEM, enable the integration with Azure AD, enter the Azure AD Tenant ID, and retrieve MDM enrollment URLs to enter into Azure.
- Select the applicable organization group.
- Navigate to Groups & Settings > All Settings > System > Enterprise Integration > Directory Services.
- On the Server tab, enable Azure AD Integration.
- In another tab in your browser, log in to the Azure Management Portal with your Microsoft account or organizational account to get the Azure AD Tenant ID.
- Select Azure Active Directory to view the Overview page.
- Copy the Azure AD Tenant ID from the Azure AD Overview page
- Go back to the Workspace ONE UEM console instance and paste the Azure AD Tenant ID into in the Directory ID text box.
- Continuing in the Workspace ONE UEM instance, enable Use Azure AD For Identity Services.
Note the MDM discovery URL and the MDM Terms of Use URL because you must enter them into Azure. You can copy them between tabs if you are using multiple browser tabs or consider copying them somewhere on your PC.
- In Azure AD, add the Workspace ONE UEM app and add the MDM URLs.
- In the Azure Management Portal instance, select your directory and navigate to the Mobility (MDM and MAM) tab.
- Select Add Application, select the AirWatch app, and choose Add.
- Select the AirWatch app that you just added to change the MDM user scope to All.
- Copy your MDM Terms of Use URL from your PC or from the browser tab with the Workspace ONE UEM instance, and paste it into the MDM terms of use URL text box in Azure.
- Copy your MDM discovery URL from your PC or from the browser tab with the Workspace ONE UEM console instance and paste it into the MDM discovery URL text box in Azure.
- Save your settings.
- In Workspace ONE UEM, enter the Azure AD Primary domain and save the settings.
- In the Azure Management Portal instance, go to the Azure AD Overview page and copy the Primary domain from the Azure AD Overview page.
- On the browser tab with the Workspace ONE UEM console instance, paste the Primary domain string in the Tenant Name text box.
- Save the settings on the Workspace ONE UEM Directory Services page.
- In Azure, assign premium licenses.
- In the Microsoft Azure console, select Azure Active Directory > Licenses.
- Select All Products and select the proper license in the list.
- Select Assign, select the users or groups for the license, and select Assign to complete the process.
On-Premises Environments or SaaS Environment with a Custom Domain Name: Azure AD as an Identity Service
Before you can use Azure AD to enroll your Windows devices, you must configure Workspace ONE UEM to use Azure AD as an identity service. Enabling Azure AD requires entering data in both the Azure Management Portal and in Workspace ONE UEM. Use tabs in your browser to have both instances open to help with entering data in both consoles.
Prerequisites
- You must have a Premium Azure AD P1 or P2 subscription to integrate Azure AD with Workspace ONE UEM.
- Azure AD integration with Workspace ONE UEM must be configured at the tenant where Active Directory (such as LDAP) is configured.
- In the Azure Active Directory portal, add a custom domain for your domain name with Microsoft Azure. Follow Microsoft's documentation at Add your custom domain name using the Azure Active Directory portal.
Important: Configure and Save LDAP First
If you are setting the Current Setting to Override on the Directory Services system settings page in Workspace ONE UEM, you must configure and save the LDAP settings before enabling Azure AD for identity services.
Procedure
- In Workspace ONE UEM, enable the integration with Azure AD, enter the Azure AD Tenant ID, and retrieve MDM enrollment URLs to enter into Azure.
- Select the applicable organization group.
- Navigate to Groups & Settings > All Settings > System > Enterprise Integration > Directory Services.
- On the Server tab, enable Azure AD Integration.
- In another tab in your browser, log in to the Azure Management Portal with your Microsoft account or organizational account and get the Azure AD Tenant ID.
- Select Azure Active Directory to view the Overview page.
- Copy the Azure AD Tenant ID from the Azure AD Overview page.
- Go to the Workspace ONE UEM console instance and paste the Azure AD Tenant ID into in the Directory ID text box.
- Continuing in the Workspace ONE UEM instance, enable Use Azure AD For Identity Services.
Note the MDM discovery URL and the MDM Terms of Use URL because you must enter them into Azure. You can copy them between tabs if you are using multiple browser tabs or consider copying them somewhere on your PC.
- In Azure AD, add the on-premises version of the Workspace ONE UEM app and add the MDM URLs.
- In the Azure Management Portal instance, select your directory and navigate to the Mobility (MDM and MAM) tab.
- Select Add Application and select the On Premises MDM app. Then, choose Add.
- Select the On Premises MDM app that you just added to set the MDM user scope to All or Some.
- Select a group of users.
- Copy your MDM Terms of Use URL from your PC or from the browser tab with the Workspace ONE UEM instance, and paste it into the MDM terms of use URL text box in Azure.
- Copy your MDM discovery URL from your PC or from the browser tab with the Workspace ONE UEM console instance and paste it into the MDM discovery URL text box in Azure.
- Save your settings.
- In the Azure Management Portal, add your Workspace ONE UEM device services URL.
- In the Workspace ONE UEM instance, go to Groups & Settings > All Settings > System > Advanced > Site URLs and copy your Device Services URL.
- In the Azure Management Portal instance, select On-Premises MDM application settings > Expose an API.
- Select Edit for Application ID URI and enter your device services URL in the Application ID URI text box.
- Save the settings.
Note: Saving the settings works if you performed the prerequisite task of adding a custom domain name. If you see an error, check that you added your custom domain to Azure.
- In Workspace ONE UEM, enter the Azure AD Primary domain and save the settings.
- In the Azure Management Portal instance, go to the Azure AD Overview page and copy the Primary domain from the Azure AD Overview page.
- In the Workspace ONE UEM console instance, paste the Primary domain string in the Tenant Name text box.
- Save the settings on the Workspace ONE UEM Directory Services page.
- In Azure, assign premium licenses.
- In the Microsoft Azure console, select Azure Active Directory > Licenses.
- Select All Products and select the proper license in the list.
- Select Assign, select the users or groups for the license, and select Assign to complete the process.
Enroll a Device with Azure AD
Enroll devices with Azure AD integration to enroll a device into the correct organization group in Workspace ONE UEM automatically. Devices enrolled through Azure AD join completely, meaning all users on the device join the domain.
This enrollment flow is for devices not already joined to Azure AD.
Procedure
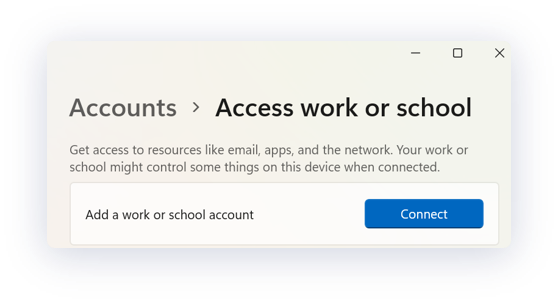
- Navigate on the Windows device to Settings > Accounts > Access Work or School. Select Continue.
- Enter your Email Address. Select Next.
- Ensure that the Workspace ONE UEM welcome page displays. Select Continue.
- Select Accept if terms of use are enabled.
- Select Join to confirm that you want to enroll in Workspace ONE UEM.
- Select Finish to complete joining your device to Workspace ONE UEM. Your device now downloads the applicable policies and profiles.
Enroll an Azure AD Managed Device into Workspace ONE UEM
Devices that are joined to Azure AD use a different enrollment flow than devices enrolling through Azure AD integration. Use this enrollment flow to enroll a device that is already joined to Azure AD into Workspace ONE UEM.
Prerequisites
- Windows OS build 14393.82 and above.
- KB update KB3176934 installed.
- No MDM applications installed under your Azure AD management portal.
- Azure AD account configured on the device.
Procedure
-
On the device, navigate to Settings > Accounts > Access work or school and select Enroll only in device management. You may also enroll through the Workspace ONE Intelligent Hub for Windows.
-
Complete the enrollment process. You must enter an email address with a different domain than your Azure AD account. If you are not using Windows Auto-Discovery, refer to Enroll Through Work Access.
-
Navigate to Settings > Accounts > Access work or school and ensure that there is an Azure AD account and a Workspace ONE UEM MDM account added.
Enroll Through Out of Box Experience
Out of Box Experience (OOBE) enrollment automatically enrolls a device into the correct organization group as part of the initial setup and configuration of a Windows device.
Important: The OOBE enrollment flow does not support Enterprise Wipe. If you perform an enterprise wipe, users cannot log into the device as connection to Azure AD has been broken. You must create a local admin account before sending an Enterprise Wipe or you get locked out of the device and forced to reset the device.
Note: The custom settings profiles cannot be tracked during OOBE and will not apply during provisioning.
Prerequisites
The OOBE process can take some time to complete on end-user devices. Consider enabling the progress display for the install status. This display allows end users to know where they are in the process. To enable the display, navigate to Groups & Settings > All Settings > General > Enrollment > Optional Prompt. To display the status of profiles during enrollment, you must enabled the Track Profile Status during OOBE Provisioning option in the General profile settings.
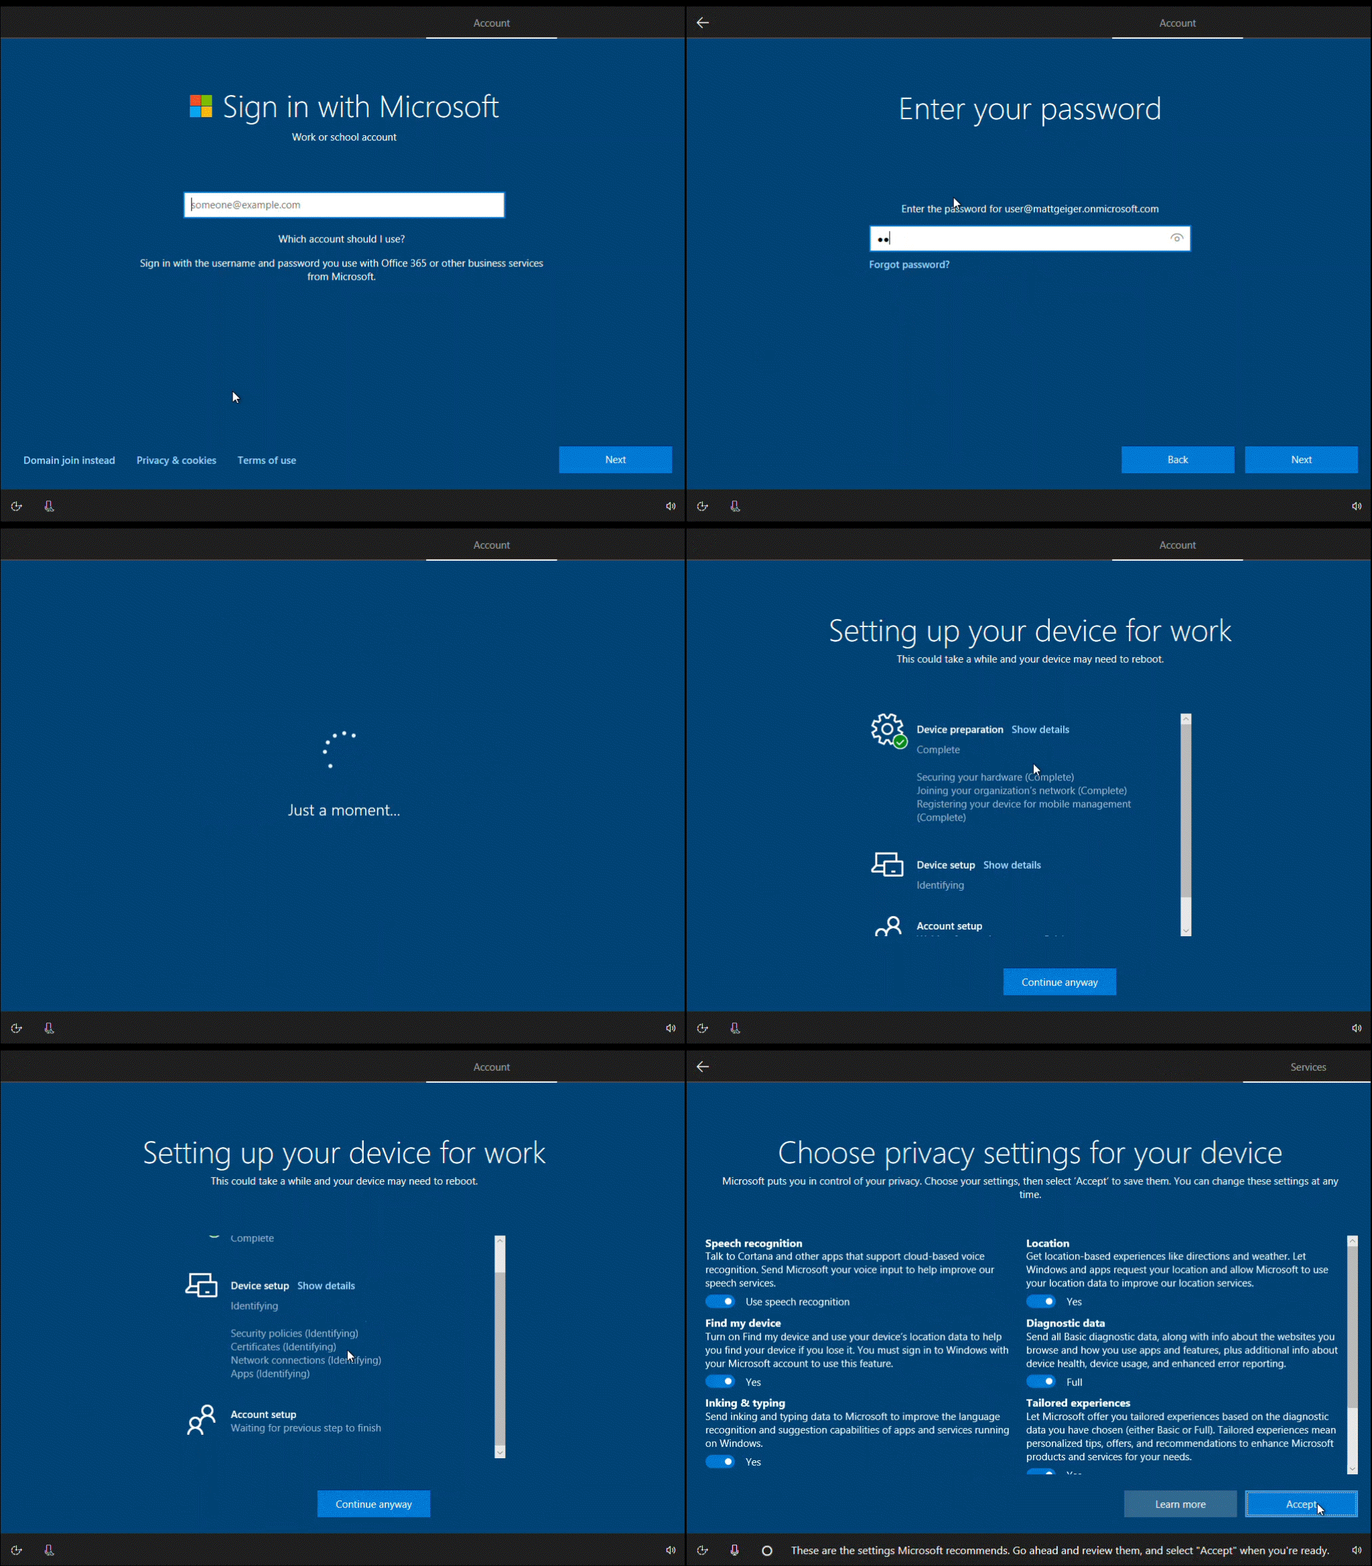
Procedure
-
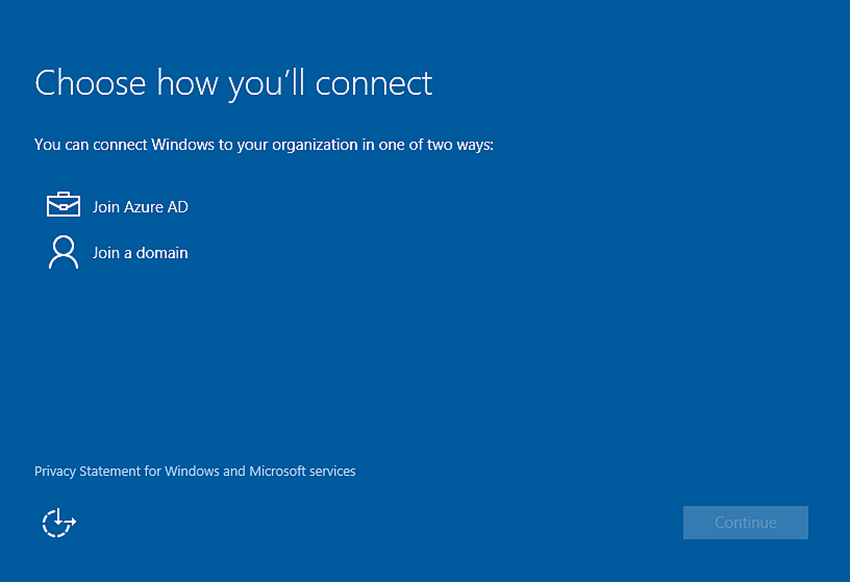
Power on the device and follow the steps to configure Windows until you reach the Choose how you'll connect screen.
-
Select Join Azure AD. Select Continue.
-
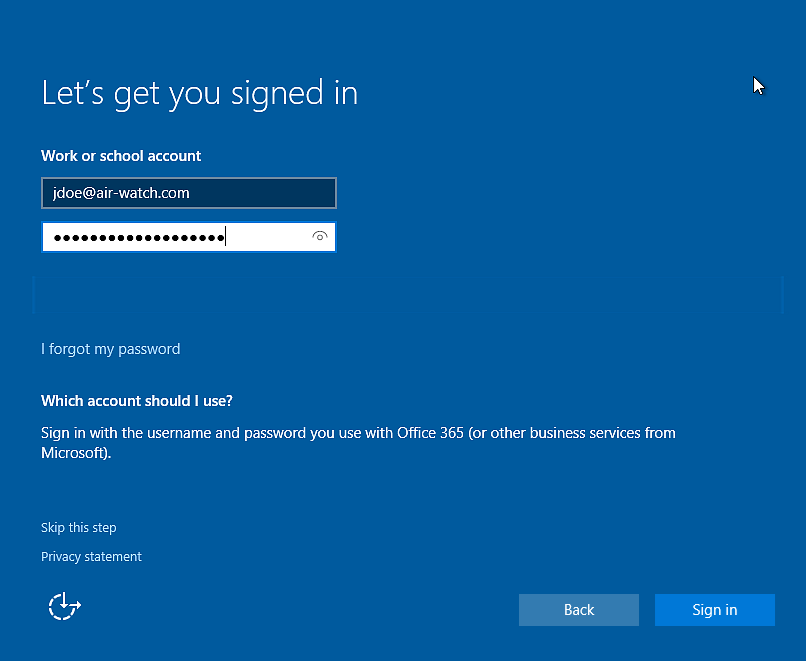
Enter your Azure AD/Workspace ONE UEM email address as the Work or school account.
-
Enter your Password. Select Sign In.
-
Ensure that the Welcome to AirWatch screen displays. Select Continue.
-
Select the Device Ownership type and enter the Asset Number if applicable. Select Next.
-
Select Accept if terms of use are enabled.
-
Select Join to confirm that you want to enroll in Workspace ONE UEM.
-
Select Finish to complete joining your device to Workspace ONE UEM. Your device now downloads the applicable policies and profiles.
Enroll Through Office 365 Apps
If your organization uses Office 365 and Azure AD integration, end users can enroll their devices the first time they open an Office 365 app.
Procedure
- Select Add a Work Account the first time you open an Office 365 application.
- Enter your Email Address and Password. Select Sign In.
- Ensure that the Workspace ONE UEM welcome page displays. Select Continue.
- Select Accept if terms of use are enabled.
- Select Join to confirm that you want to enroll in Workspace ONE UEM.
- Select Finish to complete joining your device to Workspace ONE UEM. Your device now downloads the applicable policies and profiles.
Native MDM Enrollment for Windows Desktop
Windows Desktop enrollment methods all use the Work Access native MDM Client. Use the native MDM enrollment to enroll both corporate-owned and BYOD devices through the same enrollment flow.
Work Access first processes an Azure AD workflow for domains connected to Office 365 or Azure AD when you select Connect and does not automatically complete the enrollment workflow. If you use Office 365 or Azure AD without a premium license, consider using the Workspace ONE Intelligent Hub to enroll Windows devices instead of native MDM enrollment. To complete the enrollment workflow using native MDM enrollment, select Connect twice. If you have an Azure AD premium license, you can enabled Require Management in your Azure instance to have native MDM enrollment complete the enrollment flow after the Azure workflow. You can use native MDM enrollment without issue if you do not use Office 365 or Azure AD.
Only users who have local admin permissions on the device can enroll a device into Workspace ONE UEM and enable MDM. Domain Admin permissions do not work for enrolling a device. To enroll a device with a standard user, you must use Bulk Provisioning for Windows devices.
Devices joined to a domain can enroll using the native Workplace enrollment. The email address entered in the settings is auto-populated with the Active Directory UPN attribute. If the end user wants to use a different email address, they must download the optional update.
Prerequisites
Registering your domain in Workspace ONE UEM enrollment screen removes the need to enter the Group ID during enrollment.
Note: Consider using the Workspace ONE Intelligent Hub for Windows to enroll your Windows devices instead of using native MDM enrollment. The native MDM enrollment flow does not enroll devices into MDM if you use Office 365 or Azure AD on the same domain.
Procedure
-
Navigate on the device to Settings > Accounts > Work Access and select Enroll in to device management.
-
Enter the user name you provided to your end user into the Email text box, followed by the domain for the environment in the format
Username@domain.com(such asjdoe1@acme.com). Select Continue. -
Enter the Group ID and select Next.
-
Enter your username and password and select Next. These credentials may be your directory services credentials or dedicated credentials specific to your Workspace ONE UEM environment.
-
Optional: Review the End User License Agreement and select Accept to agree to the terms of use.
-
Optional: Select Yes to save sign-in info.
Results
The device then attempts to connect to Workspace ONE UEM. If it connects successfully, a briefcase icon displays with Workspace ONE UEM written next to it. This icon shows your successful connection to Workspace ONE UEM.
Enroll Through Work Access
Work Access is the native MDM enrollment method for Windows devices. Consider using the Workspace ONE Intelligent Hub for Windows to enroll your Windows devices instead of using native MDM enrollment. The native MDM enrollment flow does not enroll devices into MDM if you use Office 365 or Azure AD on the same domain.
Procedure
- Navigate on the device to Settings > Accounts > Work Access and select Enroll in to device management.
- Enter the user name you provided to your end user into the Email text box, followed by the domain for the environment in the format
Username@domain.com(such asjdoe1@acme.com). - Enter server address as follows:
<DeviceServicesURL>/DeviceServices/Discovery.aws. Do not include 'https://' in the URL. Example:ds156.awmdm.com/deviceservices/discovery.aws. - Select Continue.
- Enter the Group ID and select Next.
- Enter your username and password and select Next. These credentials may be your directory services credentials, or dedicated credentials specific to your Workspace ONE UEM environment.
- Optional: Review the End-User License Agreement and select Accept to agree to the terms of use. This step is optional and only displays if you choose to enable it.
- Optional: Select Yes to save sign-in info.
Results
The device then attempts to connect to Workspace ONE UEM. If it connects successfully, a briefcase icon displays with Workspace ONE UEM written next to it. This icon shows your successful connection to Workspace ONE UEM.
Windows Devices Staging Enrollment
With device staging, you can configure your Windows Desktop devices for device management by Workspace ONE UEM before you send the devices to your end users.
Device Staging enrolls the device to a staging account and deploys any assigned profiles and applications to the device. The Workspace ONE Intelligent Hub must launch during this process. After the device is fully enrolled and configured, you can ship it to your end users. When an end user logs in for the first time, the Workspace ONE Intelligent Hub updates the device record in the Workspace ONE UEM console. The device is then reassigned to the end user, and any user-level profiles are pushed to the device.
There are two staging methods:
- Manual Installation – Download and install the Workspace ONE Intelligent Hub and enter enrollment credentials. This method requires devices to be domain-joined before enrollment.
- Command Line Installation – Download the Workspace ONE Intelligent Hub and then install and enroll the device using the command line.
The enrollment completes by either updating the UEM console device registry when an Active Directory user logs onto the device or by comparing the enrolled user name against a list of previously registered serial numbers.
Bulk Import Device Serial Numbers
Import device serial numbers for use with device staging to quickly add devices to the Workspace ONE UEM Console. The bulk import requires a CSV file with all the serial numbers to import.
Procedure
- Navigate to Accounts > Users or Devices > List View.
- Select Add and then Batch Import to display the Batch Import screen.
- Complete each of the required options. Batch Name, Batch Description, and Batch Type.
- Within the Batch File (.csv) option is a list of task-based templates you can use to load users and their devices in bulk.
- Select the appropriate download template and save the comma-separated values (CSV) file to somewhere accessible.
- Locate the saved CSV file, open it with Excel, and enter all the relevant information for each of the devices that you want to import. Each template is pre-populated with sample entries demonstrating the type of information (and its format) intended to be placed in each column. Fields in the CSV file denoted with an asterisk are required.
- Save the completed template as a CSV file. In the UEM console, select the Choose File button from the Batch Import screen, navigate to the path where you saved the completed CSV file and select it.
- Select Save to complete registration for all listed users and corresponding devices.
Enroll Through Command-Line Staging
Simplify enrollment for end users by staging your Windows Desktop devices using the Windows Command Line. This enrollment method for Workspace ONE UEM enrolls the device and downloads device-level profiles base on the user credentials entered.
Important: Do not change the name of the AirWatchAgent.msi file as this breaks the staging command. Also, Do not use bulk serial number import if you want to use command line staging.
Note: Do not use this process to install Workspace ONE Intelligent Hub for Windows silently on BYOD devices. You are solely responsible for providing any necessary notices to your device end users regarding your use of silent installation and the data collected from the silently installed apps. You are responsible for obtaining any legally required consents from your device end users, and otherwise complying with all applicable laws.
Note: For more detailed information regarding command line enrollment, refer to Tech Zone.
Procedure
-
Navigate to https://getwsone.com/ to download Workspace ONE Intelligent Hub for Windows.
Only download Workspace ONE Intelligent Hub. Do not start the executable or select Run as that initiates a standard enrollment process and defeats the purpose of silent enrollment. If necessary, move Workspace ONE Intelligent Hub from the download folder to a local or network drive folder.
-
Open a command line or create a BAT file and enter all the necessary paths, parameters, and values as described in the Silent Enrollment Parameters and Values section below.
-
Run the command.
Results
After the command runs, the device enrolls into Workspace ONE UEM. If the device is domain-joined, Workspace ONE Intelligent Hub updates the Workspace ONE UEM console device registry with the correct user.
Enroll Through Manual Device Staging
Simplify enrollment for end users by staging your Windows devices using the Workspace ONE Intelligent Hub. This enrollment method enrolls the device and downloads device-level profiles so the end user must only log in to the device to begin using it.
Prerequisites
These devices must be joined to a domain.
- Navigate to https://getwsone.com/ to download the Workspace ONE Intelligent Hub Installer.
- Start the installer once the download completes.
- Select Run to begin the installation.
- Select Email if you have Auto-Discovery enabled, otherwise select Server Detail.
- Complete the settings required based on the authentication type selected.
- Enter the email address to auto-fill the server details screen. Select Next and the details are entered.
- Enter the Server Name and Group ID if you are not using Auto-Discovery to complete the settings. Select Next.
- Enter the staging Username and Password and select Next.
- Complete any optional screens.
- Select Finish to complete the enrollment.
Results
Once the Workspace ONE Intelligent Hub detects a staging user, the Workspace ONE Intelligent Hub listener runs and listens for the next Windows login. When the end user logs into the device, the Workspace ONE Intelligent Hublistener reads the user UPN and email from the device registry. This information is sent to the Workspace ONE UEM console and the device registry is updated to register the device to the user.
Provisioning Mode and Command Line Enrollment for Windows Devices
The Intelligent Hub Provisioning Mode and Command Line Enrollment introduce an additional enrollment flow for both Windows Desktop physical and virtual machines. These improvements allow for the separation of the Intelligent Hub installation and the device enrollment process, providing greater flexibility in deployment scenarios.
Key Features
-
Provisioning Mode: Intelligent Hub can now be installed in provisioning mode without requiring immediate device enrollment. You may configure the Windows device, perform reboots, or even Sysprep and clone it. The Intelligent Hub remains installed and ready for device enrollment using the command line.
-
Command Line Enrollment: Administrators can trigger device enrollment at a later time using a command line option.
-
Support for Virtual Machines: Hub can be installed on a template VM (gold image) and remain installed after Sysprep and cloning, allowing for streamlined provisioning of VM pools.
Procedure
To install Hub in Provisioning Mode, use this code in the command line:
Msiexec.exe /i airwatchagent.msi PROVISIONHUB=Y
Next, use the following code to trigger Automating Enrollment at User Logon:
command line:
C:\Program Files (x86)\Airwatch\AgentUI\AWProcessCommands.exe enroll --SERVER https://ds1234.awmdm.com --OG MyOG --USERNAME staginguser --PASSWORD mypassword --ASSIGNTOLOGGEDINUSER
Results
After the Intelligent Hub is installed in provisioning mode, it will remain installed but unenrolled until a command line enrollment is completed.
Example Usage for Windows Virtual Machines
- Install Hub in provisioning mode on the template VM (gold image)
- Sysprep is run as part of the cloning process
- Create a pool of VMs based on the template
- Enrollment flow can be triggered automatically using cmd line enrollment script at user logon
Deferred Enrollment for Windows Devices
The Intelligent Hub Deferred Enrollment Mode provides the ability to install Hub and defer enrollment until an interactive Windows user session is initiated.
Key Features
- Install Hub using cmd line installation while deferring enrollment process to first Windows user session.
- Suppresses Hub UI prompts for enrollment details.
Procedure
To install Hub in Deferred Enrollment Mode, use this code in the command line:
Msiexec.exe /i airwatchAgent.msi /q DEFERENROLLMENT=Y ENROLL=Y SERVER=ds###awmdm.com LGName=<groupID> USERNAME=<staginguser> PASSWORD=<stagingpassword> ASSIGNTOLOGGEDINUSER=Y
Results
After the Intelligent Hub is installed in Deferred Enrollment mode, enrollment will be deferred until a valid interactive Windows user session occurs.
Silent Enrollment Parameters and Values
Silent enrollment requires command line entries or a BAT file to control how the Workspace ONE Intelligent Hub downloads and installs onto Windows devices.
Note: Do not use this product to install Workspace ONE Intelligent Hub for Windows silently on BYOD devices. If you silently install to BYOD devices, you are solely responsible for providing any necessary notices to your device end users regarding your use of silent installation and the data collected from the silently installed apps. You are responsible for obtaining any legally required consents from your device end users, and otherwise complying with all applicable laws.
The following tables list the enrollment parameters you can enter into a command line or into a BAT file, and the respective values for each parameter. If you are Enrolling on Behalf of Others (EOBO), ensure you use the EOBO parameters.
General Parameters
| Enrollment Parameters | Values to Add to Parameter |
|---|---|
| All MSI parameters | These parameters control the app installation behavior. /q,/qn - Controls the UI levels for installation /L - Log levels and log paths. For more information, refer to: Microsoft's Command-Line Options. |
| ASSIGNTOLOGGEDINUSER | Select Y to assign the device to the domain user that is logged in. Enter this parameter as the last argument in the command line. |
| DEFERENROLLMENT | Used to enable caching of enrollment info. DEFERENROLLMENT=Y |
| DEVICEOWNERSHIPTYPE^ | Select CD for Corporate Dedicated. Select CS for Corporate Shared. Select EO for Employee Owned. Select N for None. |
| ENROLL | Select Y to enroll. Select N for image only. The agent tries to enroll in silent mode only if this parameter is set to Y. |
| INSTALLDIR^ | Enter the directory path if you want to change the installation path. Note: If this parameter is not present, the Workspace ONE Intelligent Hub uses the default path: C:\Program Files (x86)\AirWatch. |
| LGName | Enter the organization group name. |
| PASSWORD | Enter the password for the user you are enrolling or the staging user password if staging the device on the behalf of a user. |
| PROVISIONHUB | Used to embed Hub in template or gold image. Also used for Hub installation that will survive Sysprep operation. PROVISIONHUB=Y Select Y for provisioning. Select N for enrollment. |
| SERVER | Enter the enrollment URL. |
| USERNAME | Enter the user name for the user you are enrolling or the staging user name if staging the device on the behalf of a user. |
Items denoted with a caret (^) are optional.
Enroll On Behalf Of (EOBO) Parameters
| Enrollment Parameters | Values to Add to Parameter |
|---|---|
| SECURITYTYPE | EOBO Workflow Only: Use this parameter if a user account is added to the Workspace ONE UEM console during the enrollment process. Select D for Directory. Select B for Basic User. |
| STAGEEMAIL^ | EOBO Workflow Only: Enter the email address for the user you are enrolling. |
| STAGEEMAILUSRNAME^ | EOBO Workflow Only: Enter the email user name for the user you are enrolling. |
| STAGEPASSWORD | EOBO Workflow Only: Enter the password for the user you are enrolling. |
| STAGEUSERNAME | EOBO Workflow Only: Enter user name for the enrolling user. |
Items denoted with a caret (^) are optional.
Example of Basic Silent Enrollment:
The following is an example of installing the Workspace ONE Intelligent Hub for image only without enrollment using minimum parameters required for image only.
```
AirwatchAgent.msi /q ENROLL=Y SERVER=ds###awmdm.com LGName=<groupID> USERNAME=<staginguser> PASSWORD=<stagingpassword> ASSIGNTOLOGGEDINUSER=Y
```
Bulk Provisioning and Enrollment for Windows Devices
Bulk provisioning lets you create a pre-configured package that stages Windows devices and enrolls them into Workspace ONE UEM. Learn how to use bulk provisioning to enroll and configure multiple devices with a standard user account.
This enrollment flow is the only way to enroll a device with a standard user account. Admin permissions are still required run the pre-configured package. Bulk provisioning only supports single user standard staging.
To use bulk provisioning, download the Microsoft Assessment and Development Kit and installing the Imaging and Configuration Designer (ICD) tool. The ICD creates provisioning packages used to image devices. As part of these provisioning packages, you can include Workspace ONE UEM configuration settings so that provisioned devices are automatically enrolled into Workspace ONE UEM during the initial Out of Box Experience (OOBE).
To map the devices to the correct end user automatically, register the devices per user or using a bulk import before creating the provisioning package.
Enroll with Bulk Provisioning
The Microsoft Imaging and Configuration Designer tool allows you to create a provisioning package to enroll multiple Windows devices into Workspace ONE UEM quickly and easily. Once the package is installed, the device automatically enrolls into Workspace ONE UEM.
Note: Windows 10 (21H2 and later) and Windows 11 (all versions) are no longer supported for this type of enrollment flow. Please ensure you are using a compatible version of Windows to proceed with this process. We recommend reviewing your operating system version and updating your workflow or system requirements accordingly.
Procedure
- Download the Microsoft Assessment and Deployment Kit for Windows and install the Windows Imaging and Configuration Designer tool (ICD).
- Start the Windows ICD and select New Provisioning Package.
- Enter a Project Name and select the settings to view and configure. The typical choice is the Common to all Windows desktop editions option.
- (Optional) Import a provisioning package if you want to create a provisioning package based on the settings of a previous package.
- Navigate to Runtime Settings > Workplace > Enrollments.
- In the Workspace ONE UEM console, navigate to Groups & Settings > All Settings > Devices & Users > Windows > Windows Desktop > Staging and Provisioning.When you navigate to this settings page, a staging user is created and URLs pertaining to the created staging user display. You can create your own staging user for use with bulk provisioning but the settings displayed on this settings page do not apply to any created users.
- Copy the UPN and paste it into the UPN text box of the ICD.
- Select the down arrow next to Enrollments in the Available Customizations window.
- Configure the following settings.
- Select AuthPolicy and select the value displayed in the Workspace ONE UEM console.
- Select DiscoveryServiceFullURL and copy the URL displayed in the Workspace ONE UEM console.
- Select EnrollmentServiceFullURL and copy the URL displayed in the Workspace ONE UEM console.
- Select PolicyServiceFullURL and copy the URL displayed in the Workspace ONE UEM console.
- Select Secret and copy the value displayed in the Workspace ONE UEM console.
- Select File > Save to save the project.
- Select Export > Provisioning Package to create a package for use with bulk provisioning then select Next.
- Save the Encryption password for later use if you choose to encrypt the package and then select Next.
- Save the package to a USB drive for transfer to each device you want to provision. You can also email the package to the device.
- Select Build to create the package.
Install Bulk Provisioning Packages
After you create the provisioning packages using the Microsoft Imaging and Configuration Designer, you must install the provisioning package onto the end-user devices.
-
On the device you want to provision, navigate to Settings > Accounts > Work Access and select Add or remove a package for work or school. If the package was emailed, start the package from your mail client.
-
Select Add a package and select the Removable Media choice as the method to add the package.
-
Select the correct package from the list provided.
If you added the device to the user account in the Workspace ONE UEM console before provisioning, the device is assigned upon enrollment.
Registered Mode Enrollment
Windows devices enrolled through the Workspace ONE Intelligent Hub or OOBE are MDM managed by default. To allow Windows devices to enroll without MDM management, you can enable registered mode (unmanaged) for an entire organization group or with smart groups and specific criteria. Registered mode provides users with access to corporate applications through Workspace ONE Intelligent Hub without enrolling the device in Mobile Device Management (MDM) or applying device-level management. Registered mode provides only lightweight device management and requires an Employee Essentials SKU license.
Registered mode supports the listed enrollment methods.
- Staging Users
- Command-line staging
- Manual device staging
- Silent enrollment parameters and values
- Workspace ONE Intelligent Hub for Windows with SAML authentication
Enable registered mode by organization groups or by smart groups. When you use smart groups, you can group devices for registered mode by OS version, platform, ownership type, or users.
With registered mode enrollment, users can use a subset of Workspace ONE services without MDM management, including Workspace ONE Assist, Workspace ONE Tunnel, Digital Experience Employee Management (DEEM), and Workspace ONE Hub Services.
Enroll with Registered Mode
- In the Workspace ONE UEM console, select the organization group to be enabled with registered mode enrollment and navigate to Devices > Devices Settings > Device & Users > General > Enrollment > Management Mode.
- For Current Setting, select Override.
- For Windows, select Enabled.
- Select Enabled for All Windows devices in this Organization Group.
- Optionally, you can add smart groups that are enabled for registered mode enrollments in Windows Smart Groups.
- Save your settings.
Results
Users with Windows devices from the configured smart group or the specified organization group can use product capabilities without MDM management. Device information and management capabilities from with the console are limited. Only the relevant profiles are installed on these devices.
Intelligent Hub Managed Mode Enrollment
Workspace ONE UEM supports a Windows enrollment method known as Intelligent Hub Managed mode, which provides Intelligent Hub–based device management for Windows endpoints that do not support native OMA DM management or are in the process of transitioning from another OMA DM-based management solution.
In this enrollment method, the Intelligent Hub is the primary management client, which provides full device management capabilities through the Intelligent Hub app without requiring native MDM (OMA DM) enrollment. In this mode, you can manage policies through ADMX profiles, push apps, run workflows, create baseline sensors, scripts, and more.
Intelligent Hub Managed mode enables administrators to:
- Manage all Windows devices enrolled only through Intelligent Hub:
- Deliver and manage applications using the Software Distribution Agent (SFD)
- Assign and enforce both Hub-targeted profiles and ADMX-based profiles
- Orchestrate complex multi-step deployments through workflows.
- Use baselines, sensors, and scripts to handle configuration, monitoring, and remediation tasks, while continuing to use Tunnel profiles consistently across all enrollment types
- Start new enrollments using the Intelligent Hub Managed Mode. Devices enrolled this way are managed by the Hub with full management features. This configuration applies to new enrollments and supports existing provisioning methods such as Dropship and Silent Enrollment. Out-of-box experience (OOBE) based provisioning methods, such as Autopilot, are not supported in Hub Managed mode because they are dependent on OMA DM.
- Upgrade existing Hub-Registered devices to Hub Managed mode through a server-side transition, enabling full Hub-based management without requiring device re-enrollment.
- Expand Intelligent Hub Catalog capabilities to enable end users on Hub Managed devices to install or uninstall applications and run workflows or scripts on demand directly from the Intelligent Hub catalog, similar to the experience on fully MDM-managed devices.
Key benefits of the Intelligent Hub Managed Mode Enrollment include:
-
Flexibility in Windows Management: Adopt and transition to modern management at your own pace by choosing the model that best fits your environment:
- Hub Registered: Lightweight management with support for Scripts and Sensors and can be used with the Digital Employee Experience solution.
- Hub Managed: Full Intelligent Hub–driven management without requiring native OMA DM enrollment.
- Full MDM: Combined native OMA DM and Hub management.
-
Modern management without native MDM dependency:
- Reduces migration risk by minimizing workflow disruptions when transitioning from SCCM or other legacy tools.
- Ideal for organizations migrating from another OMA DM based MDM or operating in environments where OMA DM is unavailable or not desired.
- Supports a phased transition to Workspace ONE UEM without requiring device re-enrollment, while still delivering rich app, profile, workflow, and automation capabilities.
-
Simplified admin experience:
- Clear and mode-aware UEM device details UI, with tabs and actions adapting based on enrollment type (for example, Compliance, Workflows, Apps, Baselines, Scripts, Sensors, and Updates for Hub Managed devices).
- Consistent resource targeting rules ensure that OMA DM only content applies only to full MDM devices, preventing configuration conflicts.
-
Integration of IT environments and Device Consolidation Workflows:
- Enable onboarding of previously or externally managed Windows devices into Workspace ONE co-management without full device reprovisioning and accelerating acquisition integration timelines while maintaining compliance.
-
Accelerated Employee Provisioning:
- Pre-deliver device-scoped applications and policies before user assignment, enabling a lightweight login step-up and minimizing first-login installation and background processing delays.
-
Pre-Enrolled and Secure Virtual Machine Support:
- Enable enrollment and security configuration of Windows VMs prior to user assignment, applying device-based policies and software to gold images or pooled environments to maintain a consistent security posture across dynamically provisioned workloads.
-
License-aware enablement
- Intelligent Hub Managed Mode is supported with Workspace ONE Standard, Advanced, Enterprise, Desktop Essentials, and UEM Essentials licenses.
Enroll with Intelligent Hub Managed Mode
To enable Intelligent Hub managed mode, an admin must first select Intelligent Hub Managed Mode on the enrollment settings page and then enroll the device as Hub Managed.
Prerequisites
- The device must be enrolled with Intelligent Hub version 2602 and later.
Procedure
The following procedure outlines the steps to enroll a device as Intelligent Hub managed.
-
Navigate to Groups & Settings > All Settings > Devices & Users > General > Enrollment > and click Management mode.
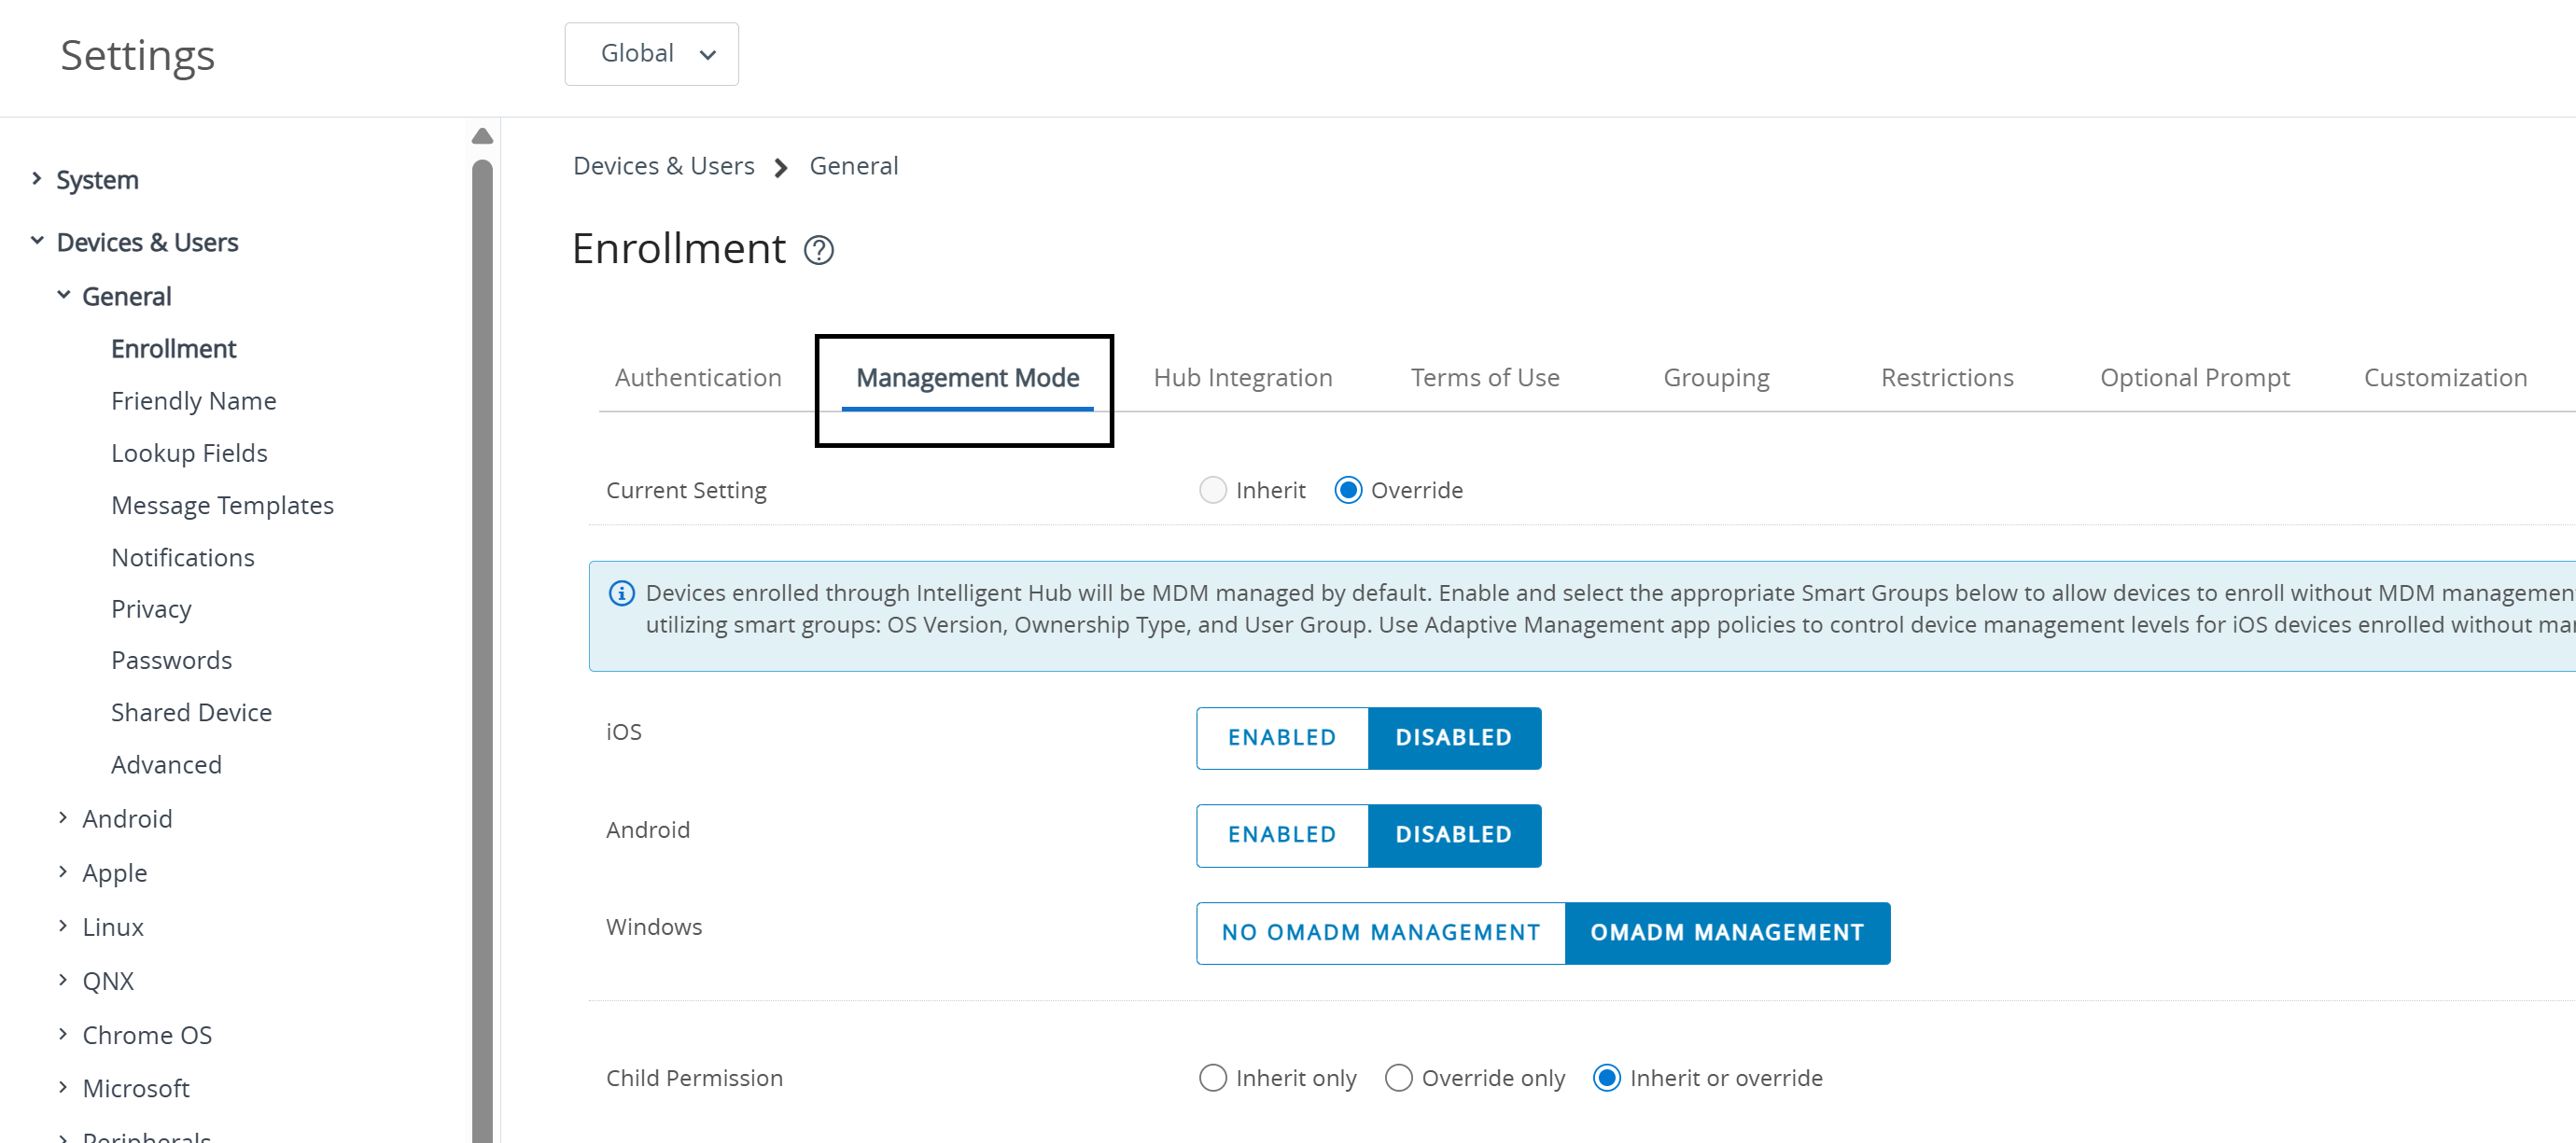
-
In Windows, select No OMADM Management and in Management Mode, select Intelligent Hub Managed Mode.
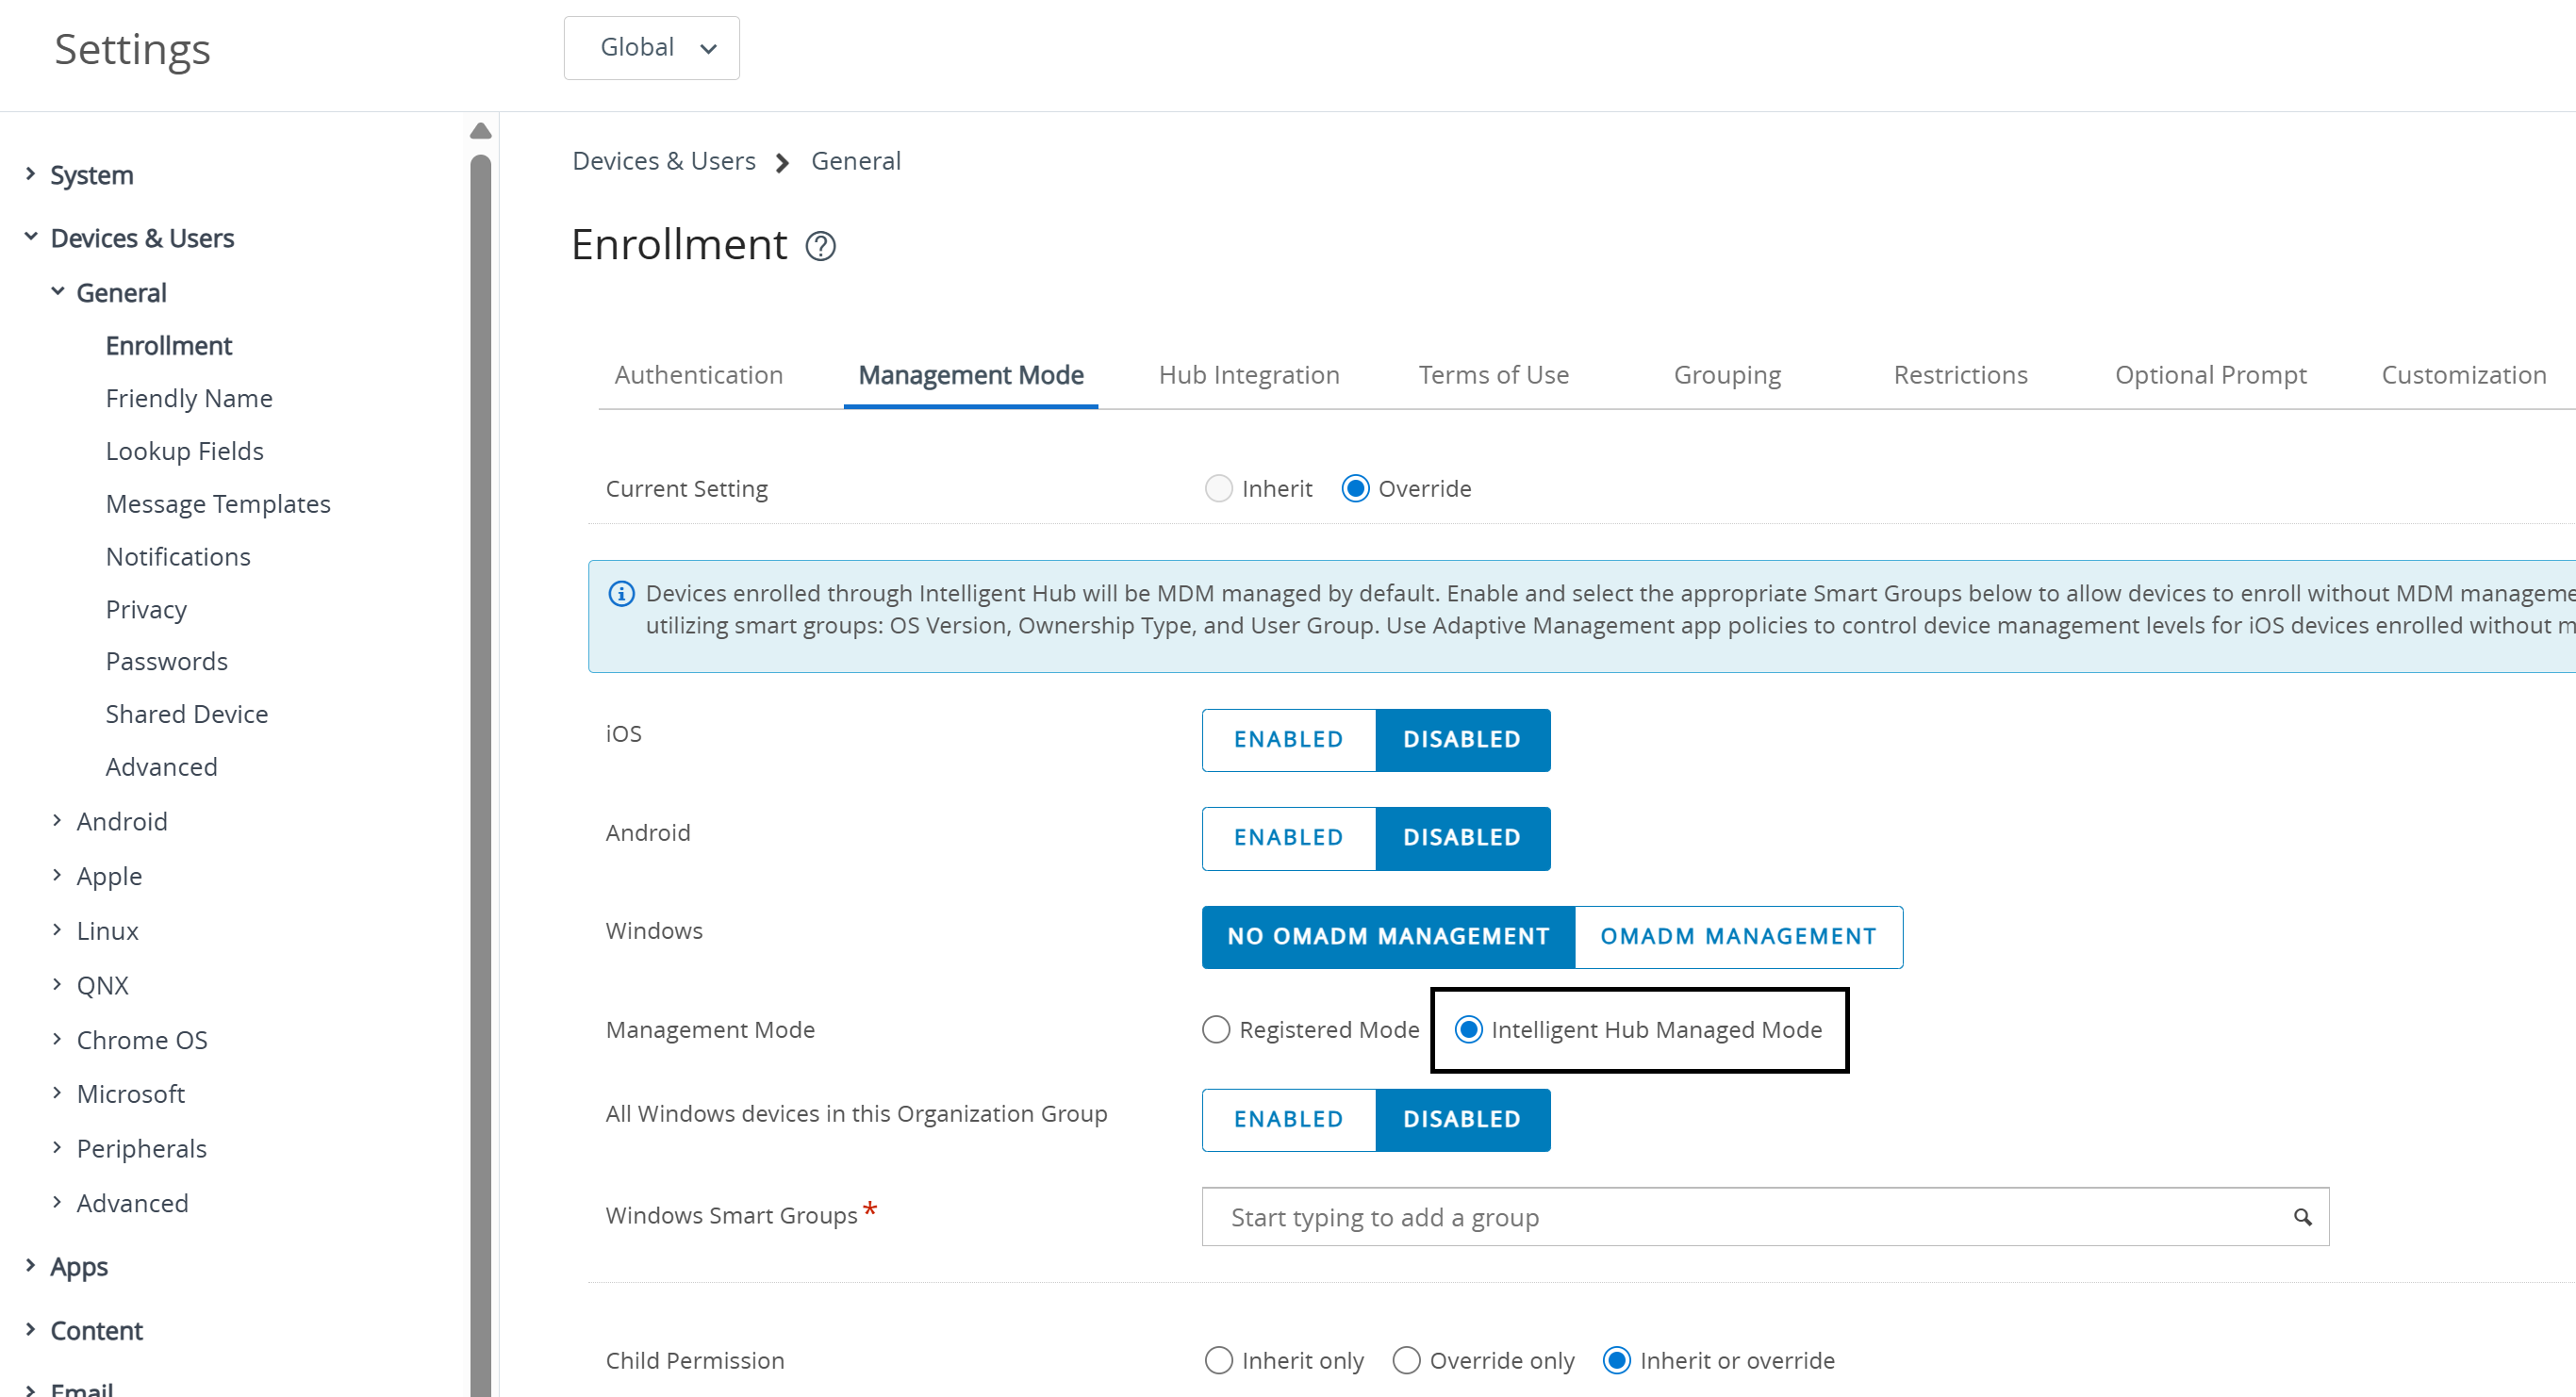
-
In Windows Smart Groups, select the smart group and click Save.
-
Enroll your device with the Omnissa Workspace ONE Intelligent Hub. See, Procedure to Enroll with the Workspace ONE Intelligent Hub.
-
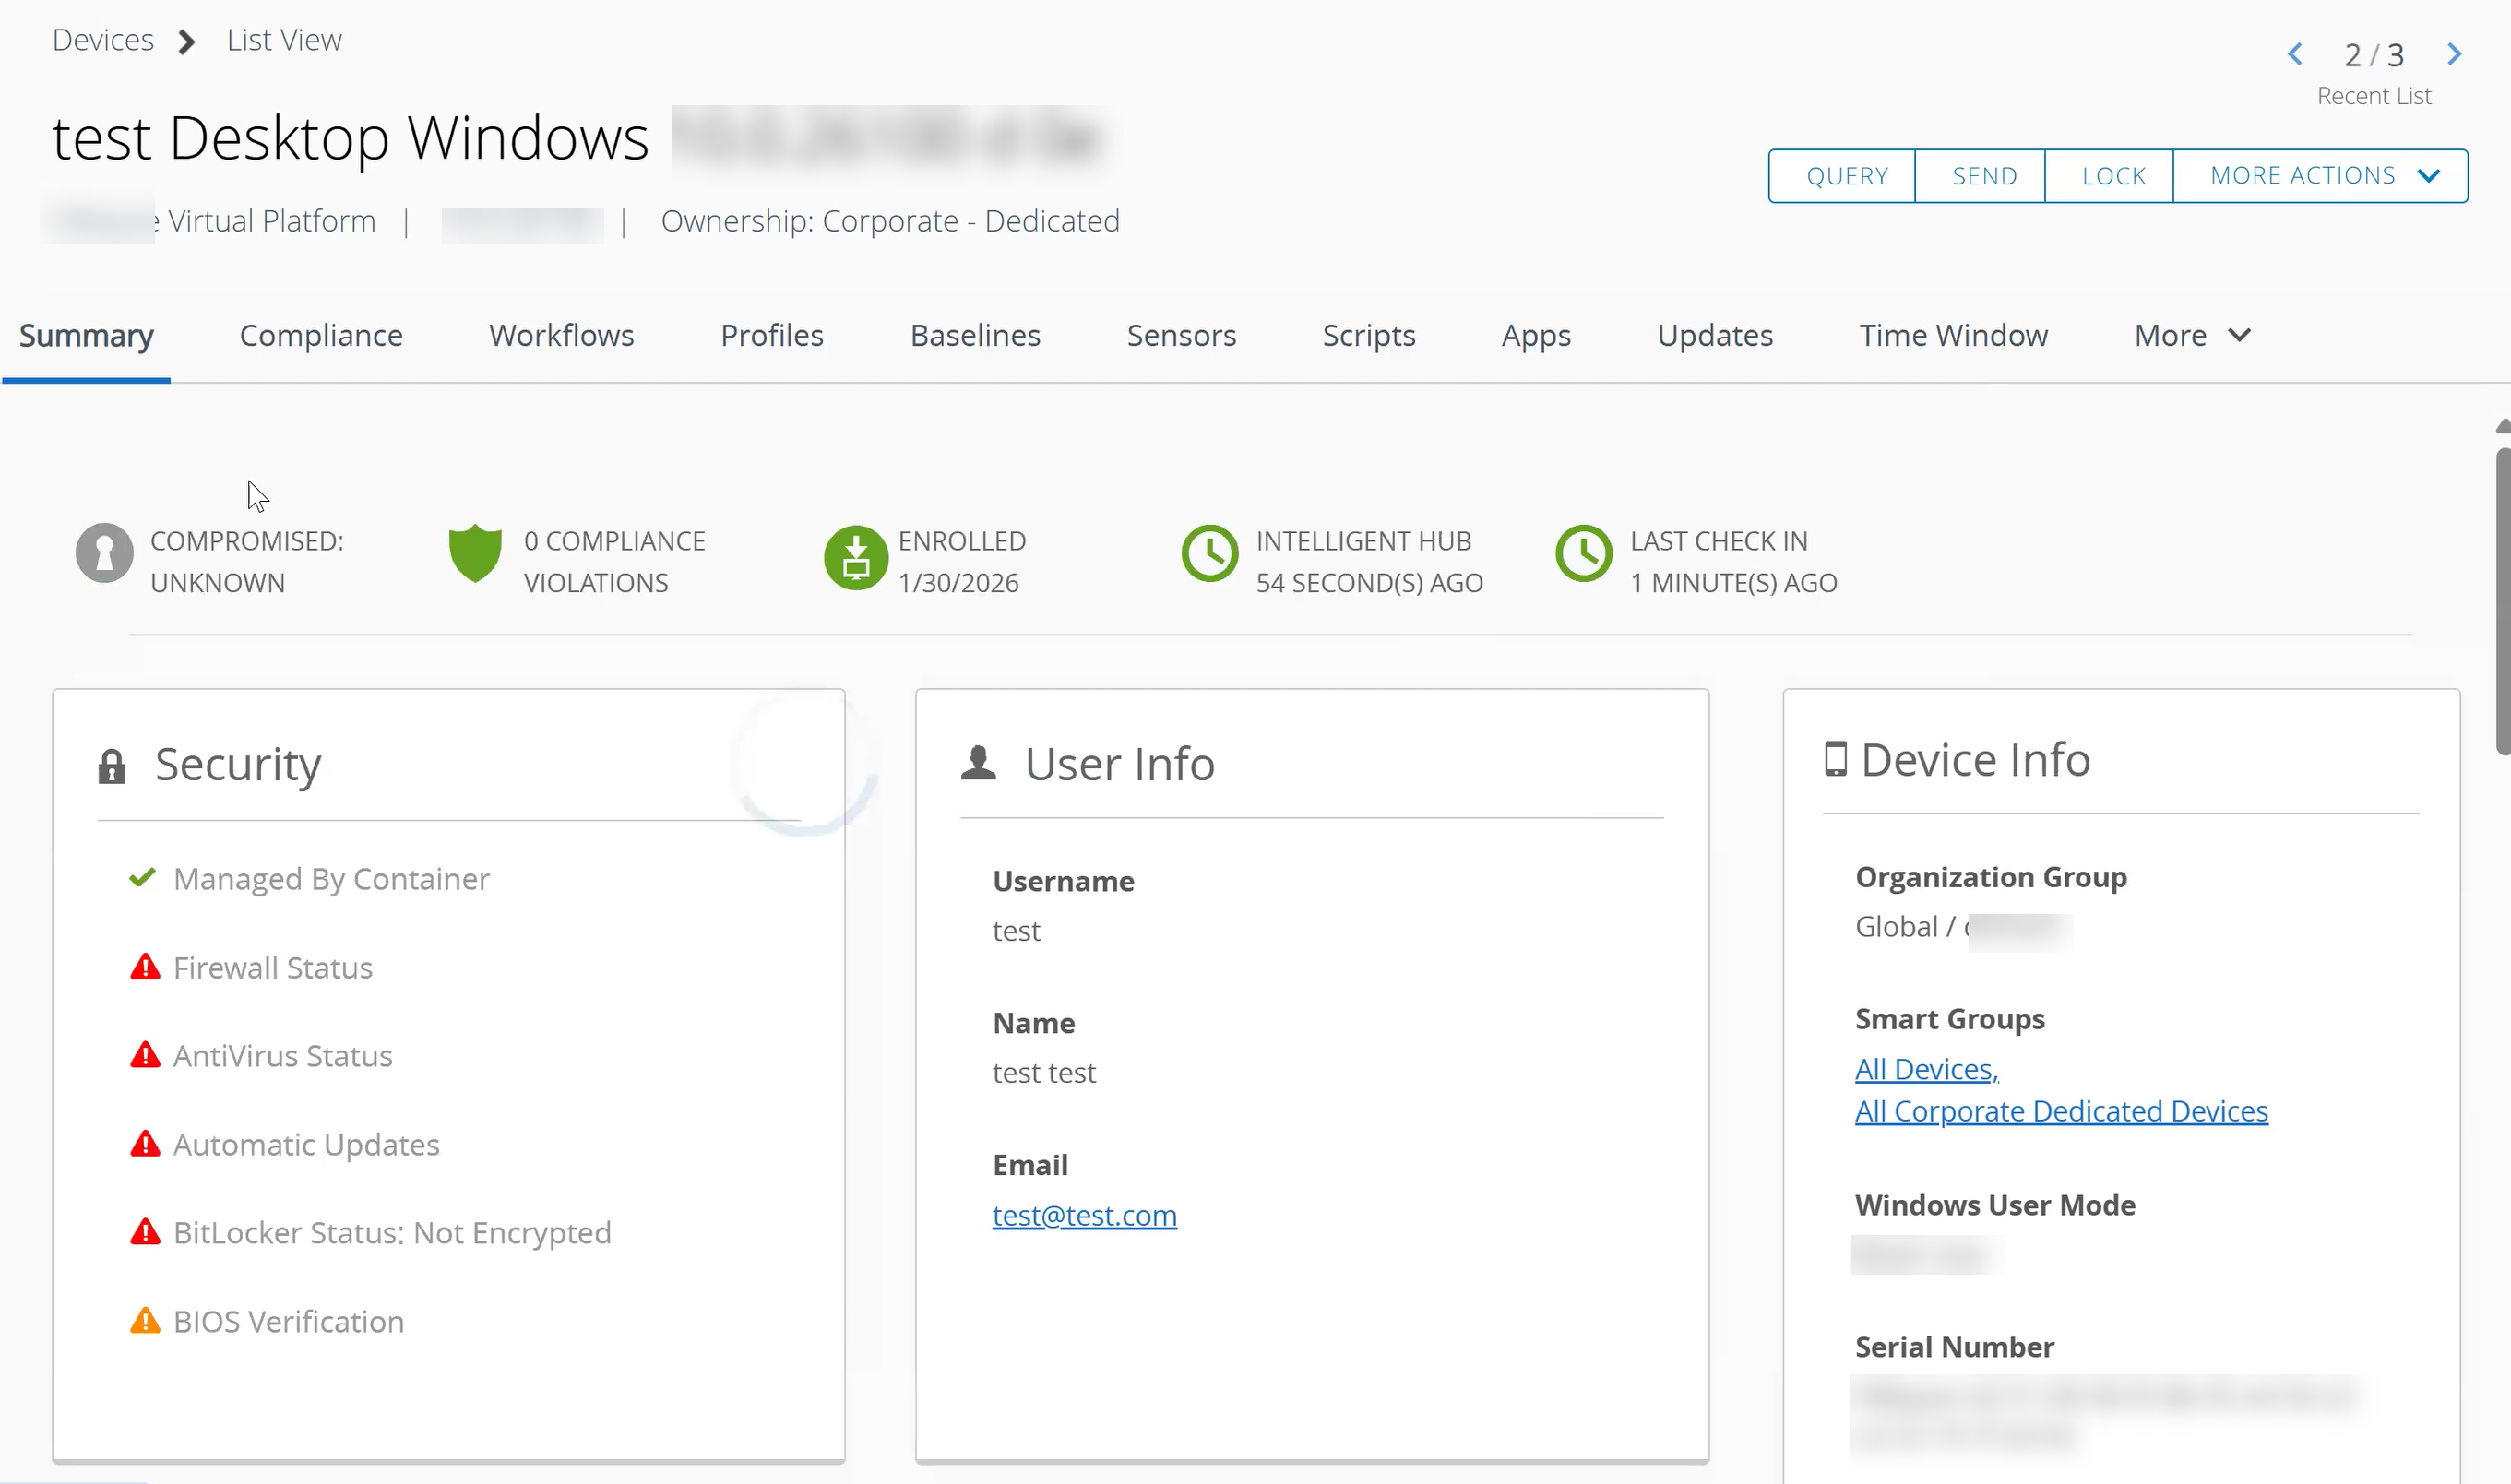
Navigate to Devices > List View to view the device enrolled as Intelligent Hub Managed mode. The following screenshot shows that the device has successfully enrolled as Hub Managed.
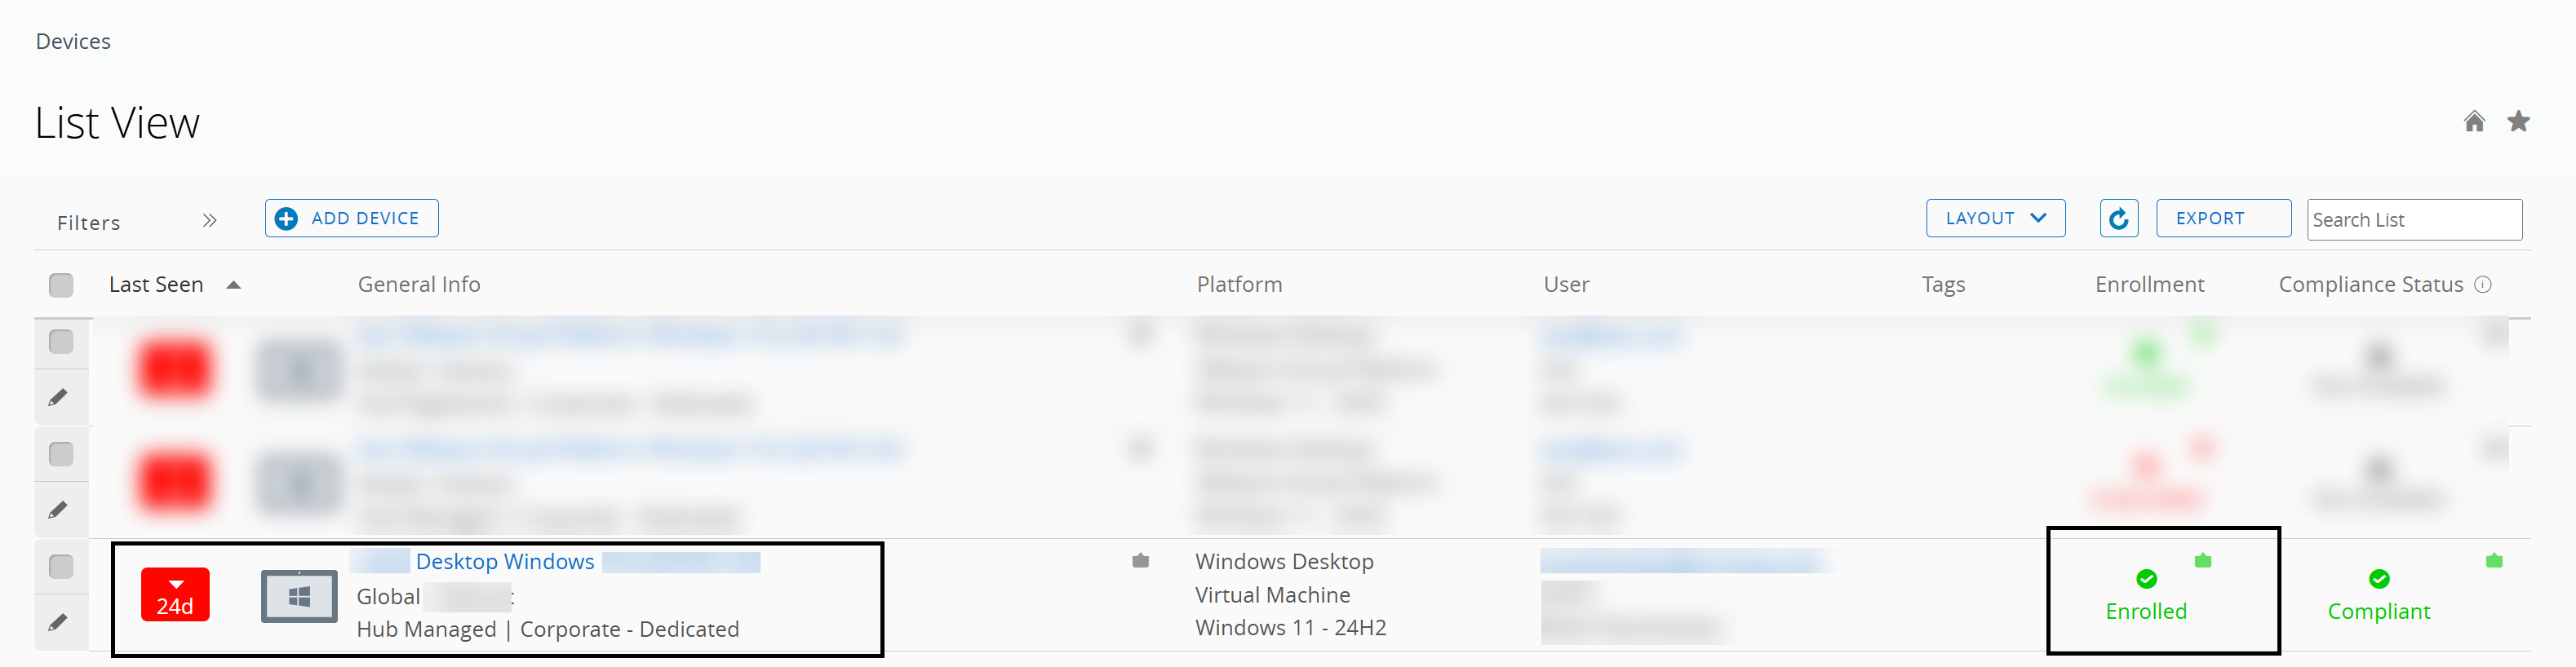
-
Click the device to view the device details.
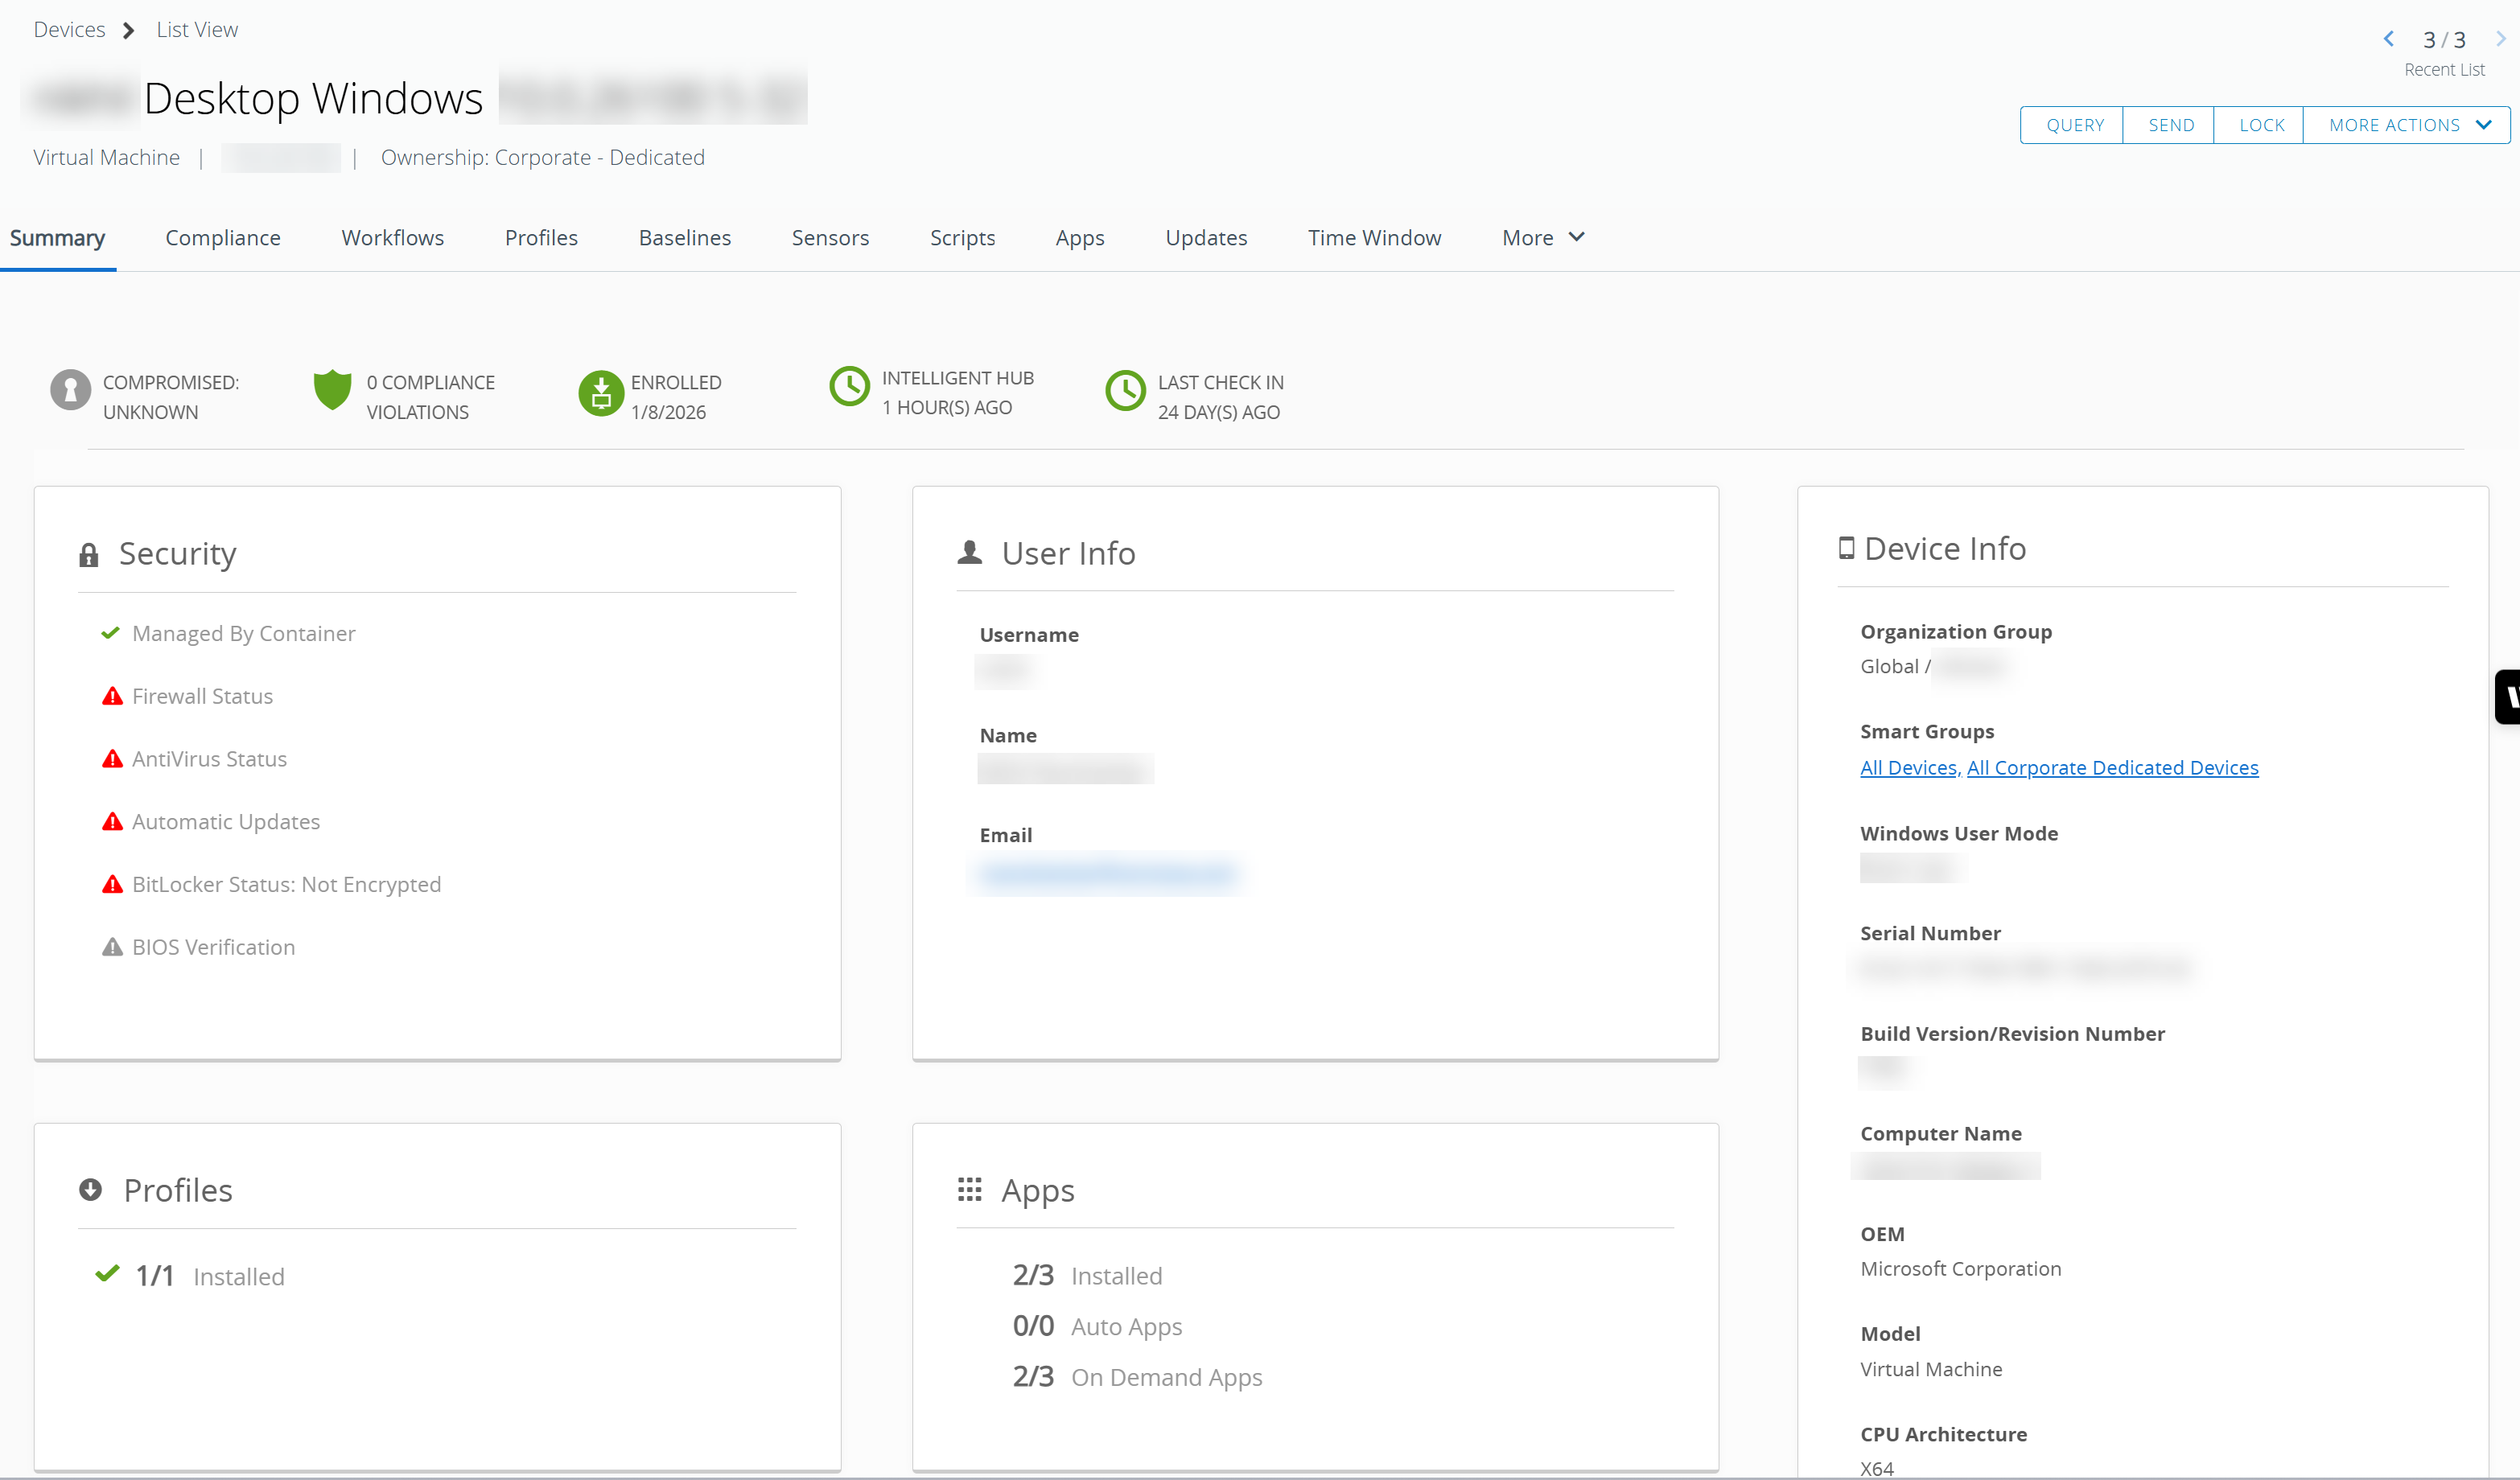
Supported Step-Up Enrollment
Step-up enrollment allows administrators to upgrade Windows devices from a lower device management mode to a higher device management mode without requiring a device wipe or end-user re-enrollment. When upgraded, devices transition seamlessly to the selected management mode and immediately gain access to the full set of corresponding management capabilities, including application deployment, profiles, baselines, sensors, scripts, and workflows.
Workspace ONE UEM supports the following step-up enrollment paths:
| From | To | Description |
|---|---|---|
| Registered Mode | Hub Managed Mode and Full MDM (OMA DM) | Intelligent Hub initiates an OMA DM enrollment to fully manage the device. Upon completion, both Intelligent Hub and OMA DM management capabilities are simultaneously active on the device. |
| Hub Managed Mode | Full MDM (OMA DM) | Intelligent Hub automatically performs native OMA DM enrollment on the device, enabling capabilities that require the native Windows MDM channel, such as Microsoft CSP-based profiles and Conditional Access. |
| Bulk Step-Up | Full MDM (OMA DM) | Perform step-up enrollment at scale, from the Device List View in the UEM console or using APIs. Bulk step-up is supported for transitions from Registered mode to Hub Managed or Full MDM, and from Hub Managed to Full MDM. |
| Automatic Step-Up | Full MDM (OMA DM) | Automatic step-up allows automatic transition of Hub Managed devices to Full MDM without requiring Admin action. |
Upgrading enrollment to Full MDM (OMA DM) mode enables the following enhanced device management capabilities:
- Zero-wipe upgrade path: Devices transition from Hub Registered or Hub Managed to full MDM without a factory reset or re-enrollment, preserving user data and device state.
- Minimal end-user disruption: The transition is admin-initiated; Intelligent Hub handles the OMA DM enrollment silently after the command is queued—no user interaction required.
- Flexible admin workflows: Supports both single-device step-up (from Device Details) and bulk step-up (from Device List), providing admins handle one-off upgrades or fleet-wide migrations easily.
- Unlock Full MDM capability: Once stepped up, devices gain access to the complete OMA DM management: CSP-based profiles, baselines, sensors, scripts, workflows, app deployment, and Autopilot support.
Step-up from Registered Mode to Intelligent Hub Managed Mode and Full MDM (OMA DM)
Admins can upgrade an existing or newly enrolled Hub Registered device to Hub Managed and Full MDM Managed mode. This change updates the device management mode and allows the device to receive all Hub targeted resources.
Note: Hub Registered mode is supported with the Employee Essentials SKU. To step-up from Registered mode to Hub Managed mode or Full MDM (OMA DM) managed mode, you must have Desktop and Server Essentials, UEM Essentials, Advanced, or Enterprise SKU licenses.
Step-up from Registered Mode to Intelligent Hub Managed Mode
The following procedure outlines the steps to upgrade an existing Hub Registered device to Intelligent Hub Managed mode.
Prerequisites
- The device must be enrolled with Intelligent Hub version 2602 and later.
- Workspace ONE UEM console 2602 and later
Procedure
-
Navigate to Devices > List View to view the device enrolled as Registered mode.
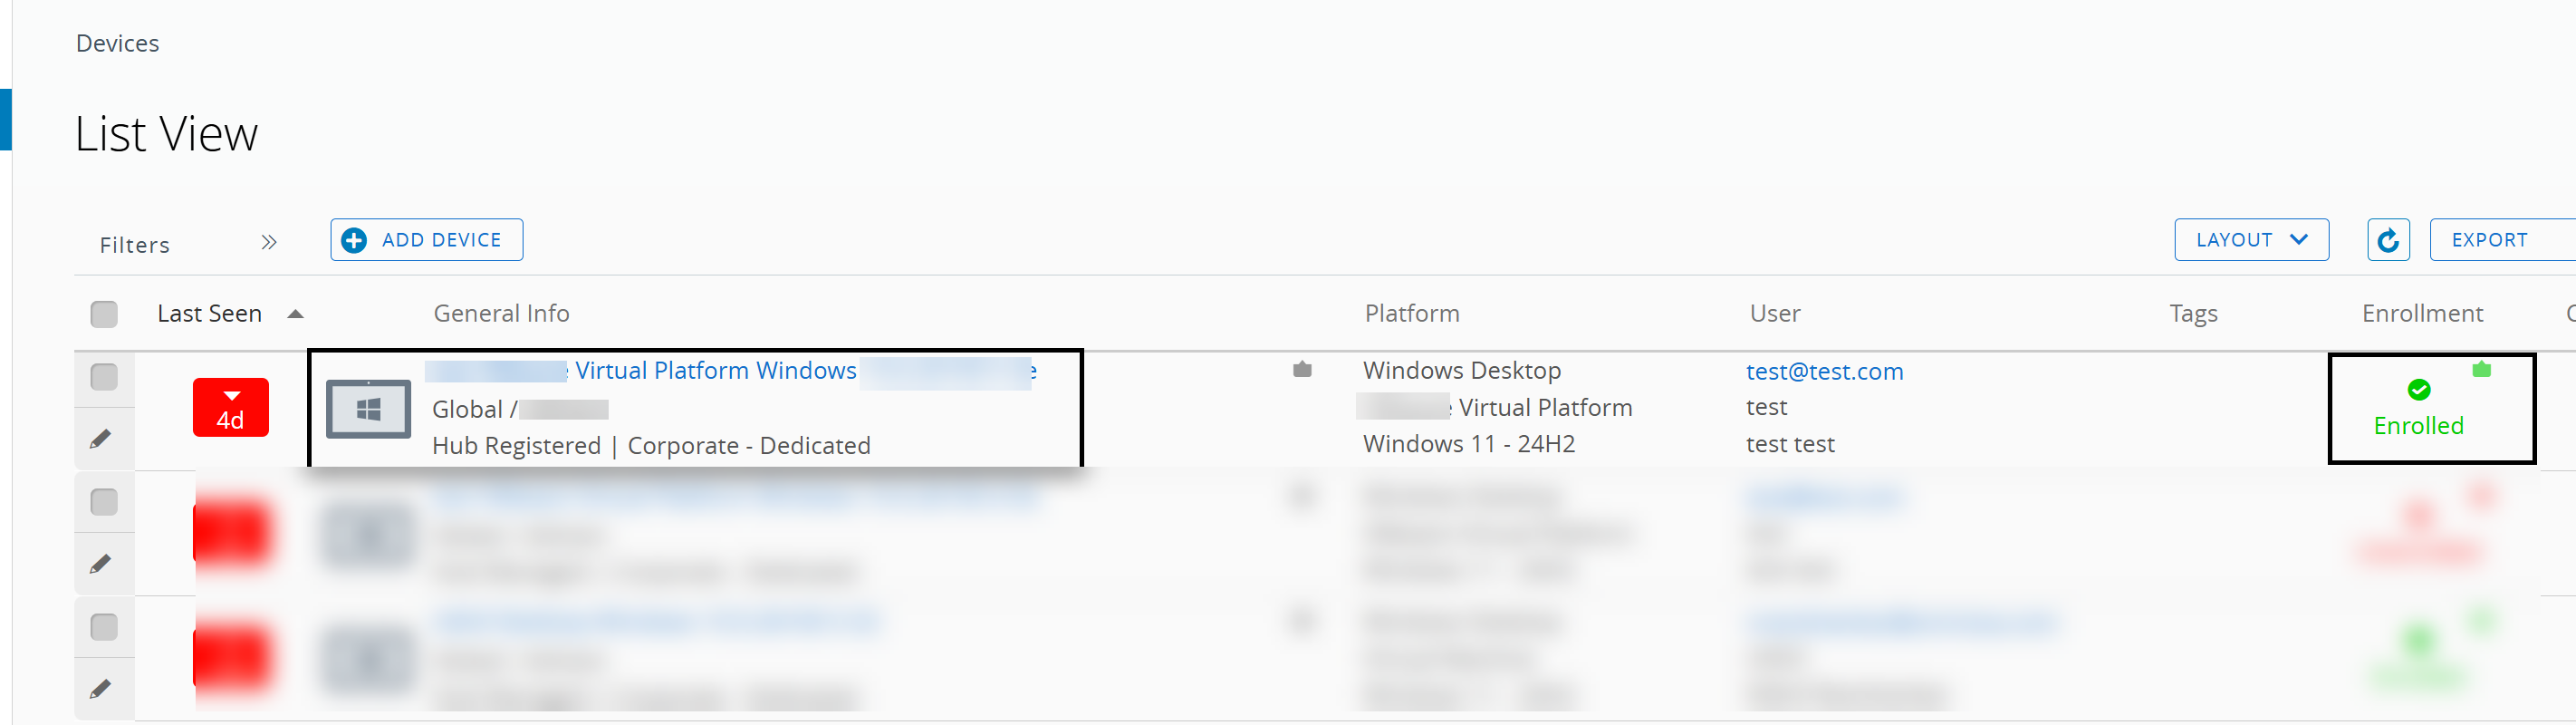
-
Click the device to view the device details.
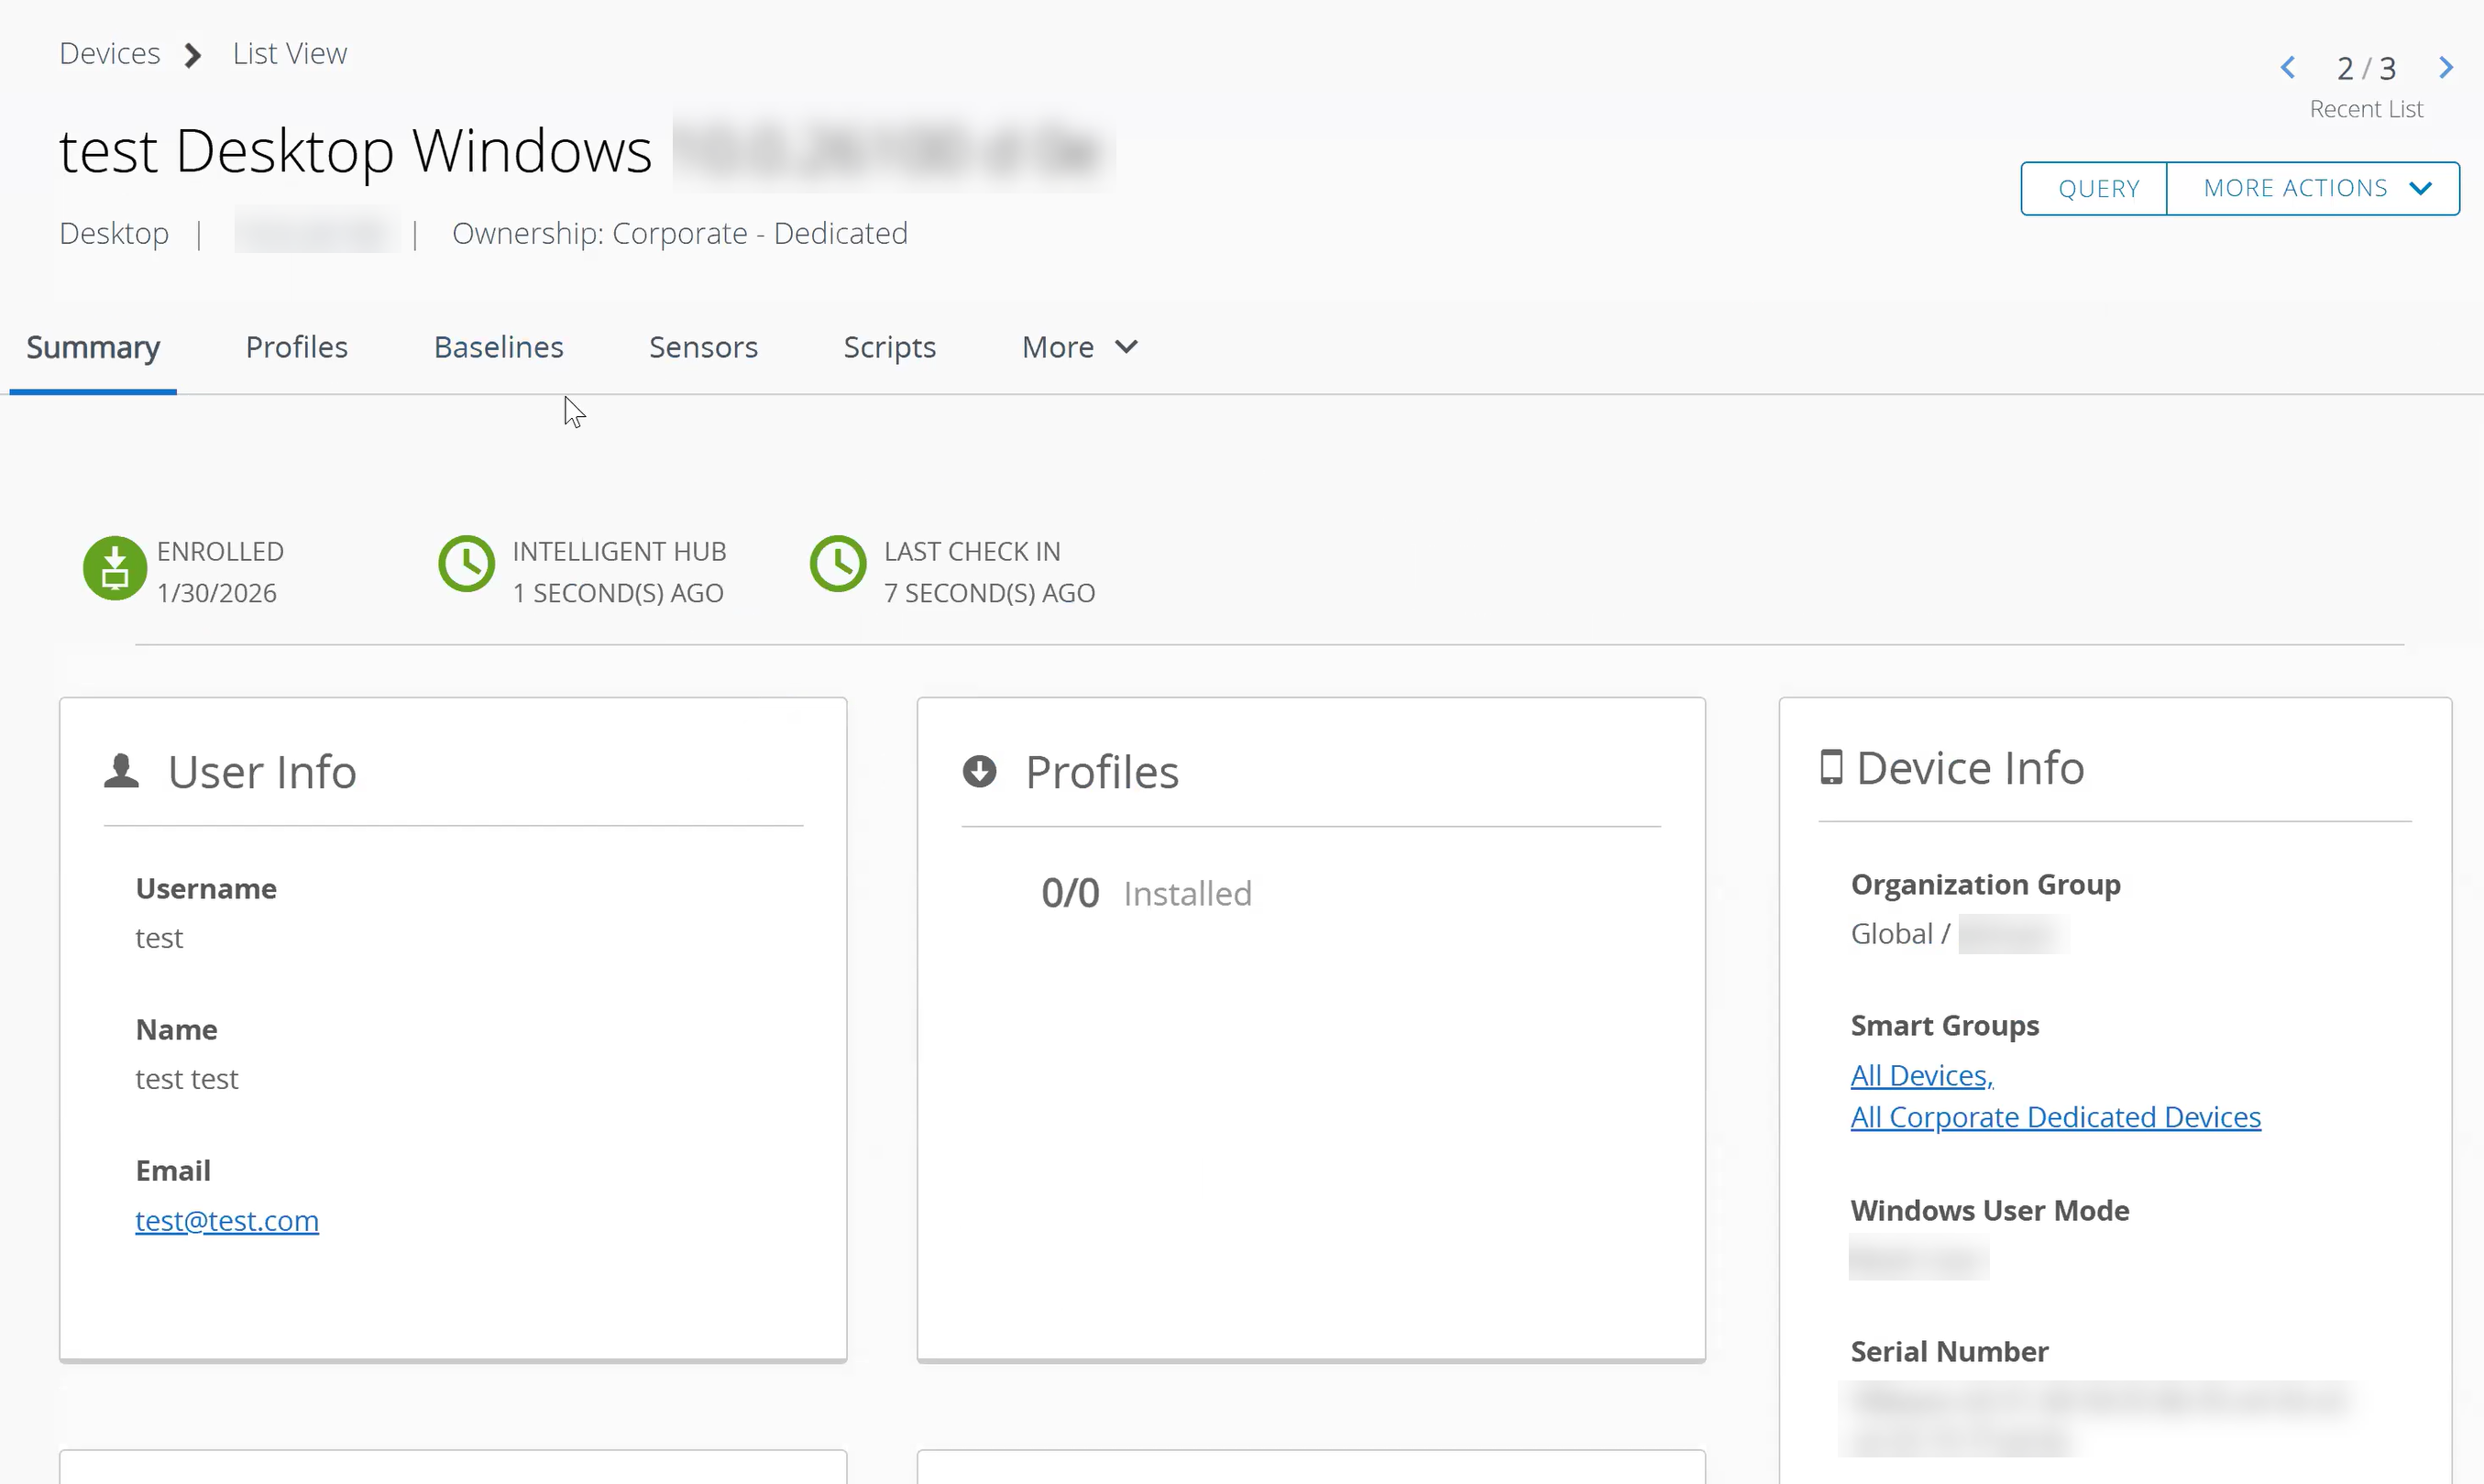
-
Navigate to Groups & Settings > All Settings > Devices & Users > General > Enrollment > and click Management mode.
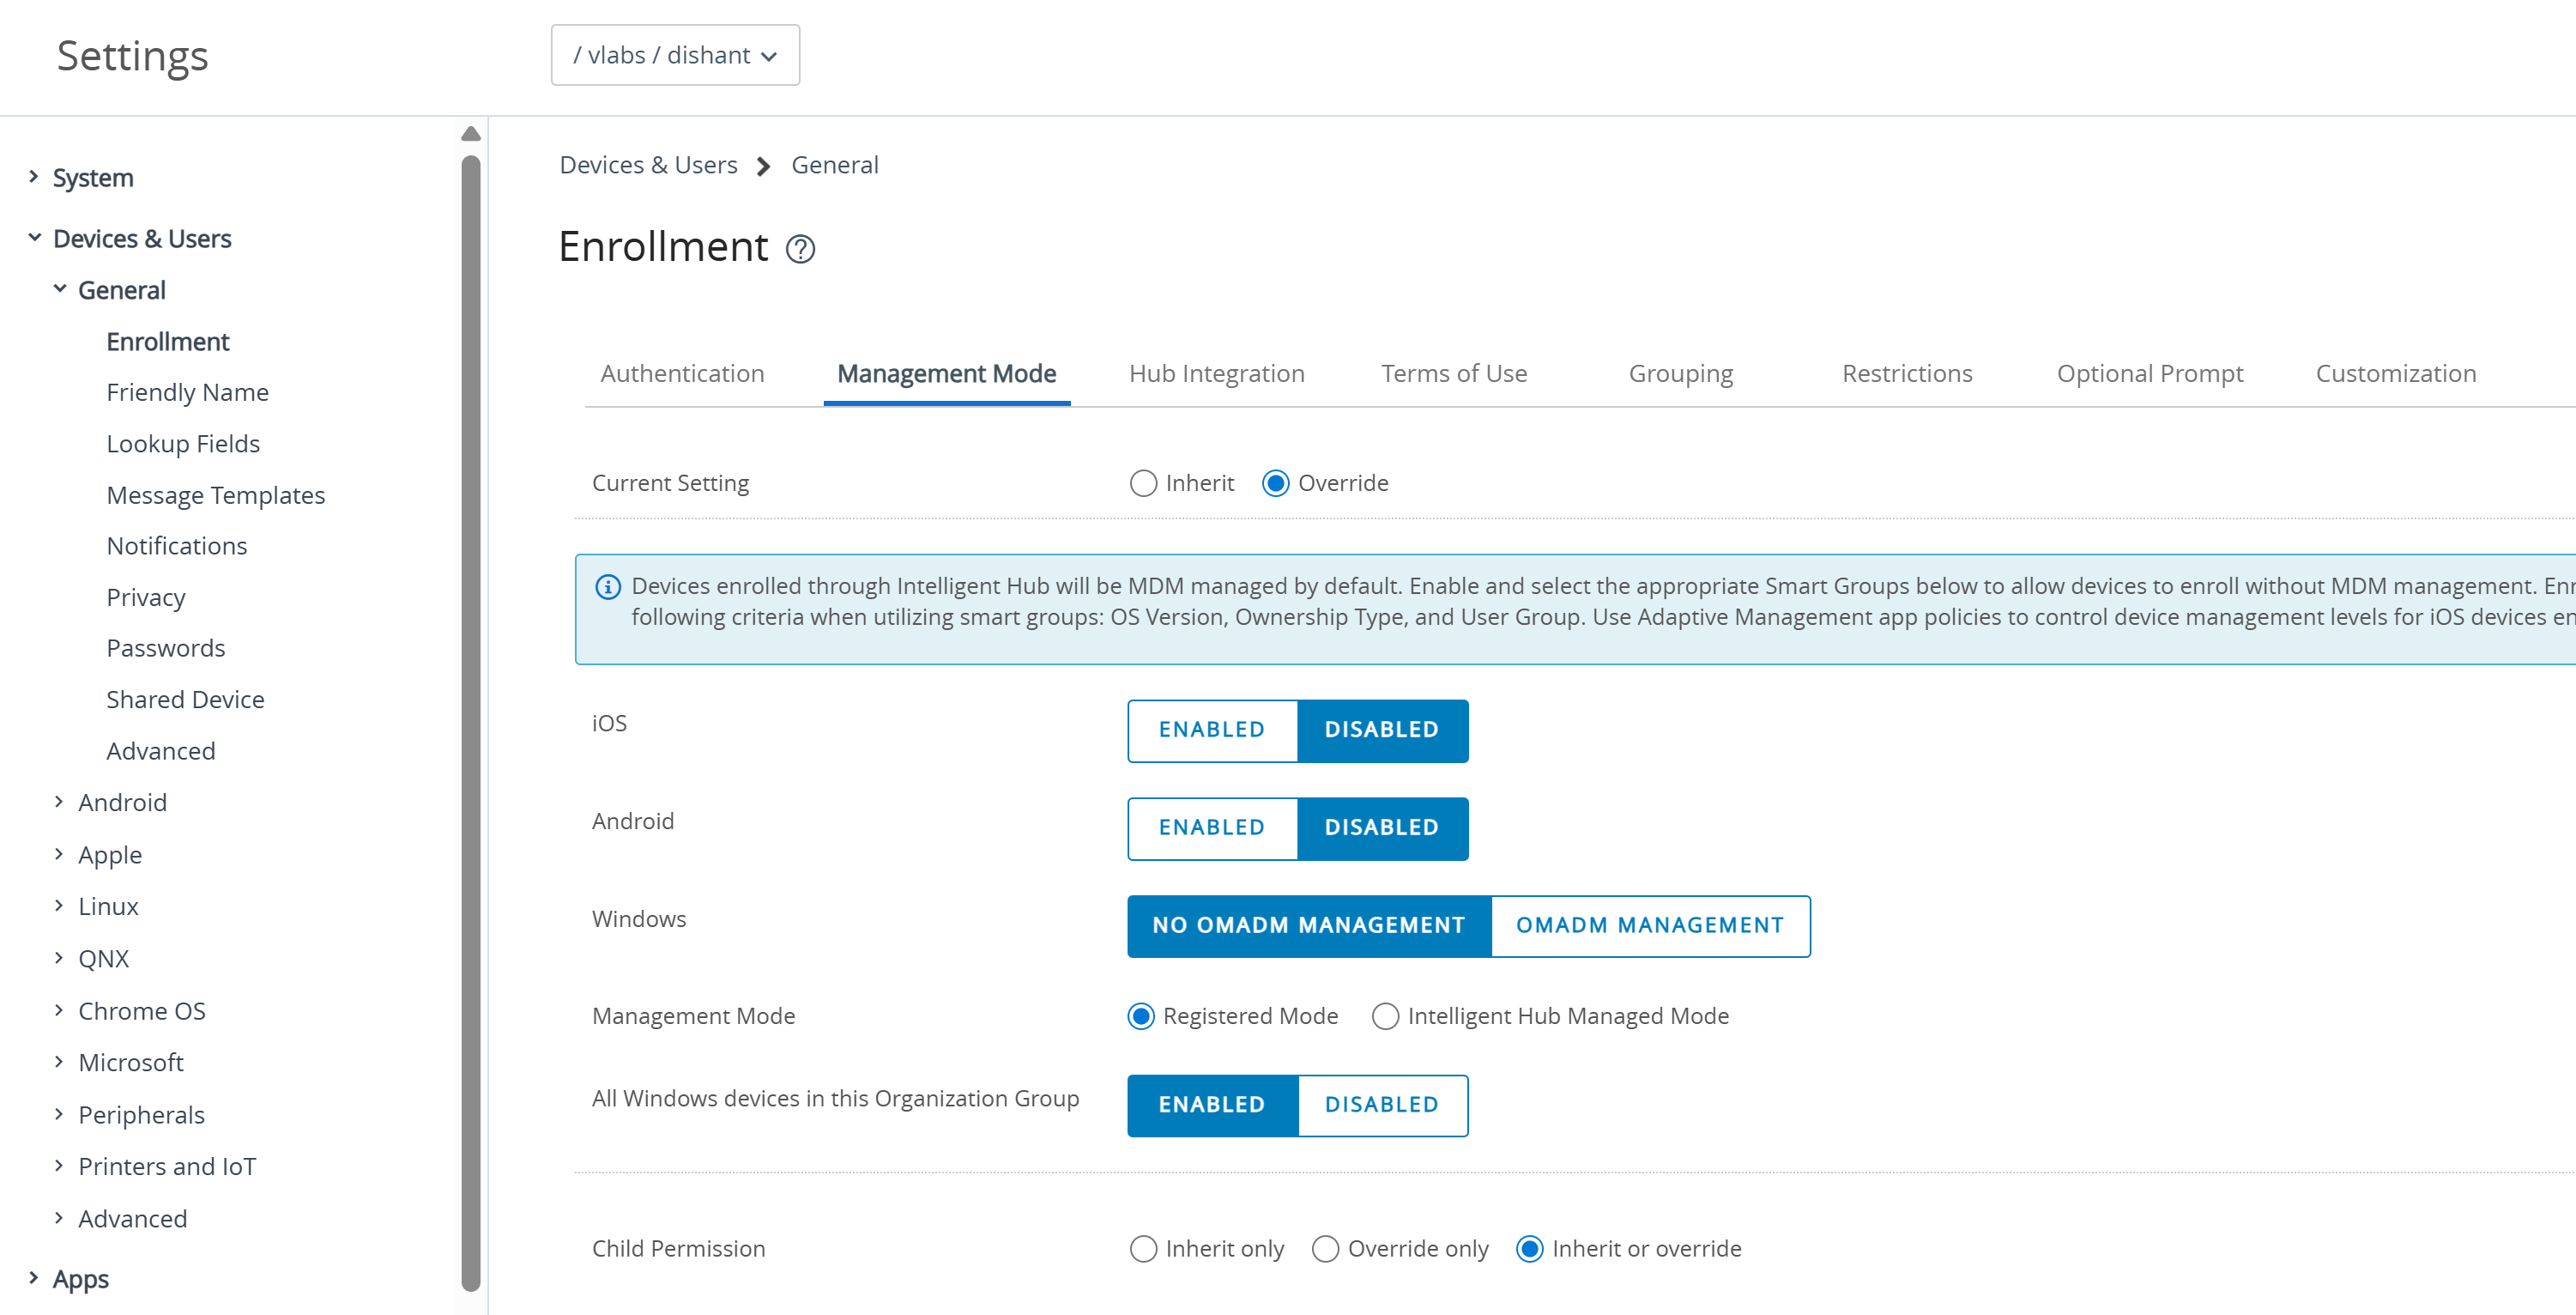
-
In the Management Mode, select Intelligent Hub Managed Mode and click Save to change the enrollment mode from Hub Registered mode to Intelligent Hub Managed mode.
-
Navigate back to Devices > List View and click the device enrolled as Hub Registered mode.
-
In the device detailed view, click More Actions and select Step-up to Hub Managed to upgrade the enrollment mode.
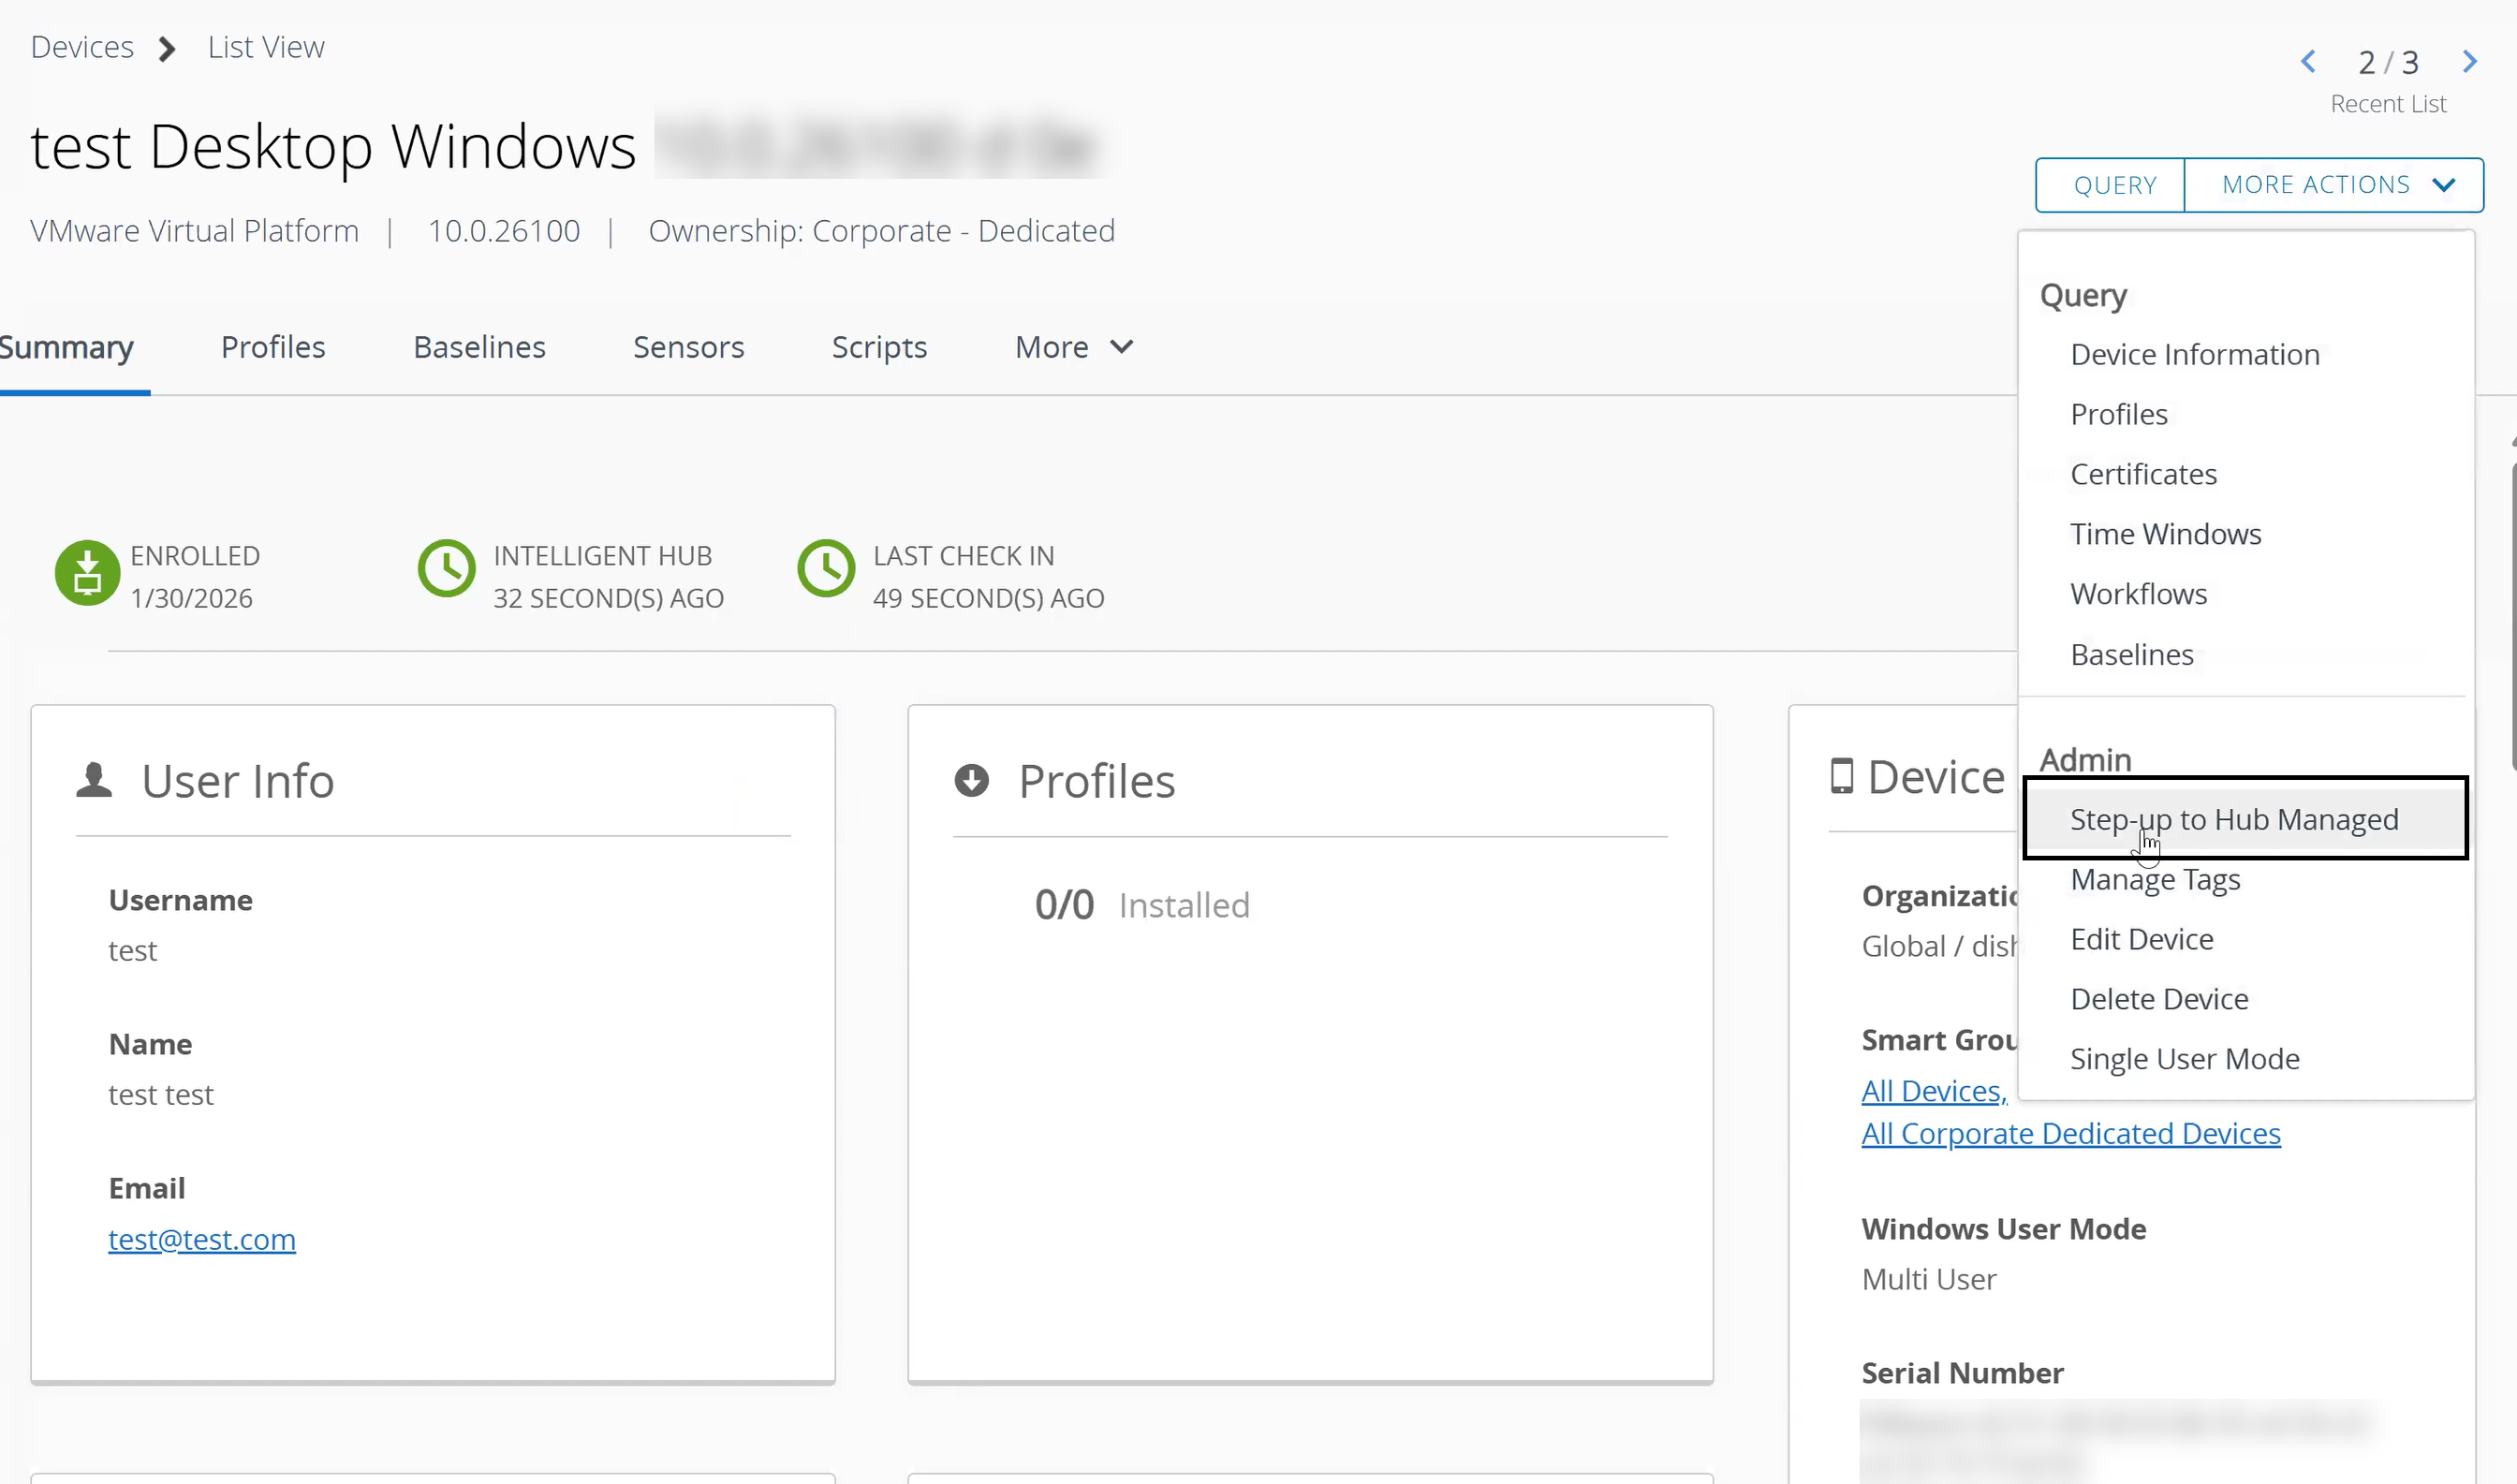
The following screenshot appears, click OK.
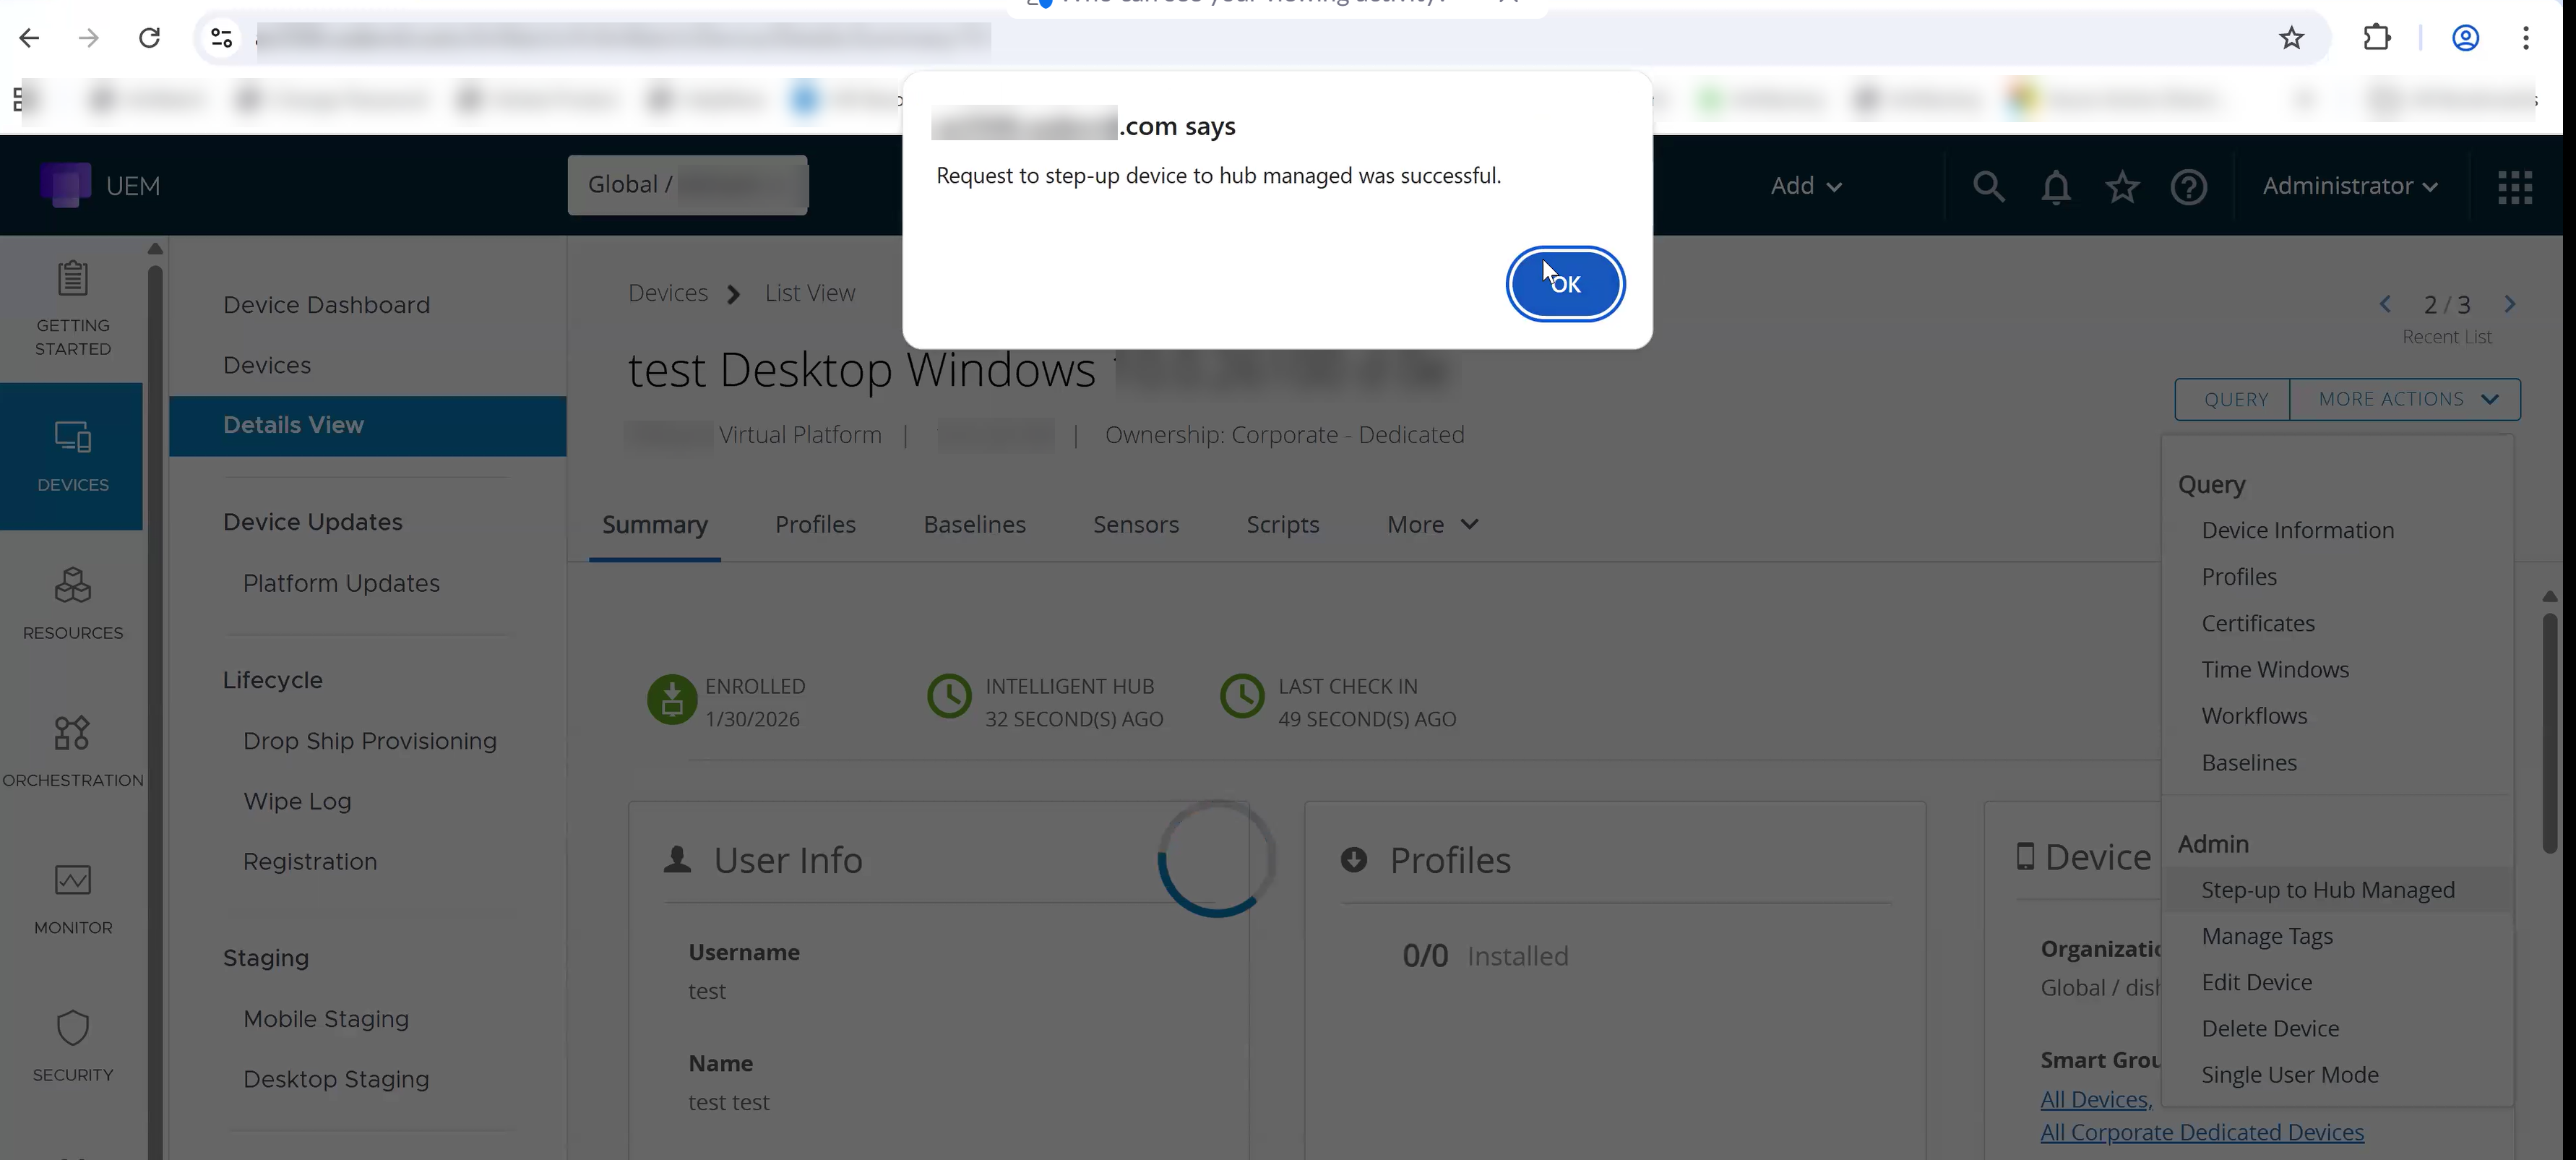
A success message appears saying the Request to step-up device to hub managed was successful.
Step-Up Enrollment from Registered Mode to Full MDM
Additionally, admins can step up devices enrolled in Registered mode to full MDM (OMA-DM) without requiring a device wipe or end-user re-enrollment.
The following procedure outlines the steps to upgrade from Registered mode to full MDM (OMA DM):
-
Navigate to Device > List View and select the device enrolled in Hub Registered mode.
-
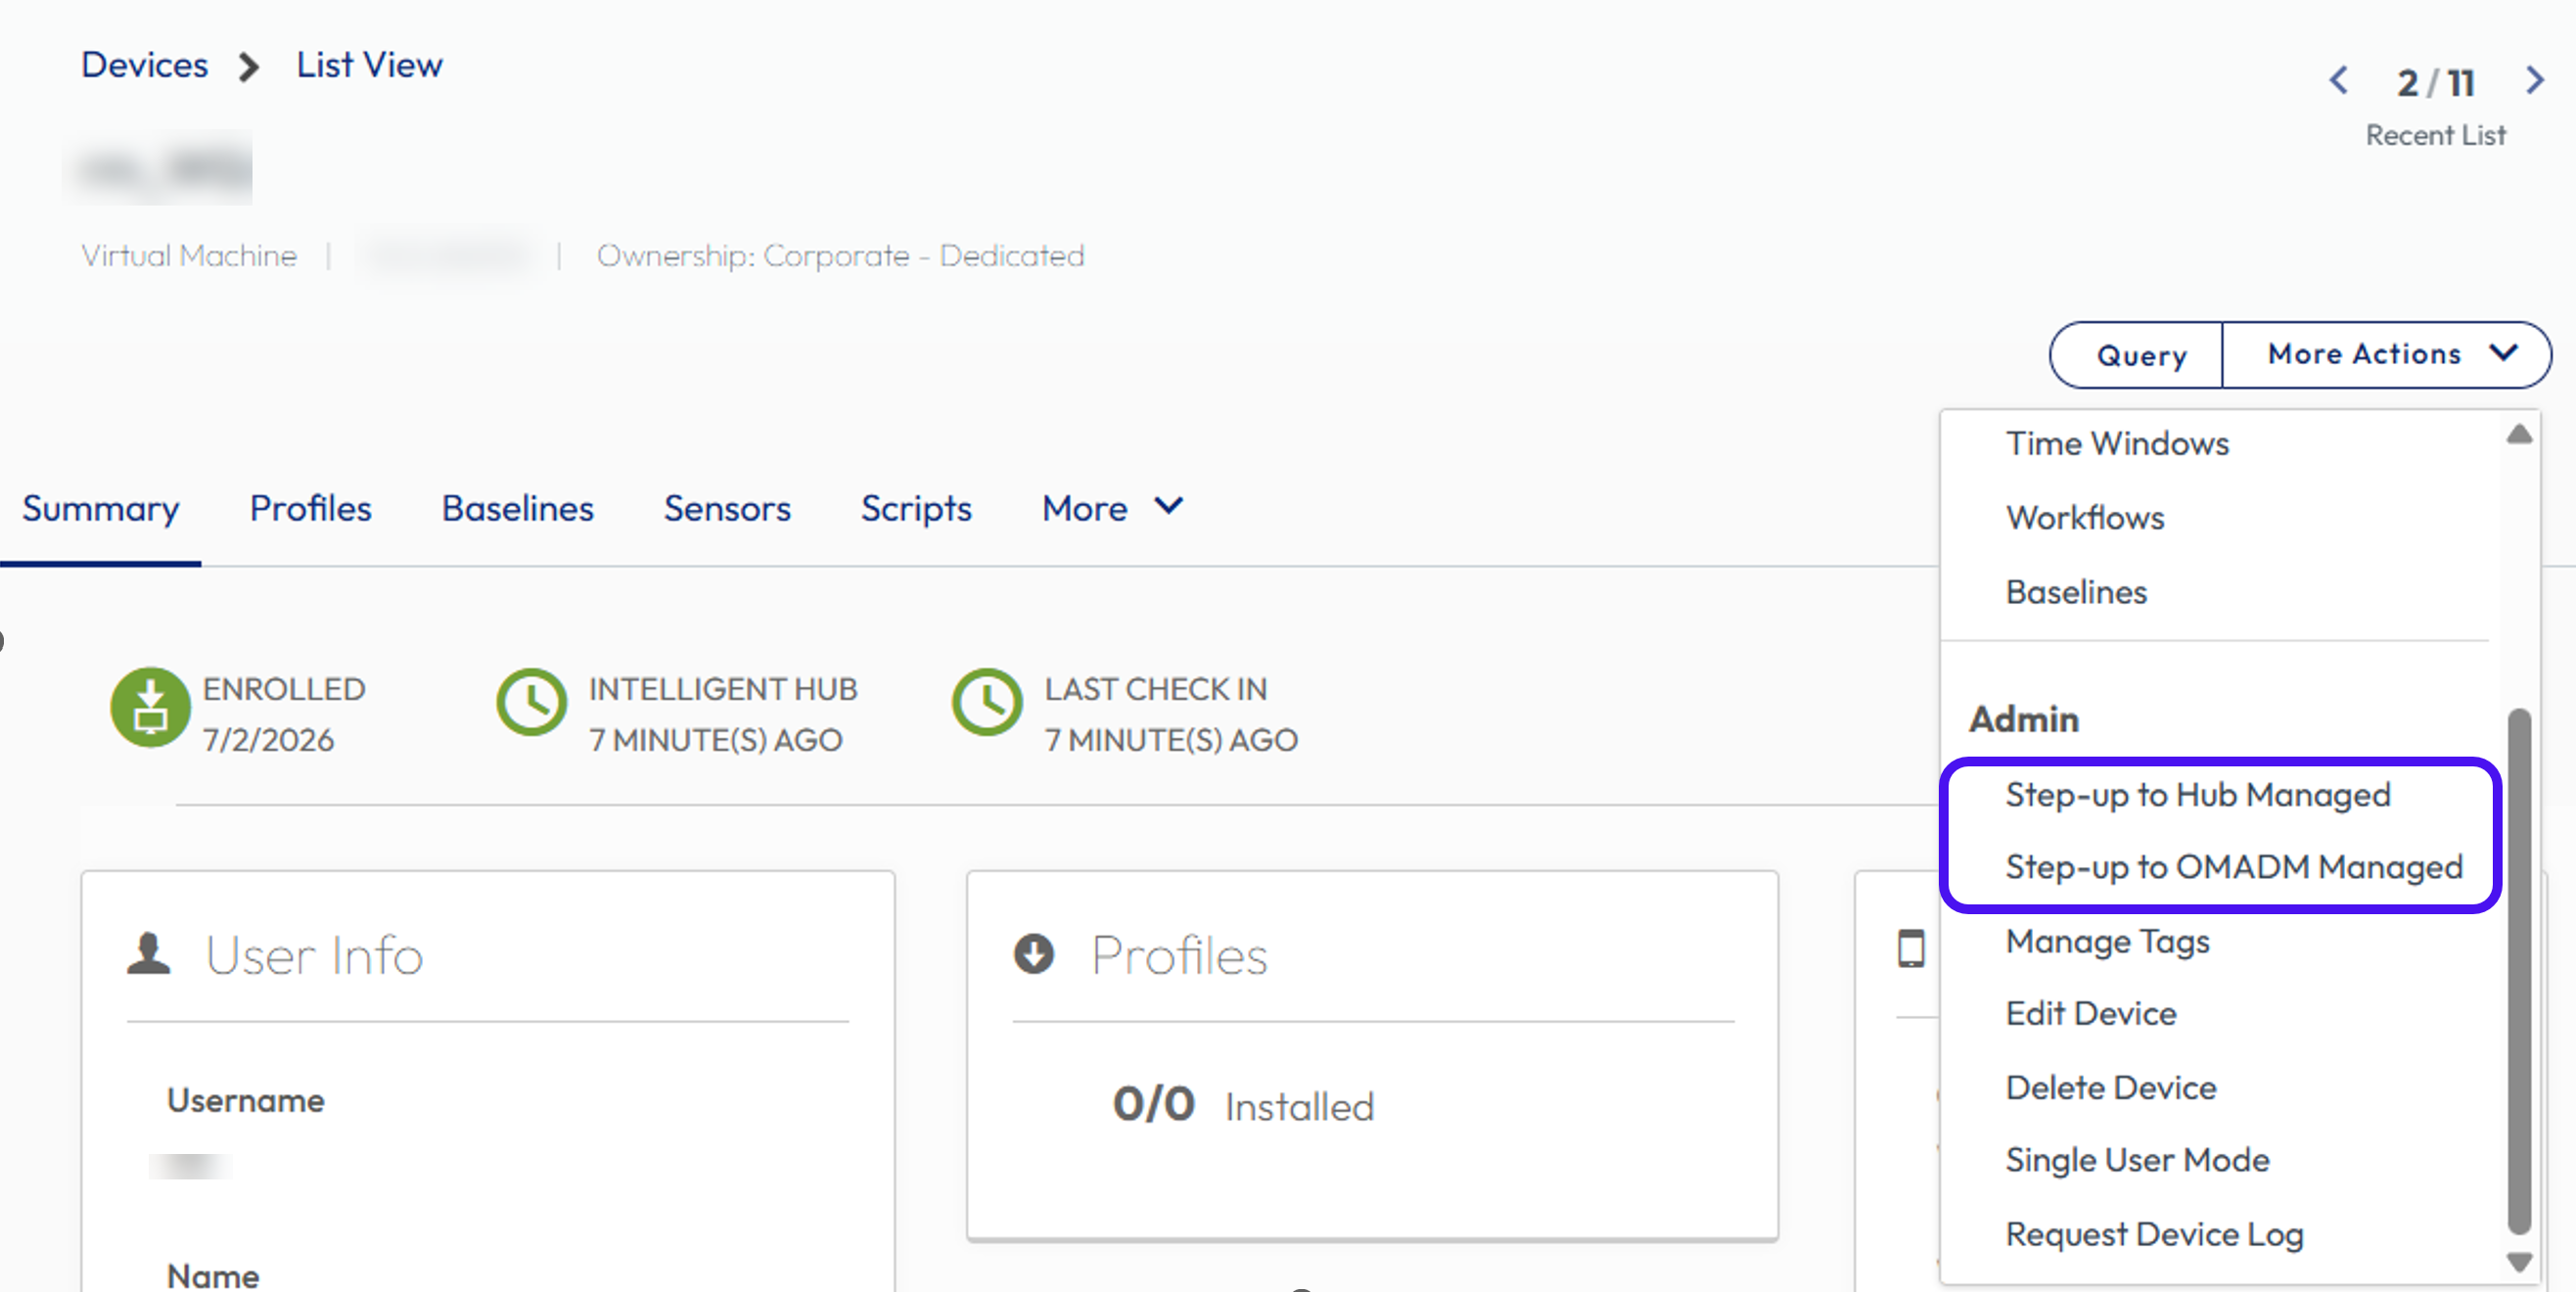
Click the device to open the device Details view, click More actions and choose Step-up to OMADM Managed.
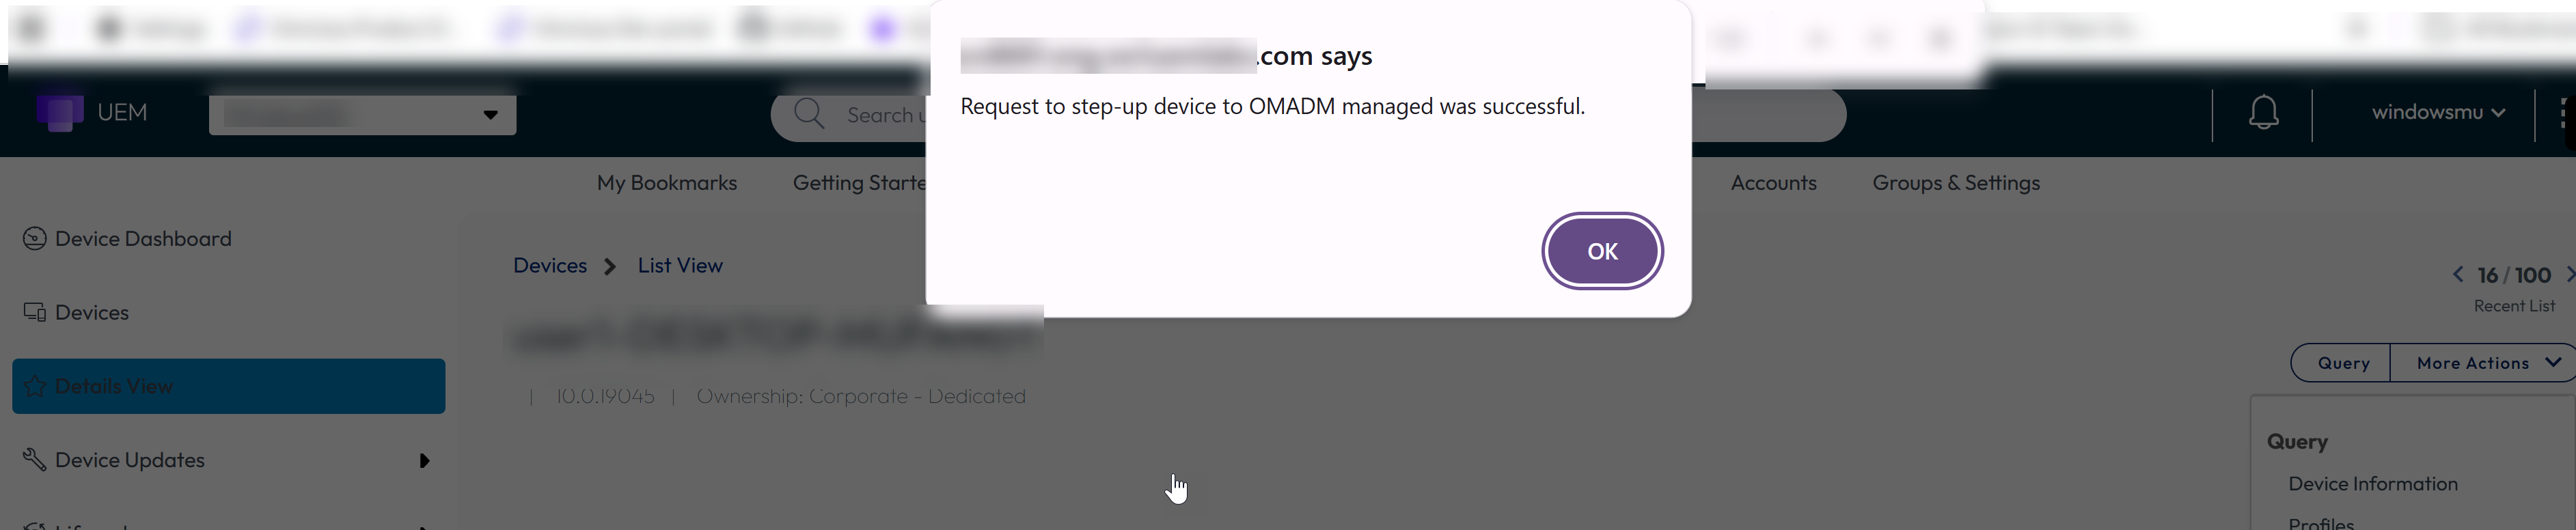
A success message appears saying the Request to step-up device to hub managed was successful.
Step-Up Enrollment from Intelligent Hub Managed Mode to Full MDM
Devices enrolled in Intelligent Hub Managed mode can upgrade to Full MDM management. When a step-up is initiated, Intelligent Hub automatically performs native OMA DM enrollment on the device, enabling capabilities that require the native Windows MDM channel, such as Microsoft CSP-based profiles and Conditional Access.
The existing device record and all Hub-based management configurations are maintained throughout the transition. No device wipe or end-user action is required. To step-up a device from Hub Managed to OMA DM, perform the following steps:
Prerequisites
To step-up a device from Intelligent Hub Managed mode to Full MDM management, you have to create an OG and enroll the device in Intelligent Hub Managed mode. For more information see, Enroll with Intelligent Hub Managed Mode section.
- The device must be enrolled with Intelligent Hub version 2607 and later
- Workspace ONE UEM console 2607 and later
Procedure
The following procedure outlines the steps to perform a device step-up from Hub Managed to OMA DM management mode.
-
Navigate to Devices > List View to view the device enrolled as Intelligent Hub Managed mode.
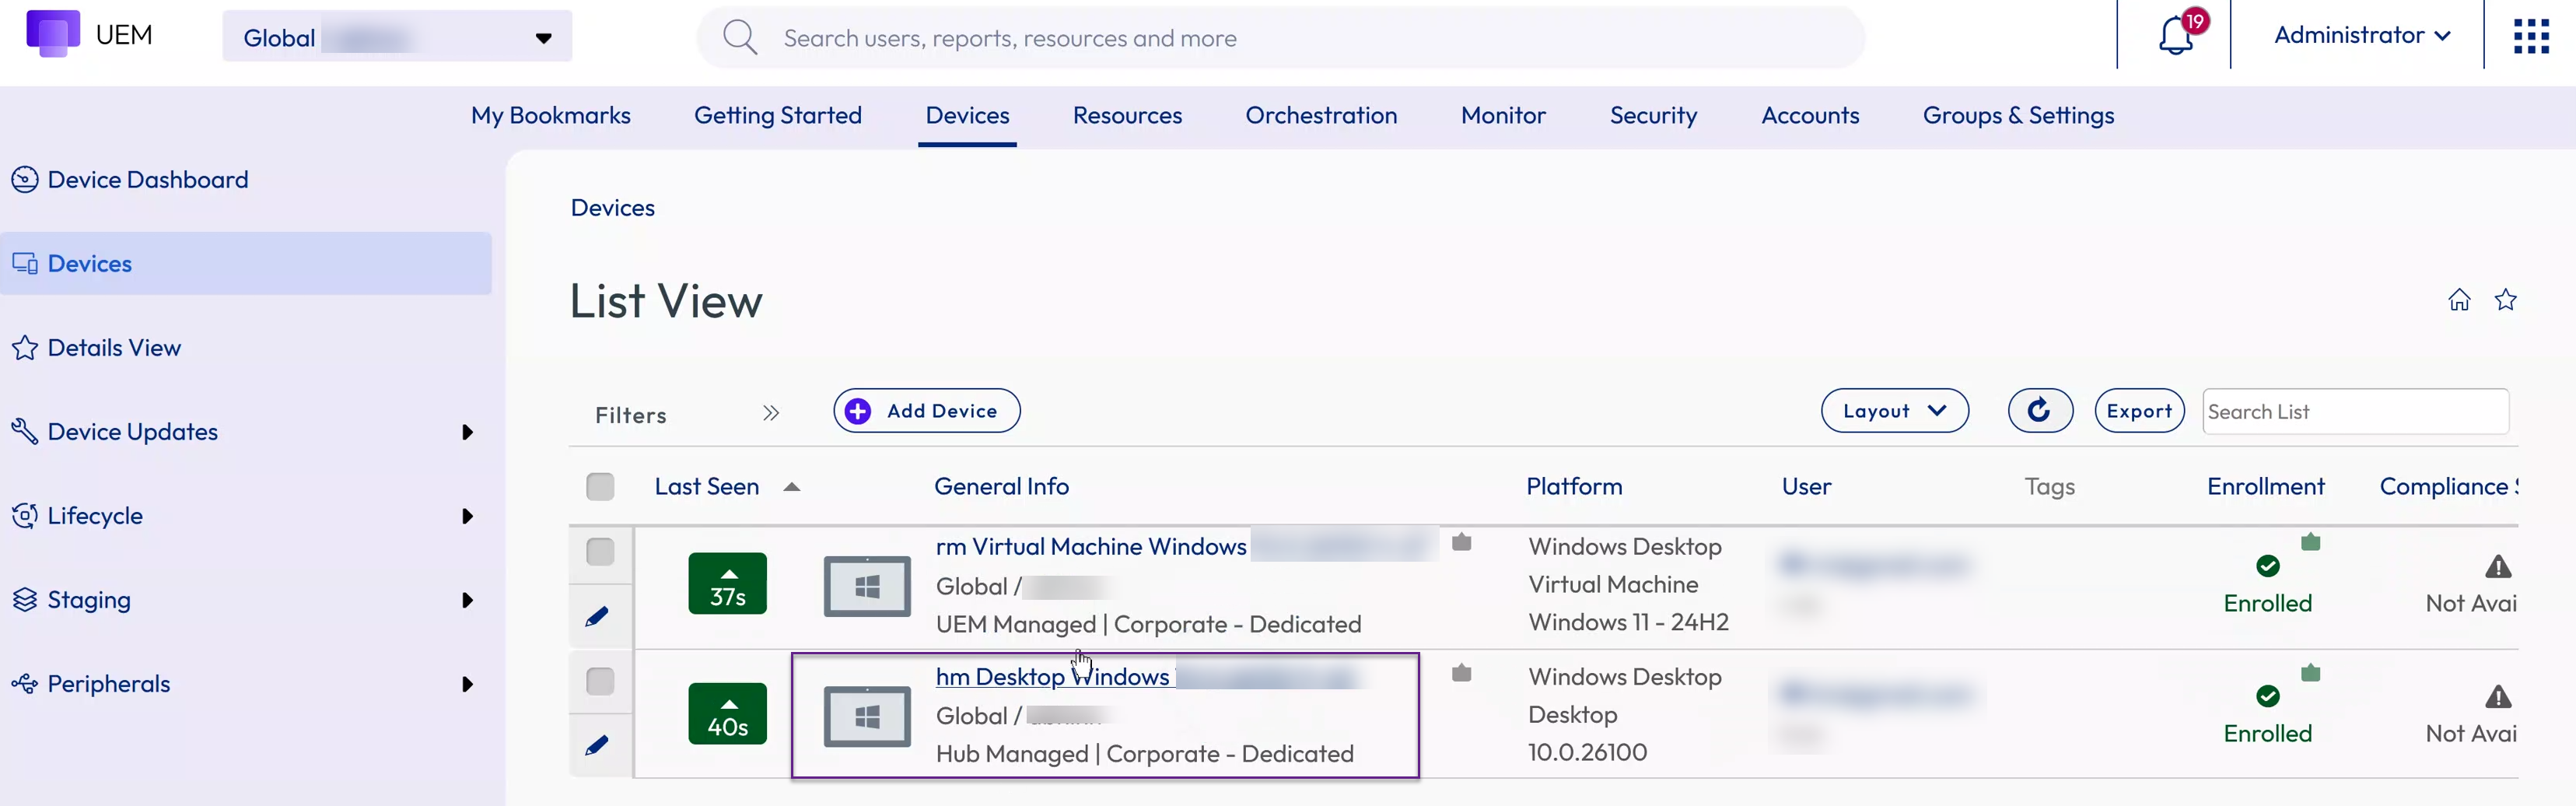
-
Click on the device and navigate to More Actions and click Step-up to OMADM Managed and then click OK.
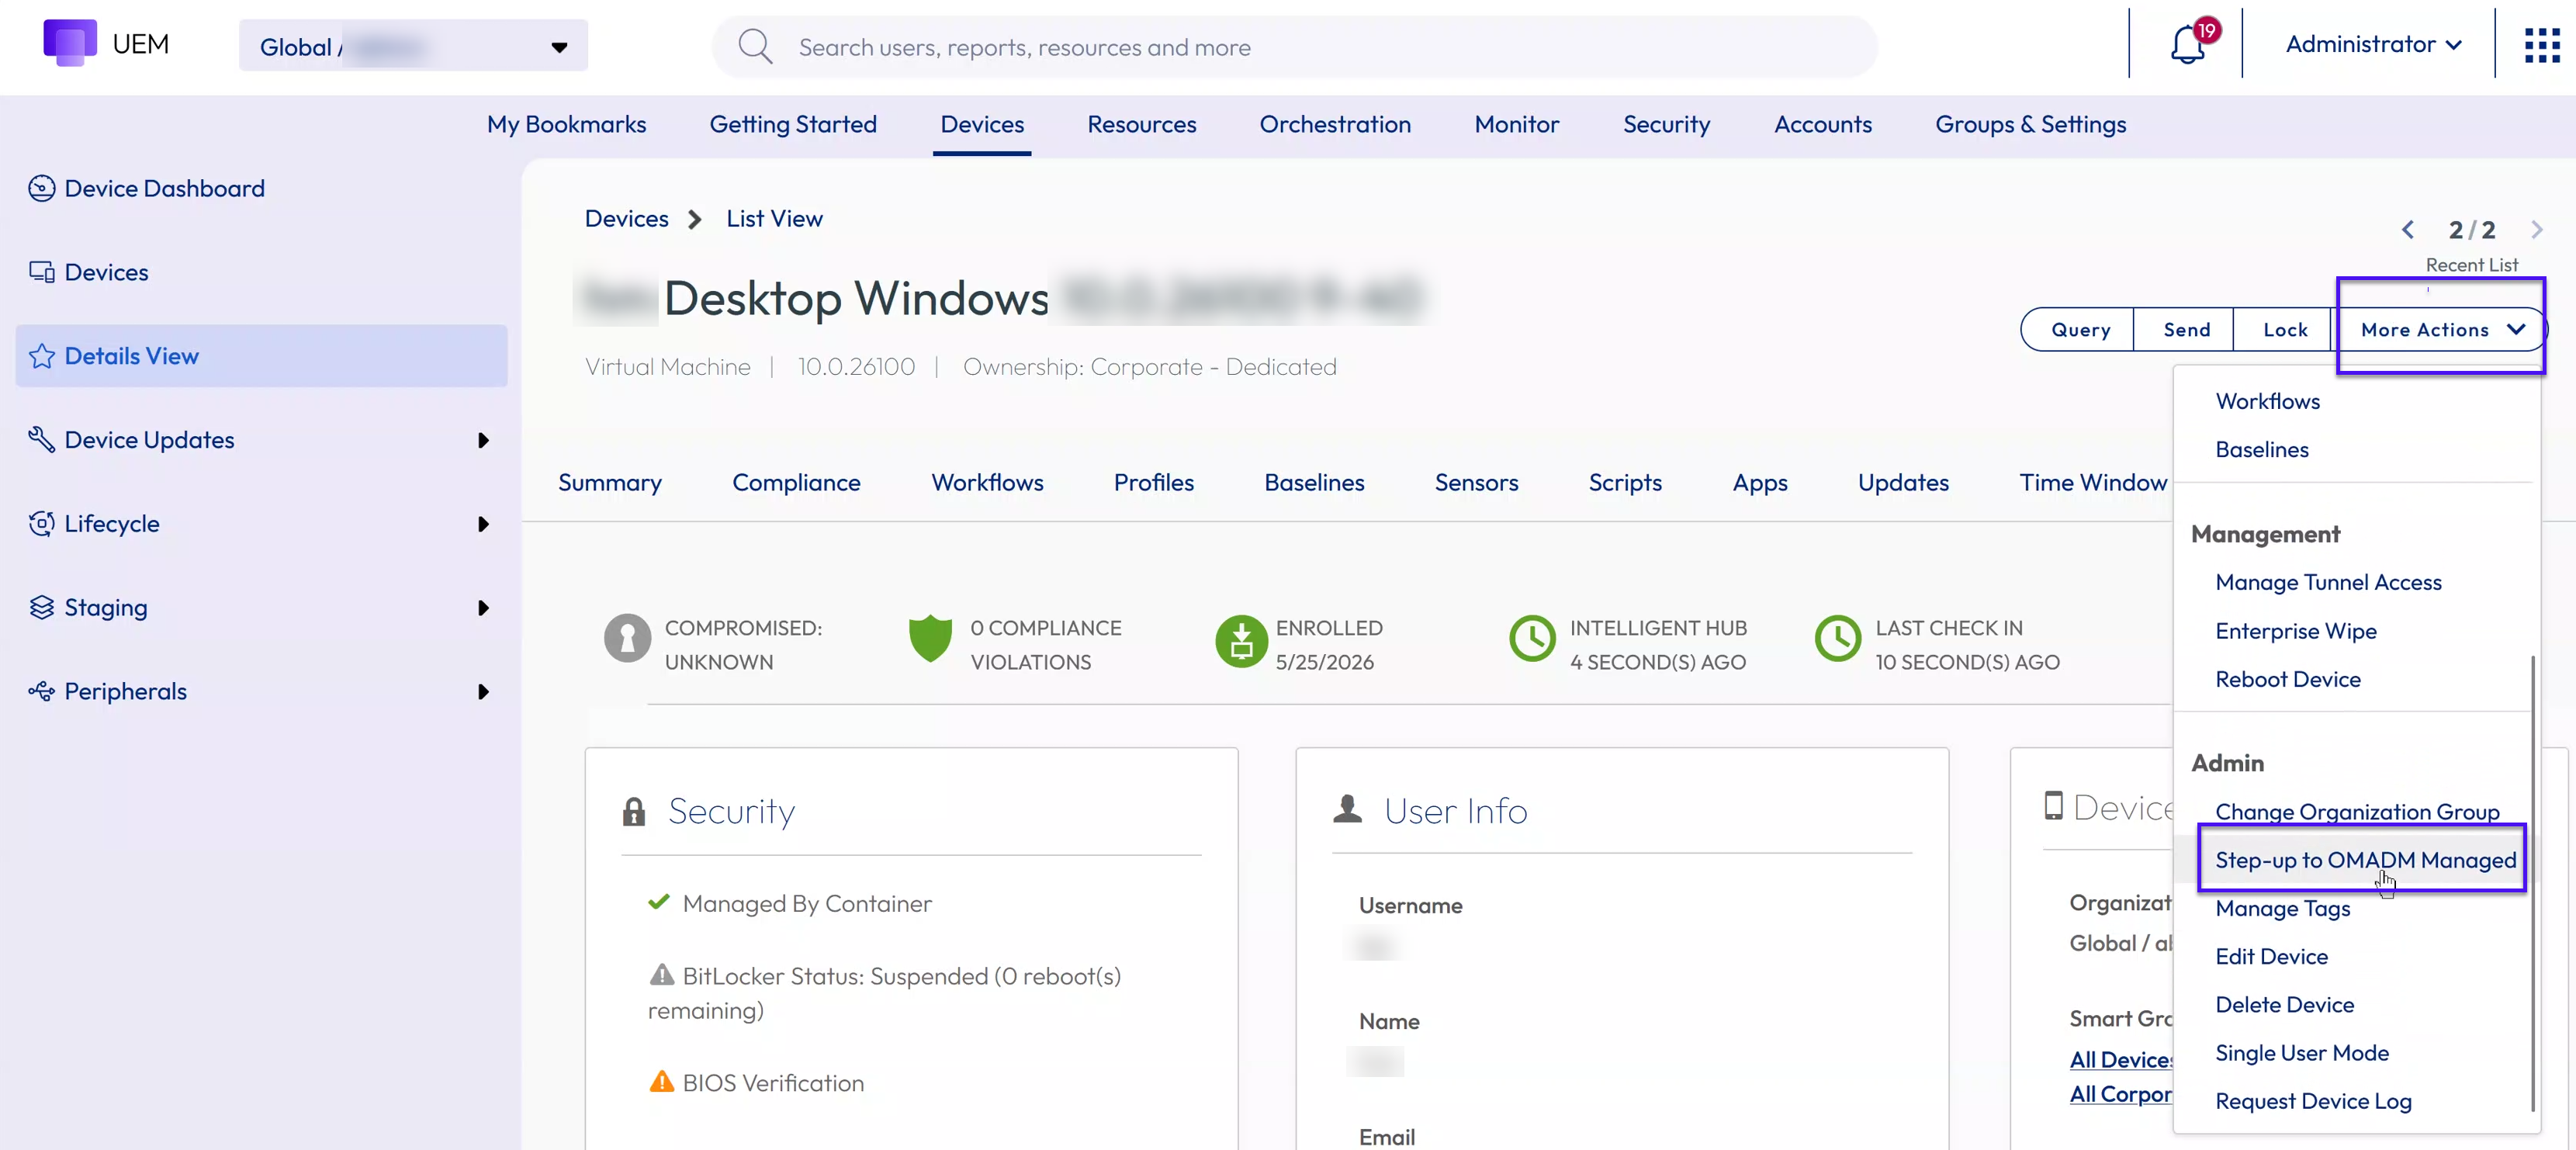
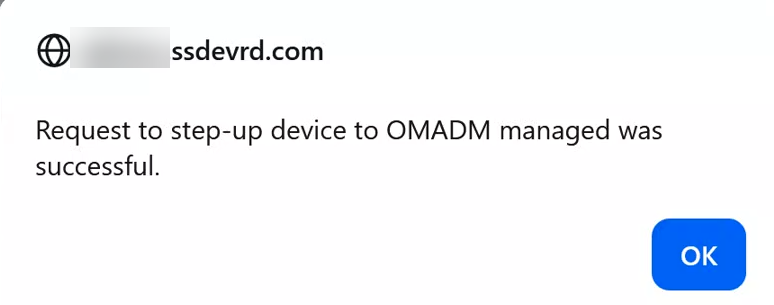
-
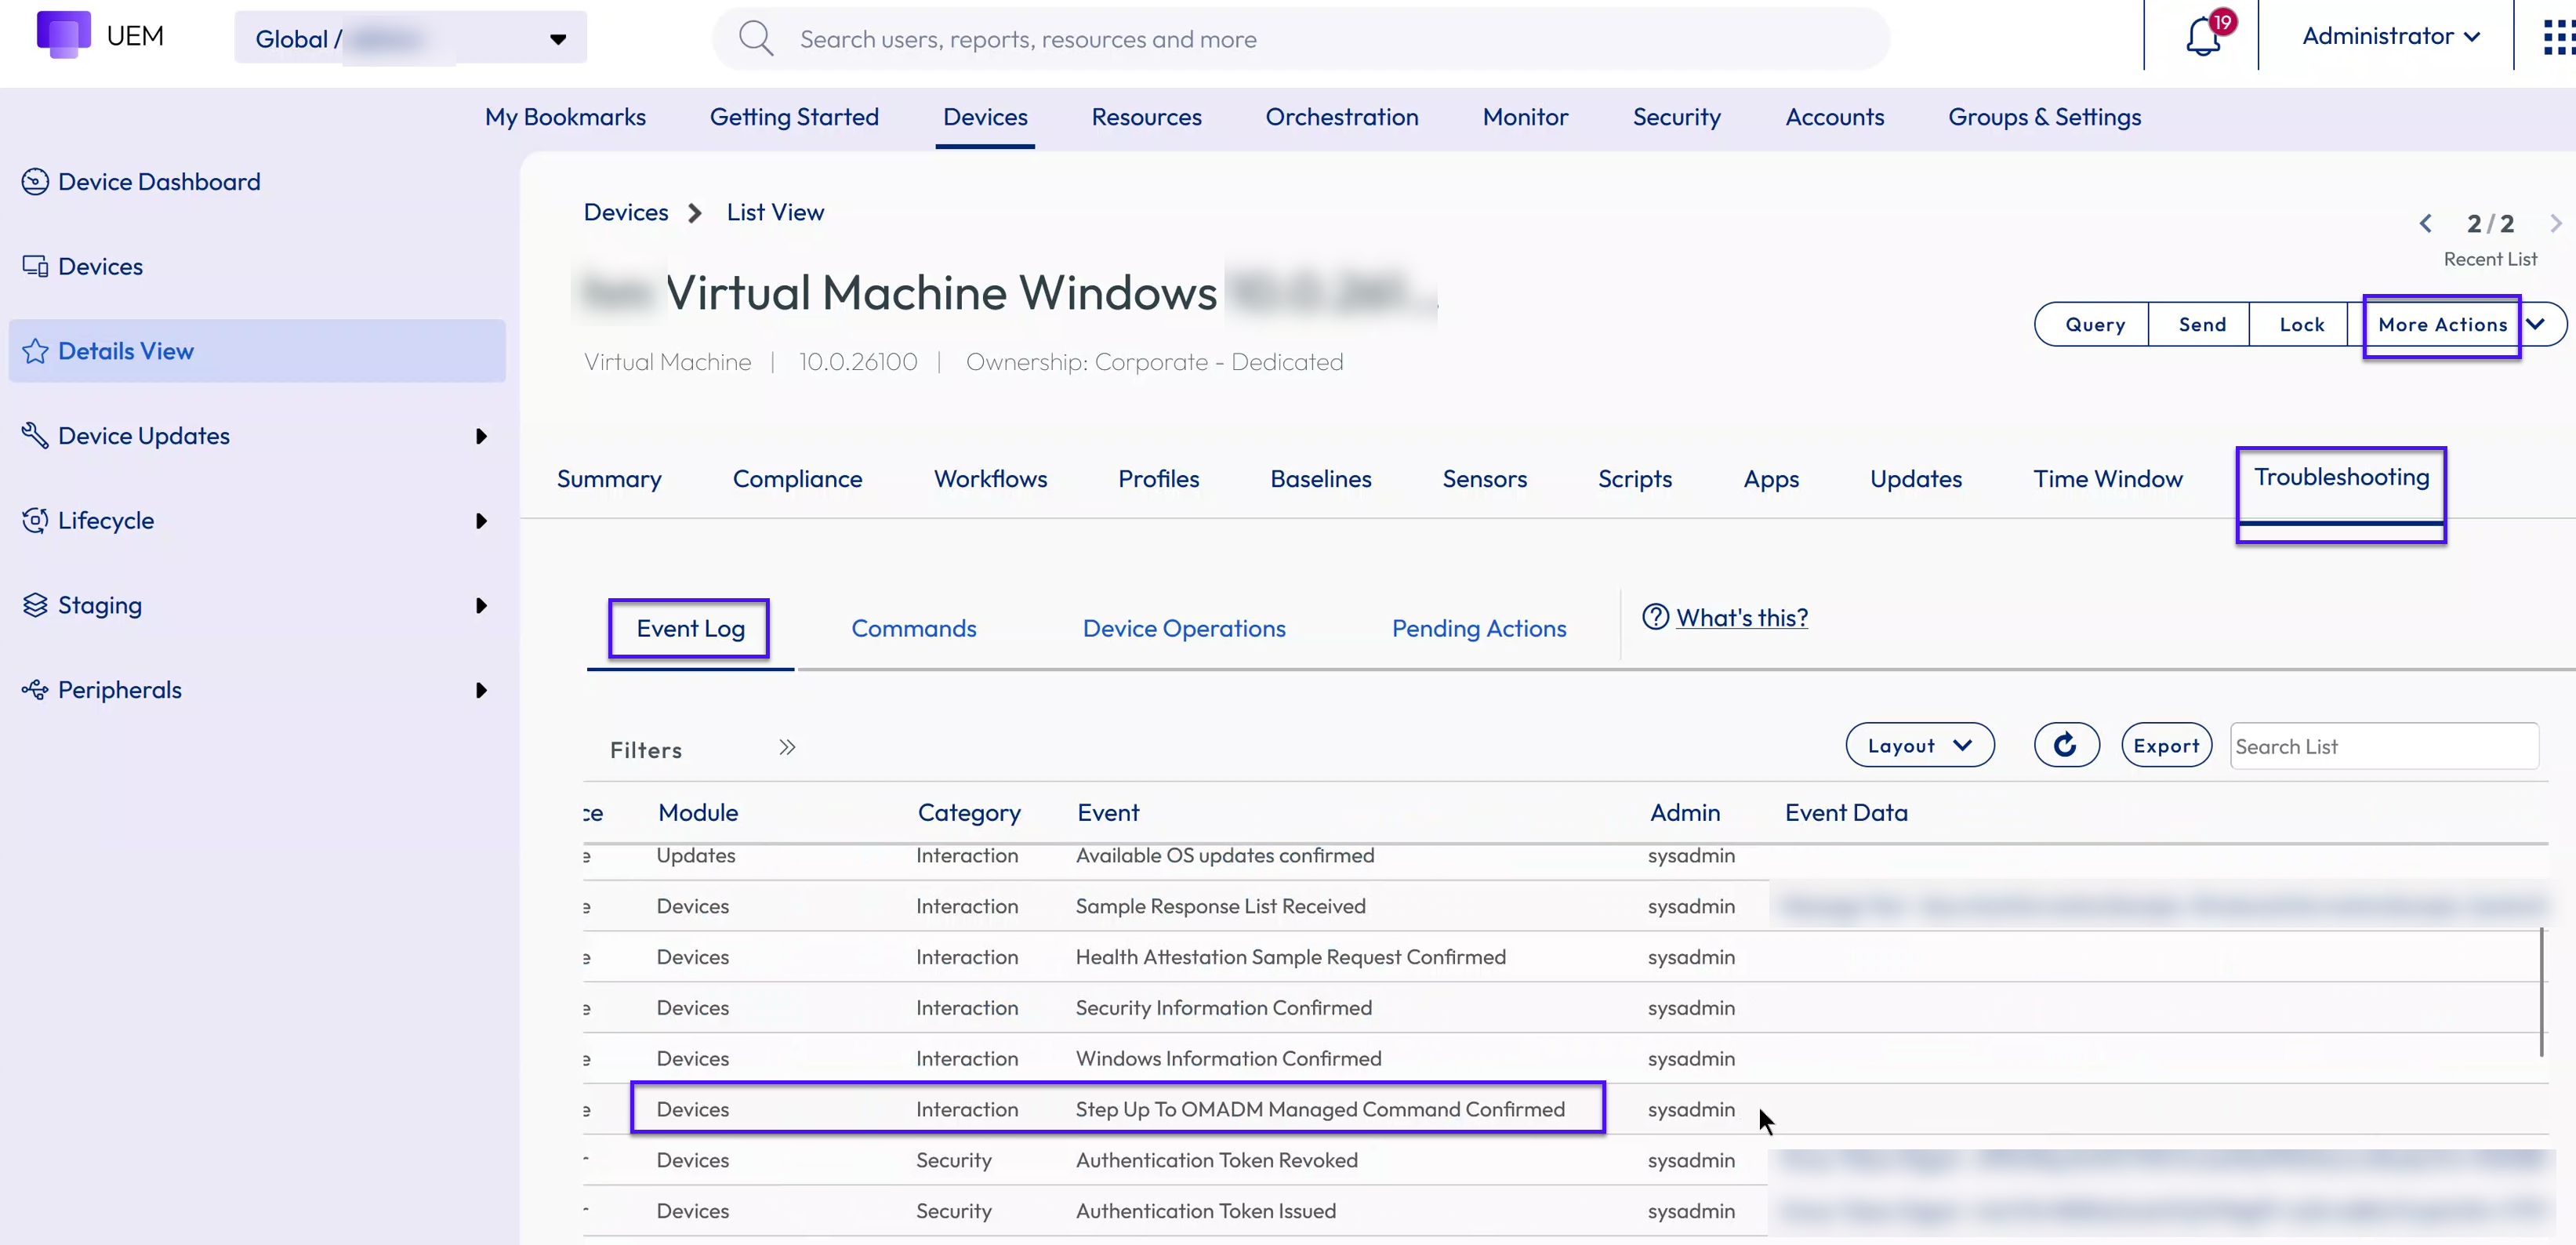
On the Device details screen, click More Actions > Troubleshooting > Commands to view the status of the enrollment.
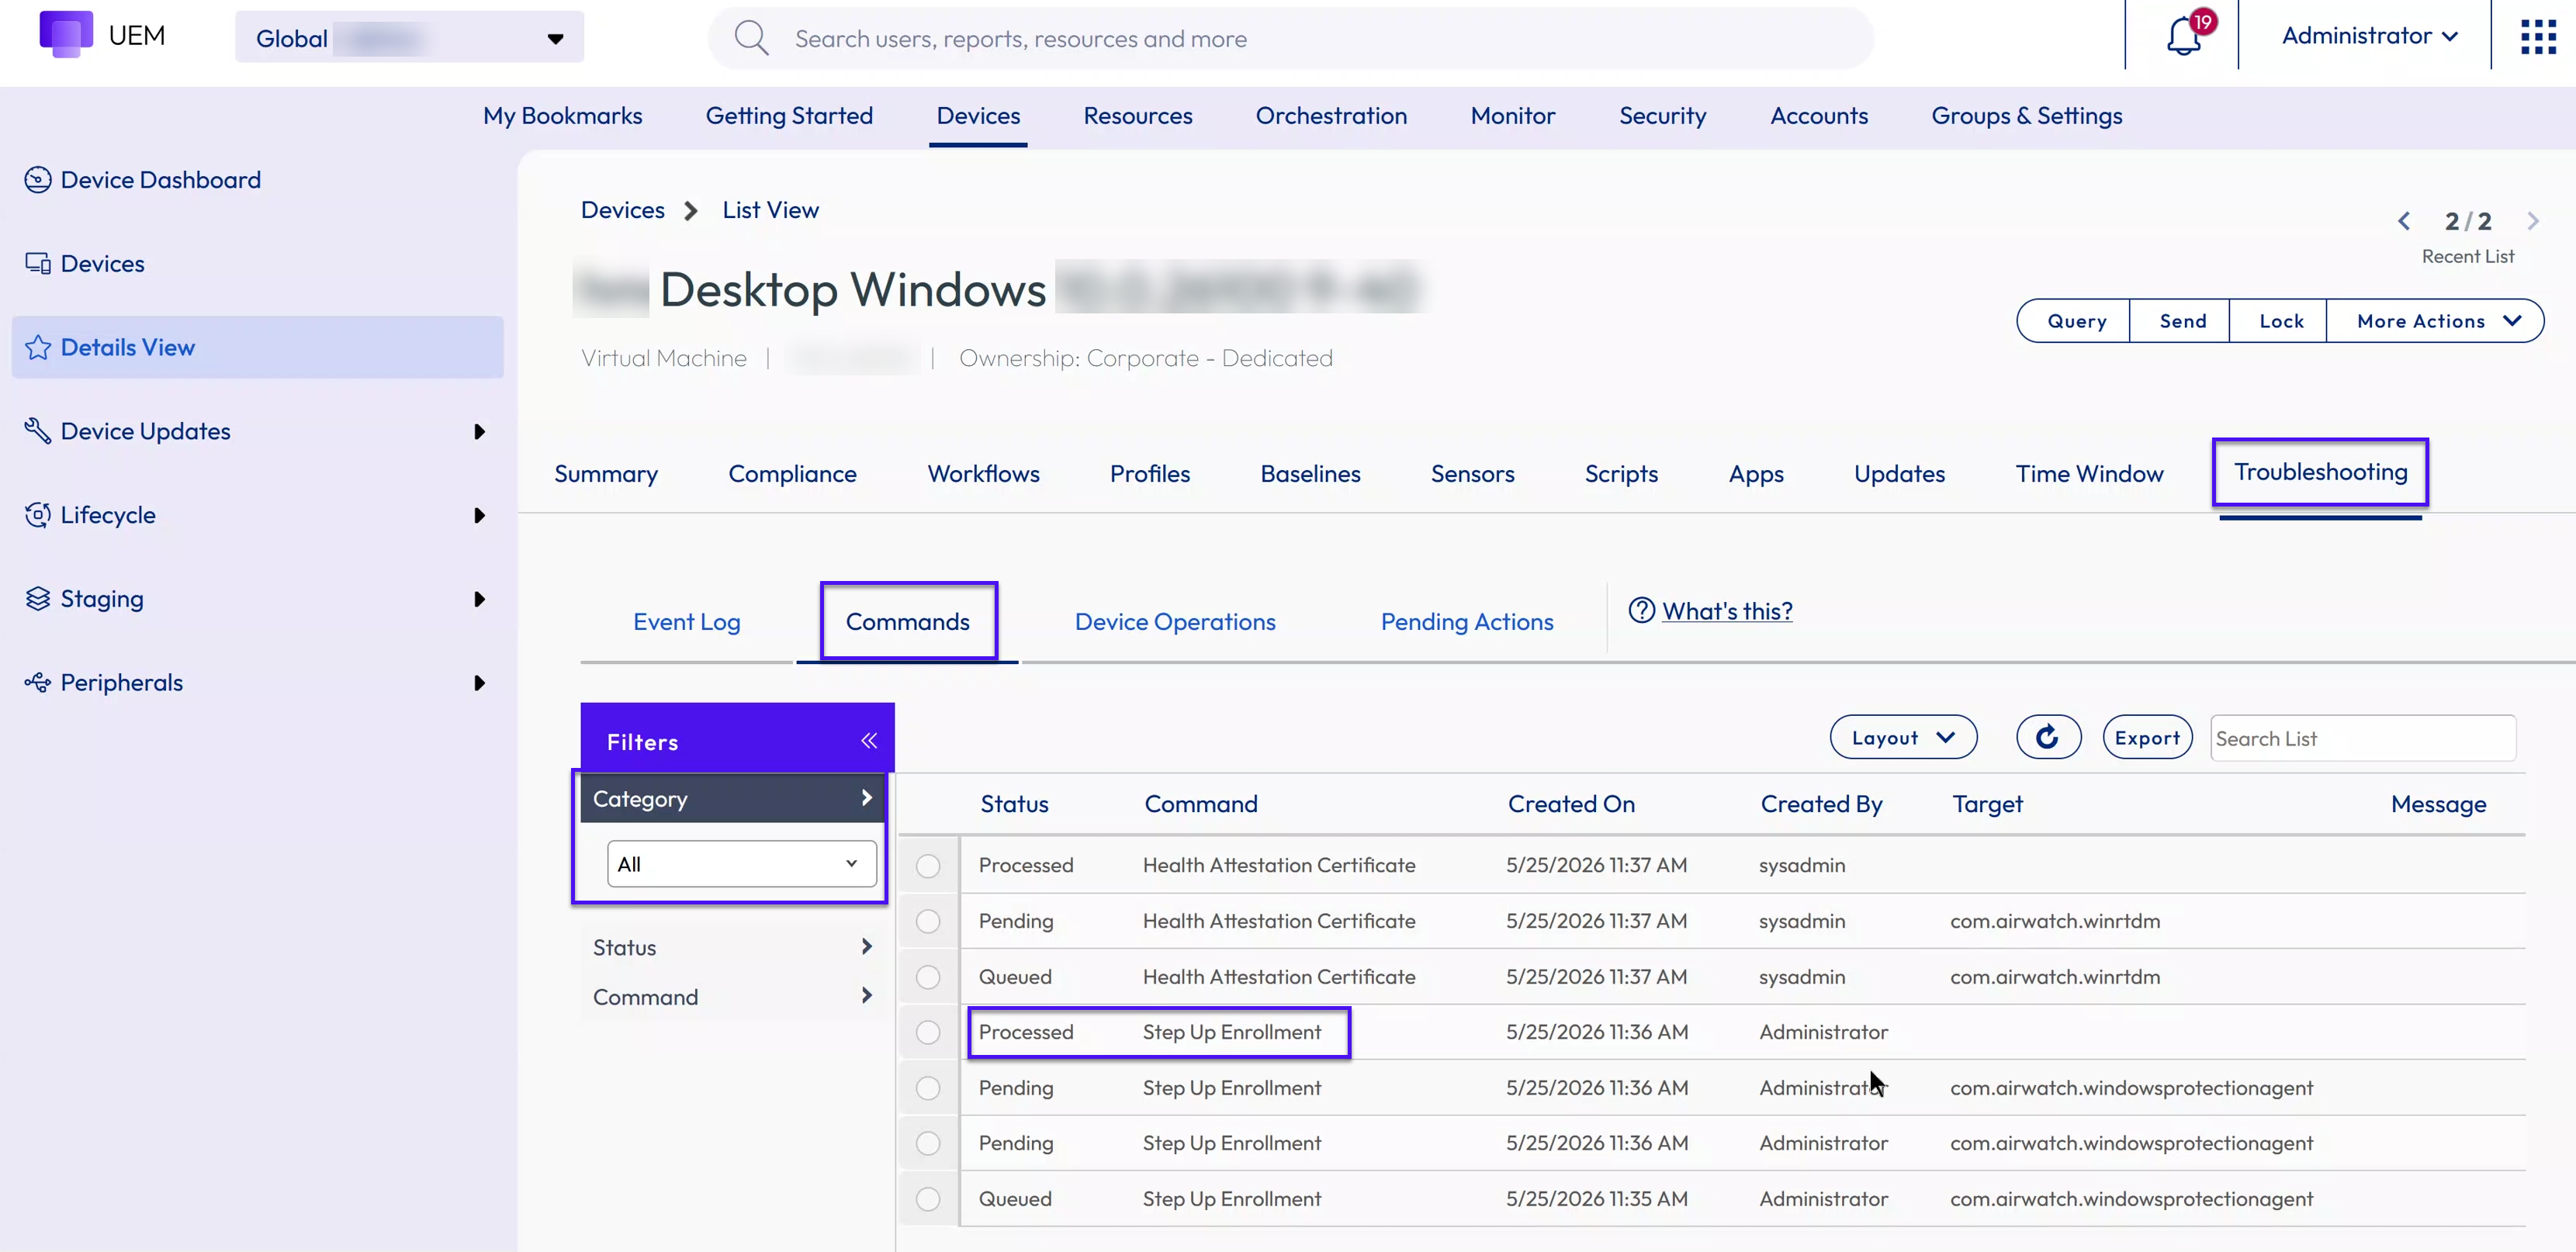
-
Navigate back to the Device Summary tab and click More Actions > Troubleshooting > Event Log. A message appears that the Step Up to OMA DM Managed Command Confirmed.
-
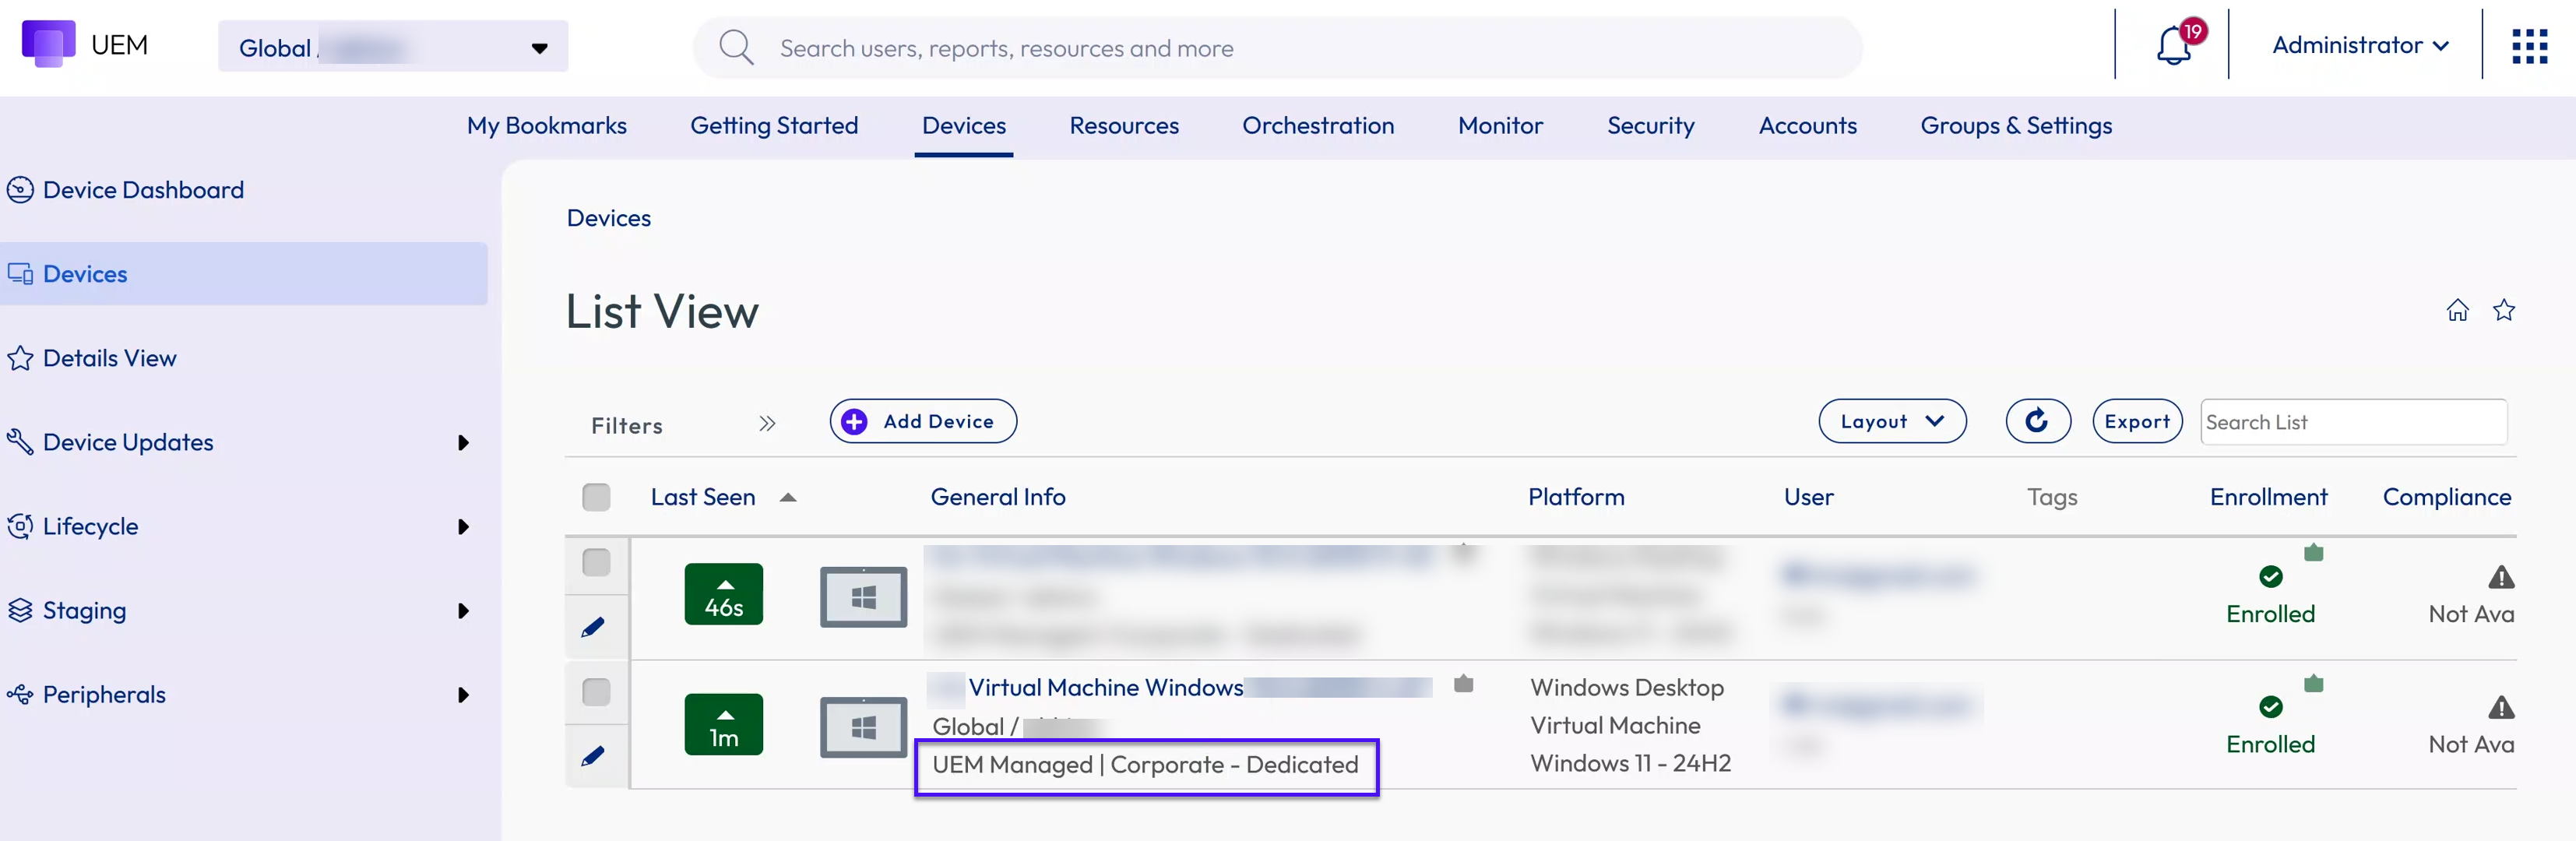
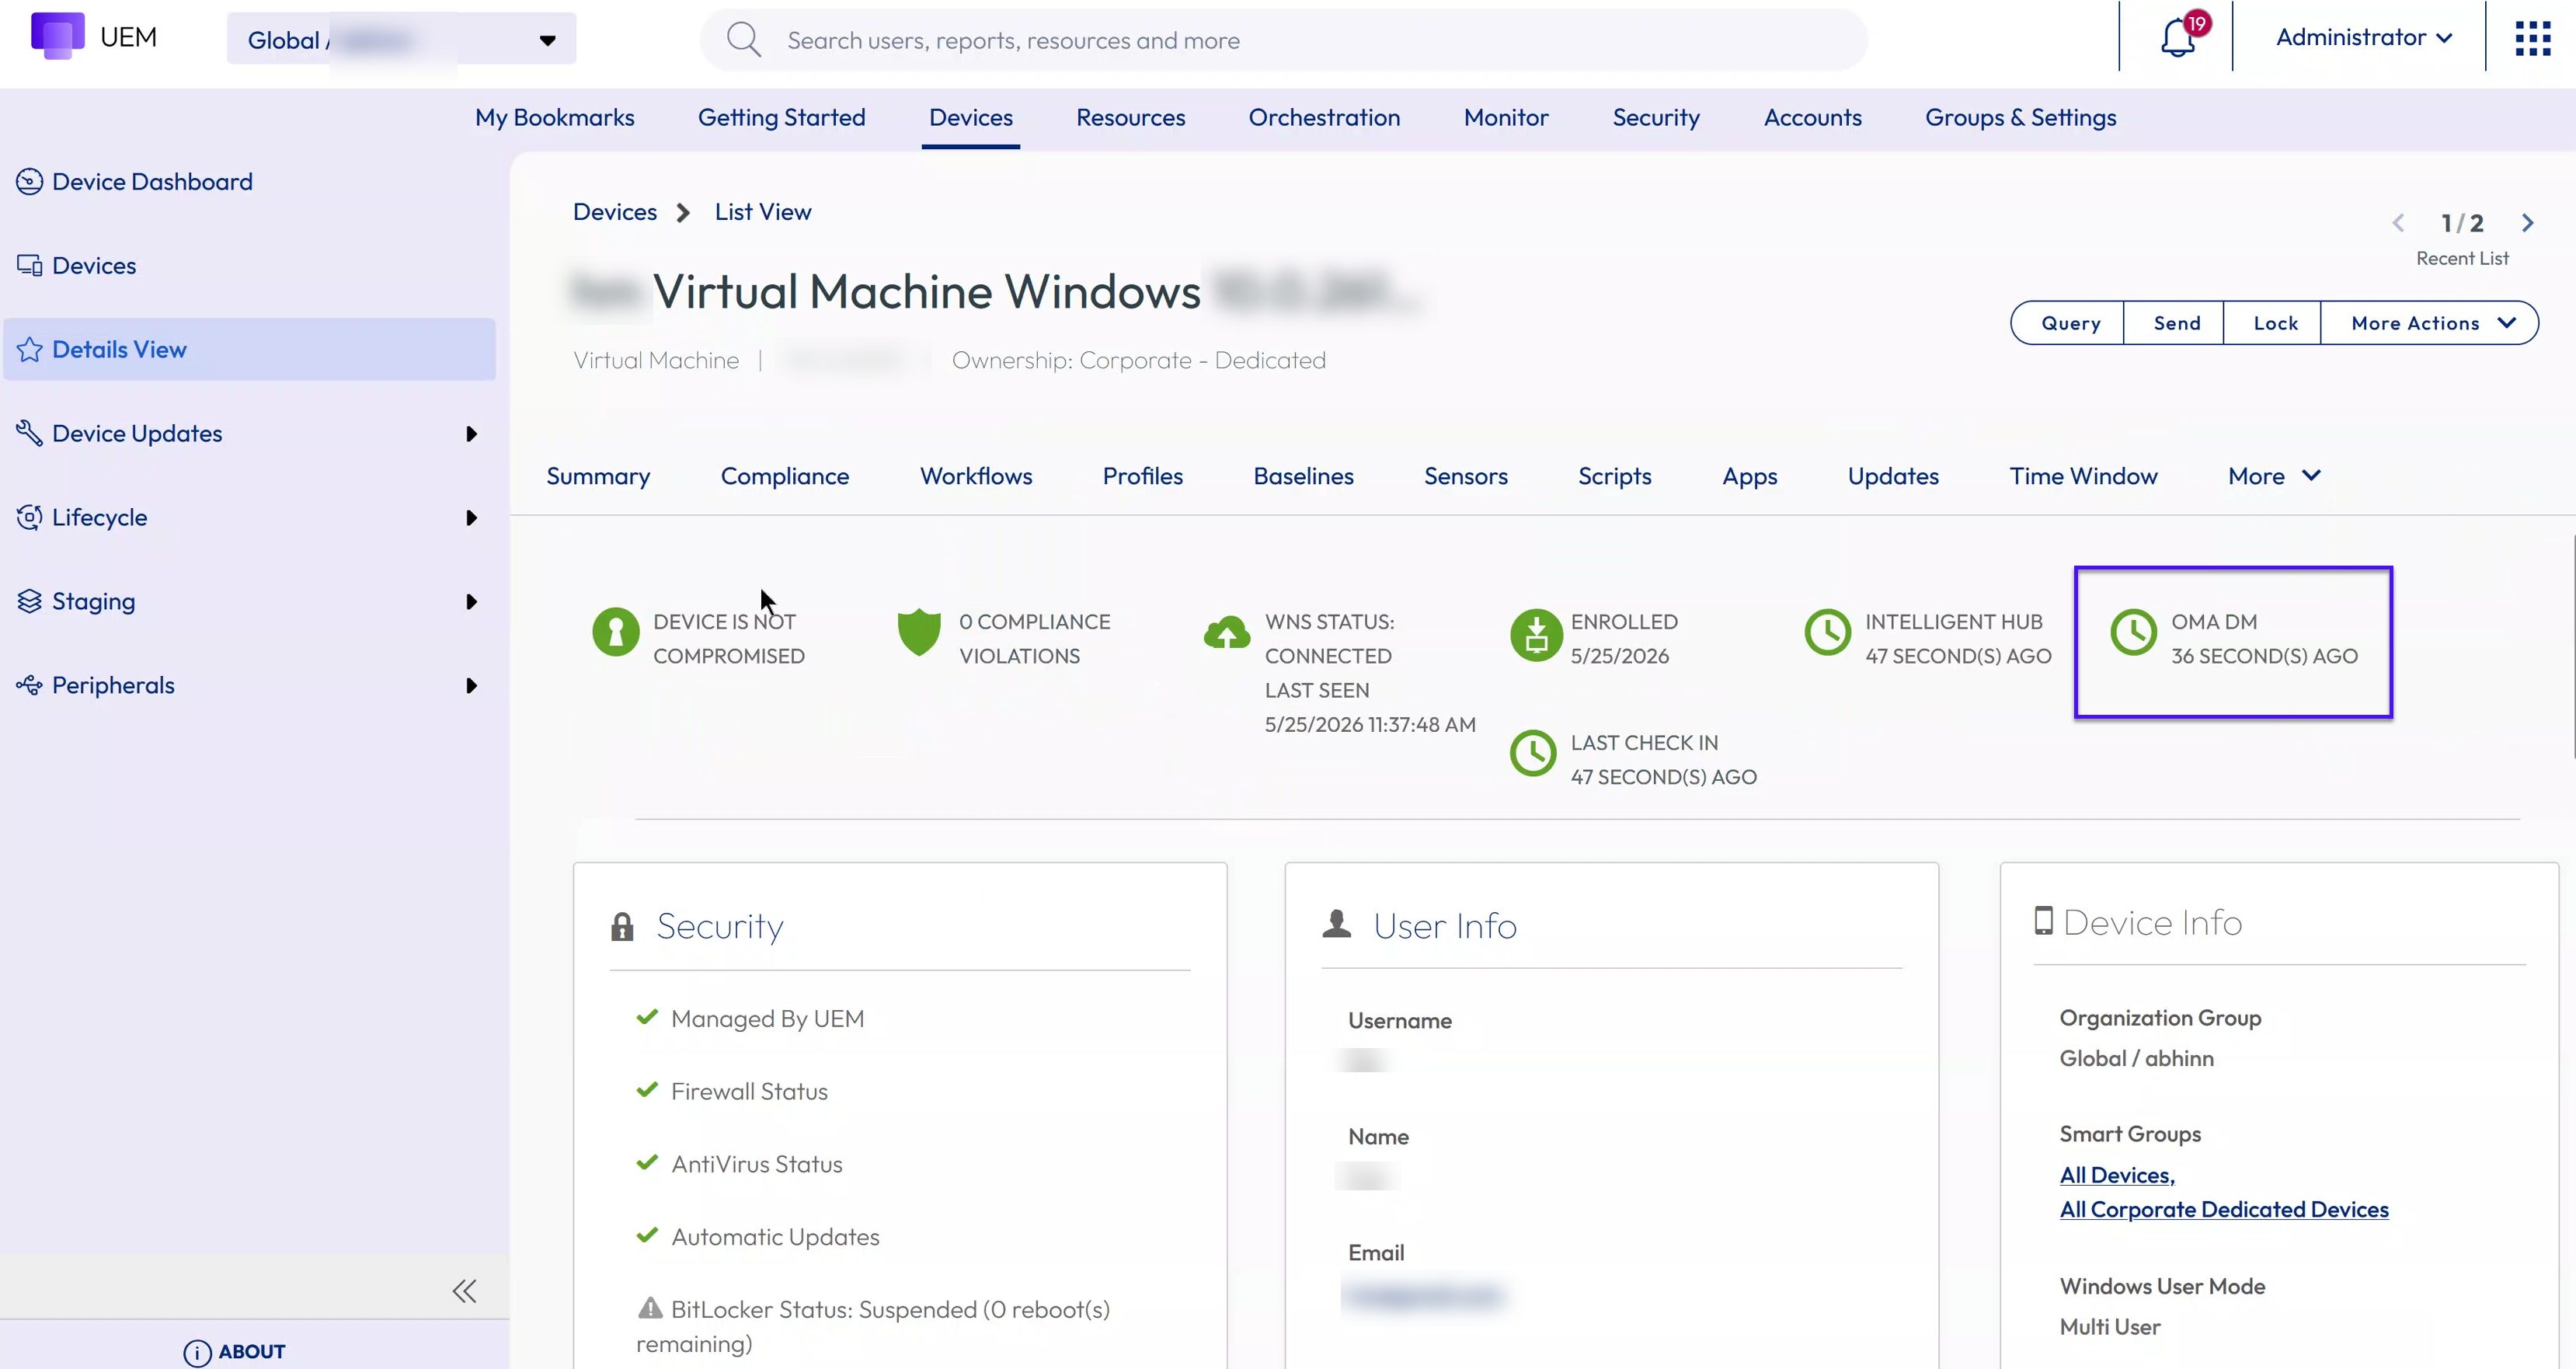
Click on the device to view that the step-up from Hub Managed to UEM Managed is complete.
Bulk Step-Up through Device List View
Administrators can perform step-up enrollment at a large scale using the Workspace ONE UEM console.
Prerequisites
To perform a bulk step-up of devices from Registered or Hub managed to full OMA DM managed mode, you have to create an OG and enroll devices in Hub Registered mode or Hub managed mode. For more information see, Enroll with Registered Mode and Enroll with Intelligent Hub Managed Mode sections.
- The device must be enrolled with Intelligent Hub version 2607 and later
- Workspace ONE UEM console 2607 and later
Procedure
The following procedure outlines the steps to perform a bulk step-up of devices in Hub Registered mode or Hub Managed mode to OMA DM managed mode.
-
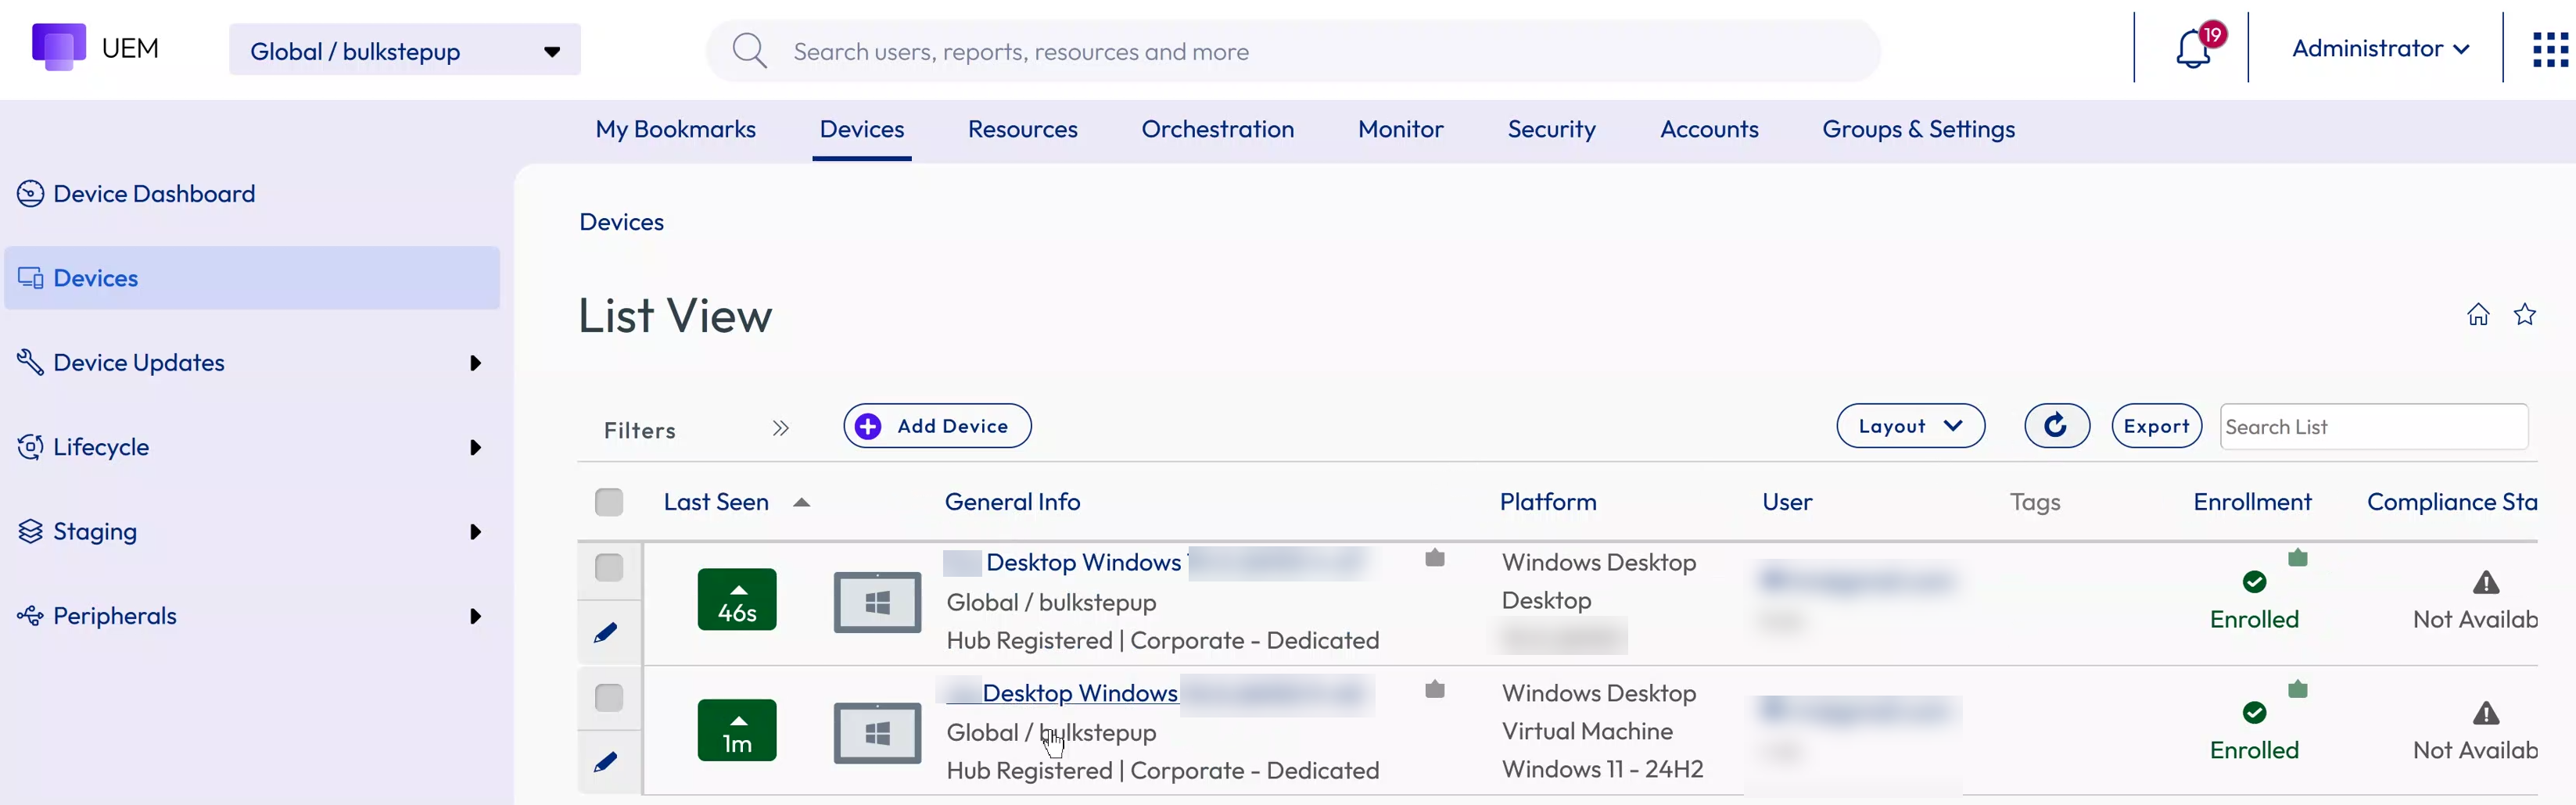
Navigate to Devices > List View to view all the devices enrolled in Hub Registered or Hub Managed mode.
-
Select all devices and click More Actions > Step-up to OMADM Managed.
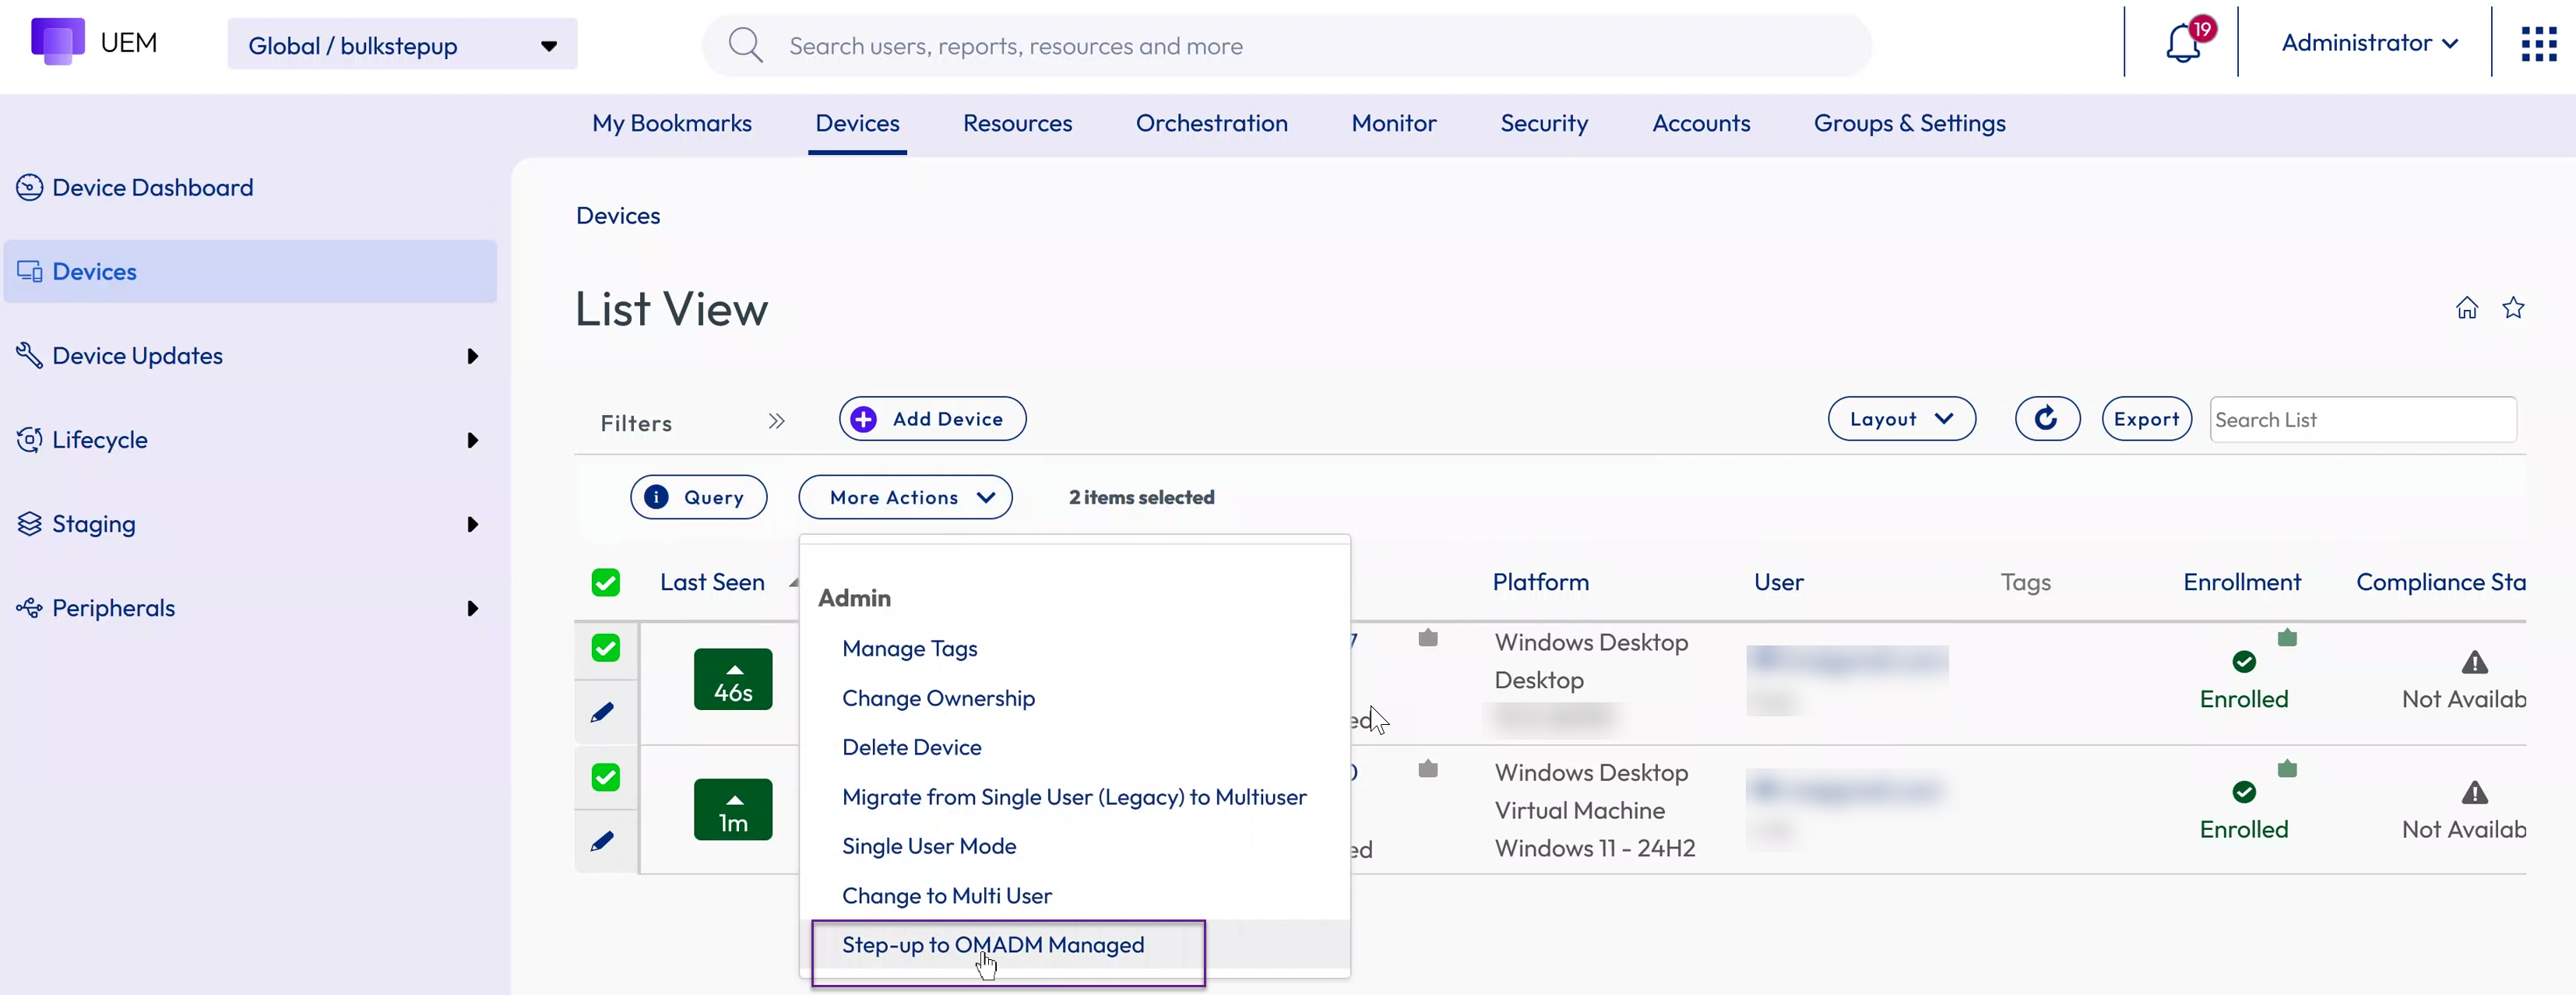
-
In the Confirmed Step-up to OMADM Managed, click Proceed and click OK.
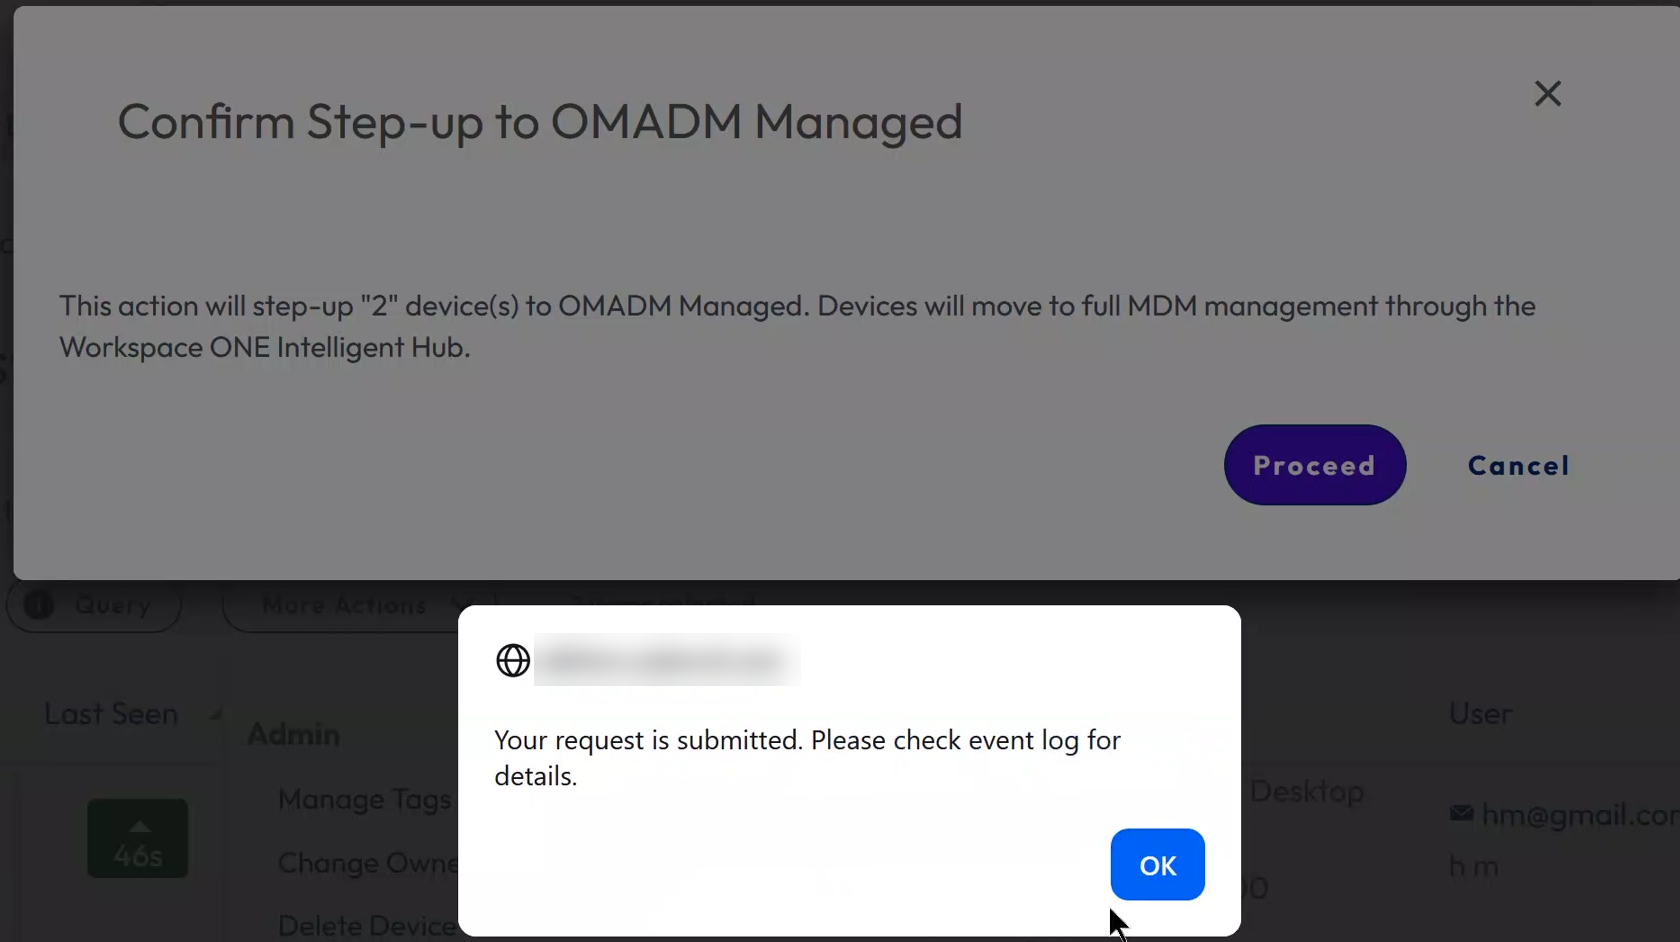
-
In the Device list view, click the device and navigate to More > Troubleshooting > Commands to view the status of enrollment.
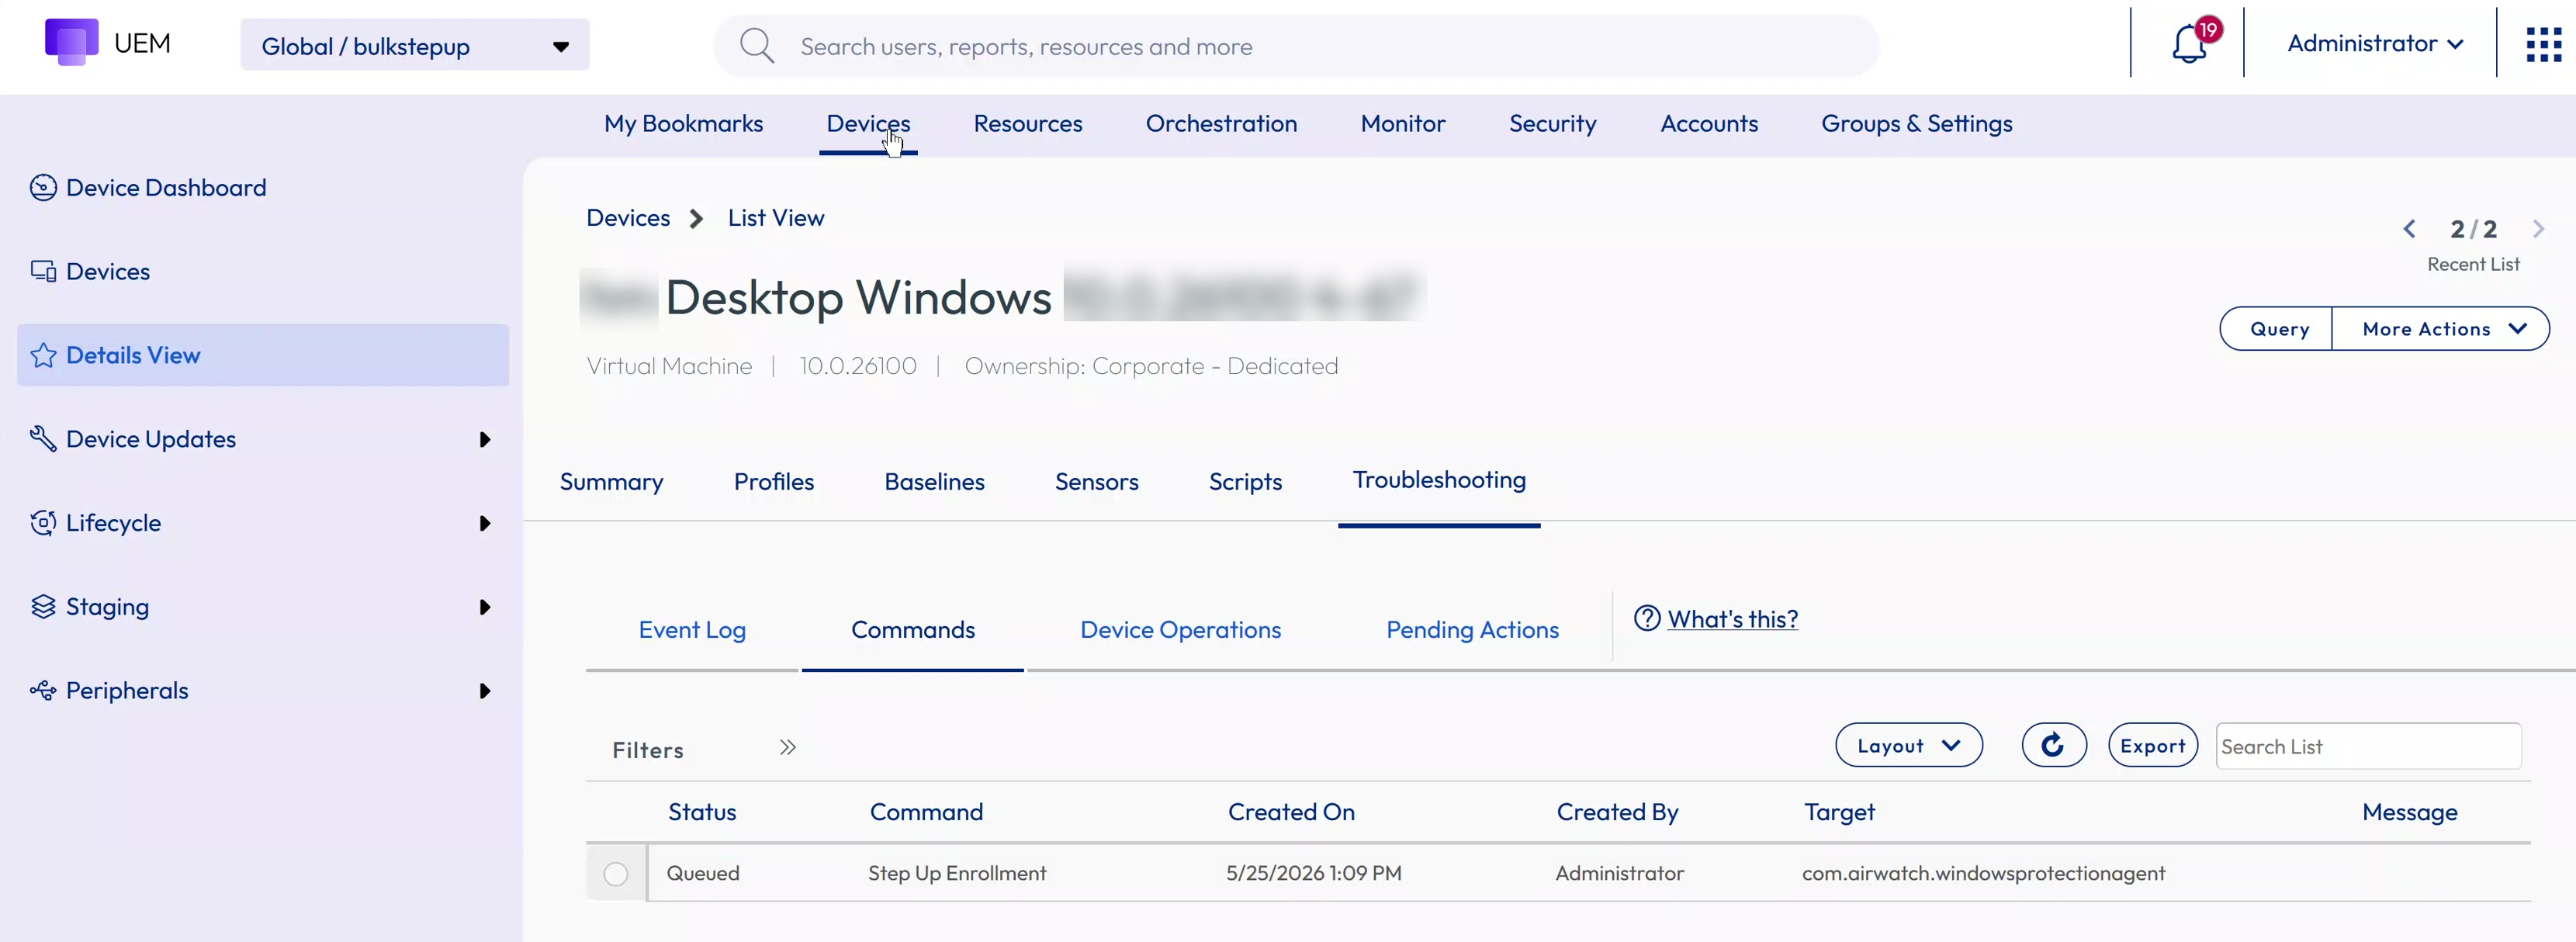
-
Click the device to view that the device is OMA DM enrolled.
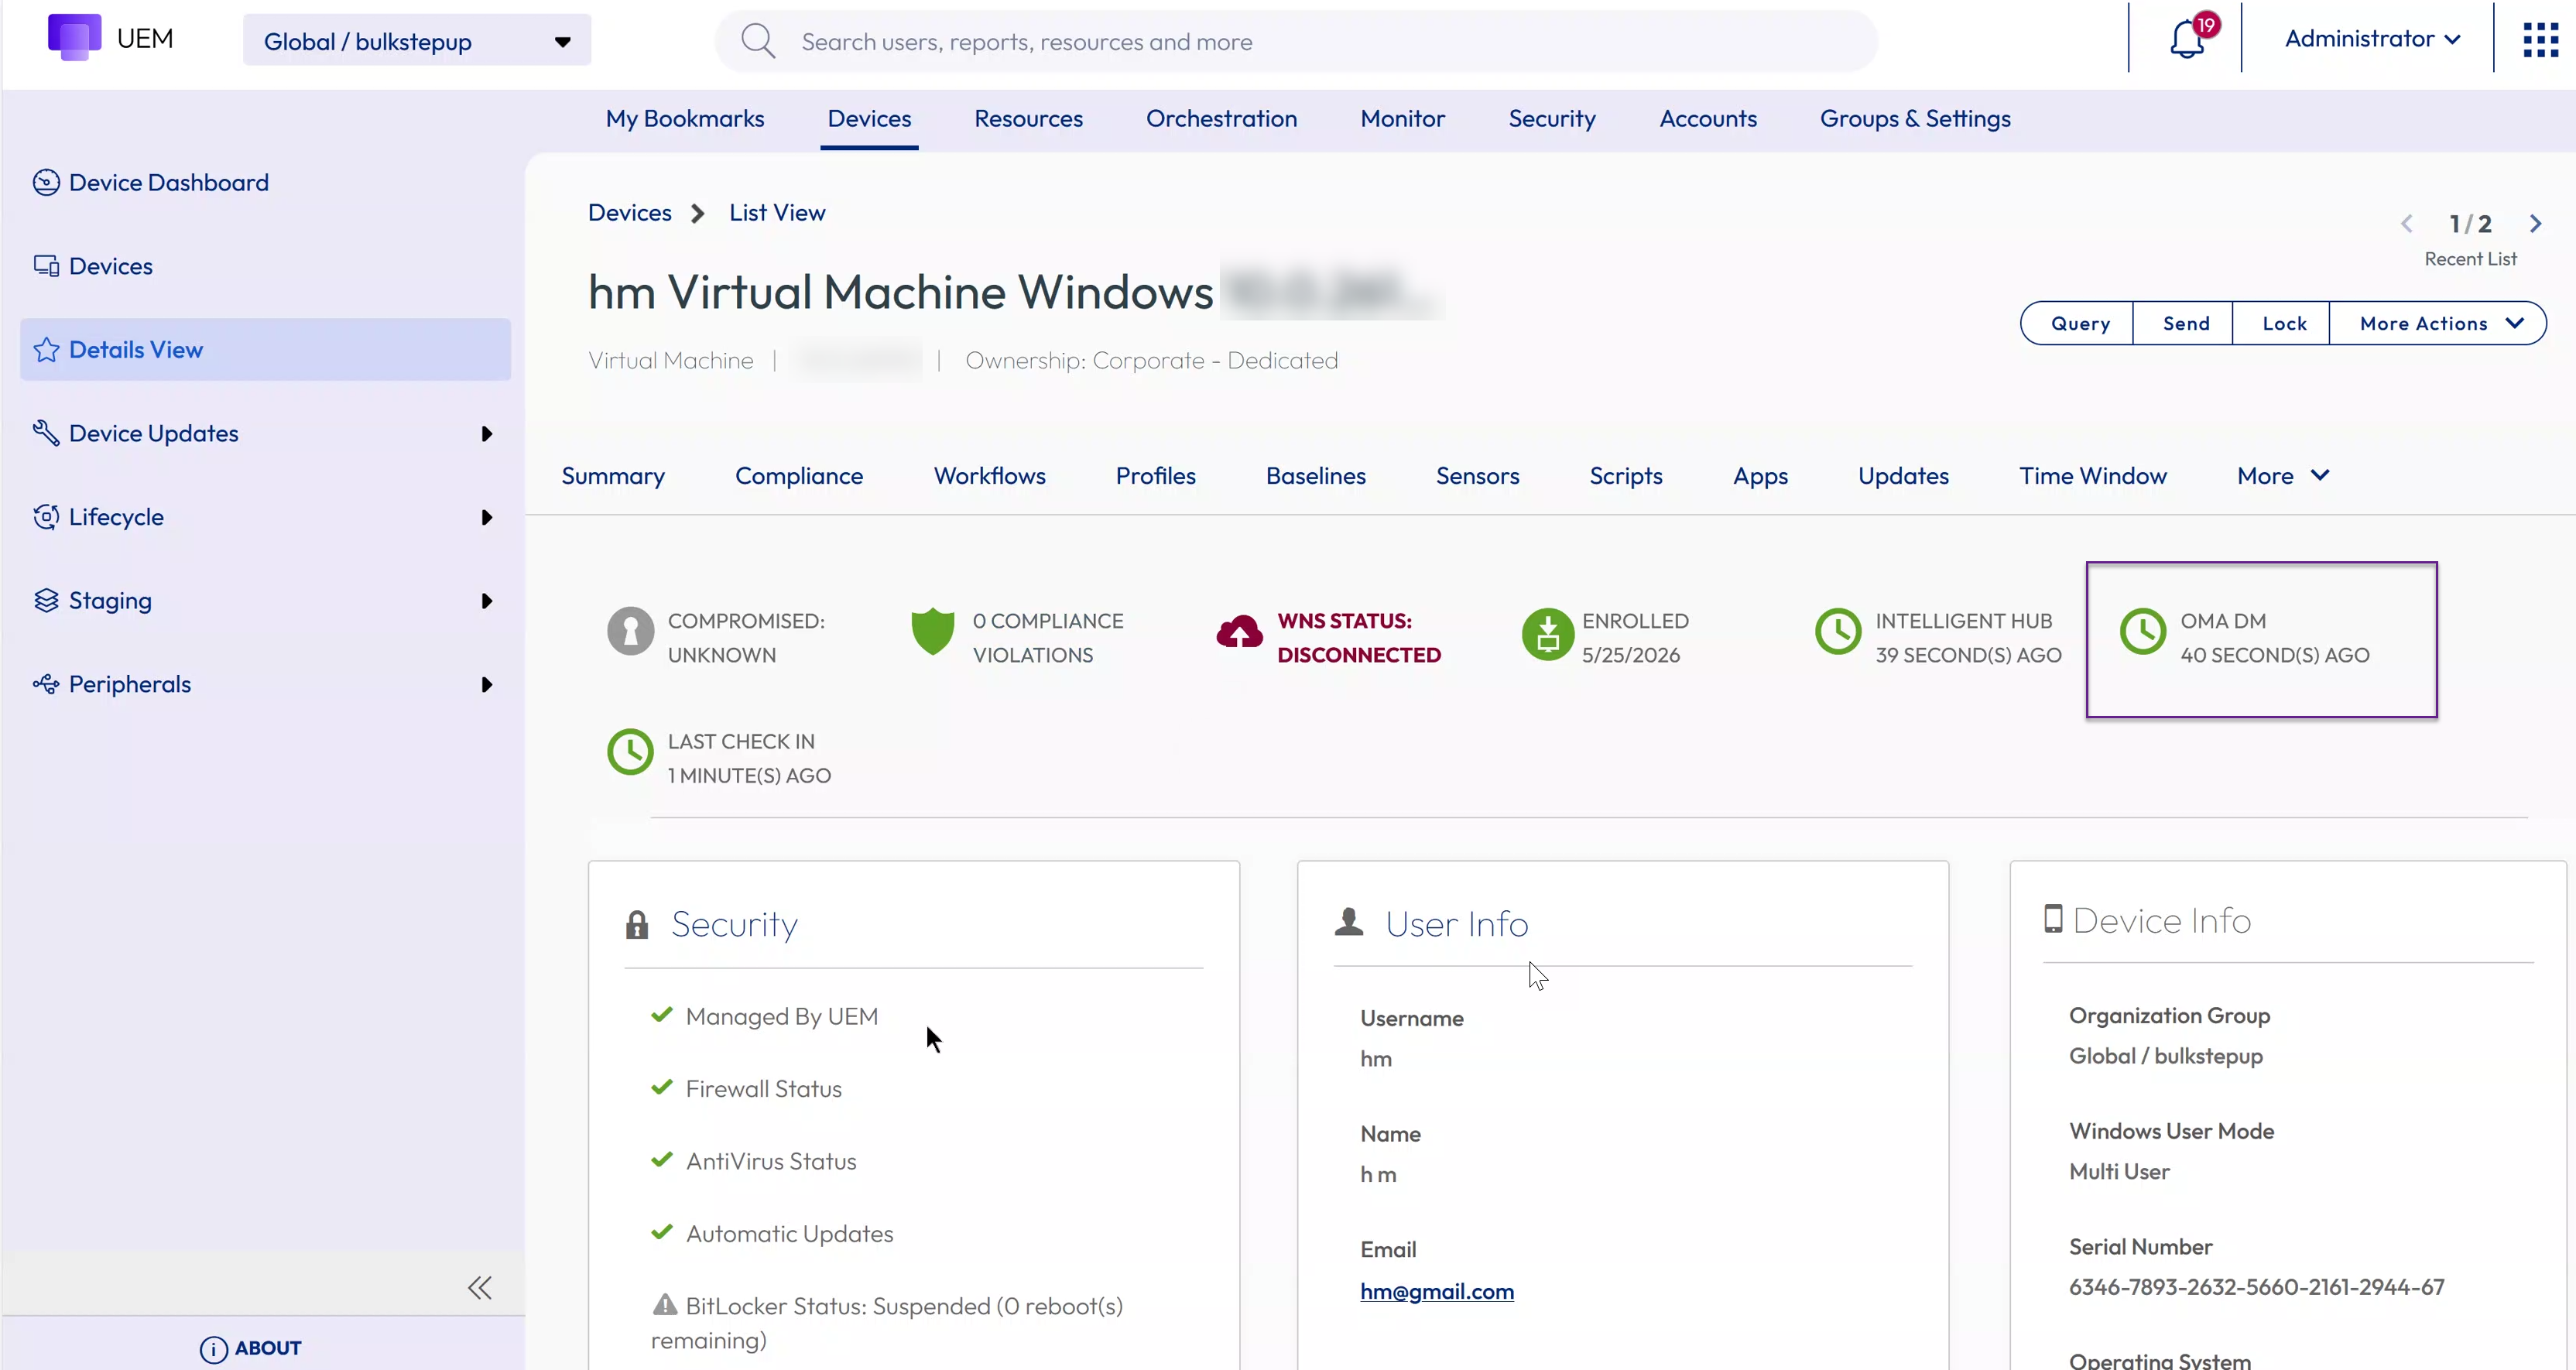
Bulk step-up can also be performed through UEM APIs, enabling automation and integration with existing IT workflows for large-scale fleet migrations.
API Details:
Request POST /API/mdm/devices/action
Sample Body:
    {
      "action_name": "STEP_UP_TO_OMADM_MANAGED",
      "filter": {
        "organization_group_uuid": "23E6F54A-4FDA-4487-904F-44486C90B44F",
        "device_uuids": [
          "00cabff6-db34-4078-a296-xxxxxxxxxxxx",
          "0c78c2b1-b785-423e-95a2-xxxxxxxxxxxx"
        ]
      },
      "requested_device_count": 2
    }
Automatic Step-Up to OMA DM on Enrollment User Sign-In
The Automatic Step-Up setting allows administrators to automatically transition eligible Hub Managed devices to Full MDM management without issuing individual step-up commands. When enabled at the organization group level, Intelligent Hub automatically initiates OMA DM enrollment upon any of the following events, such as user sign-in post enrollment or device reassignment. This ensures devices reach full management with zero per-device admin intervention.
Prerequisites
To perform an automatic step-up from Hub managed to full OMA DM managed mode, you have to create an OG and enroll devices in Hub managed mode. For more information see, Enroll with Intelligent Hub Managed Mode section.
- The device must be enrolled with Intelligent Hub version 2607 and later
- Workspace ONE UEM console 2607 and later
Procedure
The following procedure outlines the steps to automatically step-up a device from Hub managed to OMA DM-managed.
-
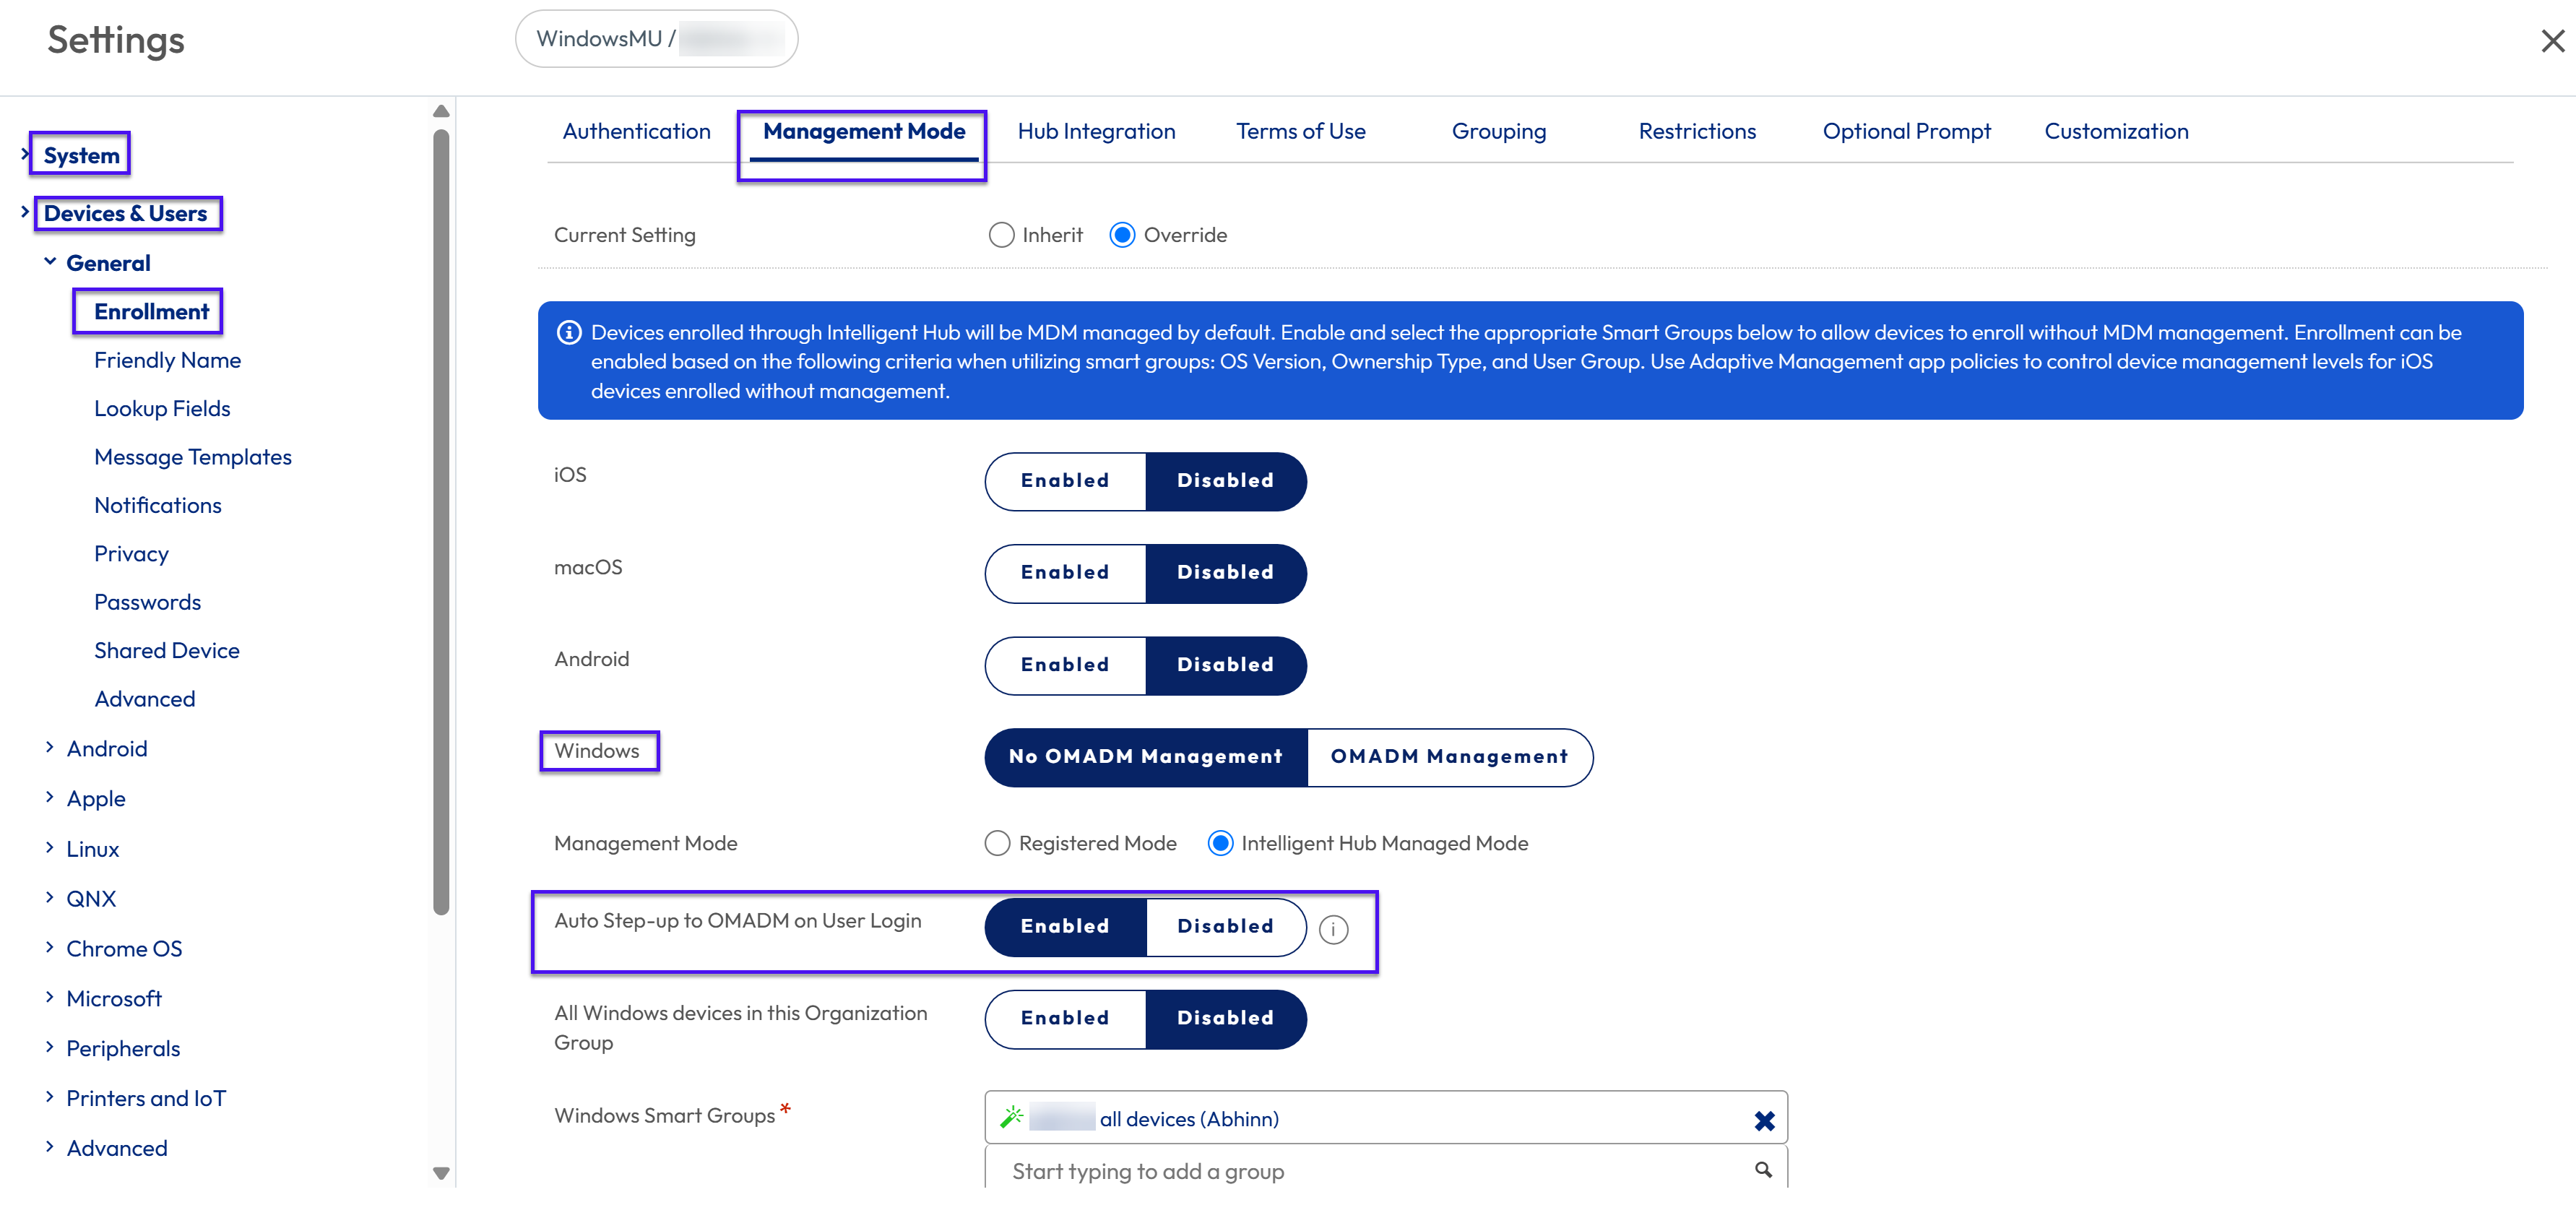
Navigate to Groups & Settings > All Settings > Devices & Users > General > Enrollment > and click Management mode.
-
In Windows, select No OMADM Management and in Management Mode, select Intelligent Hub Managed Mode.
-
In Auto Step-up to OMADM on User Login, select Enabled.
-
In Windows Smart Groups, select the smart group to which the changes will be applied.
-
Click Save.
Note:
- Automatic Step-Up is configured at the Organization Group (OG) level and applies to all newly enrolled devices within that OG. Any device enrolling into the OG after this setting is enabled will automatically enroll in Intelligent Hub Managed mode.
- If a device is configured to move to a different OG upon user sign-in, ensure that the automatic step-up setting is configured in the parent OG where the device initially enrolled. This ensures that OMA DM enrollment is triggered automatically when the user signs in, regardless of the destination OG's configuration.
- Devices can enroll in Intelligent Hub Managed mode without requiring an active user session. However, OMA DM enrollment requires the enrollment user to be signed in to the device. If automatic step-up is enabled, the device automatically initiates OMA DM enrollment when the enrollment user signs in, upgrading the device to full OMA DM management.
- If a device is enrolled using a staging user, the automatic step-up is triggered when the assigned enrollment user signs in after device reassignment.
Post-Enrollment Onboarding Settings
Admins have been shifting from imaging-based workflows to just-in-time provisioning over-the-air. In these provisioning scenarios, it is important to inform users about what is happening while their devices enroll. Workspace ONE Intelligent Hub for Windows displays and notifies the statuses of applications that are actively downloading and installing during the Windows enrollment process. This feature also provides a way to customize the user messaging during setup.
Considerations
- Post-enrollment onboarding settings are enabled by default on Windows devices managed in Workspace ONE UEM.
- The feature works in Workspace ONE UEM 2105 or later.
- The feature works with the Workspace ONE Intelligent Hub for Windows 21.05 and later.
- Enrolling through the Workspace ONE Intelligent Hub for Windows is not required as this feature works for any enrollment method, including Web Enrollment. However, you must install the app on devices to apply configurations and to display the experience.
Behaviors of the Workspace ONE Intelligent Hub
- When installed, the Workspace ONE Intelligent Hub for Windows detects the enrollment and launches the experience.
Note: The experience does not apply to upgrade scenarios. It only impacts new enrollments. - Directly after enrollment, the Workspace ONE Intelligent Hub launches and displays your customizations and tracks all apps which are set to Automatic deployment.
Deactivate the Post-Enrollment Onboarding Experience
- Select the applicable organization group.
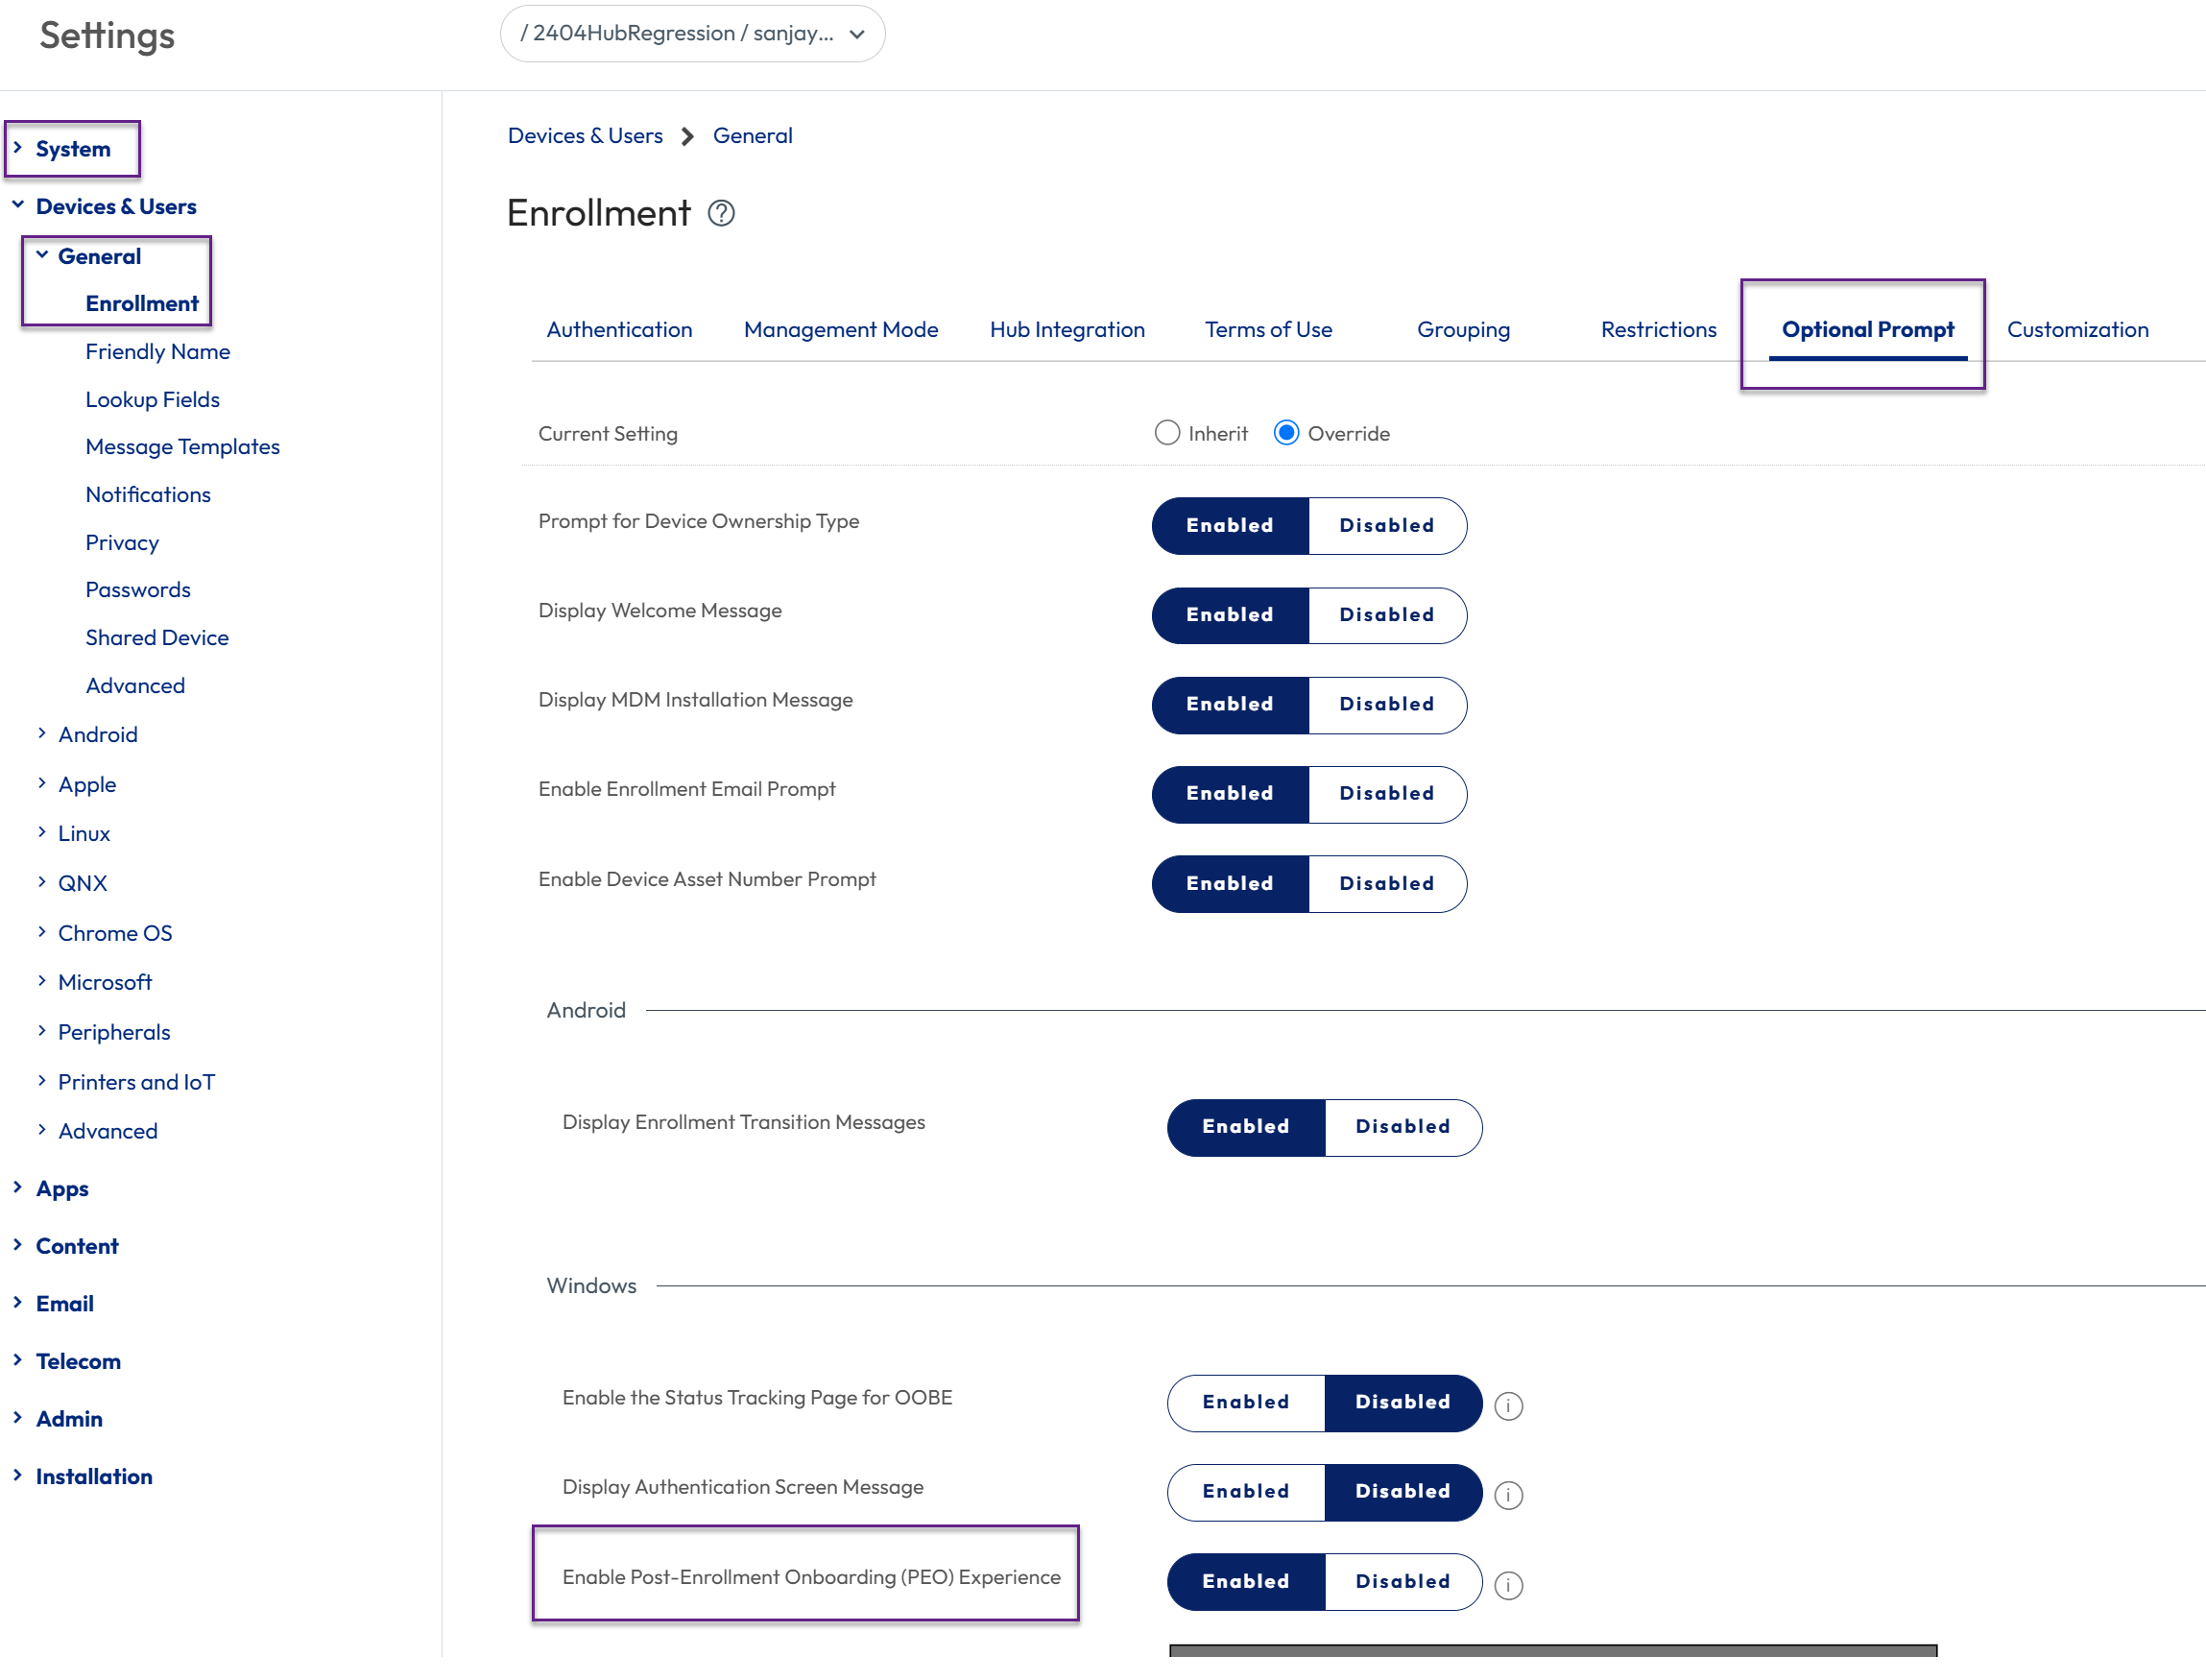
- In the Workspace ONE UEM console, go to Groups & Settings > All Settings > Devices & Users > General > Enrollment > Optional Prompt > Windows > Enable Post-Enrollment Onboarding Experience.
- Deactivate the setting.
Customize the Post-Enrollment Onboarding Experience Message
- Select the applicable organization group.
- In the Workspace ONE UEM console, go to Groups & Settings > All Settings > Devices & Users > General > Enrollment > Optional Prompt > Windows > Enable Post-Enrollment Onboarding Experience.
- If this feature was deactivated previously, select Enabled. The feature is enabled by default.
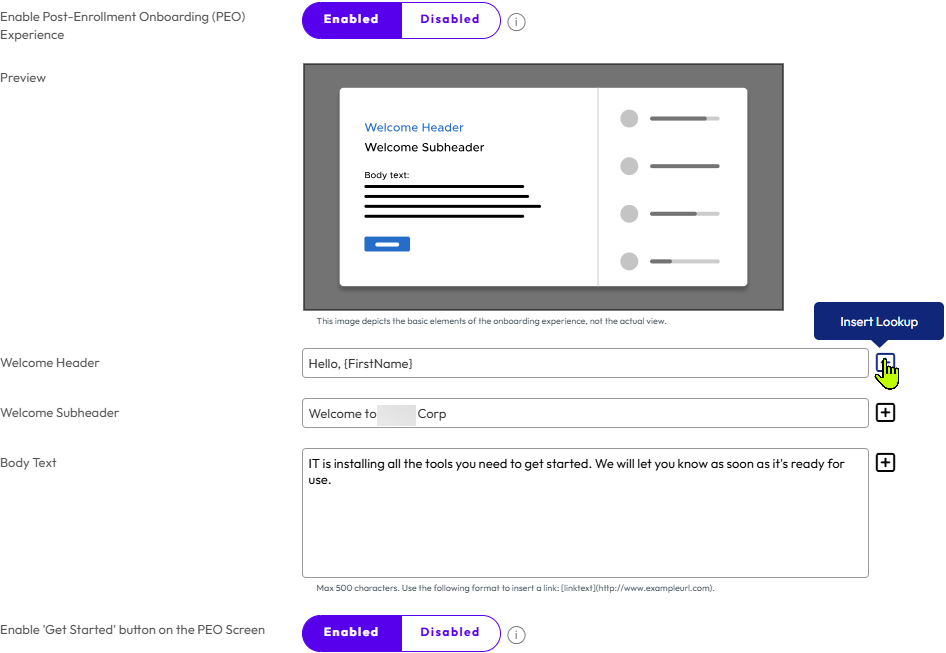
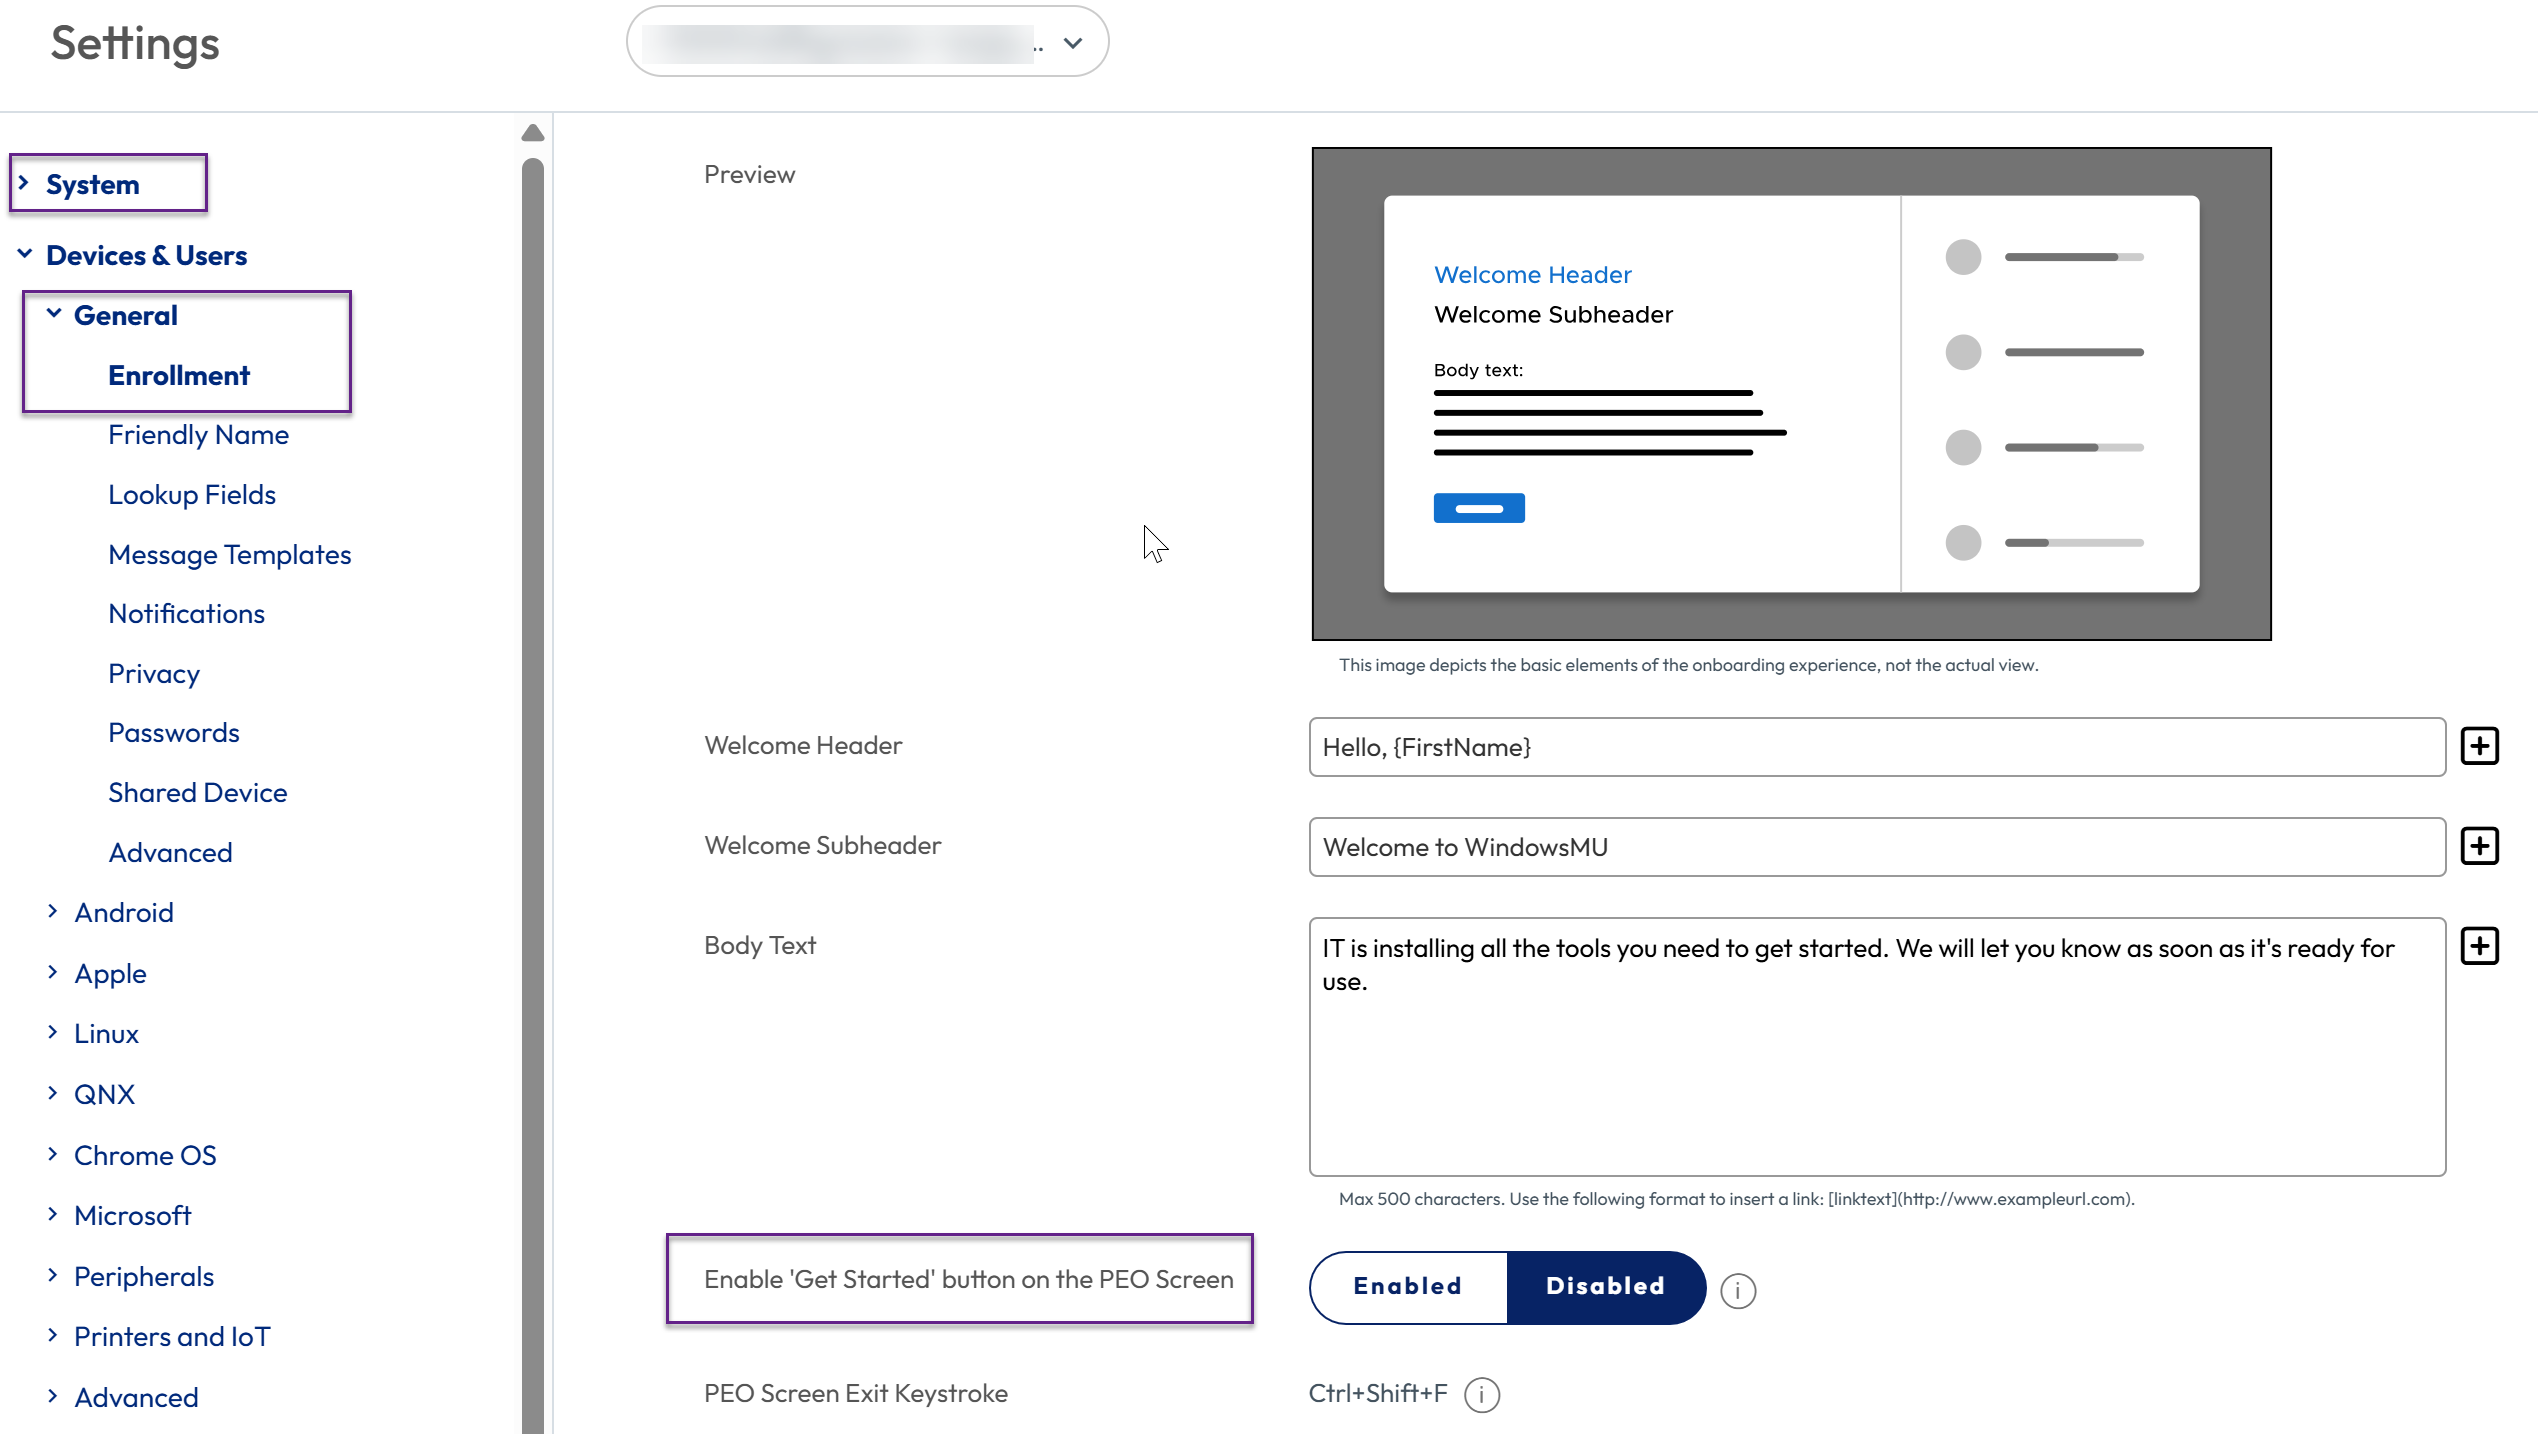
- When post-enrollment onboarding is enabled, you can customize the Welcome Header, Welcome Subheader, and Body Text fields of the post-enrollment onboarding experience message using text and lookup values.
Post-Enrollment Onboarding Workflow
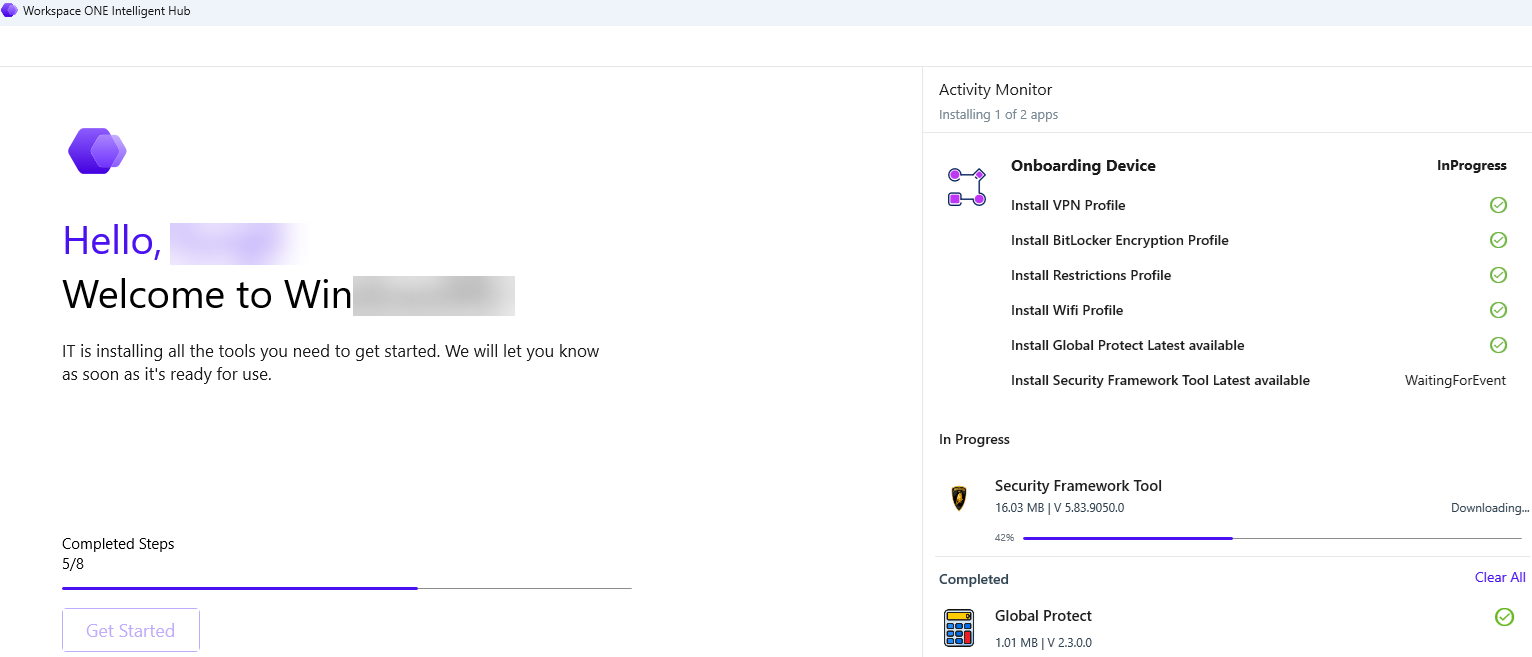
The Post-Enrollment Onboarding screen in Workspace ONE Intelligent Hub for Windows displays real-time progress of onboarding workflows, providing an enhanced user experience with full visibility into the device setup process during enrollment.
Key Benefits
- Step-by-Step Tracking: Users can see the live status (in-progress, completed, or failed) of individual resources like apps, profiles, and scripts.
- Visual Progress Bar: A dynamic progress bar displays the overall completion percentage.
- Clear Error Reporting: Any failed steps are clearly highlighted on the screen.
- Seamless Transitions: Once the initial onboarding workflow finishes, the screen automatically shifts to tracking standard application installations for a continuous setup experience.
- Flexible Configuration: Admins can enable/disable features independently via UEM console settings.
Prerequisites
-
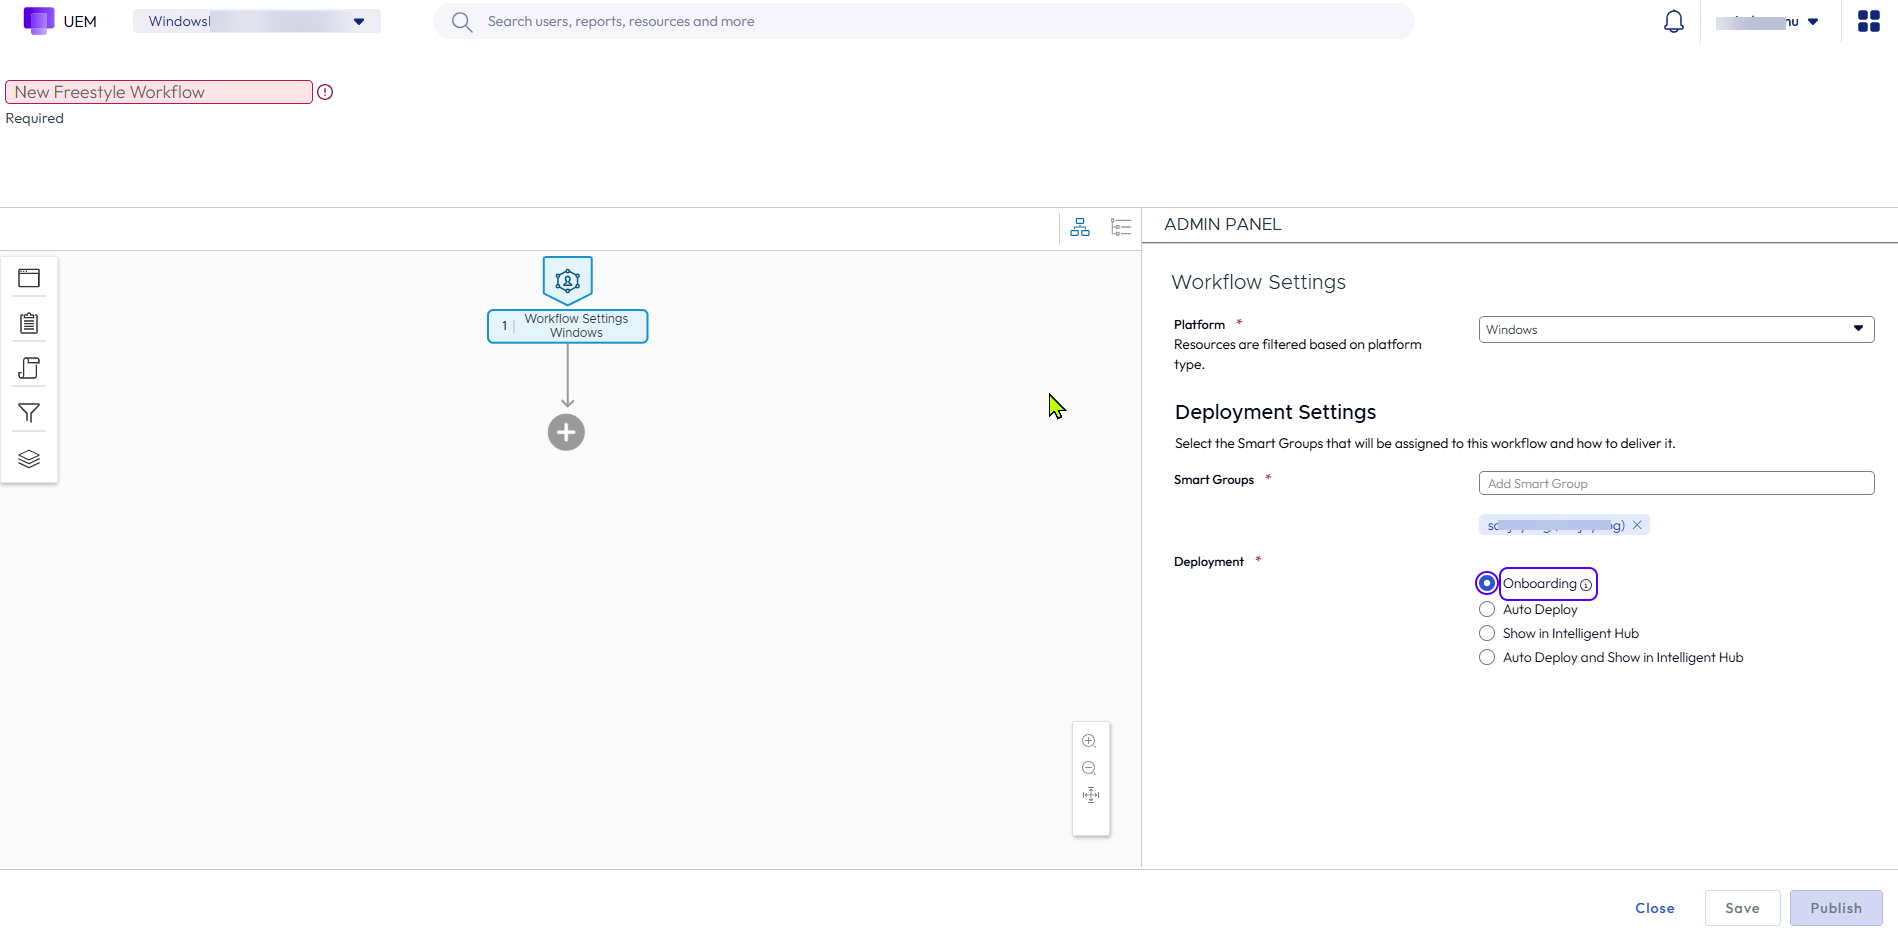
Freestyle workflows created in Workspace ONE UEM with the required resources (Apps, Profiles, Scripts).
-
Onboarding selected as workflow deployment mode in Freestyle Orchestrator.
-
Post-Enrollment Experience enabled in Workspace ONE UEM Console - Navigate to Groups & Settings > All Settings > Devices & Users > General > Enrollment > Optional Prompt
Focused Enrollment
Workspace ONE UEM now supports Focused Enrollment for Windows devices, allowing IT administrators to lock down the device during the Post-Enrollment Onboarding experience. When enabled, users are prevented from navigating away from the onboarding screen, ensuring that all critical setup steps such as profile configurations, security app installations, scripts, and workflow executions complete before the user accesses the device.
Key Behaviours
- Get Started button control: The "Get Started" button on the Post Enrollment screen remains disabled until all onboarding steps are complete, preventing users from skipping mandatory setup.
- Keyboard input blocking: All keyboard shortcuts are blocked during onboarding, except the Post Enrollment screen Exit Keystroke and CTRL+ALT+DEL, delivering a kiosk-lile experience.Mouse and touch inputs are also blocked.
- Note: Focussed Enrollment is intended to guide Administrators through onboarding completion and prevent inadvertent bypassing of setup steps. It is not intended as a security enforcement mechanism.
- Task Manager is automatically disabled during focused enrollment to prevent users from terminating the onboarding process.
Procedure
- Disable the "Get Started" button until all onboarding steps are completed, preventing users from skipping mandatory onboarding workflows. (When disabled, the button is greyed out and all user interaction (keyboard, mouse, touchscreen) is blocked until onboarding completes.
- Navigate to Groups & Settings > All Settings > Devices and Users > General > Enrollment > Optional Prompt> Windows> Enable 'Get Started' button on the PEO Screen> Disabled
- Block keyboard input during enrollment with a configurable PIN-protected exit mechanism, ensuring users cannot bypass the enrollment process via keyboard shortcuts.
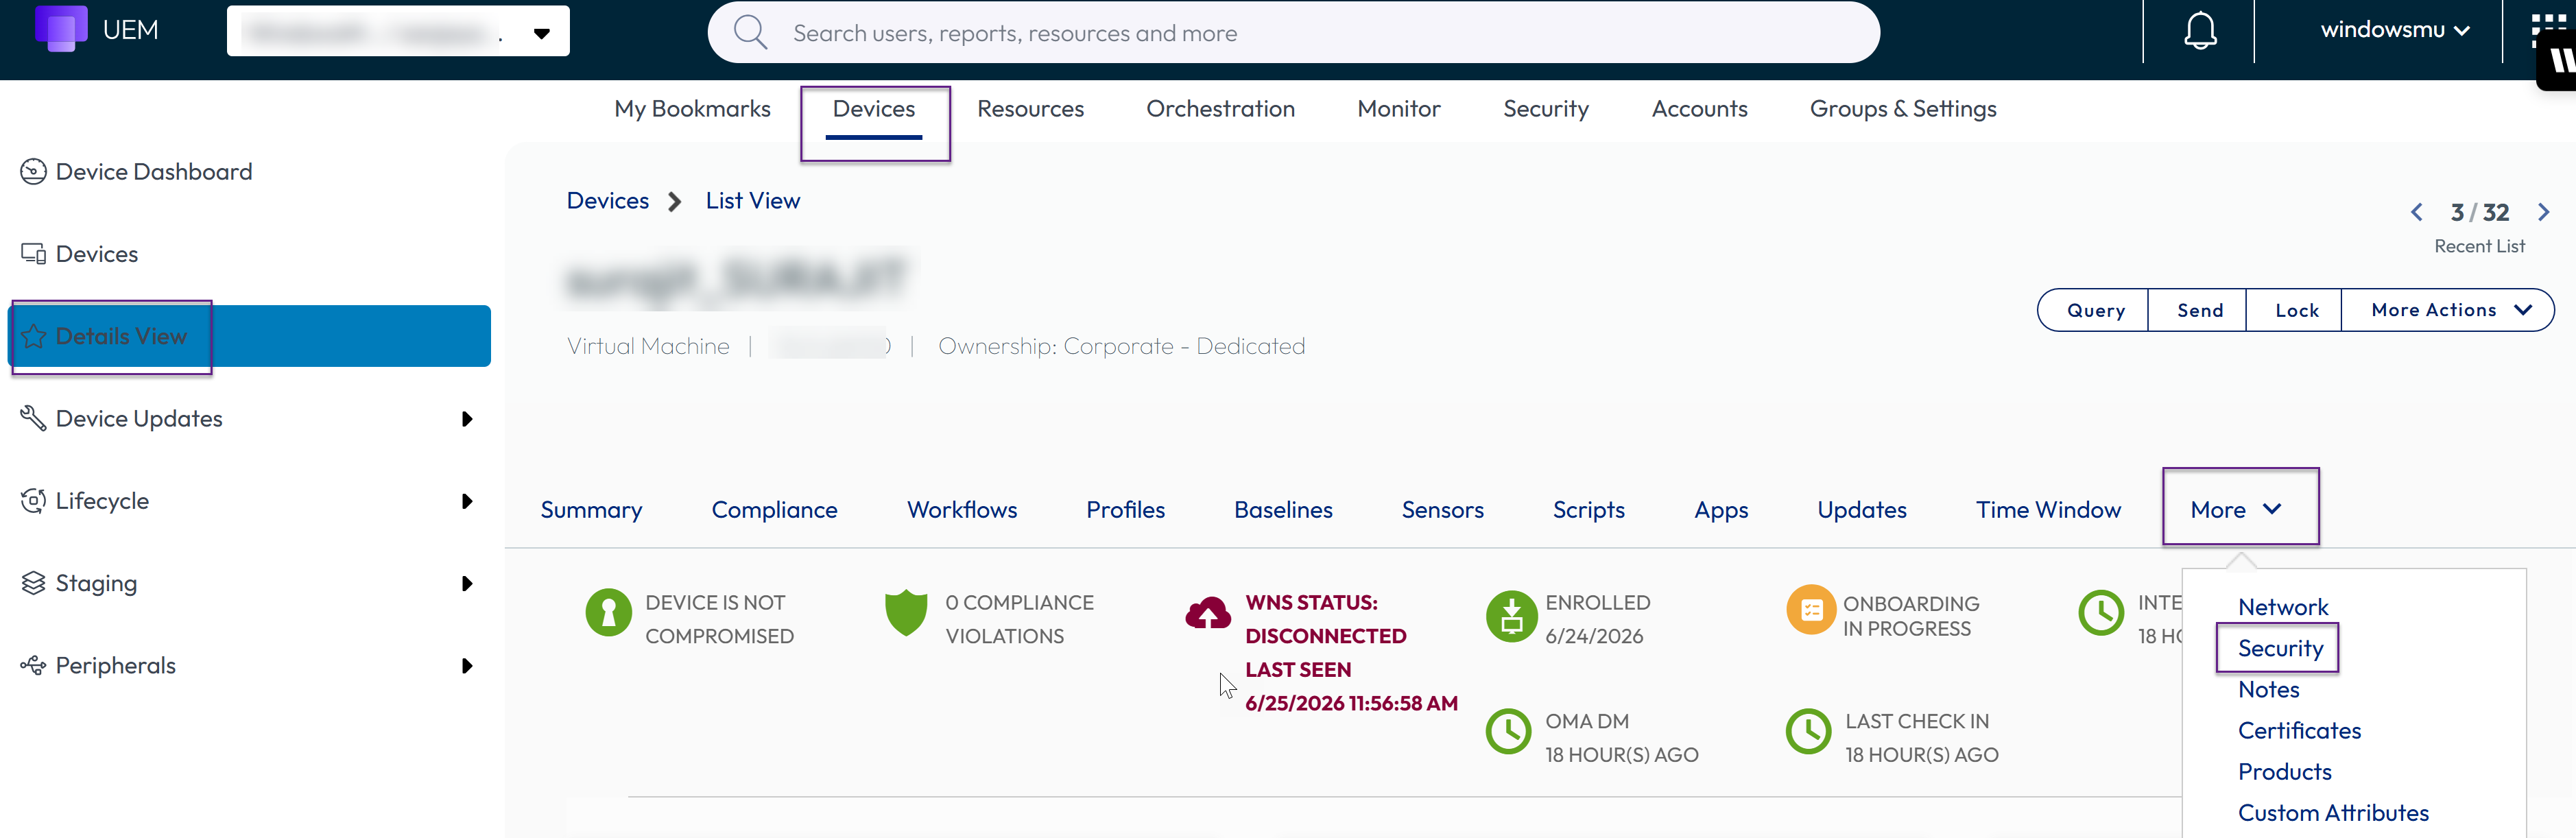
- From the UEM console select Devices.
- Select Devices List View
- Expand the More drop down menu.
- Select Security.
This gives Admins the option of setting a Post Enrollment Onboarding Exit PIN for the device.
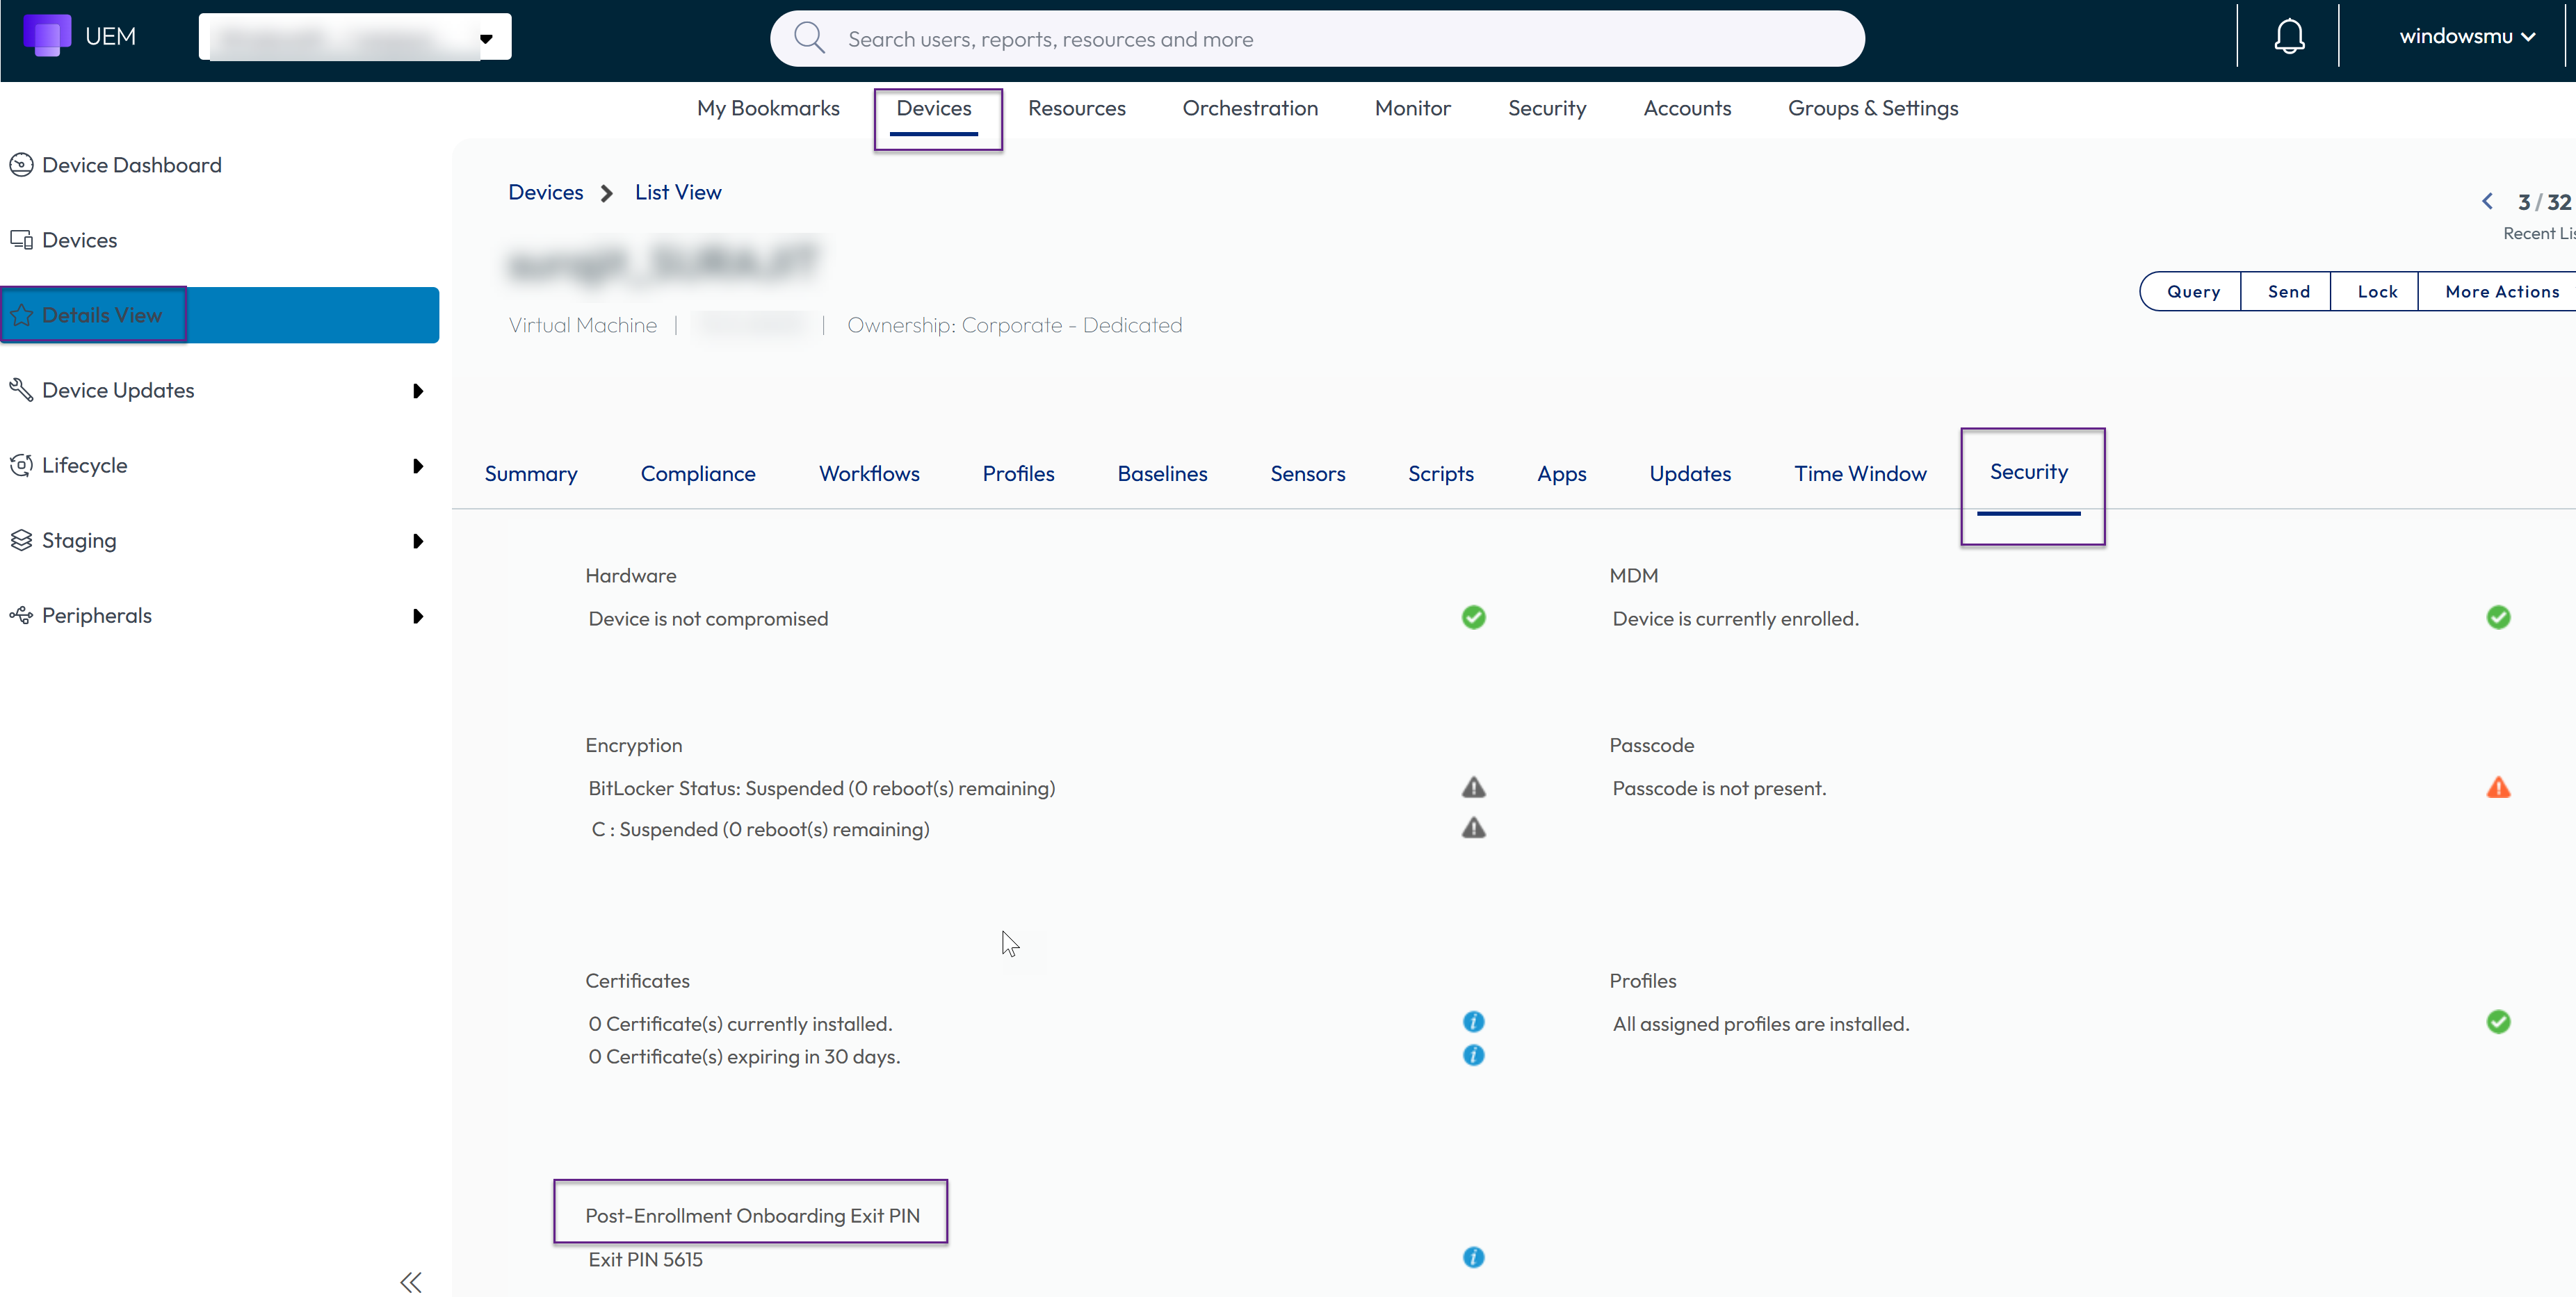
If onboarding gets stuck, fails, or IT needs to manually intervene, the device can be unlocked using the PIN-protected exit mechanism:
-
Press the configured exit key combination (default: Ctrl+Shift+F) — this is the only keyboard shortcut allowed while the screen is locked.
-
A PIN dialog appears on screen.
-
Enter the device-specific numeric PIN (generated during enrollment and available to IT admins via UEM).
-
Upon successful PIN verification, keyboard blocking is immediately disabled and the "Get Started" button is enabled, allowing the user to proceed. If an incorrect PIN is entered, an error message is displayed and the device remains locked. There is no limit on PIN retry attempts.
Current Implementation
The 'Get Started' button will be enabled soon after the Onboarding workflow is complete regardless of Success or Failure. This ensures the end user can use the device after the Onboarding workflow is complete. If there is no onboarding workflow (for example, only auto apps are present), the button remains enabled so the user can proceed.
Expected Behaviours
A user interactive script was configured as a step in the onboarding workflow whereas user interaction is disabled in the Post Enrollment Onboarding screen causing script execution failure.Scripts designed to trigger notifications will fail because the Post Enrollment Onboarding screen remains in the foreground , preventing the notifications from displaying.
Windows Enrollment Statuses
If you look at enrollment settings on the Devices > Devices Settings > Devices & Users > General > Enrollment page, you see three general enrollment scenarios for Windows devices.
-
Open Enrollment
Allows anyone meeting other enrollment criteria (authentication mode, restrictions, and so on) to enroll.
-
Registered Devices Only
Allows users to enroll using devices you or they have registered. Device registration is the process of adding corporate devices to the Workspace ONE UEM console before they are enrolled. This matrix applies to devices that register without a token.
-
Require Registration Token
If you restrict enrollment to registered devices only, you also have the option of requiring a registration token to be used for enrollment. This increases security by confirming that a particular user is authorized to enroll.
Device Type
The type of device guides how the Workspace ONE UEM system tracks and displays the device's enrollment status.
- Allowlisted devices - The Workspace ONE UEM admin adds a list of devices that are pre-approved to enroll.
- Denylisted devices - The Workspace ONE UEM admin adds a list of devices that are not allowed to enroll.
- Registered devices (without attributes) - The Workspace ONE UEM admin registers devices by adding device information to the console. If the admin does not enter device attributes, the system uses device information, which includes user, platform, model, and ownership type.
- Registered devices (with attributes) - The Workspace ONE UEM admin registers devices by adding device attributes to the console. Device attributes include UDID, IMEI, and serial number.
Enrollment Lifecycle for Devices
Device enrollment with Workspace ONE UEM has three general stages.
-
(Optional) Admins register devices or users self-register their devices in Workspace ONE UEM.
Registration helps restrict enrollment.
-
Device users or admins enroll devices with Workspace ONE UEM.
-
Device users or admins unenroll devices with Workspace ONE UEM.
Console Displays Set Statuses
The enrollment type, device type, and stage of enrollment dictate the Enrollment Status and Token Status displayed for Windows devices on the Devices > Lifecycle > Enrollment Status page.
Open Enrollment
| Type | Registered devices - Enrollment Status | Registered devices - Token Status | Enrolled devices - Enrollment Status | Enrolled devices - Token Status | Unenrolled devices - Enrollment Status | Unenrolled devices - Token Status |
|---|---|---|---|---|---|---|
| Allowlisted device | Registered | Compliant | Enrolled | Compliant | Unenrolled | Compliant |
| Denylisted device | Denylisted | Non-Compliant | Not Applicable | Not Applicable | Not Applicable | Not Applicable |
| Registered device without attributes Attributes are Serial Number, IMEI, and UDID. | Registered | Registration Active | Enrolled | Registration Active | Registered | Registration Active |
| Registered device with attributes Attributes are Serial Number, IMEI, and UDID. | Registered | Registration Active | Enrolled | Registration Active | Registered | Registration Active |
Registered Devices Only (No Token)
| Type | Registered devices - Enrollment Status | Registered devices - Token Status | Enrolled devices - Enrollment Status | Enrolled devices - Token Status | Unenrolled devices - Enrollment Status | Unenrolled devices - Token Status |
|---|---|---|---|---|---|---|
| Allowlisted device | Registered | Compliant | Enrolled | Compliant | Unenrolled | Compliant |
| Denylisted device | Denylisted | Non-Compliant | Not Applicable | Not Applicable | Not Applicable | Not Applicable |
| Registered device without attributes Attributes are Serial Number, IMEI, and UDID. | Registered | Registration Active | Enrolled | Registration Active | Registered | Registration Active |
| Registered device with attributes Attributes are Serial Number, IMEI, and UDID. | Registered | Registration Active | Enrolled | Expired | Registered | Registration Active |
Require Registration Token
| Type | Registered devices - Enrollment Status | Registered devices - Token Status | Enrolled devices - Enrollment Status | Enrolled devices - Token Status | Unenrolled devices - Enrollment Status | Unenrolled devices - Token Status |
|---|---|---|---|---|---|---|
| Registered device without attributes Attributes are Serial Number, IMEI, and UDID. | Registered | Registration Active | Enrolled | Not Applicable | Unenrolled | Registration Expired |
| Registered device with attributes Attributes are Serial Number, IMEI, and UDID. | Registered | Registration Active | Enrolled | Not Applicable | Unenrolled | Registration Expired |
Was this page helpful?