When manually building and importing a virtual machine (VM) for your pod in Microsoft Azure, you must perform several additional tasks to further prepare the base VM before installing the agent-related software components. You perform these steps using the Microsoft Azure portal and connecting into the new VM.
Follow the steps in the topics below according to type of Microsoft Windows operating system that is installed in the VM.
Previous topic:Create the Virtual Machine Manually in Your Pod in Microsoft Azure
Prepare the Server VM for Agent Installation Needed by Horizon Cloud
Use the following steps to prepare a manually created server VM, that you plan to use for your pod's RDSH farms. You perform these steps before you install the Horizon Cloud agent-related software. Use the Microsoft Azure portal and connect into the new VM.
At a high level, the steps to prepare the VM prior to actually installing the agents are:
- Enable the RDS role.
- Set the VM's local administrator account properties to Password never expires. By default, the created VM's local security policy has accounts set to a maximum password age of 42 days. Preventing this local administrator account's password from expiring prevents the possibility of being locked out from using this local account later. The Horizon Cloud image publishing workflow uses the VM's local administrator account and removes the resulting sealed VM from the domain. If you allow the account's password to expire, at a future point in time you might find you cannot log in to the VM using that account.
- Download the Horizon Agents Installer to the VM.
Prerequisites
Complete the steps in Create the Virtual Machine Manually in Your Pod in Microsoft Azure. If you are using a base VM that you created in Microsoft Azure outside of those documented steps, ensure that your base VM meets the criteria as listed in Manually Build and Import a Virtual Machine from Microsoft Azure into Horizon Cloud.
CAUTION:
Ensure that the VM was created with Storage - Use managed disk set to Yes and with the correct virtual network and subnet, as described in Manually Build and Import a Virtual Machine from Microsoft Azure into Horizon Cloud. Otherwise, this VM will be unusable in Horizon Cloud even after you configure it and install the agent-related components, and then you will have to recreate it from scratch.
To verify that the VM meets that criteria before you spend time configuring it, log in to Horizon Cloud and navigate to the Inventory VMs page to see if the VM is listed. If it is listed, then the VM meets the required criteria and you can safely proceed with further configuration.
Procedure
-
Connect to the VM and log in to the Windows system.
One method to do this is to go to the VM's details page in the Microsoft Azure portal and use the portal's Connect action.
Because this login is the first login to the operating system, Windows displays a Networks prompt question on the right-hand side. The prompt asks about automatically finding PCs, devices, and other items on the network. We usually close this prompt by clicking No.
The Server Manager automatically opens to its first-time configuration wizard.
-
Enable the RDS role in the VM.
Enabling the RDS role allows using this server VM in RDSH farms for providing session-based desktops and remote applications.
-
In Microsoft Azure portal, connect to the powered-on VM.
-
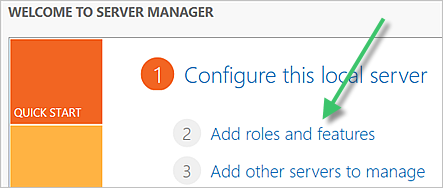
In the Server Manager dashboard, click Add roles and features.
-
Go through the wizard, selecting Role-based or feature-based installation.
-
On the Server Selection step, retain the defaults and click Next.
-
On the Server Roles step, select Remote Desktop Services and click Next.
-
On the Features step, retain the defaults and click Next.
-
Click to the Role Services step and select Remote Desktop Session Host.
-
Optionally keep the setting for the prompt about Remote Desktop Licensing Diagnoser Tools.
-
Start the process.
The wizard starts installing the RDS role. When the screen indicates that a restart is pending, close the wizard and close your RDP session.
-
In the Microsoft Azure portal, click Stop on the VM to power it off completely.
-
When the portal reflects the VM is completely stopped, click Start to power it on again.
-
Reconnect to the powered-on VM as described previously.
When the wizard displays the Completion step and you see the success messages, click Close to close the wizard.
-
-
In the VM, set the VM's local administrator account password to Password never expires.
One way to set the local administrator account password is to open Local Users and Groups by running
lusrmgr.mscand updating the account properties. -
To enable Internet Explorer temporarily to download the Horizon Agents Installer software, turn off the IE Enhanced Security Configuration for both administrators and users.
What to do next
To install the agent-related software components, complete the steps described in the topic that applies to your pod manifest version:
Note: If you want to enable logging in to the VM using a domain account, you can optionally join the VM to your Active Directory domain. Otherwise you use the local administrator account to log in to the VM when installing the agent software and customizing the VM.
Prepare the Microsoft Windows 10 or 11 Enterprise Multi-Session VM for Agent Installation Needed by Horizon Cloud
The following steps are for manually preparing a VM that has a Microsoft Windows 10 or Windows 11 Enterprise multi-session operating system, prior to installing the agents. You perform these steps using the Microsoft Azure portal and connecting into the new VM.
Remember: As described in the Microsoft documentation FAQ, Microsoft Windows 10 or Windows 11 Enterprise multi-session is a Remote Desktop Session Host (RDSH) type that allows multiple concurrent interactive sessions, which previously only Microsoft Windows Server operating systems could provide. When your Horizon Cloud tenant account configuration allows for its use, you can make use of Microsoft Windows 10 or 11 Enterprise multi-session in your Horizon Cloud environment.
At a high-level, the steps to prepare the VM prior to actually installing the agents are:
- Set the VM's local administrator account properties to Password never expires. By default, the created VM's local security policy has accounts set to a maximum password age of 42 days. Preventing this local administrator account's password from expiring prevents the possibility of not being able to use this local account at a later time. The Horizon Cloud image publishing workflow uses the VM's local administrator account and removes the resulting sealed VM from the domain. If you allow the account's password to expire, at a future point in time you might encounter issues when publishing the image.
- Download the Horizon Agents Installer to the VM.
Prerequisites
Complete the steps in Create the Virtual Machine Manually in Your Pod in Microsoft Azure. If you are using a base VM that you created in Microsoft Azure outside of those documented steps, ensure your base VM meets the criteria as listed in Manually Build and Import a Virtual Machine from Microsoft Azure into Horizon Cloud.
CAUTION:
Ensure that the VM was created with Storage - Use managed disk set to Yes and with the correct virtual network and subnet, as described in Manually Build and Import a Virtual Machine from Microsoft Azure into Horizon Cloud. Otherwise, this VM will be unusable in Horizon Cloud even after you configure it and install the agent-related components, and then you will have to recreate it from scratch.
To verify the VM meets that criteria before you spend time configuring it, log in to Horizon Cloud and navigate to the Inventory VMs page to see if the VM is listed. If it is listed, then the VM meets the above criteria and you can safely proceed with further configuration.
Procedure
-
Connect to the VM using your chosen method, such as RDP or a method you normally use when you connect to Windows VMs in Microsoft Azure.
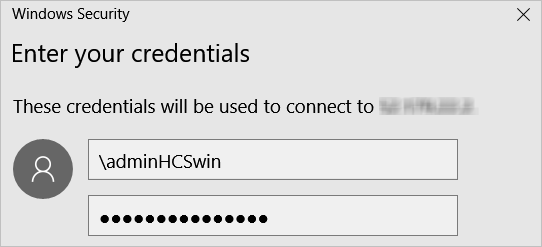
In your connection method, connect using the default user name and password that you specified in the VM creation wizard. Include a backslash (\) in front of the user name to log in without a domain. The following screenshot is an example of using an RDP client. You might have to say yes to warnings about certificates to proceed to the remote system.
Because this is the first login to the operating system, Windows might display a Networks prompt question on the right hand side. The prompt asks about automatically finding PCs, devices, and other items on the network. If the Networks prompt is displayed, dismiss it by clicking No.
-
In the VM, set the VM's local administrator account password to Password never expires.
One way to set the local administrator account password is to open Local Users and Groups by running
lusrmgr.mscand updating the account properties.
What to do next
To install the agent-related software components, complete the steps described in the topic that applies to your pod manifest version:
Note: If you want to be able to log in to the VM using a domain account, you can optionally join the VM to your Active Directory domain. Otherwise you use the local administrator account to log in to the VM when installing the agent software and customizing the VM.
Prepare the VDI Desktop VM for Agent Installation Needed by Horizon Cloud
The following steps are for manually preparing a VM that has a Microsoft Windows client operating system, prior to installing the agents. You perform these steps using the Microsoft Azure portal and connecting into the new VM.
At a high-level, the steps to prepare the VM prior to actually installing the agents are:
- Set the VM's local administrator account properties to Password never expires. By default, the created VM's local security policy has accounts set to a maximum password age of 42 days. Preventing this local administrator account's password from expiring prevents the possibility of not being able to use this local account at a later time. The Horizon Cloud image publishing workflow uses the VM's local administrator account and removes the resulting sealed VM from the domain. If you allow the account's password to expire, at a future point in time you might encounter issues when publishing the image.
- Download the Horizon Agents Installer to the VM.
Prerequisites
Complete the steps in Create the Virtual Machine Manually in Your Pod in Microsoft Azure. If you are using a base VM that you created in Microsoft Azure outside of those documented steps, ensure your base VM meets the criteria as listed in Manually Build and Import a Virtual Machine from Microsoft Azure into Horizon Cloud.
CAUTION:
Ensure that the VM was created with Storage - Use managed disk set to Yes and with the correct virtual network and subnet, as described in Manually Build and Import a Virtual Machine from Microsoft Azure into Horizon Cloud. Otherwise, this VM will be unusable in Horizon Cloud even after you configure it and install the agent-related components, and then you will have to recreate it from scratch.
To verify the VM meets that criteria before you spend time configuring it, log in to Horizon Cloud and navigate to the Inventory VMs page to see if the VM is listed. If it is listed, then the VM meets the above criteria and you can safely proceed with further configuration.
Procedure
-
Connect to the VM and log in to the Windows system.
One method to do this is to go to the VM's details page in the Microsoft Azure portal and use the portal's Connect action.
Because this login is the first login to the operating system, Windows displays a Networks prompt question on the right-hand side. The prompt asks about automatically finding PCs, devices, and other items on the network. We usually close this prompt by clicking No.
-
In the VM, set the VM's local administrator account password to Password never expires.
One way to set the local administrator account password is to open Local Users and Groups by running
lusrmgr.mscand updating the account properties.
What to do next
To install the agent-related software components, complete the steps described in the topic that applies to your pod manifest version:
Note: If you want to be able to log in to the VM using a domain account, you can optionally join the VM to your Active Directory domain. Otherwise you use the local administrator account to log in to the VM when installing the agent software and customizing the VM.
Was this page helpful?