You can configure an access policy rule to offer users a choice of authentication methods. Instead of being presented with a fixed sequence of methods, users select the authentication method they want to use from the options that you configure. This flexibility enables users to use an alternative method for signing in when they might not be able to access one of the methods.
You can offer a choice of authentication methods at either position in a rule.
-
First factor: After the user enters their identifier, the Select Authentication page displays and the user chooses the authentication method to use.
-
Second factor: The user completes first factor authentication, then the Select Authentication page displays and the user chooses the authentication method to use for second factor authentication.
You can also configure authentication chaining in access policy rules to require users to pass credentials through more than one authentication method before they can sign in. When two authentication conditions in one rule are configured, the user must correctly respond to both authentication requests. A rule can combine chaining with a choice of methods at either first or second factor, or at both.
When you select a third-party identity provider authentication method as a login option, the authentication method name you configured for the third-party identity provider instance in the Omnissa Access console is displayed on the Select Authentication login page. The description you wrote for the third-party authentication method displays under the authentication method option. See Add and Configure a SAML Third-Party Identity Provider Instance in Omnissa Access.
Note: Whenever users log in using an access policy that offers multiple authentication methods, they need to choose their preferred authentication option. Their selected option is not saved.
Example: Choice of Authentication at Second Factor
The following policy with two rules is an example of how an authentication policy can be set up to give users a choice of authentication methods.
-
Rule 1 is configured for any user coming from the INTERNAL NETWORK to authenticate with Password AND Omnissa Pass OR RADIUS OR RSA.
-
Rule 2 is configured for any user coming from an EXTERNAL NETWORK to authenticate with Password AND Certificate (cloud deployment) OR Mobile SSO (for iOS) OR OIDC Login.
The login page lists the login methods and the user selects the method they want to use.
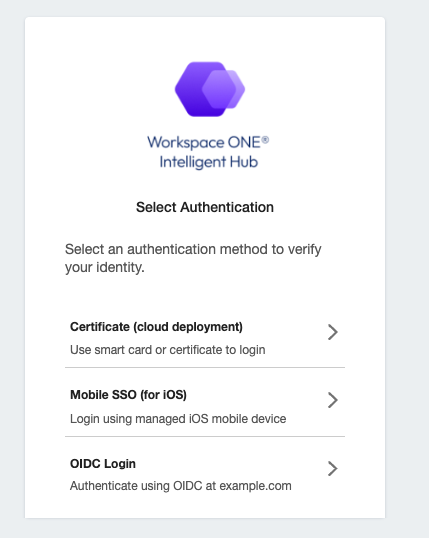
The log in experience is as follows.
-
The user successfully enters their credential for the first requested authentication method. The Select Authentication page then displays, prompting the user to choose a second authentication method.
-
The user selects an available authentication method for their device.
-
After selecting the authentication method, the user either enters their credentials or, for certificate-based authentication, is authenticated immediately. If the user selects the wrong method, they can click Back in the browser to return to the Select Authentication page. However, with certificate-based authentication that does not prompt for a credential, users cannot go back to the Select Authentication page.
Example: Choice of Authentication at First Factor
The following policy with two rules is an example of how an authentication policy can be set up to give users a choice of first factor authentication methods.
-
Rule 1 is configured for any user coming from the INTERNAL NETWORK to authenticate with Password OR Omnissa Pass.
-
Rule 2 is configured for any user coming from an EXTERNAL NETWORK to authenticate with Omnissa Pass OR FIDO2.
The log in experience is as follows.
-
The user enters their identifier on the sign-in page.
-
The Select Authentication page then displays, prompting the user to choose a first factor authentication method.
-
The user selects an available authentication method and enters their credentials for that method.
-
If the rule also configures a second factor authentication method, the user is prompted for that method. Otherwise, the user is signed in.
Prerequisites
- Authentication methods that your organization supports are configured and enabled in Omnissa Access.
- Network ranges of defined IP addresses created and assigned to the identity providers.
Procedure
-
In the Omnissa Access console Resources > Policies page, click Add Policy to add a new policy, or edit the default policy or an existing custom app policy.
-
Proceed to the Configuration page of the Add Policy or Edit Policy wizard.
-
Click Add Policy Rule.
Option Description If a user's network range is Select the network range. and the user accessing content from Select the device type that this rule manages. and user belongs to groups Select the group that this rule applies to. Then perform this action Select Authenticate using.... then the user may authenticate using Configure the authentication method order. Select the authentication method to apply first. To provide users a choice of authentication methods, click Add, and select one or more alternative authentication methods in the OR lines.
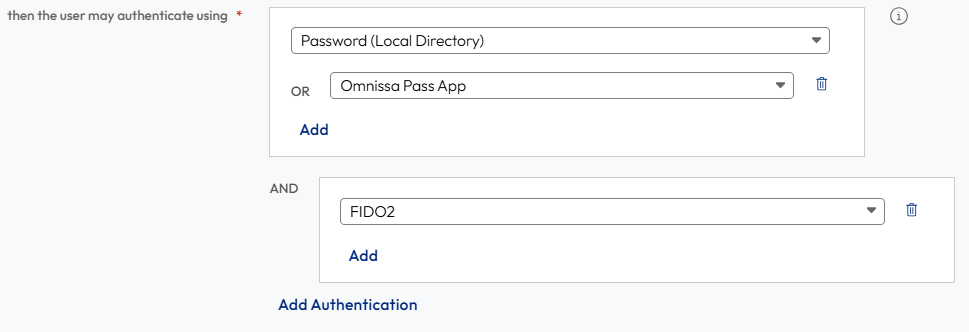
To require users to use a second authentication method, click Add Authentication and select an authentication method from the drop-down menu. To provide users a choice of authentication methods, click Add, and select one or more alternative authentication methods in the OR lines.
For example:
If the preceding method fails or is not applicable, then (Optional) Configure fallback authentication methods. Re-authenticate after Select the length of the session after which users must authenticate again. -
(Optional) In Advanced Properties, create a custom access denied error message that displays when user authentication fails. You can use up to 4000 characters, which are about 650 words. If you want to send users to another page, in the Custom Error Link URL text box, enter the URL link address. In the Custom Error Link text box, enter the text to describe the custom error link. This text is the link. If you leave this text box blank, the word Continue displays as the link.
-
Click Save.
-
Click Add Policy Rule and continue to configure the rules to progress to another rule when authentication fails.
-
After you configure the last rule in the policy, deactivate If authentication fails, then progress to the next rule.
After the custom policy is configured, you select the apps to associate with the policy. See Add Web or Virtual App-Specific Policies in Omnissa Access, Assign Apps to Custom Access Policies section.
Was this page helpful?