This page describes the use case of using Amazon WorkSpaces Core workspaces as the sources for a Horizon 8 automated desktop pool.
The ability to use Amazon WorkSpaces Core as a source for an automated desktop pool debuted in Horizon 2406.
For an in-depth article that covers deploying Horizon with Amazon EC2 and Amazon WorkSpaces overall, including using Amazon WorkSpaces as the sources for pools, see Tech Zone's Deploying Omnissa Horizon with Amazon EC2 and Amazon WorkSpaces.
Single-Session Virtual Desktops OS Support
As of this writing, the Horizon 8 automated desktop pool provisioning features for single-session virtual desktops can be used with:
- Windows 10 and Windows 11 instances of Amazon Workspaces Core
- AWS provided public WorkSpaces Core bundles (BYOP) for Windows Server 2019 and Windows Server 2022, or create your own custom server OS bundle and image tailored to your requirements. This Windows Server support is available in AWS regions where Amazon WorkSpaces Core is available.
Important: When you're going to use a Windows Server OS as the base of a single-session desktop, before you install the Horizon Agent in the OS, you must first prepare the OS as described in steps in Prepare Windows Server Operating Systems for Desktop Use.
Terminology
Even though some of the terms used in Amazon WorkSpaces Core are different than the terms used in vSphere, much of the high-level principles are the same.
The following table is an example for a Windows 11 based instance, comparing the terms used.
| Artifact | Amazon WorkSpaces Core process | vSphere process | WorkSpaces Example |
|---|---|---|---|
| A machine, the starting point for what will eventually become the golden image | Create image using the WorkSpaces UI | Create VM in the vSphere Admin UI | Image named win11-byod |
| An image, a base image to be customized to become the golden image | Result from the Create image action in the WorkSpaces UI | Result from the Create VM action in the vSphere Admin UI | Image named win11-byod |
| A bundle | Create a bundle from that image using the WorkSpaces UI | N/A - a bundle is an Amazon WorkSpaces construct | Bundle named hzn-byol, created from win11-byod |
| Customized image with Horizon Agent paired to the Connection Server | Use the bundle to create an Amazon WorkSpaces instance into which the Horizon Agent is installed. Pair that installed agent with the Connection Server, and when complete, use the WorkSpaces UI's Create Image to clone to an image again. | Customize the starter VM, install the Horizon Agent, and create a snapshot in the vSphere Admin UI. | Golden image named w11gp created from bundle hzn-byol, and this image has installed Horizon Agent |
| Custom bundle based on w11gp, the golden image having Horizon Agent installed in it | Create a bundle from the w11gp using the WorkSpaces UI, selecting the hardware type you want used for the desktop pool | N/A - a bundle is a WorkSpaces construct. vSphere uses the snapshot for the clones in the desktop pool. | w11avbundle |
Ultimately, when using Amazon WorkSpaces Core, it is the bundle that is the source that the automated desktop pool wizard needs to consume for provisioning the automated desktop pool.
You might think of the custom bundle as the golden image married to a hardware profile. In WorkSpaces, a bundle is a collection of the operating system plus storage, compute, and software resources.
Prerequisites
The steps in each section below require the following items to be in place before starting the steps.
-
An existing or new AWS account that has access for Amazon WorkSpaces Core. If you don't have an account, you can create one using the Amazon Web Services home page.
-
The Amazon account must have Bring Your Own License (BYOL) enabled. Refer to the Amazon information at Bring Your Own Windows desktop licenses. In Amazon WorkSpaces, the license and protocol are under your control. When using Amazon Workspaces Core with Horizon 8, the supported protocol is the Blast Extreme protocol, which comes from installing the Horizon Agent.
-
A Horizon 8 deployment set up and configured that's supported for this use case. This use case requires having a Horizon 8 deployment running on Amazon EC2 machines. The Connection Server is running in Amazon EC2.
-
Ensure you have your Amazon WorkSpaces set up.
- Active Directory - Amazon recommends creating an Active Directory Connector (ADC) for all directories. Horizon 8 does not support Amazon Simple AD. Amazon has this AWS white paper about the role of the AWS AD connector with Amazon WorkSpaces.
- BYOL images imported into your WorkSpaces.
-
Ensure you have set up an IAM role that has the appropriate permissions for Horizon 8 Connection Server to access the WorkSpaces resources. Refer to the Amazon information at Identity and management for WorkSpaces. In AWS, policies are sets of permissions that define what actions the IAM role can perform on specific AWS resources.
-
When using a Connection Server deployed in Amazon EC2, the IAM role must be added to the Connection Server's EC2 instance in Amazon EC2. The default is to use an instance profile to pass that IAM role to the Connection Server's EC2 instance (also referred to in the AWS documentation as an AWS service role for an EC2 instance). On the IAM role for the Connection Server the following policies provide the required permissions:
- AmazonWorkSpacesAdmin (AWS managed policy)
- AmazonSSMDirectoryServiceAccess (AWS managed policy)
- AmazonSSMManagedInstanceCore (AWS managed policy)
- Workspaces:DescribeWorkspaceImages (AWS inline policy)
-
When using a Connection Server deployed on-premises or in a public cloud outside of Amazon EC2, you'll need to provide an IAM User's AWS Access Key ID and Secret Access Key when adding Amazon WorkSpaces Core as a capacity provider. Set up an IAM user for this purpose and apply the IAM role with the required permissions to that IAM user, and establish the Access Key ID and Secret Access Key. On the IAM role for the Connection Server the following policies provide the required permissions:
- AmazonWorkSpacesAdmin (AWS managed policy)
- AmazonSSMDirectoryServiceAccess (AWS managed policy)
- AmazonSSMManagedInstanceCore (AWS managed policy)
- Workspaces:DescribeWorkspaceImages (AWS inline policy)
-
For details on how to deploy a Horizon 8 infrastructure on Amazon EC2 machines, see the section Deploying Horizon Infrastructure on Amazon EC2 Machines within Tech Zone.
Add Amazon WorkSpaces Core as a Capacity Provider
In the Horizon 8 Administration Console's Servers UI, use the Capacity Providers tab to add Amazon WorkSpaces Core as a capacity provider.
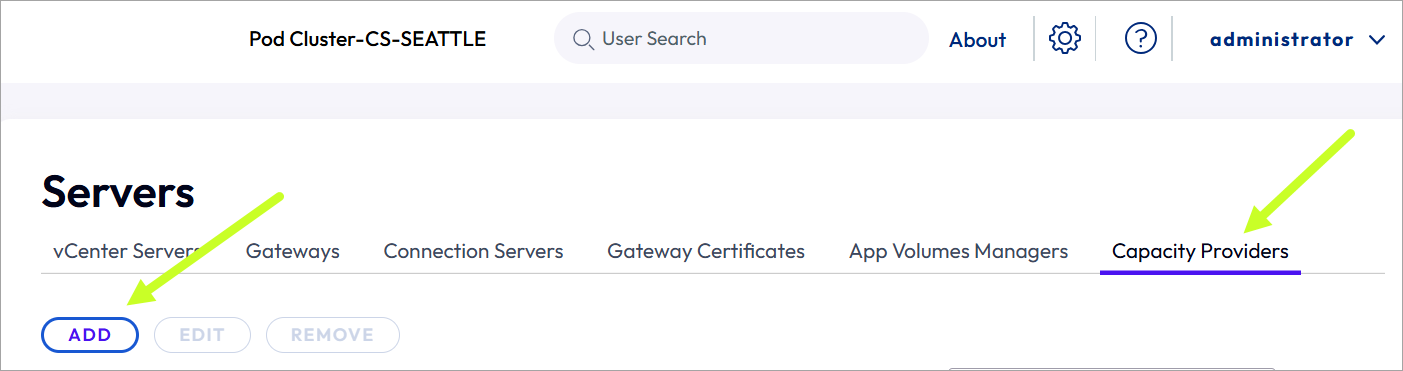
Click Add and complete the displayed UI by selecting Amazon WorkSpaces Core, entering a display name which the Administration Console will use when listing this provider, and selecting the Amazon AWS region where this capacity provider resides.
Note: When the Connection Server resides outside Amazon EC2, check the Use IAM Access Keys checkbox, and input the AWS Access Key ID and AWS Security Access Key that you set up as described in the preceding Prerequisites.
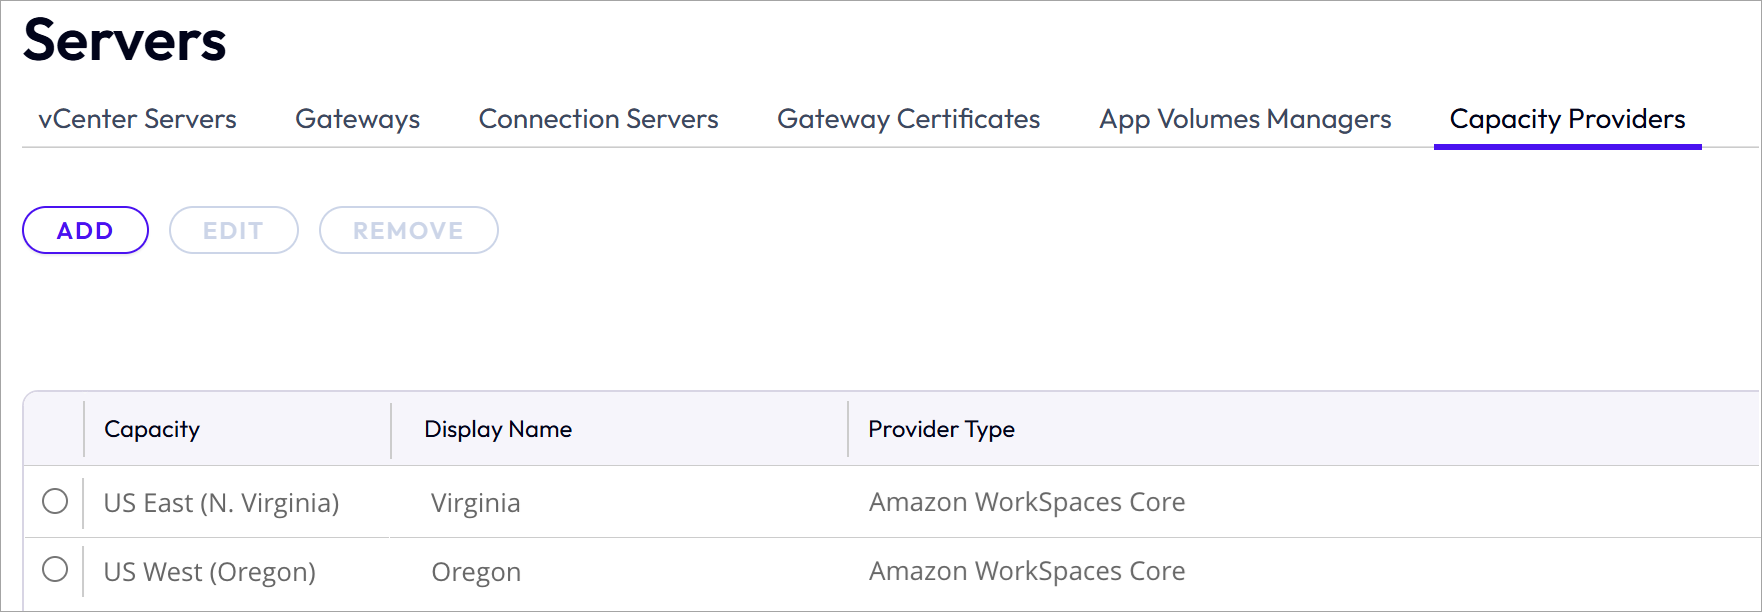
The following screenshot illustrates two providers added, one using AWS region US East (N. Virginia) and the other with region US West (Oregon).
Create the Golden Amazon WorkSpaces Core Bundle
When using Amazon WorkSpaces Core for Horizon 8 automated desktop pools, a bundle is the source that Horizon 8 consumes for provisioning the automated desktop pool.
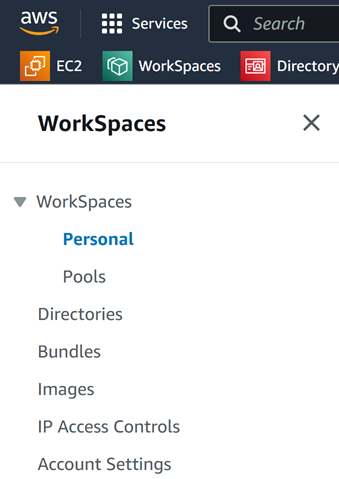
You create the bundle using the Amazon WorkSpaces UI (within the AWS console). The following screenshot illustrates the navigation side of that UI.
In the sequence below, you start in the Amazon WorkSpaces UI, then in the middle you switch to the Horizon 8 Administration Console for the Set Golden Image action to pair the agent, then switch back to the Amazon WorkSpaces UI for the final steps of converting the machine into an image and creating the bundle from that image, to make the bundle that's needed for the desktop pool wizard.
First set of steps below is for Windows desktop OSes and the next set of steps is for the Windows server OSes.
Desktop OS Golden Pattern Creation Steps
-
In the AWS WorkSpaces UI, create a desktop Windows BYOL image. (This step is equivalent to creating the VM in vSphere.) Note: Amazon recommends creating a new image (instead of importing an existing image). See the Amazon section Create a BYOL image using the WorkSpaces console.
-
Convert that image into a bundle.
Note: You can use the UI to launch an Always On instance or use cloudshell to launch a Manual (hourly billing) or decoupled (no user) instance to customize.
Example of cloudshell command:aws workspaces create-workspaces --workspaces DirectoryId=d-XXXXXXXX,UserName="'[UNDEFINED]'",BundleId=wsb-XXXXXXX,WorkspaceProperties={RunningMode=MANUAL},WorkspaceName=XXXXXXXXwhereDirectoryIDis the directory in which you want to place the WorkSpace instanceBundleIDis the bundle you want to make a copy of (the Windows Server OS)WorkSpaceNameis customizable
-
Use that bundle to create a WorkSpaces Core instance.
-
RDP to that instance, do your customizations, and run the Horizon Agent installation.
Ensure that you install the latest version of the Horizon Agent.
The agent installer's final UI message will say that you must restart the system for the confiuration changes to take effect. You can either restart it now or restart it after Step 5.
- Switch over to your Horizon Console, and in the Registered Machines - Others UI, select the machine and Set Golden Image on that machine.
This Set Golden Image action registers the instance from step 4 with the Connection Server. This action provides for the pairing of the Horizon Agent with the Connection Server.
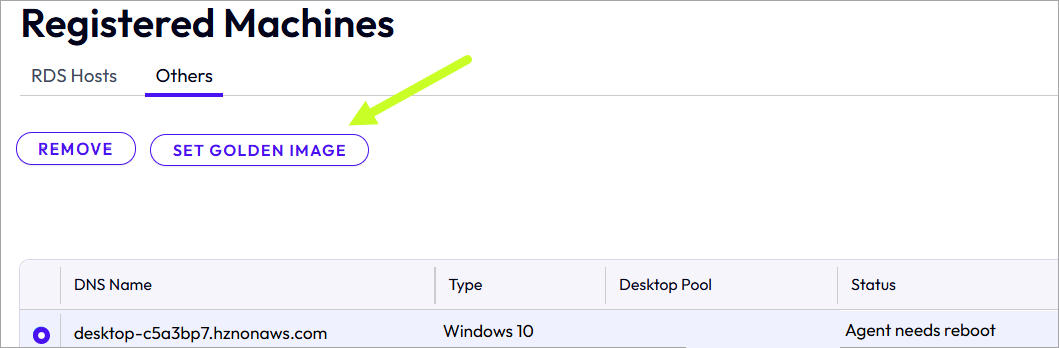
Note: Before clicking Set Golden Image, verify the displayed DNS name matches the DNS name of the machine in the AWS console.
- If you didn't restart the WorkSpaces instance in step 4, then restart that instance.
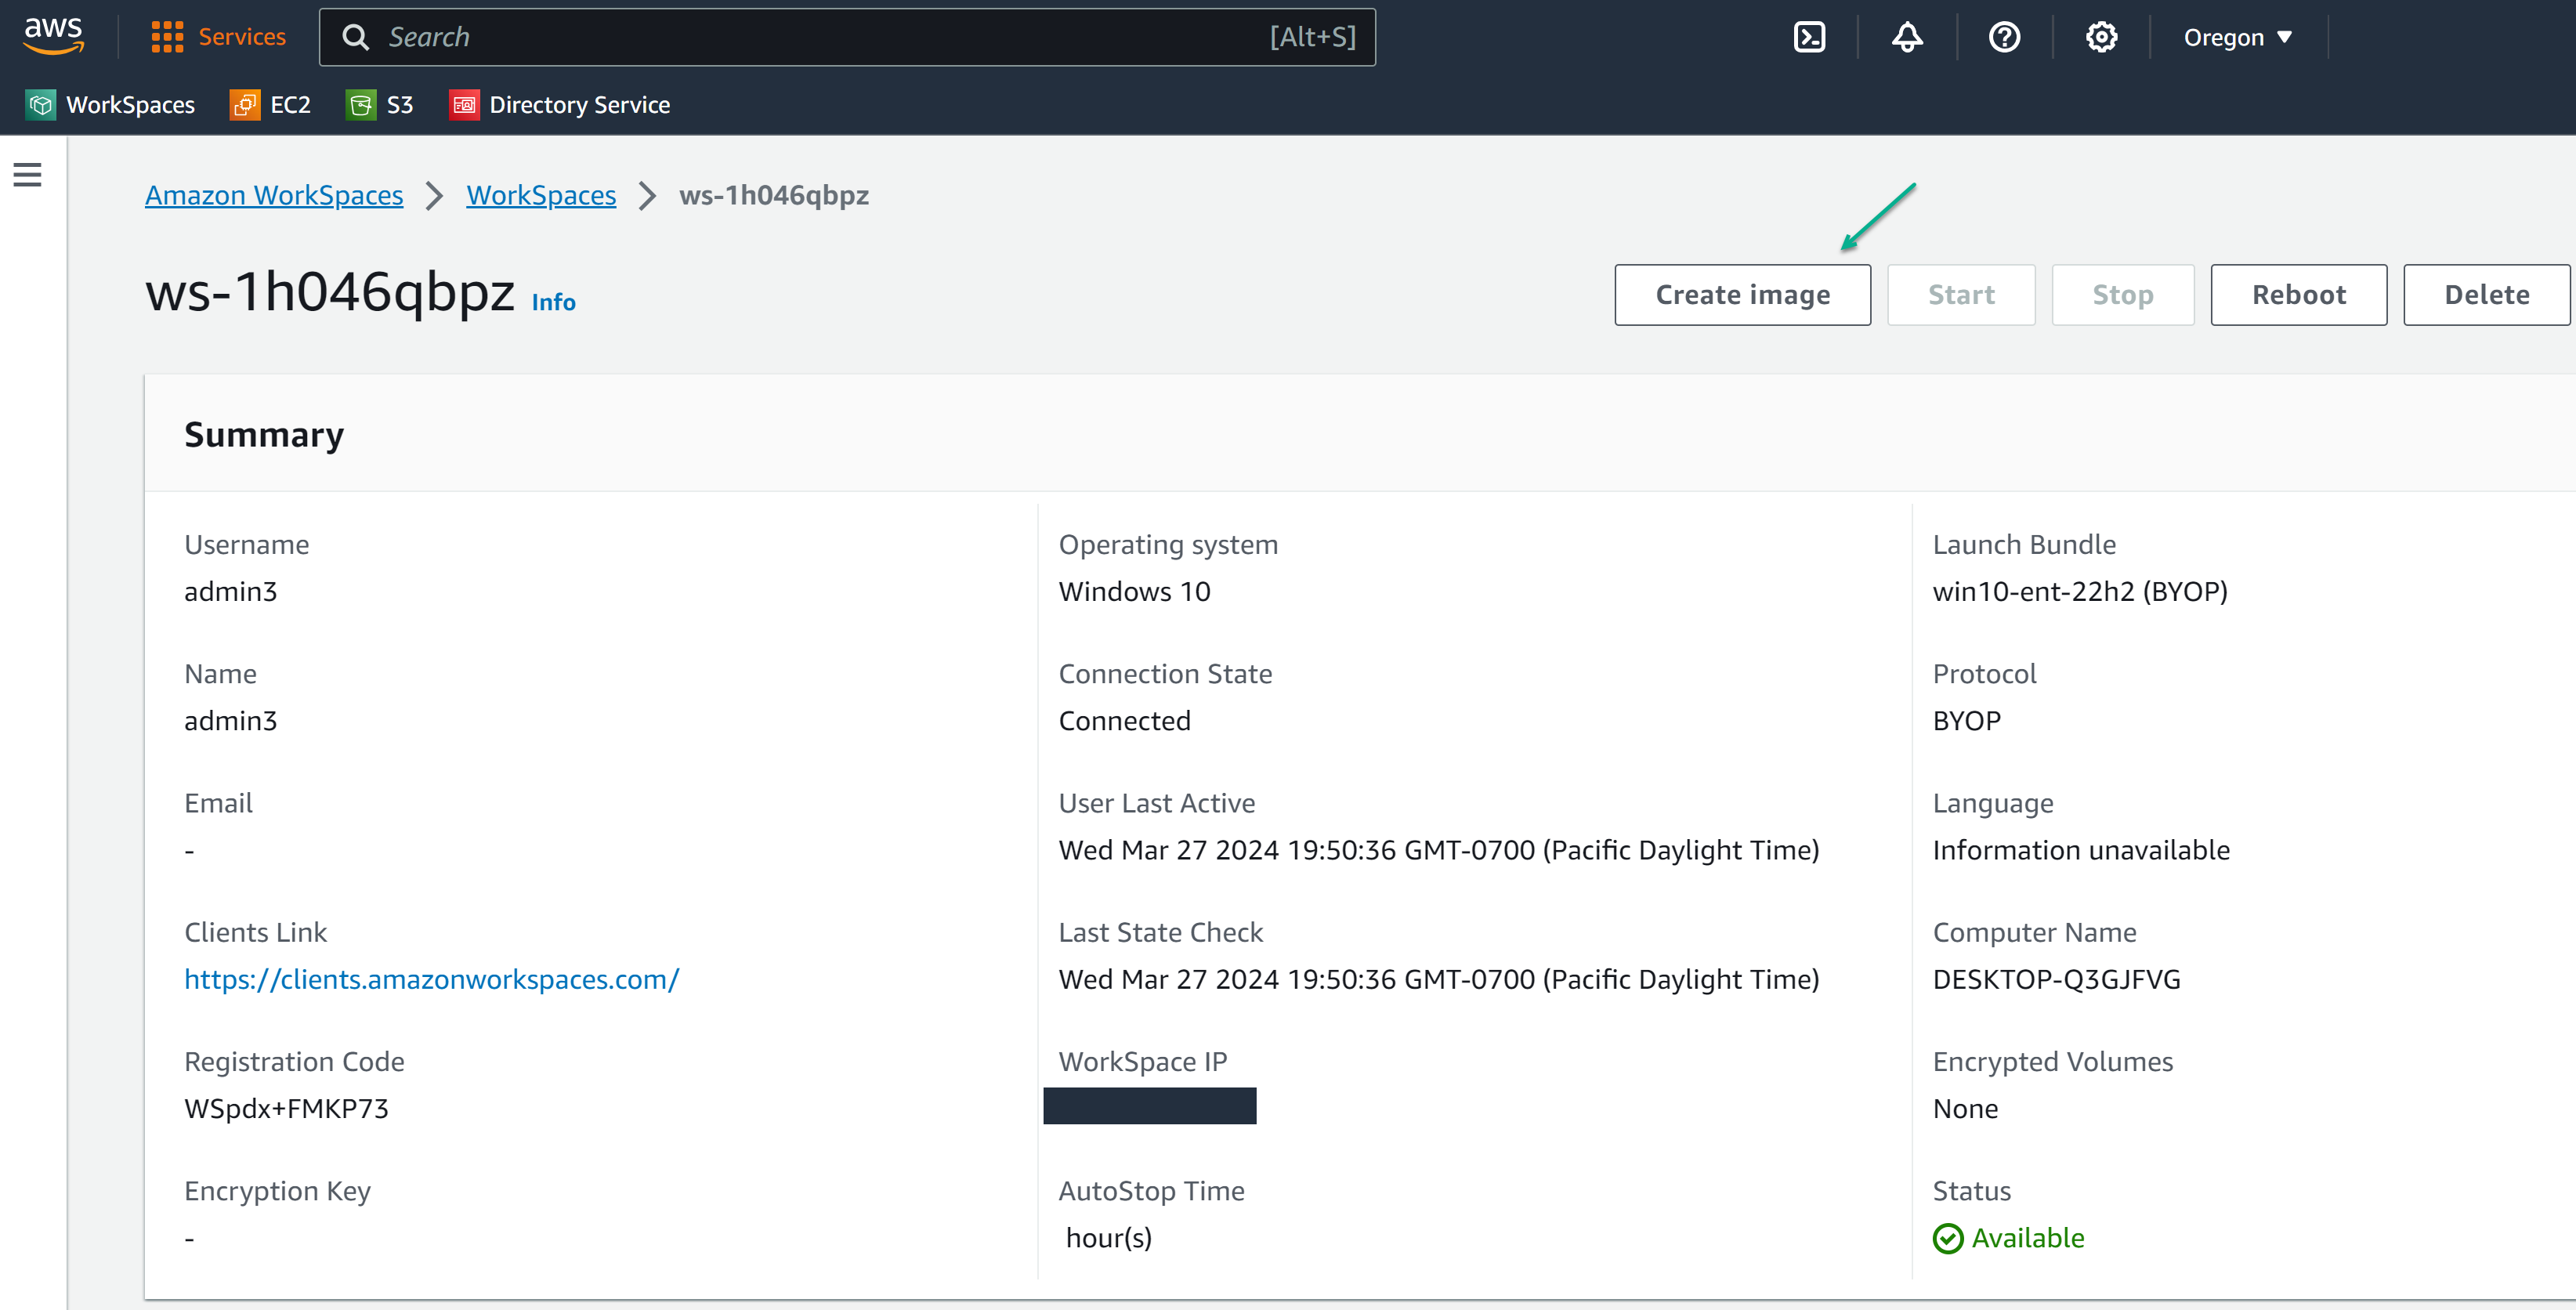
- In the WorkSpaces UI, navigate to that rebooted instance's details and then convert the instance to an AWS WorkSpaces image using the Workspaces UI's Create image action. (You're cloning the now-paired instance that has the Horizon Agent to a WorkSpaces image. The Amazon WorkSpaces UI uses the action Create image for this cloning process.)
The following screenshot illustrates the details UI for an instance named ws-1h046qbpz and the location of the Create image button. Some displayed values are redacted for privacy.
- When you see in the WorkSpaces UI that the image from step 7 has available status, create a bundle from that image, which combines that image with your desired hardware type for the pool's machines.

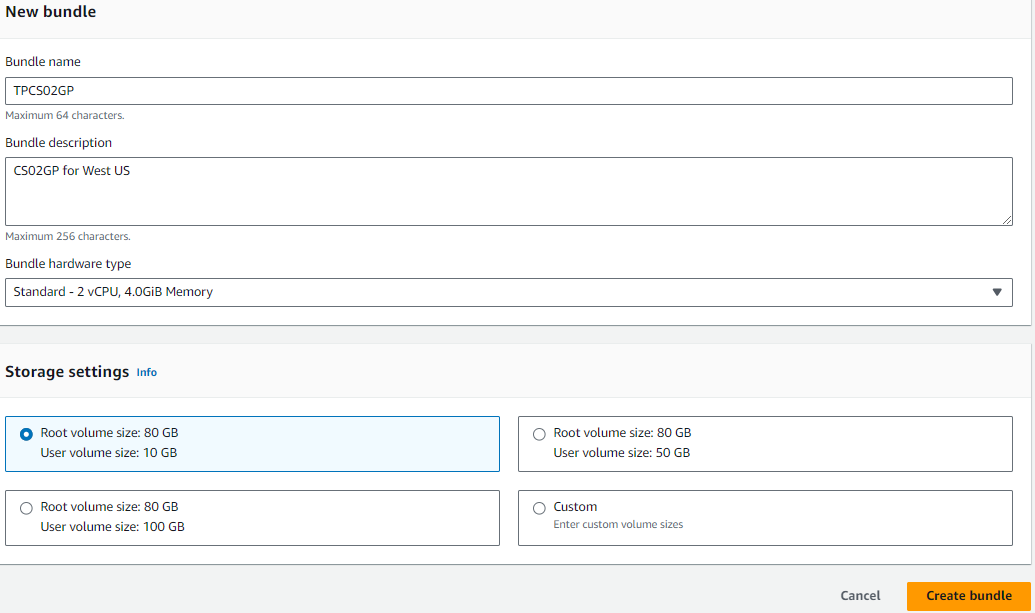
The hardware type you select here is agnostic to the original hardware type you selected for the bundle created in step 2. The hardware type chosen here is the one that the pool's machines will have.
The following screenshot is an example of performing the Create bundle menu option on an image named TPCS02GP. In the New bundle UI, you select the hardware options for the bundle.
Tip: To help distinguish the bundles that have the Horizon Agent installed from the other bundles in the WorkSpaces UI's Bundles list, use the bundle's description to keep notes, like Horizon Agent installed.
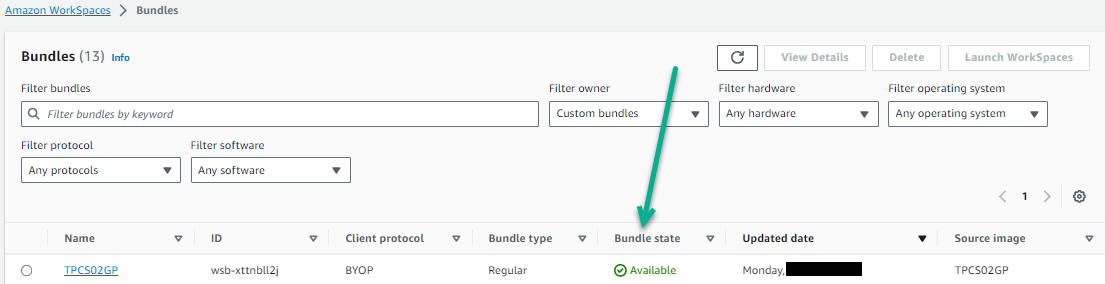
After the bundle is created, verify that has Available status. The following screenshot illustrates the bundle with ID wsb-xttnbll2j is available.
After that final step, a bundle exists which is the combination of the golden image with Horizon Agent and the hardware type you want for the desktop pool. You will select that bundle in the Automated Desktop Pool wizard as the source of the pool's desktops.
Importing an AMI to Use for an Image in Amazon Workspaces Core
Some functions for WorkSpaces Core do not work through the AWS Console. To manually import an EC2 AMI into WorkSpaces Core for use as a BYOL/BYOP image, see ImportWorkspaceImage.
Verify that your account has quota for the types of images you need. For more information, see Amazon WorkSpaces quotas.
Example Command for Graphics Import:
aws workspaces import-workspace-image --ec2-image-id ami-0824ddd4572dbc8fa --ingestion-process BYOL_GRAPHICS_G4DN_BYOP --image-name win10-ent-GPU-new-ami --image-description "AddADescription"

--ec2-image-id "ami-xxxxxxxxxxx" - is the ami that you want to import

--ingestion-process BYOL_GRAPHICS_G4DN_BYOP  - is dependent on the type of image you want to have in WorkSpaces Core

--image-name "descriptive_name"

--image-description "AddADescription"

Valid Values for WorkSpaces Core ingestion-process: BYOL_REGULAR_BYOP | BYOL_GRAPHICS_G4DN_BYOP
AWS Provided Windows Server Public Bundle Golden Pattern Creation Steps
Note: When you plan to use a Public Windows Server Amazon Workspaces Core bundle, review the AWS prerequisites for using a Public Bundle.
- In the AWS WorkSpaces UI, provision a Public bundle of Windows Server WorkSpaces Core instance as an Always On instance, or use the CLI to create a Manual instance.
The directory used for Server OS needs to be a shared directory (not dedicated for VDI).
Note: You can use the UI to launch an Always On instance or use cloudshell to launch a Manual (hourly billing) or decoupled (no user) instance to customize.
Example of cloudshell command: aws workspaces create-workspaces --workspaces DirectoryId=d-XXXXXXXX,UserName="'[UNDEFINED]'",BundleId=wsb-XXXXXXX,WorkspaceProperties={RunningMode=MANUAL},WorkspaceName=XXXXXXXX where
DirectoryIDis the directory in which you want to place the WorkSpace instanceBundleIDis the bundle you want to make a copy of (the Windows Server OS)WorkSpaceNameis customizable
-
RDP to that WorkSpace instance and do your customizations.
-
While RDP'd in that instance, install the Horizon Agent as described in Prepare Windows Server Operating Systems for Desktop Use.
Note: You must do that page's step 5 'Configure Horizon Console to treat Windows Servers as supported desktop operating systems' for Connection Server to see the server-based image as a single-session desktop.
- Switch over to your Horizon Console, and in the Registered Machines - Others UI, select the machine and Set Golden Image on that machine.
This Set Golden Image action registers the instance from step 4 with the Connection Server. This action provides for the pairing of the Horizon Agent with the Connection Server.
Note: Before clicking Set Golden Image, verify the displayed DNS name matches the DNS name of the machine in the AWS console.
-
If you haven't restarted the image after installing the Horizon Agent, switch back to the WorkSpaces instance from step 4 and restart that instance.
-
In the WorkSpaces UI, navigate to that rebooted instance's details and then convert the instance to an AWS WorkSpaces image using the Workspaces UI's Create image action. (You're cloning the now-paired instance that has the Horizon Agent to a WorkSpaces image. The Amazon WorkSpaces UI uses the action Create image for this cloning process.)
-
When you see in the WorkSpaces UI that the image from step 7 has available status, create a bundle from that image, which combines that image with your desired hardware type for the pool's machines.
The hardware type you select here is agnostic to the original hardware type you selected for the bundle created in step 2. The hardware type chosen here is the one that the pool's machines will have.
The following screenshot is an example of performing the Create bundle menu option on an image named TPCS02GP. In the New bundle UI, you select the hardware options for the bundle.
Tip: To help distinguish the bundles that have the Horizon Agent installed from the other bundles in the WorkSpaces UI's Bundles list, use the bundle's description to keep notes, like Horizon Agent installed.
After the bundle is created, verify that has Available status. The following screenshot illustrates the bundle with ID wsb-xttnbll2j is available.
After that final step, a bundle exists which is the combination of the golden image with Horizon Agent and the hardware type you want for the desktop pool. You will select that bundle in the Automated Desktop Pool wizard as the source of the pool's desktops.
What to read next
Was this page helpful?