This documentation page describes the types of desktop assignments you can create in the tenant using resources from the Horizon Cloud pods in the tenant's pod fleet. Assignments are conceptual entities in the Horizon Universal Console. Using the console, desktop assignments are the way that you define pools of end-user virtual desktops and entitle them to your end users.
Overview
A Horizon Cloud pod in a Microsoft Azure environment provides for the following types of desktop assignments.
-
Session desktop assignment
In a session desktop assignment, a Remote Desktop Services (RDS) desktop experience is shared across multiple users. These desktops are session-based connections to the RDSH-capable VMs running in a pod's RDSH farms. Before creating an RDSH session desktop assignment, you must have at least one desktops farm that was created based on the published image. See First-Gen Horizon Cloud Pods - Creating and Managing Farms.
-
Dedicated VDI desktop assignment
In a dedicated VDI desktop assignment, each virtual desktop gets mapped to a specific user. Each mapped user returns to the same desktop at every login. When a particular dedicated VDI desktop is mapped to a specific user, that desktop is said to be assigned to that user. A specific dedicated VDI desktop gets mapped to a particular user in one of two ways:
- An administrator explicitly assigns that specific desktop to that particular user, using the Assign action.
- The user is entitled to the assignment (in the Users tab) and makes an initial launch of a desktop from the assignment. At that point, that user has claimed that dedicated VDI desktop from the set of all dedicated VDI desktops defined by that assignment. When the user has claimed a dedicated VDI desktop in this way, the system maps that particular desktop to that specific user and that dedicated VDI desktop gets the Assigned status. That particular dedicated VDI desktop remains in Assigned status until either an administrator explicitly unassigns the desktop (using the Unassign action) or that user's Active Directory account is removed from the assignment's set of entitled users. Dedicated assignments require a one-to-one desktop-to-user relationship and should be sized based on the total user population. For example, you need an assignment of one hundred desktops for a group of one hundred users. The primary use for such dedicated desktop assignments is to ensure that the host name of the desktop virtual machine for each user remains the same between sessions. Certain software packages might require this use for licensing.
-
Floating VDI desktop assignment
In a floating VDI desktop assignment, a user receives a different virtual machine with a different machine name with each login. With floating desktop assignments, you can create desktops that shifts of users can use and that should be sized based on the maximum number of concurrent users. For example, three hundred users can use an assignment of one hundred desktops if they work in shifts of one hundred users at a time. With floating desktop assignments, the user might see different host names for each desktop session.
When deciding between dedicated and floating VDI desktop assignments, the floating VDI desktop assignments are a best practice because they provide more flexible pool management capabilities than dedicated VDI desktop assignments and they avoid dedicating virtual machine resources for each user. As a result, floating VDI desktop assignments typically cost less than dedicated VDI desktop assignments.
To create a desktop assignment, you must have at least one image VM in the Published state that the system will use as the underlying configured operating system for the end users' desktops.
Note: Neither session-based desktops or floating VDI desktops provide persistence of user data, settings or profiles. When a user logs off from a floating VDI desktop, that floating VDI desktop is reset to the same state it was in before that user logged in. You can provide persistence of user data, settings, and profiles by setting up Dynamic Environment Manager and configuring it for your environment. Images created using the automated Import Desktop wizard have the Dynamic Environment Manager agent installed by default. For information on configuring persistence of those items, see these resources:
- Tech Zone's Dynamic Environment Manager Configuration.
- The Dynamic Environment Manager product documentation.
About Creating These Desktop Assignments
The desktop assignment creation workflows are different depending on your tenant's current broker configuration for its Horizon Cloud pods. To see that configuration, navigate to Settings > Broker in the console.
-
Broker page indicates Universal Broker
For VDI desktops, follow the workflows described in Horizon Cloud Pods in Microsoft Azure - Creating and Viewing VDI Multi-Cloud Assignments in Your First-Gen Environment.
For session-based desktops, follow the workflows described in Horizon Cloud Pods - Provide Desktop Sessions from RDS Hosts for Your End Users by Creating an RDS-Based Session Desktop Assignment
-
Broker page indicates single-pod broker
For VDI desktops, follow the workflows described in Create a Floating VDI Desktop Assignment Provisioned by a Single Pod in Microsoft Azure and Create a Dedicated VDI Desktop Assignment Provisioned by a Single Pod in Microsoft Azure.
For session-based desktops, follow the workflows described in Horizon Cloud Pods - Provide Desktop Sessions from RDS Hosts for Your End Users by Creating an RDS-Based Session Desktop Assignment
Deploying Carbon Black Cloud with Horizon Cloud on Microsoft Azure
For information on deploying Carbon Black Cloud with Horizon Cloud on Microsoft Azure VDI desktop assignments and farms, see the Knowledge Base article Carbon Black Interoperability with Horizon Cloud on Microsoft Azure (81253).
Provide Desktop Sessions from RDS Hosts for Your End Users by Creating an RDS-Based Session Desktop Assignment
In Horizon Cloud, you provide access for your end users to a multi-session operating system by creating what are called session desktop assignments. After you create a session desktop assignment, the specified end users can have desktop sessions from a farm's RDS hosts simultaneously. For a Horizon Cloud pod in Microsoft Azure, farm hosts can be VMs running Windows Server operating systems or running Windows 10 or 11 Enterprise multi-session operating systems.
For general information about desktop assignments in Horizon Cloud, see this page's overview. If you happen to be familiar with the Horizon on-premises product, this type of session desktop is called a published desktop in that product documentation.
Prerequisites
Verify you have the following items:
- In some deployments, you might see a message displayed on the console's assignment-related pages that states you must set up the broker configuration before you can create assignments involving your pods. If you see that message, follow the on-screen guidance.
- The Farms page lists at least one farm of remote desktops type and that farm is based on the published image that you want to use for the session desktops. Only farms configured to deliver remote desktops can be used for a session desktop assignment.
- The farm is not already used in an assignment. A farm configured to deliver remote desktops cannot be used in more than one session desktop assignment. To verify whether the farm you want to use is already used in a session desktop assignment, on the console page where your session-based desktop assignments are listed, examine the Farms column. If the farm you want to use is listed, then it is already being used in a session desktop assignment and you will have to create a new farm.
Procedure
-
Navigate to the assignments-related console page where you see that RDSH desktop assignments are created and start the workflow by clicking New.
Tip: The console is dynamic and reflects the workflows and settings that are appropriate for the up-to-the-moment situation in your Horizon Cloud tenant environment. The labels displayed for the console's assignment-related pages will vary depending on factors such as the tenant's configured brokering setting, the types of cloud-connected pods in your fleet, the tenant's regional cloud plane, and features that are based on specific licensing.
-
In the displayed screen, click the Desktops icon.
The New Desktop Assignment window opens to the first wizard step.
-
Select the Session type.
-
Make your selections and move to the next step.
| Option | Description |
|---|---|
| Location | Select the location of the pod from which you want the session desktops to be provided. |
| Pod | Select the pod.
Tip: If you do not see any pods to select, verify that the Location list is not displaying a location without pods. The Location field works on the Pod list to filter out pods that are not associated with the selected location. If you previously had a pod at a location and then deleted that pod or moved it to a different location, so that the displayed location no longer has any pods, the Pod list will display no entries. Because the locations are listed alphabetically, when the screen opens, it automatically selects the one that is first in the alphabet. If that location no longer has any pods associated with it, you must switch the location to a different entry. |
| Farm | Select the farm that has the host VMs that you want for the source of the desktop sessions.
Only farms that are in the selected pod and which not already involved in existing session desktop assignments are available for selection. |
| Assignment Name | Type a friendly name for this assignment. The end users see this name when they go to access their assigned desktop. For example, when an end user launches Horizon Client to go to an assigned desktop, this name is the one displayed in Horizon Client.
The name must contain only letters, hyphens, and numbers. Spaces are not allowed. The name cannot start with a non-alphabetic character. |
-
Search for users and groups in your registered Active Directory domains, select the ones you want accessing desktop sessions using this assignment, and then move to the next step.
-
Review the configuration and complete the wizard.
Results
The system begins the process of configuring the farm's VMs to provide session desktops to the selected users. On the page that lists the assignments, the Status column reflects the current progress.
Create a Floating VDI Desktop Assignment Provisioned by a Single Pod in Microsoft Azure
In Horizon Cloud, you create desktop assignments to provision virtual desktops to your end users. You create floating VDI desktop assignments using the Assignments area of the Horizon Universal Console. When your Horizon Cloud tenant is configured to use the single-pod type of brokering with your pods in Microsoft Azure, you follow the steps here to create a desktop assignment that brokers the virtual desktop from a single pod.
Note: When your tenant is configured to use the Universal Broker with your pods in Microsoft Azure, instead of following these steps here, you would configure what is called a multi-cloud assignment, which can provision resources from multiple pods within the same assignment. See Horizon Cloud Pods - Create a VDI Multi-Cloud Assignment.
For general information about desktop assignments, see this page's overview.
Use these steps to assign a floating VDI desktop to your end users.
Prerequisites
-
In some deployments, you might see a message displayed on the console's assignment-related pages that states you must set up the broker configuration before you can create assignments involving your pods. If you see that message, follow the on-screen guidance.
-
Verify that you have at least one published image, with a Microsoft Windows client operating system. You cannot create a VDI desktop assignment without such an image. To verify, navigate to the Images page and make sure it lists an appropriate image. For steps on creating a published image, see Convert a Configured Image VM to an Assignable Image in Horizon Cloud on a Per-Pod Basis.
Note: In a tenant is configured for single-pod broker, using multi-pod images for floating VDI desktop assignments is unsupported. When you use the UI described in the following steps, the Image list will not list such multi-pod images, because those are unsupported in this use case.
-
Decide whether you want the desktops to have encrypted disks. You must specify disk encryption when creating the VDI desktop assignment. You cannot later add disk encryption after the assignment is created. For a description of the disk capability, see Using Microsoft Azure Disk Encryption with Your Farms and VDI Desktops in Your Horizon Cloud Environment.
Important: This release does not support having disk encryption for floating VDI assignments that use image VMs with attached data disks. Make sure the image you plan to use in the assignment does not have data disks.
-
Decide whether you want the ability to use NSX Cloud features with the desktop VMs. You must enable NSX Cloud management when creating the VDI desktop assignment. You cannot later enable the assignment for NSX Cloud management after the assignment is created. The published image you choose for this assignment must have the NSX agent installed in it. You must have installed the NSX agent prior to publishing the image. See NSX Cloud and Horizon Cloud Pods in Microsoft Azure and its subtopics.
Important: To use both NSX Cloud features and disk encryption, ensure the image's installed NSX agent is the latest agent version. Using disk encryption with previous versions of the NSX agent is not supported.
-
Decide whether you want this assignment's desktop VMs to be connected a VM subnet that is different from the pod's primary VM subnet (also known as the tenant subnet). If your pod is running manifest 2298 or later and you have edited the pod to add additional VM subnets, you can specify use of those subnets for this desktop assignment. For this use case, you must verify that the VM subnet you want to use is listed on the pod's details page's Networking section in a
Readystate so that the subnet will available for you to select in the workflow steps. For details, see Overview of Using Multiple Tenant Subnets with Your Horizon Cloud Pod for Your Farms and VDI Assignments.
Procedure
-
Navigate to the assignments-related console pages, locate the one on which VDI desktop assignments are created and start the new assignment workflow.
Tip: The console is dynamic and reflects the workflows and settings that are appropriate for the up-to-the-moment situation in your Horizon Cloud tenant environment. The labels displayed for the console's assignment-related pages will vary depending on factors such as the tenant's configured brokering setting, the types of cloud-connected pods in your fleet, the tenant's regional cloud plane, and features that are based on specific licensing.
-
In the New Assignment start screen, click the Desktops icon.
The New Desktop Assignment window opens to the first wizard step.
-
Select Floating.
-
Complete the selections on the Definition step and then click Next.
Note: You might have to use the scroll bar to see everything.
| Option | Description |
|---|---|
| Location | Select the location of the pod from which you want the desktops to be provided. |
| Pod | Select the pod.
Tip: If you do not see any pods to select, verify that the Location list is not displaying a location without pods. The Location field works on the Pod list to filter out pods that are not associated with the selected location. If you previously had a pod at a location and then deleted that pod or moved it to a different location, so that the displayed location no longer has any pods, the Pod list will display no entries. Because the locations are listed alphabetically, when the screen opens, it automatically selects the one that is first in the alphabet. If that location no longer has any pods associated with it, you must switch the location to a different entry. |
| Specify VM Subnet(s) | Enable this toggle to select one or more specific subnets to which the assignment's desktop VMs will be connected. After enabling the toggle, you can select the specific subnets from the displayed list.
When this toggle is switched off, the assignment's desktop VMs will be connected to the pod's primary VM subnet by default. |
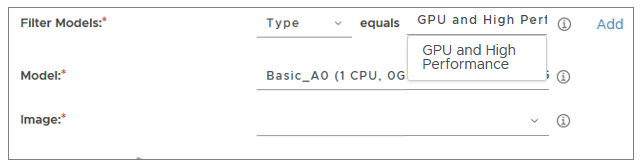
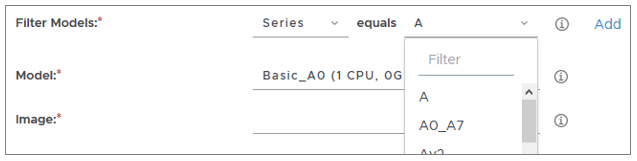
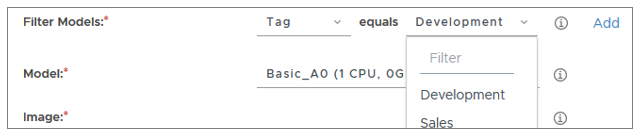
| Filter Models | Set one or more filters to control the models available in the Models drop-down menu.
You can filter models by type, series, number of CPUs, memory, and tags. For more information about selecting models, see Managing VM Types and Sizes for Farms and Assignments in the Horizon Universal Console, which describes the options on the VM Types & Sizes page (Settings > VM Types & Sizes).
The following are the criteria you can use for filters and descriptions of the values you can enter for each.
|
| Model | Select the model to use for the desktop instances. This selection defines the set of underlying resources that will be used when the desktop instances are created, in terms of capacity (compute, storage, and so on). The available choices map to standard VM sizes that are available in Microsoft Azure.
Important: For production environments, select a VM model that has a minimum of two (2) CPUs. First-gen Horizon Cloud scale testing has shown that using 2 CPUs or more avoids unexpected end-user connection issues. Even though the system does not prevent you from choosing a VM model with a single CPU, you should use such models for tests or proof-of-concepts only. |
| Disk Type |
Select a supported disk type from the available options. Disk type options are based on the model selected, and your Azure subscription and region. The following are some commonly available disk types.
|
| Disk Size |
Enter the OS disk size in GB for the VMs in this assignment.
|
| Domain | Select the Active Directory domain registered with your environment. |
| Join Domain | Select Yes so that the desktop instances are automatically joined the domain when they are created. |
| Encrypt Disks | Select Yes so that the desktop instances have encrypted disks.
Important:
|
| NSX Cloud Managed | Select Yes so that you can use features of NSX Cloud with the assignment's desktop instances. For a description of using NSX Cloud features with your desktops in Microsoft Azure, see NSX Cloud and Horizon Cloud Pods in Microsoft Azure and its subtopics.
Important:
|
| Image | Select an image that you want to assign to the end users.
Only those published images in the selected pod that are appropriate for VDI desktops are listed here. A published image, sometimes called a sealed image or an assignable image, is one that was published to the system by converting a base or golden image into a desktop. Important:
|
| Assignment Name | Type a friendly name for this floating VDI desktop assignment. Entitled end users might see a form of this assignment name in the client they use to access their desktops.
The name must contain only letters, hyphens, and numbers. Spaces are not allowed. The name cannot start with a non-alphabetic character. |
| VM Names | Base name for the desktop VMs created in this assignment. The VM names will have numbers appended to this base name, for example, win10-1, win10-2, etc. The name must start with a letter and can contain only letters, dashes, and numbers. The end users see this name when they go to access a desktop from this assignment. For example, when an end user launches Horizon Client to use one of the desktops, this name is the one displayed in Horizon Client. |
| Default Protocol | Select a default display protocol you want the end-user sessions to use.
Circumstances might occur that cause another protocol to be used instead of the default protocol. For example, the client device does not support the default protocol or the end user overrides the default protocol selection. Note: For images with the Microsoft Windows 7 Enterprise operating system, RDP is the only supported choice. |
| Preferred Client Type | Select the preferred client type used when end users launch their desktops from Workspace™ ONE™ Access, either Horizon Client or a browser for Horizon Web Client.
Note: For images with the Microsoft Windows 7 Enterprise operating system, Horizon Client is the only supported choice. |
|
Min Desktops
Max Desktops | Specify the minimum number and maximum number of desktops you want in this floating VDI desktop assignment.
When the assignment is first created, the system deploys the number of desktops specified in the Max Desktops field, and then powers off the desktops except the number specified for Min Desktops. Only the minimum number of desktop instances is initially powered on. As end-user demand increases, the system powers on additional desktops, up to the Max Desktops number. Then as end-user demand shrinks, the system powers off the desktops, until it reaches the Min Desktops number. A desktop must be free of a logged-in user session before the system will power it off. When you specify zero (0) for Min Desktops, it indicates that you want the system to power off all the assignment's desktops until there is end-user demand for a desktop. |
| Power Off Protect Time | Specify the number of minutes that you want the system to wait before automatically powering off a powered-on desktop. You can enter a value from 1 to 60. The default is 30 minutes.
This protect time is used primarily for the situations where the system will automatically power off a desktop VM. You can use this Power Off Protect Time setting to tell the system to wait the specified time before starting to power off the VM to meet the threshold setting in the Power Management field. The system waits the time specified for the Power Off Protect Time before powering off the VM to match the configured schedule. The default wait time is 30 minutes. |
| Windows license question | The wizard asks you to confirm you have an eligible license to use the Microsoft Windows operating system that is in the image and which will be in the desktop VMs. Follow the on-screen instructions.
For a client operating system, Horizon Cloud sets the VDI assignment's desktop VMs to use the Windows Client license type by default and you cannot change that setting. |


Optionally configure the advanced properties.
| Option | Description |
|---|---|
| Computer OU | Active Directory Organizational Unit where the desktop VMs are to be located. Enter the Active Directory Organizational Unit using the distinguished name, for example, OU=RootOrgName,DC=DomainComponent,DC=eng, and so on. The OU and each path in a nested OU can contain any combination of letters, numbers, special characters, and spaces, and can have a maximum of 64 characters.
If you need to use nested Organization Units, see Considerations For Using Nested Active Directory Domain Organizational Units. Note: If the Computer OU is set to |
| Run Once Script |
(Optional) Location of a script that you want run in the assignment's desktop VMs after the VM creation process.
Note: The script must end with a reboot step to reboot the VM. Otherwise, the end user will not be able to log in the desktop until doing a manual restart. A sample reboot line as a Windows command is: The reason why the script must end with a reboot step is due to the sequence when the script is run after the sysprep process. When the system creates a desktop VM for the assignment, the VM boots up and completes the |
| Session Timeout Interval | This time interval is the amount of time the end users' sessions can be idle before the system forces a log off from the desktops. This time out applies to the logged-in session to the underlying Windows operating system. The time you specify here is different from the time out settings that govern Horizon Client or Horizon Web Client during end users' logged-in sessions.
CAUTION: When the system forces the log off in the underlying Windows operating system session, any unsaved data is lost. To prevent an unintended loss of data, set this interval high enough to accommodate the business needs of your end users. The default interval is one week (10080 minutes). Note: If no user activity occurs before the timeout interval is reached, a message appears in the desktop that indicates that the user will be logged off if they do not click OK in the next 30 seconds. If the logout occurs, any unsaved user data, such as documents or files, is lost. |
| Azure Resource Tags |
(Optional) Create custom tags to be applied to Azure resource groups. Azure resource tags are only applied to the resource groups, and are not inherited by the resources in the groups. To create the first tag, enter information in the Name and Value fields. To create an additional tag, click Add and then enter information in the Name and Value fields that appear below the existing ones.
After an assignment has been created, you can add more Azure resource tags and edit or delete tags for that assignment. |
- In the wizard's Management step, complete the fields and make your selections as appropriate and then click Next.
| Option | Description |
|---|---|
| Image Updates |
The Concurrent Quiescing Desktops setting controls the number of powered-on desktop VMs in this floating VDI desktop assignment that can be concurrently quiesced during the time the assignment's image is being updated.
For example, when you later edit this floating VDI desktop assignment to use another image, the system will power off this number of powered-on desktops simultaneously for those VMs that do not have any sessions. (When a powered-on desktop has a session, the system holds off powering off that desktop until the session ends.) To the set of powered-off desktop VMs, the system performs the required actions to provision the new image to that set. For typical use cases, this number would be set to a subset of the full maximum number of desktops defined for this assignment. However, if you want, you can specify a number here equal to the Max Desktops setting. In that scenario, you would be allowing the system to power off all of the assignment's powered-on desktops simultaneously when you edit the assignment to use a new image. Note: This setting does not pertain to desktop VMs that are powered off. When an image is changed for a floating VDI desktop assignment, the system immediately deletes those powered-off desktop VMs and updates them to the new image. |
| Power Management |
These power management settings are related to the thresholds at which the system automatically increases and shrinks the number of powered-on desktop instances in the floating VDI desktop assignment according to usage. When the usage increases above an upper bound, the system automatically powers up a new desktop instance. When the usage shrinks below a lower bound, the system shuts down deallocates desktop VMs as end users log off from the desktops.
The power management selections balance capacity cost with faster availability:
|
| Timeout Handling | Configure how you want the system to handle the desktops' user sessions.
Note: The user sessions governed by these settings are the user logins to the desktops' Windows operating system. These sessions are not the user logins in Horizon Client, Horizon Web Client, Omnissa Access, or Intelligent Hub. The user's session begins when the user authenticates to the desktop's Windows operating system.
|
| Schedule Power Management |
To help optimize savings and performance of the desktop VMs in Microsoft Azure, you can optionally configure schedules to adjust the minimum number of powered-on desktop instances on a recurring weekly basis. For example:
Note: By default, when a user logs off of a desktop at a time that lies outside of a schedule's time period, the system protects the desktop VM from powering off for the time specified in the Power Off Protect Time field. The default is 30 minutes. |
-
On the Users step, search for users and groups in your registered Active Directory domains, select the ones you want to entitle to use desktops from this assignment, and then click Next.
-
On the Summary step, review the configuration and then click Submit.
Results
The system begins the process of configuring the desktop instances to provide VDI desktops to the selected users. On the Assignments page, the Status column reflects the current progress.
Note: Creation of an encrypted desktop VM takes approximately twice as long as creating a non-encrypted VM. As a result, the end-to-end time to complete creating a VDI desktop assignment that has disk encryption enabled is approximately twice as long as creating that VDI desktop assignment without disk encryption enabled.
What to do next
If the image for this floating VDI desktop assignment has applications that require opening special ports, you might need to modify this assignment's associated Network Security Group (NSG) in Microsoft Azure. For details about the NSG, see About Network Security Groups and VDI Desktops in a Horizon Cloud Pod.
If you specified NSX Cloud management for this assignment, you can use your NSX Cloud environment's Service Manager (CSM) to see that the desktop VMs are managed in NSX Cloud. Log in to your environment's CSM and navigate to Clouds > Azure > Instances. When that Instances page shows a status of Managed for the desktop instances, you can start implementing NSX policies on them.
Create a Dedicated VDI Desktop Assignment Provisioned by a Single Pod in Microsoft Azure
In Horizon Cloud, you create desktop assignments to provision virtual desktops to your end users. You create dedicated VDI desktop assignments using the Assignments area of the Horizon Universal Console. When your Horizon Cloud tenant is configured to use the single-pod type of brokering with your pods in Microsoft Azure, you follow the steps here to create a desktop assignment that brokers the virtual desktop from a single pod.
Note: When your tenant is configured to use the Universal Broker with your pods in Microsoft Azure, instead of following these steps here, you would configure what is called a multi-cloud assignment, which can provision resources from multiple pods within the same assignment. See Horizon Cloud Pods - Create a VDI Multi-Cloud Assignment.
For general information about desktop assignments in your tenant environment, see this page's overview.
Prerequisites
-
In some deployments, you might see a message displayed on the console's assignment-related pages that states you must set up the broker configuration before you can create assignments involving your pods. If you see that message, follow the on-screen guidance.
-
Verify that you have at least one published image, with a Microsoft Windows client operating system. You cannot create the VDI desktop assignment without such an image. To verify, navigate to the Images page and make sure it lists an appropriate image. For steps on creating a published image, see Convert a Configured Image VM to an Assignable Image in Horizon Cloud on a Per-Pod Basis.
-
Decide whether you want the desktops to have encrypted disks. You must specify disk encryption when creating the VDI desktop assignment. You cannot later add disk encryption after the assignment is created. For a description of the disk capability, see Using Microsoft Azure Disk Encryption with Your Farms and VDI Desktops in Your Horizon Cloud Environment.
Important: This release does not support having disk encryption for floating VDI assignments that use image VMs with attached data disks. Make sure the image you plan to use in the assignment does not have data disks.
-
Decide whether you want the ability to use NSX Cloud features with the desktop VMs. You must enable NSX Cloud management when creating the VDI desktop assignment. You cannot later enable the assignment for NSX Cloud management after the assignment is created. The published image you select for this assignment must have the NSX agent installed in it. You must have installed the NSX agent before publishing the image. See NSX Cloud and Horizon Cloud Pods in Microsoft Azure and its subtopics.
-
Decide whether you want this assignment's desktop VMs to be connected a VM subnet that is different from the pod's primary VM subnet (also known as the tenant subnet). If your pod is running manifest 2298 or later and you have edited the pod to add VM subnets, you can specify use of those subnets for this desktop assignment. For this use case, you must verify that the VM subnet you want to use is listed on the pod's details page's Networking section in a
Readystate so that the subnet will available for you to select in the workflow steps. For details, see Overview of Using Multiple Tenant Subnets with Your Horizon Cloud Pod for Your Farms and VDI Assignments.
Procedure
-
Navigate to the assignments-related console pages, locate the one on which VDI desktop assignments are created and start the new assignment workflow.
Tip: The console is dynamic and reflects the workflows and settings that are appropriate for the up-to-the-moment situation in your Horizon Cloud tenant environment. The labels displayed for the console's assignment-related pages will vary depending on factors such as the tenant's configured brokering setting, the types of cloud-connected pods in your fleet, the tenant's regional cloud plane, and features that are based on specific licensing.
-
In the New Assignment start screen, click the Desktops icon.
The New Desktop Assignment window opens to the first wizard step.
-
Select Dedicated.
-
Complete the selections on the Definition step and then click Next.
Note: You might have to use the scroll bar to see all the required fields.
| Option | Description |
|---|---|
| Location | Select the location of the pod from which you want the desktops to be provided. |
| Pod | Select the pod. Tip: If you do not see any pods to select, verify that the Location list is not displaying a location without pods. The Location field works on the Pod list to filter out pods that are not associated with the selected location. If you previously had a pod at a location and then deleted that pod or moved it to a different location, so that the displayed location no longer has any pods, the Pod list will display no entries. Because the locations are listed alphabetically, when the screen opens, it automatically selects the one that is first in the alphabet. If that location no longer has any pods associated with it, you must switch the location to a different entry. |
| Specify VM Subnet(s) | Enable this toggle to select one or more specific subnets to which the assignment's desktop VMs will be connected. After enabling the toggle, you can select the specific subnets from the displayed list.
When this toggle is switched off, the assignment's desktop VMs will be connected to the pod's primary VM subnet by default. |
| Filter Models | Set one or more filters to control the models available in the Models drop-down menu. You can filter models by type, series, number of CPUs, memory, and tags. For more information about selecting models, see Managing VM Types and Sizes for Farms and Assignments in the Horizon Universal Console, which describes the options on the VM Types & Sizes page (Settings > VM Types & Sizes).
To set a filter, you first select the criterion in the drop-down menu and then enter the desired values. By default, there is a single filter with the criterion Tag and the value Recommended. You can edit this first filter and add more filters connected by And and Or operators. The following are the criteria you can use for filters and descriptions of the values you can enter for each.
|
| Model | Select the model to use for the desktop instances.
This selection defines the set of underlying resources that will be used when the desktop instances are created, in terms of capacity (compute, storage, and so on). The available choices map to standard VM sizes that are available in Microsoft Azure. Important: For production environments, select a VM model that has a minimum of two (2) CPUs. First-gen Horizon Cloud scale testing has shown that using 2 CPUs or more avoids unexpected end-user connection issues. Even though the system does not prevent you from choosing a VM model with a single CPU, you should use such models for tests or proof-of-concepts only. |
| Disk Type |
Select a supported disk type from the available options. Disk type options are based on the model selected, and your Azure subscription and region. The following are some commonly available disk types.
|
| Disk Size |
Enter the OS disk size in GB for the VMs in this assignment.
For more information, see the section 'Required Administrator Actions When the Disk Size for a Farm or VDI Desktop Assignment is Increased' in Troubleshooting . |
| Domain | Select the Active Directory domain registered with your environment. |
| Join Domain | Select Yes so that the desktop instances are automatically joined to the domain when they are created. |
| Encrypt Disks | Select Yes so that the desktop instances have encrypted disks. Important: If you want disk encryption, you must make this selection when creating the VDI desktop assignment. You cannot later add disk encryption after the assignment is created. |
| NSX Cloud Managed | Select Yes so that you can use features of NSX Cloud with the assignment's desktop instances. For a description of using NSX Cloud features with your desktops in Microsoft Azure, see NSX Cloud and Horizon Cloud Pods in Microsoft Azure and its subtopics.
Important:
|
| Image | Select an image that you want to assign to the end users.
Only those published images in the selected pod that are appropriate for VDI desktops are listed here. A published image, sometimes called a sealed image or an assignable image, is one that was published to the system by converting a base or golden image into a desktop. Important: If you set the NSX Cloud Managed toggle to Yes, ensure that the image you select here has the NSX agent installed on it. For the NSX Cloud management features to work with the assignment's desktop instances, the image that you select for this assignment must have the NSX agent already installed on it. The system does not verify if the selected image has the NSX agent when it creates the VDI desktop assignment. |
| Assignment Name | Type a friendly name for this dedicated VDI desktop assignment. Entitled end users who have not yet claimed or been assigned a desktop from this assignment might see a form of this assignment name in the client they use to access their desktops. The name must contain only letters, hyphens, and numbers. Spaces are not allowed. The name cannot start with a non-alphabetic character. |
| VM Names | Base name for the desktop VMs created in this assignment. The VM names will have numbers appended to this base name, for example, win10-1, win10-2, and the like. The name must start with a letter and can contain only letters, dashes, and numbers. The end users see a form of this name in the client they use to access their desktops. |
| Default Protocol | Select a default display protocol you want the end-user sessions to use.
Circumstances might occur that cause another protocol to be used instead of the default protocol. For example, the client device does not support the default protocol or the end user overrides the default protocol selection.
Note: For images with the Microsoft Windows 7 Enterprise operating system, RDP is the only supported choice. |
| Preferred Client Type | Select the preferred client type used when end users launch their desktops from Workspace™ ONE™ Access, either a Horizon Client or a browser for Horizon Web Client. Note: For images with the Microsoft Windows 7 Enterprise operating system, Horizon Client is the only supported choice. |
| Capacity | Type the number of desktops required in the assignment. |
| Min Desktops Max Desktops |
Tip: This Min Desktops setting for a dedicated VDI desktop assignment works slightly different from how the setting works for a floating VDI desktop assignment. For a dedicated VDI desktop assignment, the Min Desktops setting refers to the unassigned desktops. When a desktop becomes assigned to a user, that desktop VM is no longer an unassigned desktop, and as a result, is not considered part of the set of desktops governed by the Min Desktops setting. If the number of unassigned desktop VMs in the assignment are less than the value for Min Desktops, you will observe that the number of powered-on VMs is less than the Min Desktops value.
|
| Power Off Protect Time | Specify the number of minutes that you want the system to wait before automatically powering off a powered-on desktop. You can enter a value from 1 to 60. The default is 30 minutes. This protect time is used primarily for the situations where the system will automatically power off a desktop VM. You can use this Power Off Protect Time setting to tell the system to wait the specified time before starting to power off the VM. For example, if there is a schedule defined in the Schedule Power Management, the system can automatically power off desktops to meet the configured schedule. If you manually power on one of the assignment's desktops within the configured schedule, the system waits the time specified for the Power Off Protect Time before powering off the VM to match the configured schedule. The default wait time is 30 minutes. |
| Windows license question | The wizard asks you to confirm you have an eligible license to use the Microsoft Windows operating system that is in the image and which will be in the desktop VMs. Follow the on-screen instructions.
For a client operating system, Horizon Cloud sets the VDI assignment's desktop VMs to use the Windows Client license type by default and you cannot change that setting. |
Optionally configure the advanced properties.
| Option | Description |
|---|---|
| Computer OU | Active Directory Organizational Unit where the desktop VMs are to be located. Enter the Active Directory Organizational Unit using the distinguished name, for example, OU=RootOrgName,DC=DomainComponent,DC=eng, and so on. The OU and each path in a nested OU can contain any combination of letters, numbers, special characters, and spaces, and can have a maximum of 64 characters.
If you need to use nested Organization Units, see Considerations For Using Nested Active Directory Domain Organizational Units Note: If the Computer OU is set to |
| Run Once Script |
(Optional) Location of a script that you want run in the assignment's desktop VMs after the VM creation process.
Note: The script must end with a reboot step to reboot the VM. Otherwise, the end user will not be able to log in the desktop until doing a manual restart. A sample reboot line as a Windows command is: The reason why the script must end with a reboot step is due to the sequence when the script is run after the sysprep process. When the system creates a desktop VM for the assignment, the VM boots up and completes the |
| Max Desktop Deletions | This sets the number of desktop VMs that can be deleted in the assignment before counting them against the rate you set for Deletion Protection on the Settings > General Settings page.
Select one of the following options from the drop-down menu.
Important: If you specify a new image for a dedicated desktop assignment, the system changes the Max Desktop Deletions setting if necessary so that all unassigned desktop VMs can be rebuilt with the new image. Note: If you select Unlimited for Deletion Protection, there is no need to use the Max Desktop Deletions setting.For more information about the Deletion Protection setting, see section 'Customizable General Settings for Your Horizon Cloud Tenant Environment' in Tour of the First-Gen Horizon Universal Console. To prevent all VM deletions in a dedicated desktop assignment, use the Prevent Deletions setting on the Assignments page. See Prevent Deletions or Allow Deletions for a Dedicated Desktop Assignment. |
| Session Timeout Interval | This time interval is the amount of time the end users' sessions can be idle before the system forces a log off from the desktops. This time out applies to the logged-in session to the underlying Windows operating system.
The time you specify here is different from the time out settings that govern the Horizon Client or Horizon Web Client logged-in sessions of end users. CAUTION: When the system forces the log off in the underlying Windows operating system session, any unsaved data is lost. To prevent an unintended loss of data, set this interval high enough to accommodate the business needs of your users. The default interval is one week (10080 minutes). Note: If no user activity occurs before the timeout interval is reached, a message indicates that the user will be logged off if they do not click OK in the next 30 seconds. If the logout occurs, any unsaved user data, such as documents or files, is lost. |
| Azure Resource Tags |
(Optional) Create custom tags to be applied to Azure resource groups. Azure resource tags are only applied to the resource groups, and are not inherited by the resources in the groups.
To create the first tag, enter information in the Name and Value fields. To create an additional tag, click Add and then enter information in the Name and Value fields that appear below the existing ones.
After an assignment has been created, you can add more Azure resource tags and edit or delete tags for that assignment |
- In the wizard's Management step, complete the fields and make your selections as appropriate and then click Next.
| Option | Description |
|---|---|
| Image Updates |
The Concurrent Quiescing Desktops setting controls the number of unassigned desktops in this dedicated VDI desktop assignment that can be concurrently quiesced during the time the assignment's image is being updated. For example, when you later edit this dedicated VDI desktop assignment to use another image, the system will power off at the same time this number of unassigned desktops. Then the system performs the required actions to provision the new image to that set of powered-off unassigned desktops.
Note: Desktops in a dedicated VDI desktop assignment that are mapped to users are said to be assigned to those users. Unassigned desktops in a dedicated VDI desktop assignment are desktops which have not yet been mapped to specific users. |
| Timeout Handling | Configure how you want the system to handle the desktops' user sessions.
Note: The user sessions governed by these settings are the user logins to the desktops' Windows operating system. These sessions are not the user logins in Horizon Client, Horizon Web Client, or Workspace ONE. The user's session begins when the user authenticates to the desktop's Windows operating system.
|
| Schedule Power Management |
To help optimize savings and performance of the desktop VMs in Microsoft Azure, you can optionally configure schedules to adjust the minimum number of powered-on unassigned desktop instances on a recurring weekly basis. For example:
You can specify up to 10 schedules for the dedicated VDI desktop assignment. If any schedules have overlapping time periods but specify different minimum unassigned desktop numbers, the system uses the largest value minimum unassigned desktops for the overlapping time period. CAUTION: By default, when you configure a schedule here for a dedicated VDI desktop assignment, the system keeps all of the already assigned desktop VMs powered on, regardless of the schedule. That is:
For example, if all of the desktops in this dedicated VDI desktop assignment are mapped to users (assigned), and there is a schedule configured here, the system does not power off those assigned desktops by design. This design is for ensuring an assigned desktop is ready to meet its mapped-to user's request to log in, even when a schedule is in effect. As a result, if all of the desktops are in assigned state, when a schedule is set here, those assigned desktops will remain powered on, even when their assigned users are not logged in. If you want all assigned desktop VMs to be powered off during a specific day, like a weekend day, do not configure any schedules here. To configure a schedule:
Note: By default, when a user logs off of a desktop at a time that lies outside of a schedule's time period, the system protects the desktop VM from powering off for the time specified in the Power Off Protect Time field. The default is 30 minutes. |
-
On the Users step, search for users and groups in your registered Active Directory domains, select the ones you want to entitle to use desktops from this assignment, and then click Next.
-
On the Summary step, review the configuration and then click Submit.
Results
The system begins the process of configuring the desktop instances to provide VDI desktops to the selected users. On the Assignments page, the Status column reflects the current progress.
Note: Creation of an encrypted desktop VM takes approximately twice as long as creating a non-encrypted VM. As a result, the end-to-end time to complete creating a VDI desktop assignment that has disk encryption enabled is approximately twice as long as creating that VDI desktop assignment without disk encryption enabled.
Also, when the image VM has a data disk, additional time is needed for creating an encrypted desktop VM based on that image VM. The longest times occur for data disks of larger, terabyte sizes.
What to do next
If the VDI desktop has applications that require opening special ports, you might need to modify this VDI desktop assignment's associated Network Security Group (NSG) in Microsoft Azure. For details about the pod's NSG, see About Network Security Groups and VDI Desktops in a Horizon Cloud Pod.
If you specified NSX Cloud management for this assignment, you can use your NSX Cloud environment's Service Manager (CSM) to see that the desktop VMs are managed in NSX Cloud. Log in to your environment's CSM and navigate to Clouds > Azure > Instances. When that Instances page shows a status of Managed for the desktop instances, you can start implementing NSX policies on them.
Horizon Cloud on Microsoft Azure - Brief Introduction to Single-Pod Broker
This article is a brief introduction to the brokering type known as single-pod broker.
The single-pod brokering type is also known as legacy or classic brokering, because it was the original and only type of brokering available for Horizon Cloud pods when they first debuted. The latest, more advanced brokering technology is Universal Broker. Tenants that are configured to use single-pod brokering can transition to use Universal Broker. See Understanding the Transition Process from Single-Pod Broker to Universal Broker.
As of the v2111 service release, use of single-pod brokering is not available to greenfield customer tenant environments. In this context, greenfield means a tenant environment in which the console's enablement procedure was never previously initiated within the console's Broker page for the tenant's Horizon Cloud pods.
Single-Pod Brokering and End-User Assignments
When the tenant is configured to use single-pod brokering, the following types of per-pod assignments are possible from your Horizon Cloud pods.
- A VDI desktop assignment consisting of virtual desktops from a single Horizon Cloud pod
- A session desktop assignment consisting of session-based desktops from Microsoft Remote Desktop Services (RDS) hosts within a single Horizon Cloud pod
- A remote applications assignment consisting of applications provisioned by RDS hosts within Horizon Cloud pods
- An App Volumes applications assignment consisting of App Volumes applications hosted on VDI desktops within Horizon Cloud pods
Was this page helpful?