This documentation page describes how to create a farm in your first-gen Horizon Cloud tenant and how to manage the farm and its pool of multi-session VMs post-creation.
Creating a Farm
In Horizon Cloud, you create a farm so that you can provision desktop sessions or remote applications to your end users from hosts that are capable of serving multiple user sessions simultaneously.
When created, the farm consists of a pool of multi-session machines. These multi-session machines can be VMs running Microsoft Windows Server operating systems or running Microsoft Windows 10 or 11 Enterprise multi-session operating systems. You create farms using the console's Farms page.
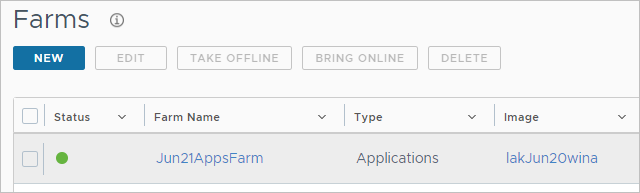
By default, Horizon Cloud farms are configured with rolling maintenance. For an example of how rolling maintenance works for a farm, see Example of Farm Rolling Maintenance.
Note: When you want to provision desktops running a Microsoft Windows 10 or 11 multi-session operating system and have use of App Volumes applications in those desktops, you create a farm of desktop type. Specify the sealed multi-session Microsoft Windows 10 or 11 image in which you installed the App Volumes agent.
Prerequisites
-
Verify that you have at least one image listed on the Images page, that image has a multi-session Windows operating system, the Images page shows that image is in Published state, and that image is located in the Horizon Cloud pod in which you want to create the farm. You cannot create a farm in a pod without such an image available in that pod.
-
Decide if you want this farm's VMs to be connected to a VM subnet that is different from the pod's primary VM subnet (also known as the tenant subnet). If your pod is running manifest 2298 or later and you have edited the pod to add additional VM subnets, you can specify use of those subnets for this farm. For this use case, you must verify that the VM subnet you want to use is listed on the pod's details page's Networking section in a
Readystate so that the subnet will available for you to select in the workflow steps. For details, see Overview of Using Multiple Tenant Subnets with Your Horizon Cloud Pod for Your Farms and VDI Assignments. -
Decide whether this farm will serve session-based desktops or remote applications. In this release, the same farm cannot serve both.
Note: To have your end users use App Volumes applications with a Microsoft Windows 10 or 11 multi-session operating system, you must entitle those users to both an App Volumes applications assignment and to a session-based desktops assignment. For this scenario, create a desktops farm to provide those session-based desktops based on that farm. When creating that desktops farm, select the published image that you created with the Microsoft Windows 10 or 11 multi-session operating system.
-
Decide whether you want the farm's multi-session VMs to have encrypted disks. You must specify disk encryption when creating the farm. You cannot later add disk encryption after the farm is created. For a description of the disk capability, see Using Microsoft Azure Disk Encryption with Your Farms and VDI Desktops in Your Horizon Cloud Environment.
-
Decide whether you want the ability to use NSX Cloud features with the farm's VMs. You must enable NSX Cloud management when creating the farm. You cannot later enable the farm for NSX Cloud management after the farm is created. The published image you choose for this farm must have the NSX agent installed in it. You must have installed the NSX agent prior to publishing the image. See NSX Cloud and Horizon Cloud Pods in Microsoft Azure and its subtopics.
-
If the image's operating system contains Universal Windows Platform (UWP) applications, decide on the method you want to use to ensure that your end users can use those UWP applications from the farm's VMs. An example is when the image has the Microsoft Windows 10 or 11 Enterprise multi-session operating system. The method you choose to enable use of those UWP applications might determine which Active Directory OU you use for the farm. For more information, see Enable a Horizon Agent Policy to Allow Running UWP Applications from RDSH VMs.
Procedure
-
In the administrative console, navigate to Inventory > Farms.
-
Click New and start the wizard.
-
Complete your selections as appropriate and then move to the next step.
Note: You might have to use the scroll bar to see all the required fields.
| Option | Description |
|---|---|
| Name | Enter a name for this farm. |
| Description | Enter an optional description. |
| VM Names | Base name for all of the multi-session VMs created for this farm. The VM names will have numbers appended to this base name, for example, win2016-1, win2016-2, etc. The name must start with a letter and can contain only letters, dashes, and numbers. |
| Farm Type | Specify the type of asset this farm provides to end users:
|
| Location | Select the location associated with the pod that has the multi-session image. This selection filters the choices in the Pod field to only the pods in the selected location. |
| Pod | Select the pod. Tip: If you do not see any pods to select, verify that the Location list is not displaying a location without pods. The Location field works on the Pod list to filter out pods that are not associated with the selected location. If you previously had a pod at a location and then deleted that pod or moved it to a different location, so that the displayed location no longer has any pods, the Pod list will display no entries. Because the locations are listed alphabetically, when the screen opens, it automatically selects the one that is first in the alphabet. If that location no longer has any pods associated with it, you must switch the location to a different entry. |
| Specify VM Subnet(s) | Enable this toggle to select one or more specific subnets to which the farm's VMs will be connected. After enabling the toggle, you can select the specific subnets from the displayed list. When this toggle is switched off, the farm's VMs will be connected to the pod's primary VM subnet by default. |
| Filter Models | Set one or more filters to control the models available in the Models drop-down menu. You can filter models by type, series, number of CPUs, memory, and tags. For more information about selecting models, see Managing VM Types and Sizes for Farms and Assignments in the Horizon Universal Console, which describes the options on the VM Types & Sizes page (Settings > VM Types & Sizes).
Note: For Windows 11 Enterprise operating system farms, make sure to select Gen1 or Gen1, Gen2 models.
To set a filter, you first select the criterion in the drop-down menu and then enter the desired value(s). By default, there is a single filter with the criterion 'Tag' the value 'Recommended'. You can edit this first filter and add more filters connected by And and Or operators.
The following are the criteria you can use for filters and descriptions of the values you can enter for each.
|
| Model | The choices here are filtered by your selections in Filter Models. Select the VM model to use for the farm's multi-session VMs. This selection defines the set of underlying resources that will be used when the farm's VMs are created, in terms of capacity (compute, storage, and so on). The available choices map to standard VM sizes that are available in Microsoft Azure. Note: For Windows 11 Enterprise operating system farms, make sure to select Gen1 or Gen1, Gen2 models. Important: For production environments, select a VM model that has a minimum of two (2) CPUs. First-gen Horizon Cloud scale testing has shown that using 2 CPUs or more avoids unexpected end-user connection issues. Even though the system does not prevent you from choosing a VM model with a single CPU, you should use such models for tests or proof-of-concepts only. |
| Disk Type |
Select a supported disk type from the available options. Disk type options are based on the model selected, and your Azure subscription and region. The following are some commonly available disk types.
|
| Disk Size |
Enter the OS disk size in GiB for the farm's VMs.
|
| Image | Select the multi-session image.
Important:
|
| Preferred Protocol | Select a default display protocol you want the end-user sessions to use. Circumstances might occur that cause another protocol to be used instead of the default protocol. For example, the client device does not support the default protocol or the end user overrides the default protocol selection. |
| Preferred Client Type | Select the preferred client type used when end users launch their session-based desktops from Access, either Horizon Client or a browser for Horizon Web Client. |
| Domain | Select the Active Directory domain registered with your environment. |
| Join Domain | Select Yes so that the farm's VMs are automatically joined to the domain when they are created. |
| Encrypt Disks | Select Yes so that the farm's VMs have encrypted disks. Important: If you want disk encryption, you must make this selection when creating the farm. You cannot later add disk encryption after the farm is created. |
| NSX Cloud Managed | Select Yes so that you can use features of NSX Cloud with the farm's VMs. For a description of using NSX Cloud features with your farms in Microsoft Azure, see NSX Cloud and Horizon Cloud Pods in Microsoft Azure and its subtopics.
Important:
|
| Min VMs Max VMs | Specify the minimum number and maximum number of multi-session VMs you want in this farm. When the farm is first created, the system deploys the number of VMs specified in the Max VMs field, and then powers off the VMs except the number specified for Min VMs. Only the minimum number of VMs are initially powered on. As end user demand increases, the system powers on additional VMs, up to the Max VMs number. Then as end-user demand shrinks, the system powers off the VMs, until it reaches the Min VMs number of VMs. A VM must be completely empty of user sessions before the system powers it off. When you specify zero (0) for Min VMs, it indicates that you want the system to power off all the farm's VMs when there is no end-user demand for sessions to the farm. When you enter zero (0) for Min VMs, use the Power Of Protect Time field to specify the amount of time you want the system to wait after determining the remaining powered-on VM has no user sessions before the system powers off that VM. |
| Power Off Protect Time | Specify the number of minutes that you want the system to wait before automatically powering off a powered-on farm VM. You can enter a value from 1 to 60. The default is 30 minutes. This protect time is used primarily for the situations where the system would normally power off a farm's VM. You can use this Power Off Protect Time setting to tell the system to wait the specified time before starting to power off the VM. The default wait time is 30 minutes. |
| Sessions per VM | Specify the number of concurrent end-user sessions per VM that this farm will allow. For a pod in Microsoft Azure, the maximum number of concurrent connected sessions per pod is stated in the page First-Gen Tenants - Service Limits. Note: If your GPU-enabled image is based on the Azure VM series powered by NVIDIA GRID technology and Microsoft Windows Server 2012 R2, then due to a NVIDIA driver limitation, a farm using that image for its multi-session VMs is limited to 20 sessions maximum per VM. If you have that particular combination (image based on a GPU N-series model, NVIDA drivers,and Microsoft Windows Server 2012 R2), do not specify more than 20 here. |
| Windows license question | The wizard asks you to confirm you have an eligible license to use the Microsoft Windows operating system that is in the image and which will be in the farm's VMs. Follow the on-screen instructions. |
Optionally configure the advanced properties.
| Option | Description |
|---|---|
| Computer OU | Active Directory Organizational Unit where the farm VMs are to be located. Enter the Active Directory Organizational Unit using the distinguished name, for example, OU=RootOrgName,DC=DomainComponent,DC=eng, and so on. The OU and each path in a nested OU can contain any combination of letters, numbers, special characters, and spaces, and can have a maximum of 64 characters.
If you need to use nested Organization Units, see Considerations For Using Nested Active Directory Domain Organizational Units.
Note: If the Computer OU is set to CN=Computers, the system uses the default Active Directory Computers container for VMs. Your Active Directory might have this default container redirected to an organizational unit class container. |
| Run Once Script | (Optional) Location of a script that you want run in the farm's VMs after the VM creation process.
Note: The script should end with a reboot step to reboot the VM. A sample reboot line as a Windows command is:
Windows RunOnce path (System run once) and then restarts the VM. On the next restart, the system logs in to the Windows operating system using the local administrator account and runs the script. |
| Azure Resource Tags |
(Optional) Create custom tags to be applied to Azure resource groups. Azure resource tags are only applied to the resource groups, and are not inherited by the resources in the groups.
To create the first tag, enter information in the Name and Value fields. To create an additional tag, click Add and then enter information in the Name and Value fields that appear below the existing ones.
|
- In the wizard's next step, complete the fields and make your selections as appropriate and then click Next.
| Option | Description |
|---|---|
| Rolling Maintenance | Select the maintenance type, either according to a time cadence (Scheduled) or based on user sessions to this farm's VMs (Session). When Scheduled is selected, configure the maintenance cadence, either daily or weekly. If you choose a daily recurrence, specify the hour at which the maintenance will start. If you choose a weekly recurrence, specify both the day of the week and the hour. When Session is selected, specify the number of sessions at which the farm should begin rolling maintenance. Note: Sessions which are logged off within 15 minutes are not counted for the purposes of the rolling maintenance calculations, to prevent restarting or rebuilding the VMs based on a count of short running sessions. In the Concurrent Quiescing VMs field, specify the number of farm VMs that can be in the quiescing state at the same time. When a VM is in quiescing state, the VM continues to work for the user sessions already connected to that VM, but it does not accept any new user connections. For a simple example, see Example of Farm Rolling Maintenance. |
| VM Action | Select the action that the system should perform on the VMs undergoing maintenance.
|
| Power Management |
These power management settings are related to the thresholds at which the system automatically increases and shrinks the number of powered-on farm VMs according to the session usage on the VMs. When the usage increases above an upper bound, the system automatically powers up one of the unused VM. When the usage shrinks below a lower bound, the system drains the VM until it is not being used. Then the system shuts down the VM and deallocates it.
The power management selections balance capacity cost with faster availability:
Optimized Power
For additional information, see About Power Management and Load Balancing for Farms. |
| Timeout Handling | Configure how you want the system to handle certain types of user sessions.
Note: The user sessions governed by these settings are the user logins to the Windows operating system session of the RDS session desktop or application. These sessions are not the user logins in Horizon Client, Horizon Web Client, or Omnissa Access.
The user's session begins when the user authenticates to the Windows operating system that underlies the session-based desktop or the remote application that is served from this farm's multi-session VMs.
|
| Session Timeout Interval | This time interval is the amount of time the end users' sessions can be idle before the system forces a logoff from the session-based desktops or applications that are served by this farm. This timeout applies to the logged-in session to the underlying Windows operating system. The time you specify here is different from the time out settings that govern end users' Horizon Client or Horizon Web Client logged-in sessions. CAUTION: When the system forces the logoff in the underlying Windows operating system session, any unsaved data is lost. To prevent an unintended loss of data, set this interval high enough to accommodate the business needs of your end users. The default interval is one day (1440 minutes). Note: If no user activity occurs before the timeout interval is reached, a message indicates that the user will be logged off if they do not click OK in the next 30 seconds. If the logout occurs, any unsaved user data, such as documents or files, is lost. |
| Schedule Power Management |
To help optimize savings and performance of the farm's VMs in Microsoft Azure, you can optionally configure schedules to adjust the minimum number of powered-on VMs in this farm on a recurring weekly basis. For example:
|
-
In the wizard's Load Balancing step, enter values for Login Threshold. This setting controls the number of logins allowed within a time period before a VM is deprioritized for having new sessions assigned to it. For example, if Login Threshold is set to 3 logins per 30 seconds, then whenever there have been 3 logged-in sessions assigned to VM 1 within the previous 30 seconds, the next session is assigned to VM 2, and so on.
Note: Load Balancing settings might not appear or might be deactivated if you have an older environment or if the agent for the farm is not the latest version.
-
Complete the fields under Session Host Load balancing settings.
- Horizon Cloud agents use the first five settings (CPU Usage Threshold, Memory Usage Threshold, Disk Queue Length Threshold, Disk Read Latency Threshold, and Disk Write Latency Threshold) to calculate the Agent Load Index, a value between 0 and 100 that measures a VM's load.
- The last setting, Load Index Threshold, is the Agent Load Index value at which a VM is considered full.
Important: Because of the key role that Agent Load Index plays in power management, it is essential that you select appropriate values for these settings so you can achieve the desired balance of power consumption and performance in your environment.
For more information about how Agent Load Index affects power management, see About Power Management and Load Balancing for Farms in Horizon Cloud.
Option Description CPU Usage Threshold Threshold value for the CPU usage in percentage. You can set a value from 0 to 100. The recommended value is 90, which is also the default value. Memory Usage Threshold Threshold value for the memory in percentage. You can set a value from 0 to 100. The recommended value is 90, which is also the default value. Disk Queue Length Threshold Threshold of the average number of both read and write requests that were queued for the selected disk during the sample interval. You can set the value to any positive integer. By default, this setting is not considered for load balancing. The default value is 0. Disk Read Latency Threshold Threshold of the average time of read of data from the disk in milliseconds. You can set the value to any positive integer. By default, this setting is not considered for load balancing. The default value is 0. Disk Write Latency Threshold Threshold of the average time of write of data to the disk in milliseconds. You can set the value to any positive integer. By default, this setting is not considered for load balancing. The default value is 0. Load Index Threshold Value of the Agent Load Index at which a VM is considered to be full and is not assigned any new sessions. You can enter a value between 0 and 100. The default value is 90. Note: The system corrects this value if necessary to be greater than the power management high threshold. This ensures effective power management. -
Click Next.
-
In the wizard's Summary step, review the settings and then click Submit to begin creating the farm.
Results
The system starts creating the farm. You can monitor the progress using the Activity page. When the farm's status shows a green dot on the Farms page, the farm is ready for use.
Note: Creation of an encrypted farm VM takes approximately twice as long as creating a non-encrypted VM. As a result, the end-to-end time to complete creating a farm that has disk encryption enabled is approximately twice as long as creating that farm without disk encryption enabled.
Also, when an image VM has a data disk, additional time is needed for creating an encrypted farm VM based on that image VM. The longest times occur for data disks of larger, terabyte sizes.
What to do next
If you created a desktops farm, you would next create a session-based desktop assignment for your end users by following the steps in Horizon Cloud Pods - Provide Desktop Sessions from RDS Hosts for Your End Users by Creating an RDS-Based Session Desktop Assignment.
Note: If you created a desktops farm to have your end users use App Volumes applications in a Microsoft Windows 10 or 11 multi-session operating system, you would perform these workflows next:
- Ensure the App Volumes applications are added into your applications inventory using the import workflow. Alternatively, instead of the import workflow, you can use a different image that is based on a Windows 10 or 11 client operating system, and use the create workflow to capture applications from that Windows 10 or 11 client system into your inventory. You can entitle those applications to your users and they can be used with the session-based desktops based on this farm, even when those applications are captured from the client type of Windows 10 or 11 operating system.
- Entitle those applications to your users by creating an App Volumes assignment.
- Entitle a session-based desktop to those users, based on this farm by creating a session-based desktop assignment.
If you created an applications farm, you would next scan that farm to load applications into Horizon Cloud and then create an applications assignment so your end users can use the remote applications from that farm.
For more information, see Applications in Your Horizon Cloud Inventory, Remote Applications - Importing from RDSH Farms that are Provisioned by Horizon Cloud Pods in Microsoft Azure, and Remote Applications - Create a Remote Application Assignment for Remote Applications Provisioned By Horizon Cloud Pods in Microsoft Azure.
If the image for this farm has applications that require opening special ports, you might need to modify this farm's associated Network Security Group (NSG) in Microsoft Azure. For details about the NSG, see About Network Security Groups and Farms in a Horizon Cloud Pod.
If you specified NSX Cloud management for this farm, you can use your NSX Cloud environment's Service Manager (CSM) to see that the farm's VMs are managed in NSX Cloud. Log in to your environment's CSM and navigate to Clouds > Azure > Instances. When that Instances page shows a status of Managed for the farm's VMs, you can start implementing NSX policies on them.
Enable a Horizon Agent Policy to Allow Running Universal Windows Platform (UWP) Applications from Microsoft Windows 10 or 11 Enterprise Multi-Session RDSH VMs in Horizon Cloud
When you create a farm based on a Microsoft Windows 10 or Windows 11 Enterprise multi-session operating system VM and you want your end users to be able to use Universal Windows Platform (UWP) applications that the operating system provides, you must enable a specific Horizon Agent policy that is inactive by default. The Horizon Agent's default policy settings do not permit launch of UWP applications. As a result, you must take some steps to enable the Horizon-agent-related Group Policy Setting named Enable UWP support on RDSH platforms so that your end users can use those UWP applications.
For a description about the required setting and the Horizon ADMX template that contains it, search for Enable UWP support on RDSH platforms within the Horizon Remote Desktop Features and GPOs guide located at Horizon Documentation.
The corresponding Horizon Agent policy within the farm VMs is inactive by default. Therefore, you must enable it to permit your end users to use the UWP applications provisioned from those farm VMs — either in session-based desktops or remote applications.
Unless that agent policy is enabled, the UWP application status shows as Unavailable to the Horizon Agent installed in the RDSH VM, and as a result, an end user would not be able to access that UWP application.
Important: After enabling the policy, you must force the GPO setting to the farm's existing RDSH VMs and you must restart the Horizon View Agent service (wsnm.exe) in those RDSH VMs or restart the RDSH VM to make the GPO take effect.
The Horizon Agent Configuration ADMX template file (named vdm_agent.admx) contains this policy setting in its Unity Touch and Hosted Apps folder. One way to configure the required policy setting to the farm's RDSH VMs is to use that ADMX template file in your Active Directory server to add the Unity Touch and Hosted Apps folder to your Active Directory server's Group Policy Management Editor. When the folder is present there, then you can enable the UWP support for the VMs using a GPO in your Active Directory system on the farm's target OU by following the sample steps below.
Prerequisites
In your Active Directory server, create a named GPO that you'll use to apply the UWP group policy setting to the RDSH VMs. The Group Policy Management Console (GPMC) is typically launched by Start > Administrative Tools > Group Policy Management. Link the GPO you create to the OU in which those RDSH VMs will exist. This OU is the one specified in the Create Farm page when you create the farm that will have provision those RDSH VMs. If you do not specify an OU in the Create Farm page, the default OU used is the one you specify when you register the Active Directory server with Horizon Cloud, in the Active Directory registration workflow.
Remember: Ultimately, the goal is to ensure that the farm RDSH VMs have the required agent policy enabled if you want your end users to launch the UWP applications. The steps here are an example of one way in which you can enable the required policy on the RDSH VMs. You might choose to adopt a different method that provides you the same result. That would be your choice.
Procedure
-
Download the
Horizon GPO Bundlefrom Customer Connect. In Customer Connect Downloads area, locate the Horizon Service row and view its download components. Within that page you’ll see the Horizon Cloud on Microsoft Azure row and can click on its Go to Downloads. In that next page, locate the entry namedHorizon GPO Bundleand download its ZIP file. All of the ADMX files that provide group policy settings for Horizon-related components are in this file. -
Unzip the ZIP file and copy the following files to the indicated locations:
- Copy the
vdm_agent.admxfile to your Active Directory server, to the%systemroot%\PolicyDefinitionslocation. - Copy the
vmd_agent.admllanguage resource file for the locale you want (such asen-US/vmd_agent.adml) file to your Active Directory server, to the%systemroot%\PolicyDefinitions\<locale>location wherematches the locale of the ADML file you are copying.
- Copy the
-
On the Active Directory server, open Group Policy Management and select to edit the GPO that you created for applying the UWP group policy settings.
-
In the Group Policy Management Editor, expand the Computer Configuration > Policies > Administrative Templates > View Agent Configuration > Unity Touch and Hosted Apps.
-
In that Unity Touch and Hosted Apps folder, locate the Enable UWP support on RDSH platforms and edit it to set it to Enabled.
-
Link that GPO with the OU in which the farm's RDSH VMs are created.
Remember: When you link the GPO with the OU in which the farm's VMs are created, the UWP policy that you set in that GPO using the steps above is applied to all of the VMs in that OU. That is standard GPO behavior.
-
Force the GPO setting to the farm's RDSH VMs.
-
Restart the Horizon View Agent service (
wsnm.exe) in those RDSH VMs.
Managing Farms in Horizon Cloud
You can perform several actions on the farms listed on the administrative console's Farms page.
Actions You Can Perform on the Farms Page
At a page level, you can select the check box next to an existing farm and click one of the buttons to perform its associated action on the farm.
-
Edit
Clicking this button launches a wizard in which you can change certain settings, such as the farm's power management settings, the minimum and maximum number of VMs the farm can have, and so on. The wizard is similar to the New Farm wizard, with read-only fields for those settings that cannot be changed for an existing farm. For detailed descriptions of the fields, see Creating a Farm.
Alternatively, instead of using the Edit button, you can click the farm's name and update the settings from the farm's summary page.
When you edit the farm and reduce the Sessions per VM value, any existing sessions in excess of the new lower value are not automatically logged off. You can either manually log off the excess sessions or wait until the system logs off the sessions according to the values for the farm's Timeout Handling settings (Empty Session Timeout, Log Off Disconnected Sessions, Max Session Lifetime) and Session Timeout Interval. Because those existing sessions in excess of the new lower value are not automatically logged off, the console might display VM and farm utilization values higher than 100% until the excess active sessions are logged off.
- When you change the Sessions per VM value, the system might power on or power off the farm's VMs to meet the new load on the farm based on the updated value.
- If the model VM you selected to create the farm has become unavailable, you will not be able to expand the farm. The farm will remain fully functional except for this limitation. To see if a VM type is available, navigate to the VM Types & Sizes page (Settings > VM Types & Sizes). For more information about model VMs, see Managing VM Types and Sizes for Farms and Assignments in the Horizon Universal Console.
-
Take Offline
Clicking this button opens a window in which you can select to take a farm offline for maintenance.
-
Bring Online
Clicking this button opens a window in which you can select to bring an offline farm back online.
-
Delete
You use this button to delete the selected farm. However, before you can delete a farm using this button, you must delete any assignments that are using the farm. You can view the assignments that are using the farm by navigating to the Assignments page and sorting on its Farms column.
Note: Deleting the farm deletes all the farm's underlying RDSH VMs. When a farm is deleted, all of that farm's logged activity is removed from the Activity page.
Actions You Can Perform Within a Farm's Detailed Pages
From the Farms page, you can click a farm's name to see its detailed pages. Initially the Summary page is displayed.
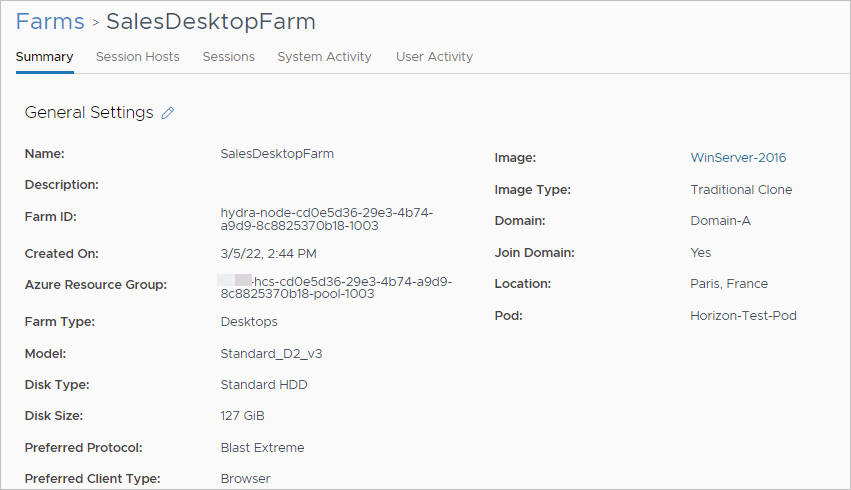
The following screenshot is an illustration of a farm's Summary page for a farm in a pod in Microsoft Azure.
-
Summary page
The Summary page displays the farm's current settings. For each page section, you can click the pencil icon to change those settings that the system allows to be updated for an existing farm. Some settings cannot be changed on a farm after it is created, such as its pod.
-
Session Hosts page
The Session Hosts page displays the existing RDSH instances in the farm. The actions you can perform on a selected instance are power on or off (depending on the VM's current state), delete, and reset the agent pairing.
-
Sessions page
The Sessions page displays the farm's existing user sessions. When you select a session, you can disconnect it or log the user off the session. When you click Disconnect, you force the user's session to be disconnected. No message is sent to the user that the session is disconnecting. When you click Log Off, a message is displayed to the user with a grace period in which the user can save documents before the session ends.
-
System Activity page
The System Activity page displays activity in the farm due to system actions, such as expanding the farm. On the System Activity page, you can cancel tasks and export reports.
You can cancel assignment-related tasks before they complete by selecting the task in the list and clicking Cancel Tasks.
- Before attempting to select a task for cancellation, refresh the view to update the status for the tasks displayed.
- If a task is in a state where the system allows you to cancel it, you can select the check box corresponding to that cancelable task. The following table shows tasks that you can cancel.
Task Cancel When Task is in Queued State Cancel When Task is in Running State Farm Expansion Supported Note: When the system has automatically created an expansion task for an RDSH farm, the farm must be offline before you can cancel that task. Supported - When the system has automatically created an expansion task for an RDSH farm, the farm must be offline before you can cancel that task.
- Resources that have already been created, such as VMs and OS/data disks, are destroyed when the task is canceled. When VMs are destroyed or not created, this changes the size of the assignment.
- This option is not available for multi-cloud assignments.
Assignment Expansion Supported Note: When the system has automatically created an expansion task for a VDI desktop assignment, the assignment must be offline before you can cancel that task. Supported - When the system has automatically created an expansion task for an RDSH farm, the farm must be offline before you can cancel that task.
- Resources that have already been created, such as VMs and OS/data disks, are destroyed when the task is canceled. When VMs are destroyed or not created, this changes the size of the assignment.
- This option is not available for multi-cloud assignments.
Convert VM to Image Supported Note: If you cancel this task, and want to retry it, first confirm that the VM is in a state where it can be converted. If you are not sure, power off and then power on the VM. Supported Note: If you cancel this task, and want to retry it, first confirm that the VM is in a state where it can be converted. If you are not sure, power off and then power on the VM. You can export the displayed information as a report file with the Export Report feature. When you export a report, it appears on the Exported Reports tab of the Reports page, where you can download the report. See Reports Page for more information. When you begin the export, you can choose whether you want to export all data or only the data as currently filtered. Then a message appears at the top of the page indicating that the report is being generated. You can see the progress of the report and download it when complete on the Exported Reports tab of the Reports page. Depending on the number of records, the preparation time can take several minutes. For example, a report with 50,000 records takes approximately 10 minutes.
Attention: If any of your pods in Microsoft Azure are at manifests earlier than 2552, the process for larger reports is as follows:
- When you begin the export a message appears stating that the report is being compiled and it can take some time. Depending on the number of records, the preparation time can take several minutes. For example, a report with 50,000 records takes approximately 10 minutes.
- When the preparation is done, another dialog box appears with the message
Report Generated Successfullyand a Download button. After clicking the Download button, you must wait for the download to complete before closing this dialog box. Closing it before the download is complete cancels the download. Because you cannot perform any other actions in the console until this process is finished, if you have a large number of activity records you should plan to export the information when you can wait up to 10 minutes before performing other tasks in the console.
-
User Activity page
The User Activity page displays activity in the farm due to user actions, such as logging on and logging off sessions provided by the farm.
You can export the displayed information as a report file with the Export Report feature.
When you export a report, it appears on the Exported Reports tab of the Reports page, where you can download the report. See Reports Page for more information.
When you begin the export, you can choose whether you want to export all data or only the data as currently filtered. Then a message appears at the top of the page indicating that the report is being generated. You can see the progress of the report and download it when complete on the Exported Reports tab of the Reports page. Depending on the number of records, the preparation time can take several minutes. For example, a report with 50,000 records takes approximately 10 minutes.
Attention: If any of your pods in Microsoft Azure are at manifests earlier than 2552, the process for larger reports is as follows:
- When you begin the export a message appears stating that the report is being compiled and it can take some time. Depending on the number of records, the preparation time can take several minutes. For example, a report with 50,000 records takes approximately 10 minutes.
- When the preparation is done, another dialog box appears with the message
Report Generated Successfullyand a Download button. After clicking the Download button, you must wait for the download to complete before closing this dialog box. Closing it before the download is complete cancels the download. Because you cannot perform any other actions in the console until this process is finished, if you have a large number of activity records you should plan to export the information when you can wait up to 10 minutes before performing other tasks in the console.
Manage Farm RDSH Session Hosts
You can perform certain actions on the individual RDSH session hosts in a farm.
Procedure
-
Click Inventory > Farms.
The Farms page displays.
-
Click the name of a farm on the list.
The farm details page displays.
-
Click Session Hosts at the top of the page.
The Session Hosts tab displays, showing a list of the RDSH session host virtual machines (VMs) in the farm. You can filter, refresh, and export the list using the controls to the top right of the page.
You can perform the following actions by selecting one or more session host VMs and clicking one of the buttons at the top of the page.
Note: The VM status must be green to perform these actions.
| Option | Description |
|---|---|
| Shutdown | Shuts down the selected VMs.
|
| Delete | Deletes the selected VM. To reduce the size of the farm when the VM is deleted, select Yes under 'Reduce farm size' in the dialog box. |
| Reset Agent Pairing | Repairs the agent pairing state when a pairing failure has occurred.
|
| User Login Mode | Controls user logins for maintenance purposes. Settings are described below.
Note: You can only change this setting if the VM has the latest agent.
|
Was this page helpful?