You use the Manage Subscription workflow in the Horizon Universal Console to edit or delete the Microsoft Azure subscription information that is stored in your Horizon Cloud environment. You can also use this workflow to add Microsoft Azure subscription information that you want stored in Horizon Cloud prior to deploying a pod into that subscription's capacity.
In addition to using your Microsoft Azure subscription information during the pod deployment process, Horizon Cloud must use your Microsoft Azure subscription information to run and manage the pods you have deployed into your subscription's capacity in the Microsoft Azure cloud. The subscription information that you specify in the pod deployment wizard is saved to your Horizon Cloud environment. The information is stored as a configuration setting, using a name that you specify. The Manage Subscription workflow provides for adding, editing, and deleting these stored subscription configurations.
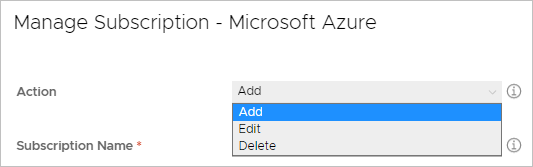
Note: When there are no existing stored Microsoft Azure subscriptions, only the Add choice is available in the Action menu.
How Do I Launch the Manage Subscription Workflow?
You can launch the overall Manage Subscription workflow from either the Manage action on the console's Capacity page's Resources tab or from the Getting Started page. The following screenshot illustrates the location of the Manage action in the Capacity page.
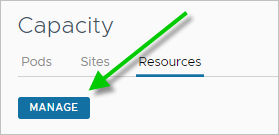
You can also launch the workflow by clicking the name of a subscription that is listed on the Resources tab. Clicking a specific name will open the Manage Subscription window with that name selected by default in the Subscription Name field and the other fields prefilled with the information stored for that name.
Note: When you open Manage Subscription by clicking a specific name, the Edit choice is pre-selected in the Action menu. The system assumes when you click on a specific item, you intend to update that specific configuration.
Editing an Existing Subscription
When you have changed the subscription information in the Microsoft Azure portal that Horizon Cloud relies on using with the deployed pods, you must update the corresponding information pieces in the configuration saved in Horizon Cloud. Only when the subscription information on both sides matches — the Microsoft Azure portal side and the Horizon Universal Console side — can the subscription information stored in your Horizon Cloud environment remain viable for use with the pods already deployed in that subscription. As an example, when you change the application ID for the subscription on the Microsoft Azure side, then you would log in to Horizon Cloud and use the Edit action of the Manage Subscription workflow to update the saved configuration's Application ID field to match.
For the editing steps, see Change, Modify, and Update the Subscription Information Associated with Deployed Horizon Cloud Pods.
Deleting an Existing Subscription
In addition to editing, the workflow also provides for deleting a stored configuration when all of the pods that were associated with that subscription name have been deleted. Deleting a stored configuration prevents that subscription name from appearing in the pod deployment wizard the next time you start to deploy a pod. Deleting such no-longer-used subscription names is useful when you have been doing trials or proof-of-concepts from the Horizon Cloud environment, where you are repeatedly deploying, then deleting, then re-deploying new pods and you want to remove the subscription information saved from the previous deployments.
To delete a named set of subscription information:
-
On the Capacity page's Resources tab, click the name of the subscription that you want to delete from Horizon Cloud. The following screenshot illustrates the clickable names
sub1andsub2.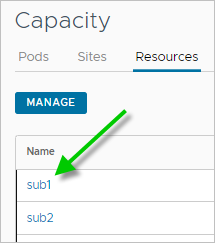
-
In the Manage Subscription window that opens, verify the subscription name you clicked is the one you want to delete and select Delete in the Action menu. The following screenshot illustrates selection of the Delete action for the subscription information saved under the name
sub2.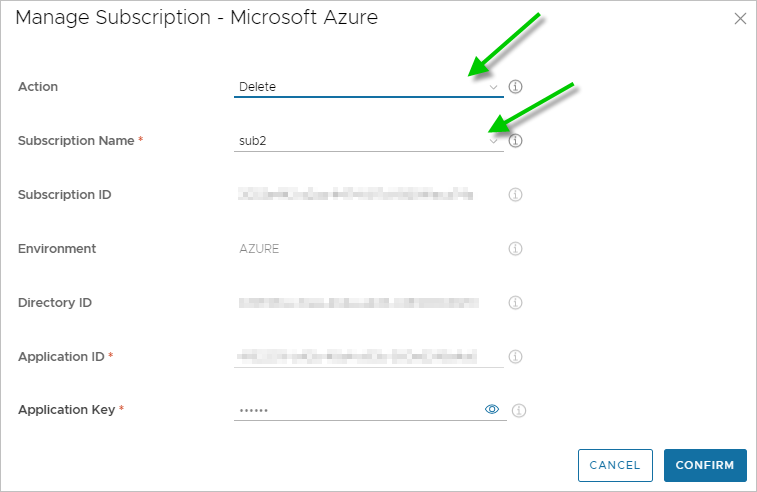
Note: If the subscription name has any pods associated with it, a message displays saying that you cannot delete it. Only subscription names that have zero pods associated with them can be deleted.
-
Click Confirm.
For the use case where you have deleted all of your pods that you had deployed into Microsoft Azure cloud and you want to delete all of the stored subscription information, navigate to the Getting Started page and use its Manage > Manage Subscriptions action to open the Manage Subscription window and delete the named sets of information.
Adding New Subscription Information
The Manage Subscription workflow also provides for adding a new set of subscription information and saving it to your Horizon Cloud environment outside of the pod deployment wizard. This use case is helpful when people on your team have distinct responsibilities — such as when one person on your team is responsible for adding all of the subscription information using specific while another person on your team is responsible for actually deploying the pods. The first person can add all of the information into Horizon Cloud prior to the pod deployment process.
Important: When you are entering new information, you must ensure the subscription information you enter meets the subscription requirements described in the prerequisites, especially that the service principal has the role permissions it needs. If the information does not meet the subscription requirements, when this named set of subscription information is selected in workflows such deploying a new pod, those workflows might fail.
To add a new set of subscription information and save it in Horizon Cloud:
-
On the Capacity page's Resources tab, click Manage.
Note: If you are adding a new subscription in the Getting Started page, click Manage > Manage Subscriptions.
-
In the Manage Subscription window, verify the Action is set to Add.
-
In Subscription Name, type a name that you want to use for this set of saved subscription information. The console will use this name in its pages and workflows that involve subscriptions. The name must start with a letter and contain only letters, dashes, and numbers.
-
Specify the Microsoft Azure subscription information.
Option Description Environment Select the cloud environment associated with your subscription, for example: - Azure - Commercial, for the standard global Microsoft Azure cloud regions
- Azure - China, for the Microsoft Azure in China cloud
- Azure - US Government, for the Microsoft Azure US Government cloud
Subscription ID Enter your cloud capacity subscription ID (in UUID form). This subscription ID must be valid for the environment you selected. For Microsoft Azure, you can obtain this UUID from your Microsoft Azure portal's Subscriptions area. Directory ID Enter your Microsoft Azure AD Directory ID (in UUID form). For Microsoft Azure, you can obtain this UUID from your Microsoft Azure Active Directory properties in the Microsoft Azure portal. Application ID Enter the application ID (in UUID form) associated with the service principal you created in the Microsoft Azure portal. Creating an application registration and its associated service principal in your Microsoft Azure Active Directory is a prerequisite. Application Key Enter the key value for the service principal's authentication key that you created in the Microsoft Azure portal. Creating this key is a prerequisite. -
Click Confirm.
Was this page helpful?