This section describes the process of configuring Omnissa Access as an identity provider in Okta. This configuration is required to configure a unified catalog as well as mobile SSO and device trust.
Get Omnissa Access SAML Metadata Information
Retrieve the SAML metadata information from Omnissa Access that is required to set up an identity provider in Okta.
Procedure
-
Log in to the Omnissa Access console as the System administrator.
-
Select Resources > Web Apps.
-
Click the Settings button.
-
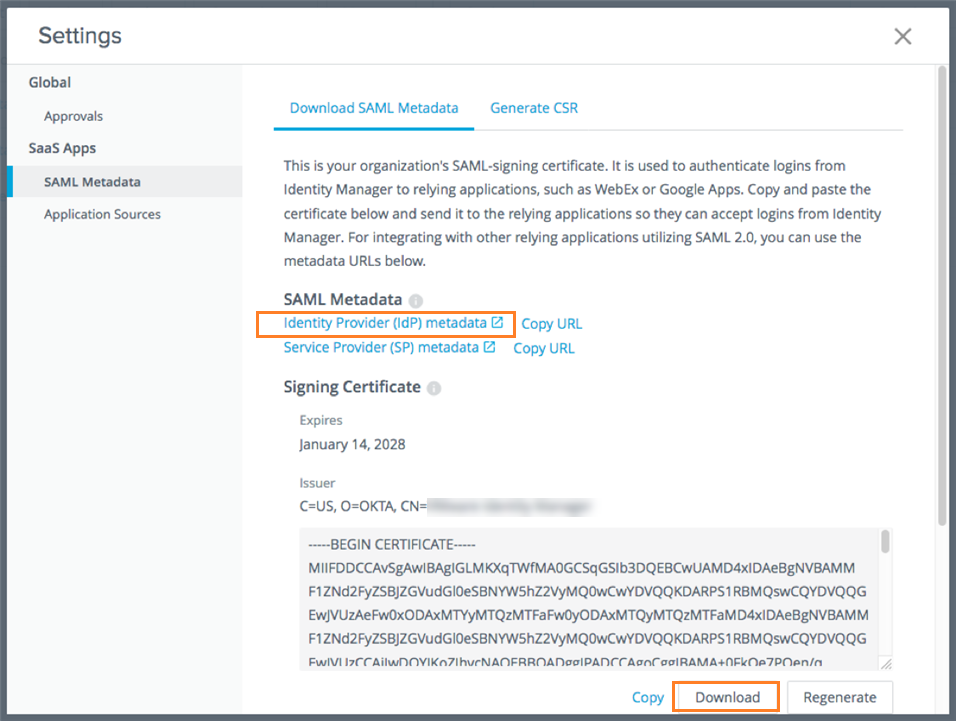
Click SAML Metadata in the left pane.
-
From the Download SAML Metadata tab, download the Signing Certificate.
-
In the Signing Certificate section, click Download.
-
Make a note of the location of the downloaded
signingCertificate.cerfile.
-
-
Retrieve the SAML metadata.
-
In the SAML Metadata section, right-click the Identity Provider (IdP) metadata link and open it in a new tab or window.
-
In the identity provider metadata file, find and make a note of the following values:
-
entityID
For example: https
://tenant.workspaceoneaccess.com/SAAS/API/1.0/GET/metadata/idp.xml -
SingleSignOnService URL with Binding="urn:oasis:names:tc:SAML:2.0:bindings:HTTP-POST"
For example: https
://tenant.workspaceoneaccess.com/SAAS/auth/federation/sso
-
-
Add Identity Provider in Okta
Create the identity provider record in Okta.
For additional information about how Okta handles external identity providers, see the Okta documentation on Identity Providers.
Procedure
-
Log in to the Okta Admin console with Administrator privileges or any role entitled to add an Identity Provider.
-
Navigate to Security > Identity Providers.
-
Click Add Identity Provider, then select Add SAML 2.0 IdP.
-
Enter a name for the identity provider. For example, Workspace ONE.
-
Enter the following information:
Option Description IdP Username idpuser.subjectNameId
If you plan to send the username in a custom SAML attribute, define an appropriate expression. For information, see https://developer.okta.com/reference/okta_expression_language.Filter Uncheck the box. Match against Okta Username
Adjust the selection as required for your environment and the values that you plan to send.If no match is found Redirect to Okta sign-in page IdP Issuer URI Enter the entityID.
This is the value you obtained from the identity provider metadata file from Workspace ONE. For example: https://tenant.workspaceoneaccess.com/SAAS/API/1.0/GET/metadata/idp.xmlIdP Single Sign-On URL Enter the SingleSignOnService Location URL.
This is the value you obtained from the identity provider metadata file from Workspace ONE. For example: https://tenant.workspaceoneaccess.com/SAAS/auth/federation/ssoIdP Signature Certificate Browse and select the Signing Certificate file you downloaded from Workspace ONE.
Tip: You may need to change the file extension or default browser filter to look for *.crt and *.pem files.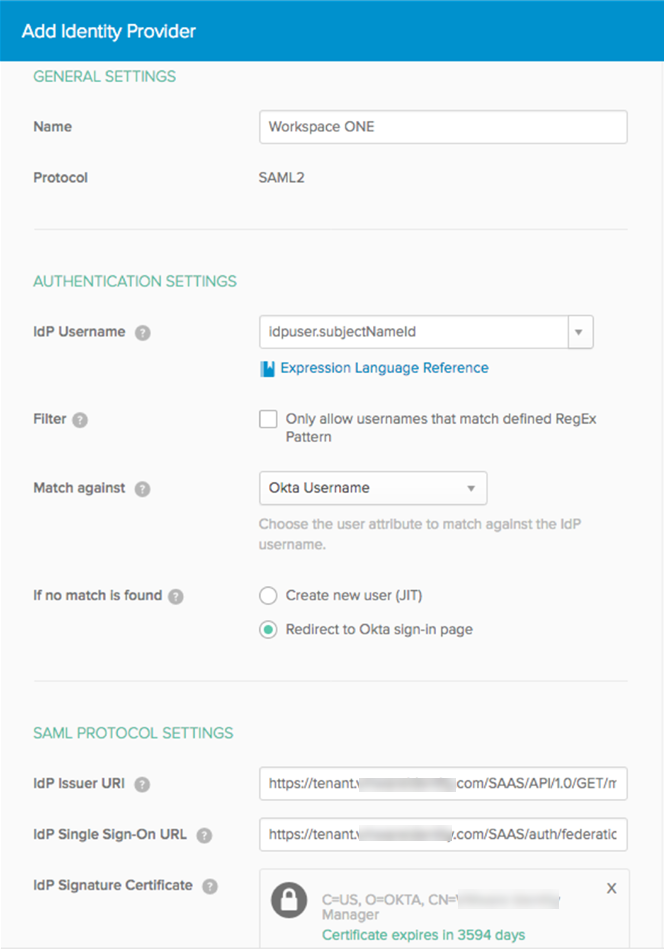
-
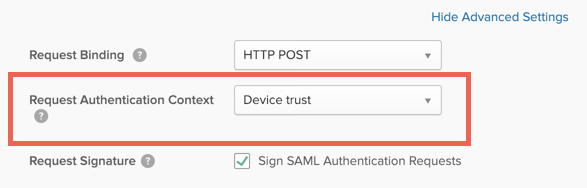
Click Show Advanced Settings, scroll to the Request Authentication Context option, and select Device Trust.
This setting specifies the context of the authentication request.
-
Click Add Identity Provider.
-
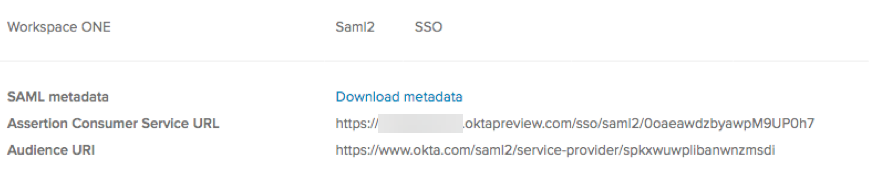
Verify that the following information appears:
- SAML Metadata
- Assertion Consumer Service URL
- Audience URI For example:
-
Download and save the metadata file.
-
Click the Download Metadata link.
-
Save the metadata file locally.
-
Open the metadata file and copy its contents.
You will use this metadata when you configure the Okta Application Source in Omnissa Access.
-
What to do next
Configure the Okta Application Source. Configuring the Okta Application Source is mandatory.
Was this page helpful?