You can integrate Omnissa App Volumes Manager with Omnissa Access to enable users to access their App Volumes packaged applications from Workspace ONE Intelligent Hub. Omnissa Access also provides Single Sign-On (SSO) to the applications for a seamless user experience.
You configure the integration in App Volumes Manager. You also assign applications to users and groups in App Volumes Manager, not in Omnissa Access.
After the applications and entitlements are synchronized to Omnissa Access, you can view them in the Omnissa Access console. You can also group applications into categories that appear in the Intelligent Hub catalog.
End users can access and launch their assigned applications from Intelligent Hub on a Windows machine, from either the Intelligent Hub for Windows app or the Intelligent Hub web portal. When a user launches an application, it is delivered dynamically from App Volumes Manager.
The Omnissa Access default access policy determines access to all App Volumes applications.
Note: You cannot assign custom app policies to App Volumes applications.
Requirements
- App Volumes Manager 2509 (Build 4.19) or later
- Omnissa Access Cloud
- Intelligent Hub web portal or Intelligent Hub for Windows 26.02.1 or later
- App Volumes Agent 2509 (Build 4.19) or later installed on the user's Windows machine
Complete the prerequisites in Omnissa Access
Before you configure the integration in App Volumes Manager, complete the following prerequisites in Omnissa Access:
-
Ensure that the same users and groups are synchronized to both App Volumes Manager and Omnissa Access. The distinguishedName attribute is used to identify users and is required for all users.
Note: Only Active Directory is currently supported as the directory source. To synchronize users and groups from Active Directory to Omnissa Access, you must install the Directory Sync component of the Omnissa Access Connector and create a directory in Omnissa Access.
-
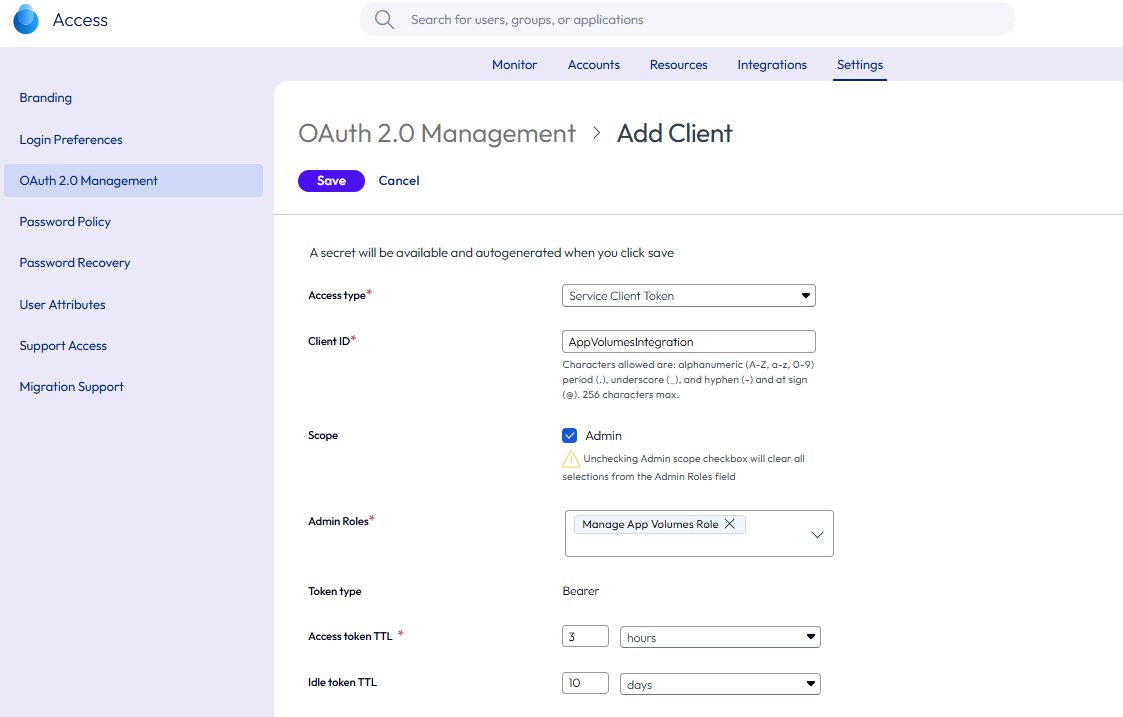
Create an OAuth 2.0 service client in the Omnissa Access console for the App Volumes integration.
-
Determine which admin role you want to assign to the new OAuth 2.0 service client.
The predefined Super Admin role includes all the required permissions. However, for security, we recommend that you create a custom role instead, limiting the client to just the permissions it needs to execute the integration.
To create a custom role, select Accounts > Roles in the Omnissa Access console, click Add, and define a role that includes the following permissions:
- Catalog: Read and Manage App Volumes Apps for All resources
- Users and Groups: Read for All resources
- Directory Management: Read for All resources
- Entitlements: Read, Manage App Volumes Entitlements, Manage Third Party Entitlements, Manage Web Entitlements, and Manage ThinApp Entitlements for All resources
- Identity and Access Management: Read for All resources
Click Save to save the role.
-
Select Settings > OAuth 2.0 Management.
-
Click Add Client.
-
For Access type, select Service Client Token.
-
Enter a unique name for the Client ID.
-
For Scope, select Admin.
-
For Admin Roles, select the custom role you created for this integration.
-
Specify the token time-to-live (TTL) for the access token.
-
Click Save.
For example:
-
Copy the Client ID and Shared Secret before leaving the page. You need these values to configure the integration in App Volumes Manager.
Note: The secret is no longer displayed after you leave the page. If you did not copy the secret, you can regenerate it and use the new value in the App Volumes Manager configuration.
-
See Managing OAuth 2.0 Clients in Omnissa Access for more information about creating OAuth 2.0 clients.
Configure the integration in App Volumes Manager
Follow the instructions in Configure App Volumes Manager Integration with Omnissa Access to configure the integration.
You will be required to enter the OAuth 2.0 Client ID and Client Secret, as well as your Omnissa Access tenant URL.
Verify App Volumes applications in Omnissa Access
After you integrate App Volumes Manager with Omnissa Access, the App Volumes applications are synchronized to Omnissa Access based on certain triggers. See "Events that trigger synchronization between App Volumes Manager and Omnissa Access" in Configure App Volumes Manager Integration with Omnissa Access.
In Omnissa Access, you can verify that the applications have been successfully synchronized and appear in the catalog.
-
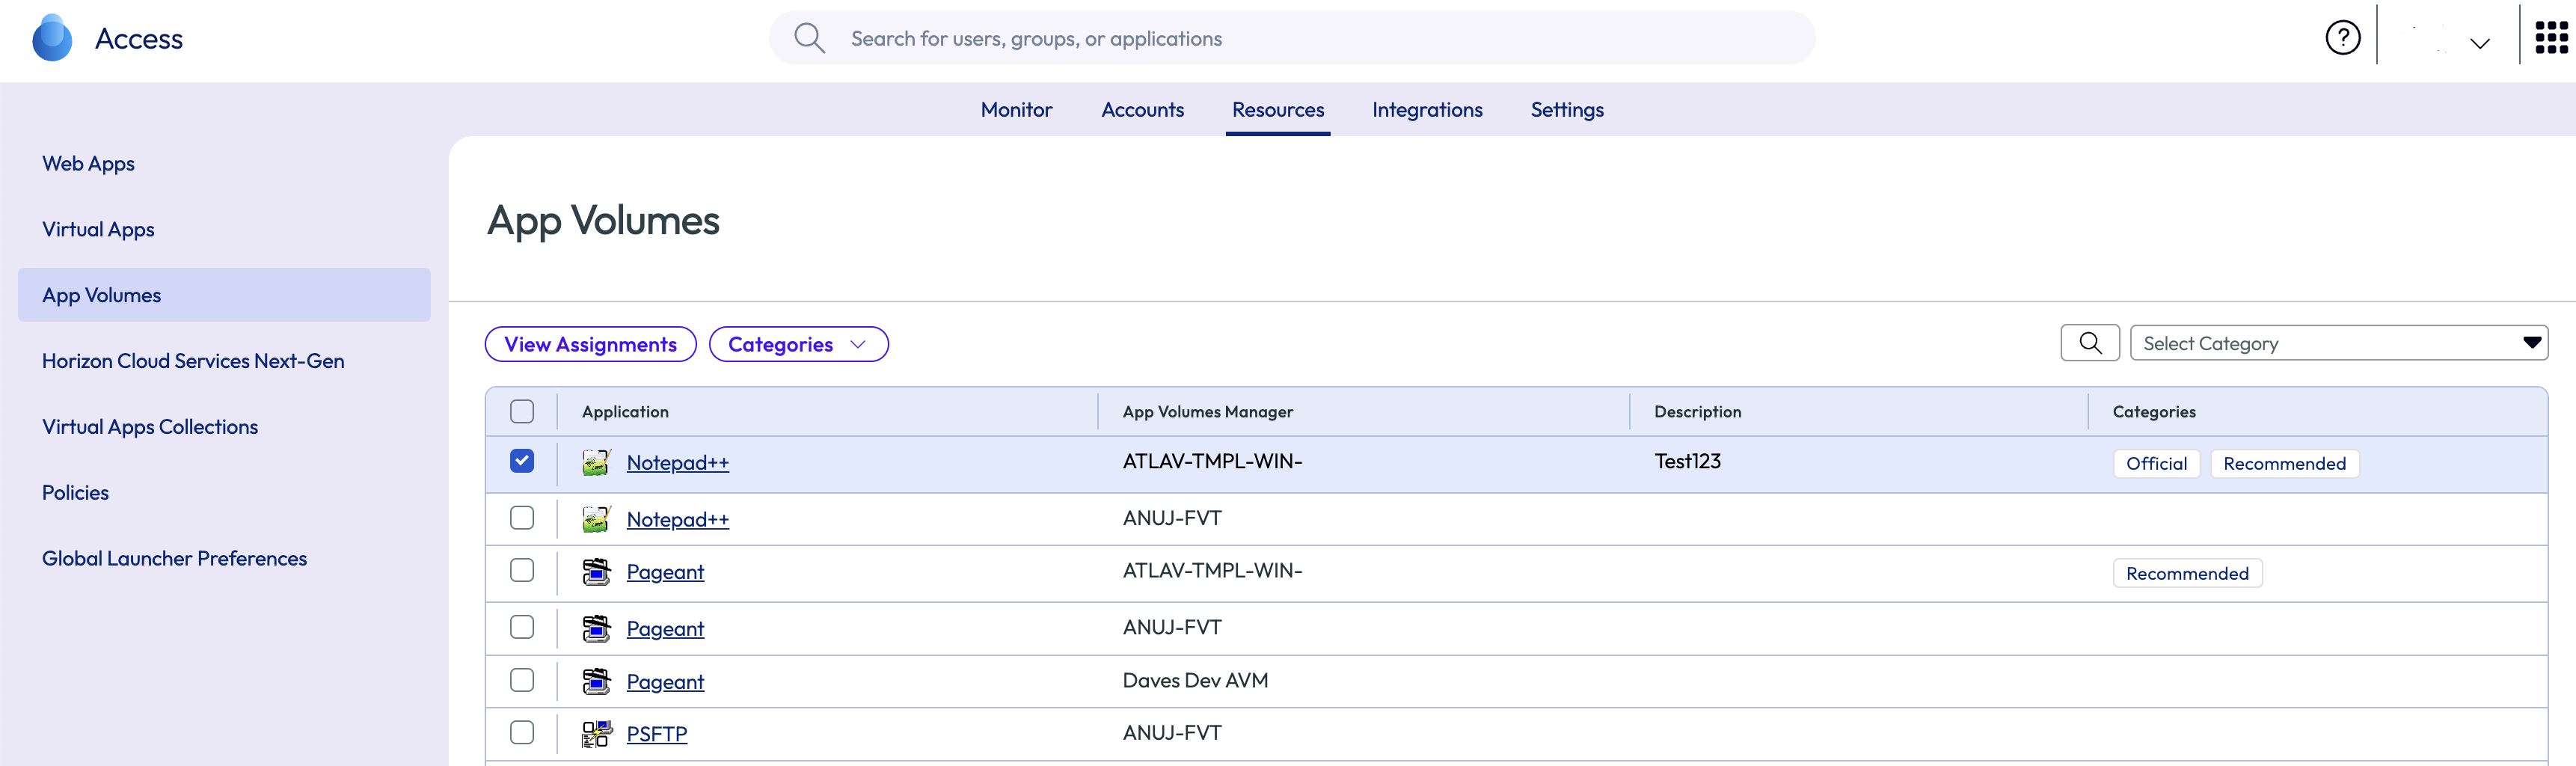
In the Omnissa Access console, select Resources > App Volumes.
-
Verify that the applications you expect to see appear in the list.
For example:
-
To view details about an application, such as its version or the App Volumes Manager instance name and ID, click the application.
-
To verify user or group assignments for an application, click View Assignments on the application page.
You can also check assignments by user or group by navigating to the Accounts > Users or Accounts > User Groups page, selecting the user or group, and selecting the Applications tab.
Note: You cannot create, edit, or delete assignments in Omnissa Access. Manage assignments in App Volumes Manager.
Assign applications to categories
You can organize the App Volumes applications into categories to make it easier for users to find them in the Intelligent Hub catalog. An application can be included in multiple categories.
In addition to the categories you create, a predefined Recommended category is available. Apps that are part of this category appear in a Recommended section in the Intelligent Hub catalog.
-
In the Omnissa Access console, navigate to Resources > App Volumes.
-
Select the application, then click Categories.
-
Either select an existing category or type a name to create a new category.
Check access policies
The Omnissa Access default access policy applies to all App Volumes applications. You cannot apply custom access policies to these applications.
To view the default access policy, select Resources > Policies in the Omnissa Access console.
Enable App Volumes Apps for Intelligent Hub web portal
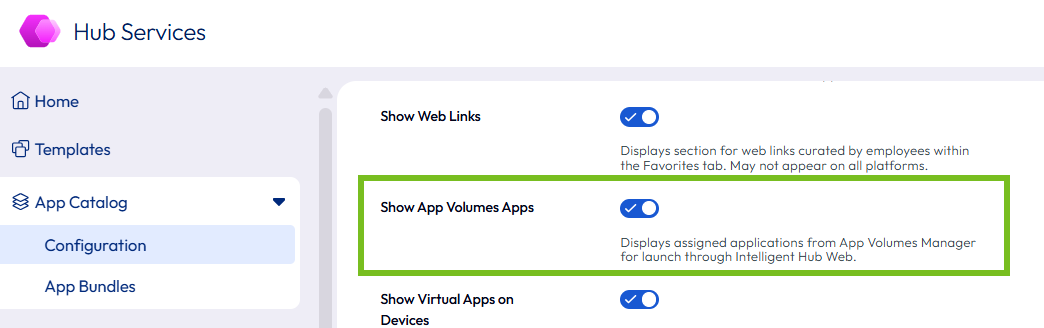
After you configure the integration, App Volumes applications appear in Intelligent Hub for Windows. However, the applications do not appear in the Intelligent Hub web portal by default. To display App Volumes applications in the portal, you must enable the Show App Volumes Apps option in the Hub Services console. This option is turned off by default.
Before enabling the option, configure browser policies for Windows machines to allowlist your Intelligent Hub web URL for local network access. Without these browser policies, users will get repeated Local Network Access prompts in browsers such as Google Chrome and Microsoft Edge when the Intelligent Hub web portal connects to the local App Volumes Agent running on their Windows machines. The browser policies allowlist the Intelligent Hub web URL, which prevents the prompts.
Prerequisites
- Configure Windows browser policies to allowlist your Intelligent Hub web URL for local network access.
- Roll out and verify the policies on all Windows machines that will access App Volumes applications on the Intelligent Hub web portal.
Procedure
-
In the Hub Services console, navigate to App Catalog > Configuration.
-
If you only have a single Global version of the App Catalog:
- Enable the Show App Volumes Apps toggle.
- Click Save.
- Enable the Show App Volumes Apps toggle.
-
If you are using Hub templates and have created multiple versions of the App Catalog, perform the following steps for each version that applies to users who will access App Volumes applications through the Intelligent Hub web portal:
- Select the App Catalog version from the VERSION dropdown.
- Enable the Show App Volumes Apps toggle.
- Click Save.
Note: Enabling the toggle on the Global version is not sufficient. You must enable the toggle on every applicable App Catalog version.
End User Experience
End users access their App Volumes applications from Intelligent Hub on a Windows machine. They can use either the Intelligent Hub for Windows app or the Intelligent Hub web portal to access the applications. The App Volumes Agent must be installed and running on the Windows machine.
Note: For App Volumes applications to display in the Intelligent Hub web portal, the Show App Volumes Apps toggle in the Hub Services console must be enabled.
App Volumes applications appear in the Hub catalog along with the other applications that the user is assigned. If you classified the applications into categories in Omnissa Access, they appear under those categories. Users can search for, sort, and view details of the applications. They can also add them to the Favorites tab for easy access.
Here is an example of an App Volumes application in the Intelligent Hub catalog:
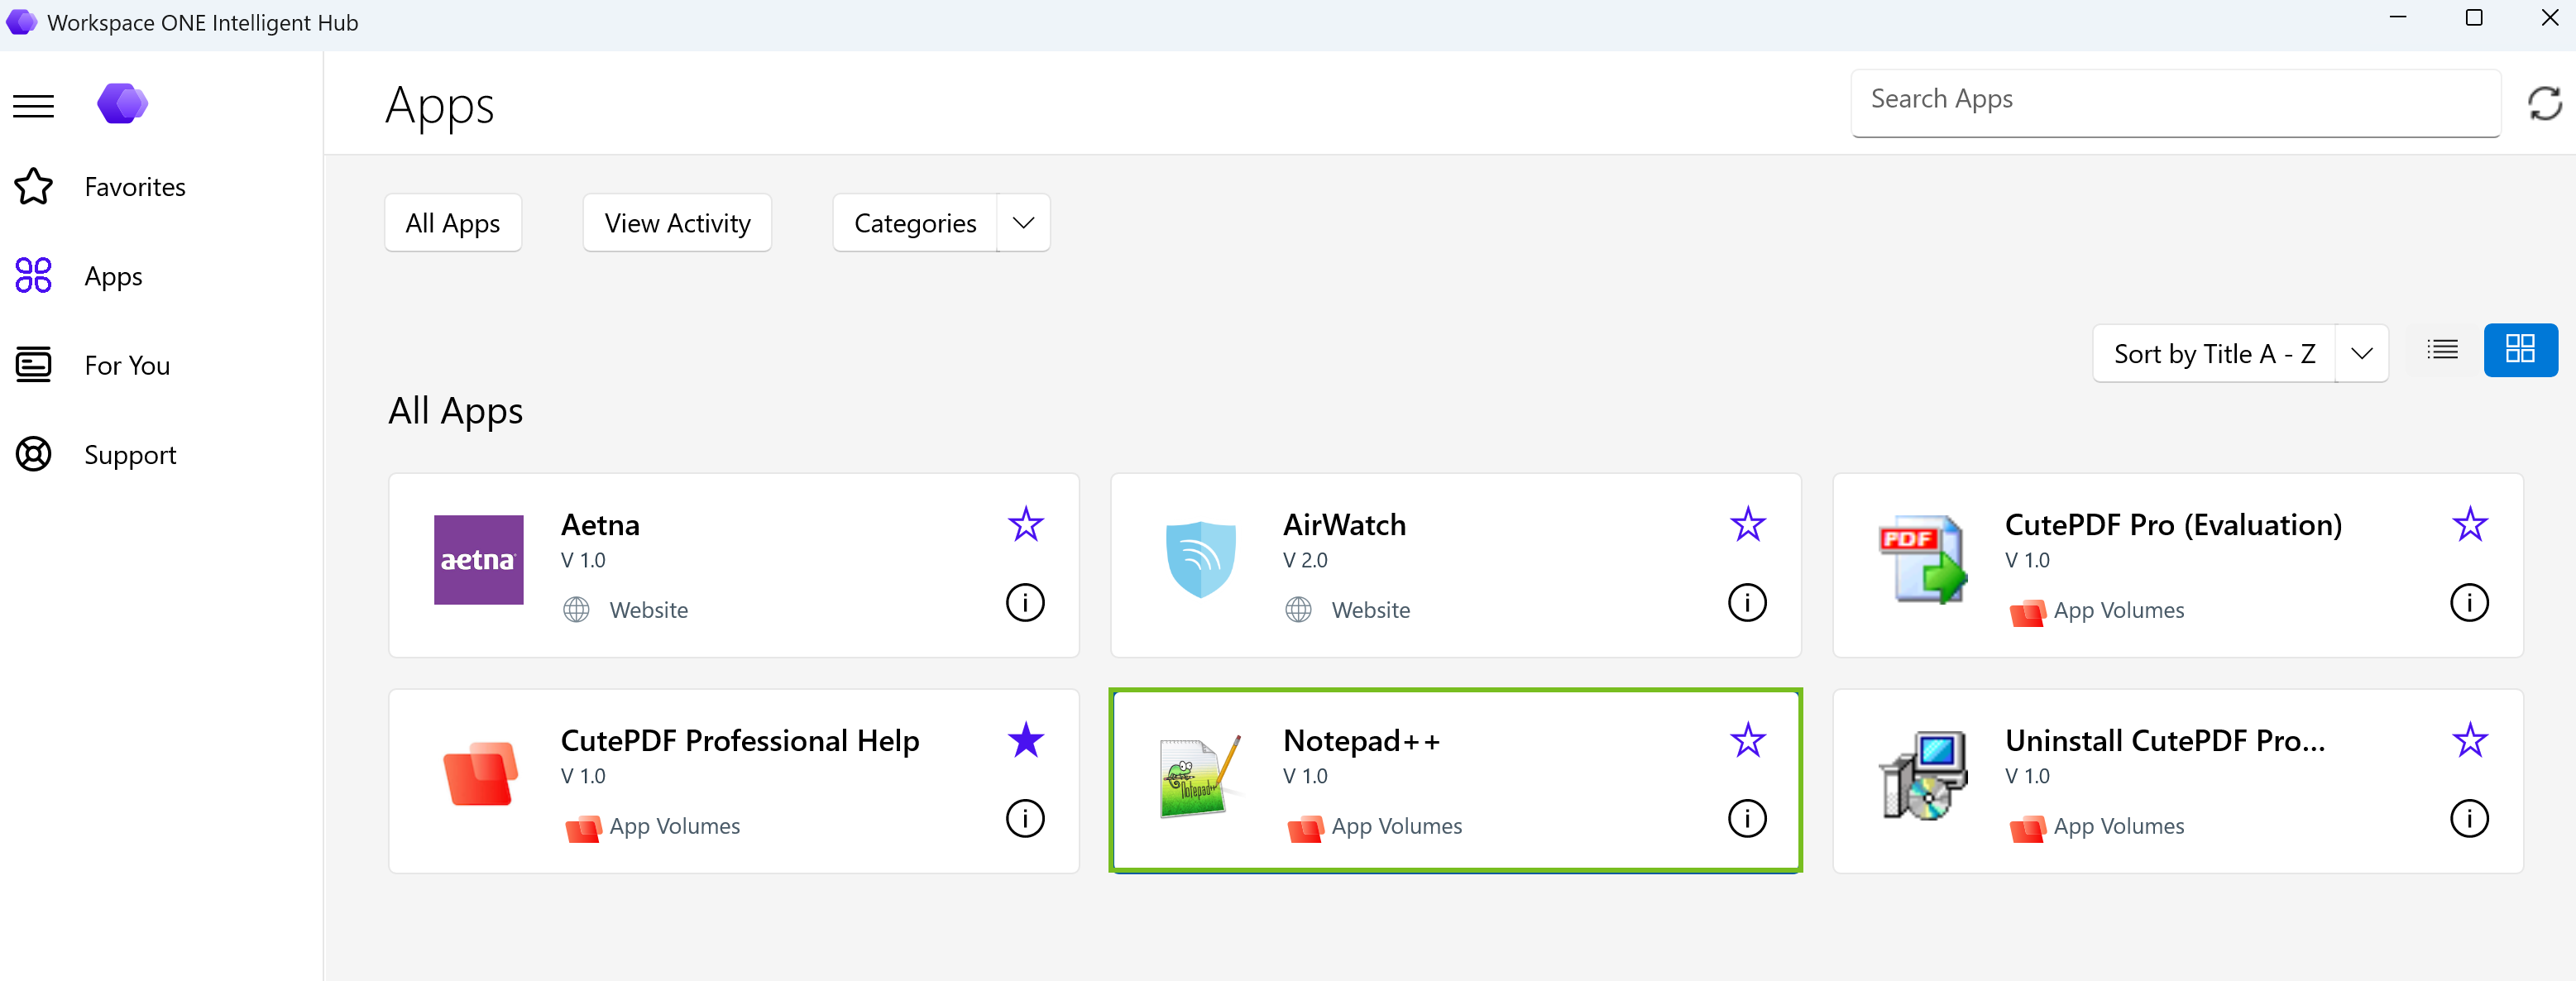
When a user launches an App Volumes application, it is delivered dynamically from App Volumes Manager. Intelligent Hub sends a secure URI to the local App Volumes Agent, which then launches the application on the device.
Troubleshooting
Refer to the following troubleshooting tips if you encounter issues with App Volumes applications in Intelligent Hub:
-
If the App Volumes Agent is not installed or cannot be detected, App Volumes applications do not appear in the Hub catalog.
-
If the App Volumes agent is installed but cannot be reached, the user can see the applications in the catalog but receives an error when trying to launch them.
-
If an App Volumes application fails to launch, the App Volumes Agent displays a popup with the following error message:
Application delivery failed. -
(Intelligent Hub for Windows) If you roll out the App Volumes Agent after deploying Intelligent Hub for Windows, there will be a lag before users can see App Volumes applications. The applications will appear after:
- The Agent is installed and running.
- Intelligent Hub next refreshes entitlements on the device.
-
(Intelligent Hub web portal) Users on some browsers, such as Microsoft Edge and Chrome version 142 and later, might need to allow the following browser prompt in order for App Volumes applications to appear in the Intelligent Hub portal:
Look for and connect to any device on your local network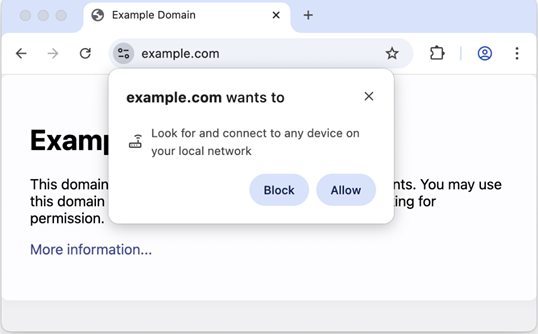
You can prevent the prompt from appearing by configuring browser policies for Windows to allowlist your Intelligent Hub web URL for local network access.
-
(Intelligent Hub web portal) If App Volumes applications do not appear in the Intelligent Hub web portal even though entitlements are configured, verify that the Show App Volumes Apps option is enabled in the Hub Services console. See Enable App Volumes Apps for Intelligent Hub web portal for information.
Was this page helpful?