This topic describes the process for setting up automatic agent updates for your environment when your data center does not have external internet access.
If your data center does not have external internet access, you must perform the steps below to set up automatic agent updates. When this process is complete, your system indicates available agent updates on the Assignments and Images pages of the tenant administrator's console. See the Tenant Administration guide for more information.
Note: If you configured automatic agent updates in Horizon DaaS 9.0.0 or 9.0.1, the file locations you set are not migrated and must be configured again on the upgraded tenant.
Procedure
-
Create a directory called
C:\WinFileShare\hotpatch. -
Download the agent tarball file and extract it into the
hotpatchdirectory. -
Navigate to the subfolder called
files. -
Get the SHA256 value of the
supportingFiles.tarfile.-
Start PowerShell and navigate to the folder containing the newly extracted
supportingFiles.tarfile. -
Enter the following command:
Get-FileHash supportingFiles.tar -Algorithm SHA256 >SHA256.txtNote the hash value that is returned, because you will use it in the Administration Console later.
Note: If you are using Linux, you can use the following command instead:
openssl dgst -sha256 supportingFiles.tar
-
-
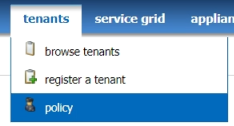
In Service Center, click tenants > policy, and select your tenant.
-
Update policies as shown in the following table.
Policy New Value agentupdate.cachePath /mnt/wem/___
/mnt/wem/__192_168_1_100_My_Shareagentupdate.cipherList AES256-GCM-SHA384agentupdate.enable trueagentupdate.enablehotpatch trueagentupdate.job.repeatInterval 3600000agentupdate.job.startDelay 30000 -
In the Administration Console, click Settings > File Share.
-
Click New.
-
Fill out details for file share.
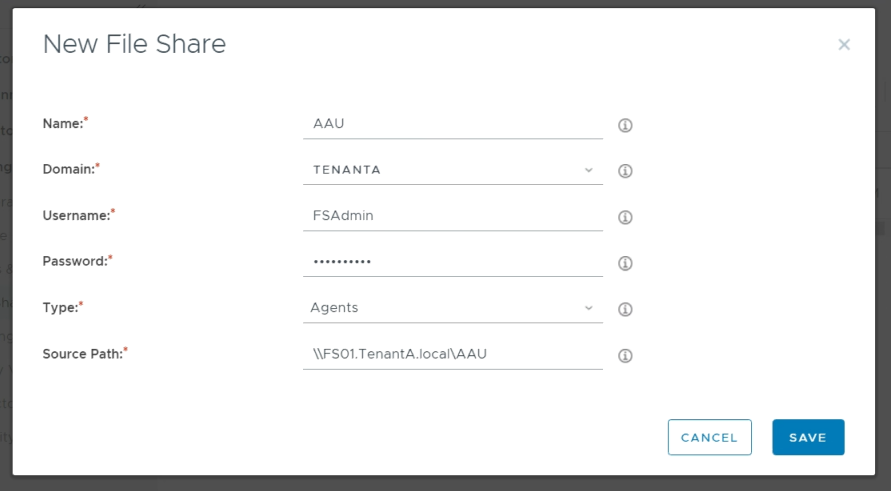
Note: If you have not created a file server, assign a server to host your agent file share, create a file share, and configure share and NTFS permissions (read/write, and so on) before proceeding with next steps.
-
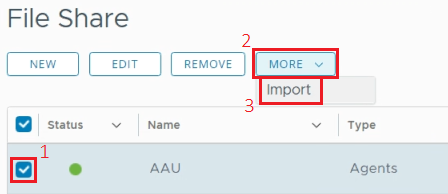
Select the check box on the new file share in the console then click More > Import.
-
Open the
SHA256.txtfile created previously, copy the checksum, paste it into the File Hash text box, and click Validate.The following success message displays:

You can now begin updating images and assignments with the latest agent using the Update Agent feature.
Was this page helpful?