You can edit your environment's pools by using the Horizon Universal Console. You can change certain properties in the pool's configuration as described in the following procedure. Some values such as name and type cannot be changed. For information about settings that are specified during pool creation, refer to Create a Pool. For more information about pool power policies, hibernate pools, and virtual machines (VMs) refer to Pool Power Policies.
In the console and under the Pools left menu, your list of Pools is shown in a table format. The menu button options are: Add, Edit, Delete, Provisioning and an Ellipsis (...) button that shows more options. When you select a specific Pools checkbox, these menu buttons will show up or gray out as needed. If you scroll to the bottom of the table, there is a button to Manage Columns that allows you to select what columns you want to be shown or hidden in the table.
Procedure
-
From the Horizon Universal Console, select Pools on the left menu.
-
Select the pool you want to work in and click Edit.
-
In the Edit Pool section, you can update the description and select the pool type.
-
In the Desktops section, you will see many subsections. Under the Destination subsection it will display the pool's configure Site, Horizon Edge, Provider, and the option to Use dedicated host. These values are un-editable for an existing pool.
-
Use Azure Availability Zones: When the toggle is enabled during pool creation, you can choose one or more availability zones. If you enable this option while editing a pool, only future VMs created after enablement would be distributed across your selected zones. Existing VMs are not moved. For more information refer to Microsoft documentation.
-
Enable Hibernate: For both Microsoft Azure and Amazon WorkSpaces Core Pools, you can enable the toggle. Important: Once hibernation is enabled, it cannot be disabled. Refer to Hibernate Pools and Virtual Machines (VMs) topic below for more information on Hibernating a pool or VM.
-
-
In the Desktops section, the Image subsection displays the Generation type, the Image name, and the Image Marker.
-
For a Microsoft Azure Pool, you can change the pool's image to a different image by selecting both a Generation type and an Image option for this pool. Both generation 1 and 2 image VMs are supported. If you select V1, only images with a Microsoft Azure generation 1 VM and models that support generation 1 can be selected. Your selection for the Generation type acts as a filter to determine which images are listed in the Image drop-down menu and which models are listed in the Model drop-down menu.
Note: If an image or image marker is updated for a dedicated pool, the system only rebuilds the unassigned VMs. Assigned VMs will not receive the updated image until they are unassigned.
-
-
Still under the Image subsection, select the Marker of the image selected.
- For a Microsoft Azure Pool, you must use one or more markers or tags to later edit the pools of an image version. Add the markers if they were not previously added to the image version. For more information refer to Add Version to an Existing Microsoft Azure Compute Gallery Image. Also Using Azure Resource Tags and Using Amazon Resource Tags.
Note: If a marker associated with an older agent version is selected, a warning message is displayed. As best practice, select a marker with the latest agent version.
-
Still under the Image subsection, select the check box next to Do you have a valid license for this Windows OS and select the next check box to confirm you have an eligible license for this Windows OS.
-
In the Desktops section, under the VM details subsection, select values for the Filter Model, Model, Disk type, Disk size, and Encrypt Disks options for your pool.
For a Microsoft Azure Pool
-
Select a Microsoft Azure VM Model type to use for the pool or accept the default. The Model setting refers to the compatibility of different Microsoft Azure VM types and sizes with Horizon Cloud. To select a different model, click the X, then click the drop-down menu, and select a model. Refer to Microsoft Azure VM Types and Sizes for Horizon Cloud (89090) for more information.
-
Use the Filter Model settings to reduce the number of Microsoft Azure VM model options listed, if not the list of models is very long. You can filter the list by Tag, CPU, RAM, Series, GPU Type, and Disk Type. Click + to add other filters. The reduced list will include a subset of models based on your specific requirements.
Filter Operator Description Tag equals - Recommended: Microsoft Azure VM models that work particularly well for pools.
- High Performance: Azure VM models that offer premium disk support.
- Custom: Custom tags that can be added and configured by the administrator.CPU equals The CPU filter uses a from/to range to define acceptable CPU values. RAM equals Memory uses a from/to range to define acceptable RAM values. Series equals Use the drop-down menu to view the list of Azure VM series and select the one that best fits your needs. GPU Type equals Use the GPU Type filter to select GPU-enabled Azure VM models:
- NONE: Filters out GPU-enabled models.
- AMD: Includes only AMD GPU-enabled models.
- NVIDIA: Includes only NVIDIA GPU-enabled models.Disk Type equals Use the Disk Type filter to select Premium, which provides premium disk support. -
You can select a Disk type value based on the VM model selected, and the Microsoft Azure subscription and region.
-
You can change the Disk size value from 127 to 4095 GB. The default Disk size value is 127 GB.
-
If you want to encrypt disks for all VMs in this pool, enable the Encrypt Disks toggle.
Note:
- Disk encryption for managed VMs is supported using Azure Disk Encryption (ADE).
- Other disk encryption configurations (including customer-managed key models outside of Azure Disk Encryption) or changes performed directly in Azure are not supported for VMs managed by Horizon Cloud.
- Disk encryption is not supported for Linux desktop pools.
-
Important: Changing the model used by an existing pool will only affect new VMs. Existing VMs in the pool will continue to use the previously selected model.
-
You can label a model as hidden if you do not want the model to be available for new pools however, a hidden model can continue to be used by an existing pool. A model will be marked deprecated if Microsoft Azure no longer provides the model. When editing a pool, if the currently selected model is marked as deprecated, update the model to a different one to allow the pool to create more virtual machines in the future, e.g. when expanding the pool.
-
-
In the Desktops section, under the Machine Identity (Domain) subsection, the pool's configured machine identity is displayed.
-
For Microsoft Azure, if the toggle to Defer VM availability until hybrid join is shown, you can enable or disable seamless access to both on-premises and cloud-based resources for the pool. This option is only available if the specified Machine Identity provider is an on-premises Active Directory server.
-
If this existing pool is configured to use your local Active Directory domain, you can change the OU which the pool uses for the machine identities.
Note: To prevent naming conflicts, when the pool is reusing VM names, the Computer OU field's value cannot be changed. The displayed state of the Reuse VM names option in the Properties subsection indicates whether the pool is reusing VM names. In case of a Microsoft Entra ID-joined pool, the Administrative unit field's value cannot be changed when the pool is reusing VM names.
-
-
In the Desktops section, under the Provisioning subsection, you can update settings as needed.
Editing Administrator Credentials: At times while provisioning a pool an administrator will need to edit the pool to provision more VMs. From the console under the Pools menu, you can edit the administrator credentials (username and password) when provisioning new (additional) VMs. This means that the new VMs pool credentials will be different from the previous (older) VMs credentials.
-
Select how your VMs are provisioned:
-
All at once: All VMs in the pool are provisioned at the time the pool is created.
-
On-Demand: VMs are provisioned as they are needed. When this option is selected, the Simplify Provisioning toggle appears.
-
When the toggle is Enabled (recommended), the pool uses the Pool Group spare capacity percentage setting. Pool-level minimum and maximum spare settings are ignored, giving you centralized, consistent control across all pools in the group.
-
When the toggle is disabled, the pool falls back to the legacy spare configuration and provisioning is managed individually at the pool level.
-
-
Simplify Provisioning: Existing pools can be migrated at any time by enabling the toggle. Warning: Enabling Simplify provisioning may change the number of spare VMs maintained.
-
If On-Demand is selected with Simplify Provisioning disabled, you have to specify the number of Minimum spare VMs and Maximum spare VMs for this pool.
- Note: Spare VMs are VMs not currently in use that are powered on and ready for new user sessions. The system tries to maintain spare VMs equal to (Minimum spare VMs + Maximum spare VMs) / 2. Provision and deprovision operations are triggered based on the difference between the existing spare VMs and this target.
-
-
-
In the Desktops section, under the Properties subsection, you can update an existing pool as needed.
-
Reuse VM names: This setting governs how VM names are recycled. The available name range is determined by the Maximum VMs setting configured in the Provisioning section. This toggle cannot be edited but if enabled, you can switch between these two policies: Reuse VM names when possible or Restrict VM names to configured range.
- Reuse VM names when possible: Reuses names from deleted VMs. If no previously used names are available, the system might generate new names outside the configured pool range. Requirement: Ensure your domain join account has the necessary permissions to reuse existing computer accounts.
- Restrict VM names to configured range: Strictly limits VM names to the defined pool range. New VMs will only reuse names from deleted VMs, and the system will never create names outside the configured range.
-
Time Zone - Select the time zone that the VMs should use and select the check box if the clock should automatically be adjusted for daylight saving time. Changing the time zone on an existing pool will only affect newly created VMs. Existing VMs will keep the original time zone setting. Note: This option is not available for the Amazon WorkSpaces Core provider type.
-
Update admin credentials: Enable the toggle to update the desktop admin credentials. When not enabled you will retain the previously configured credentials. Note: Once the admin credentials are updated, any VMs created after the update will be assigned to the new credentials, while VMs created prior to the update will continue using the old credentials.
-
Use outbound proxy - Enable the toggle to if you want to route outbound requests to the Internet through a proxy server. Then provide the values for proxy host, proxy port, and optional bypass proxy IP addresses (for IP addresses for which the outbound proxy will not be applied). Note: This option is not available for Amazon WorkSpaces Core providers.
-
-
In the Desktops section, under the Properties subsection, expand the Advanced option to set the VM Refresh Method, Resource Tags (Optional), and Post Customization Script (Optional).
The VM refresh method: This determines how the system returns a Floating Desktop VM to a clean state after a user logs off. You can choose either Delete VM or Revert to Snapshot.
-
Delete VM: This refresh method deletes and recreates a VM after the user logs off.
- There is no change to existing pools however, if you have experienced issues with VM refresh reliability, you can go in and edit your existing pools to use the Delete VM option.
-
Revert to Snapshot: This refresh method takes a snapshot after VM creation and later reverts to that snapshot to refresh the VM after the user logs off.
- The snapshot is only valid for 20 days and will then be recycled.
- There may be additional costs associated with storing and managing snapshots.
- Note: This feature is not supported by the Amazon WorkSpaces Core cloud provider.
-
Note: Administrative actions that change a floating pool's VM refresh method are best performed during a maintenance window or off-peak hours. Switching to Revert to Snapshot triggers a rebuild of existing VMs in the pool, which can temporarily reduce available capacity for new connections.
Resource Tags (Optional) can be used with Microsoft Azure and/or Amazon WorkSpaces Core cloud provider pools. If inherited tags exist, they will be displayed here.
- To add a tag, click Add and it will be applied to the resource groups specific to this pool. Click Done when you finish.
- For more information refer to Using Azure Resource Tags and/or Using Amazon Resource Tags.
Post Customization Script (Optional) This feature allows you to run a one-time script at the end of provisioning the VMs and before the machine is made available for end users to connect to.
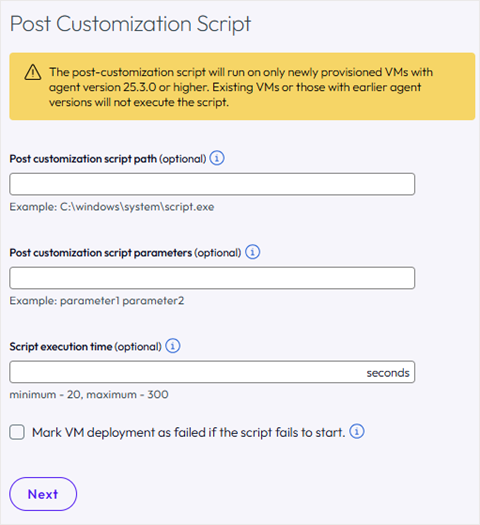
- Post customization script path (optional): The path to the script that will be run during VM provisioning. Example: C:\windows\system\script.exe
- Post customization script parameters (optional): Parameters or values required for the script to run successfully. Example: parameter1 parameter2
- Script execution time (optional): Specifies the duration the system will wait after starting the script on a VM before marking it as available for user sessions. Use this delay to allow scripts to fully execute. This delay ensures that script has enough time to complete, functioning similarly to a fixed static timer.
- Mark VM deployment as failed if the script fails to start: When enabled, this setting will mark the deployment as failed if the script fails to start. However, if the script starts but encounters an issue during execution, the deployment will still be considered successful.
Note: The post-customization script will run on only newly provisioned VMs with agent version 25.3.0 or higher. Existing VMs or those with earlier agent versions will not execute the script.
Click Next to save your changes and move to the next section.
-
-
In the Networks section, you can update an existing pool as needed.
- Dual-stack support: When enabled, VMs deployed as part of this pool will receive both an IPv4 and IPv6 address. Dual-stack subnets must be selected when this is enabled.
- Select the virtual networks and tenant (desktop) subnets for Microsoft Azure
- Note: The Azure dual-stack option cannot be modified when you edit a pool. For Amazon WorkSpaces Core, select the Availability Zone and Subnet for one or both availability zones.
Click Next to save your changes and move to the next section.
-
(Optional) The Dynamic Environment Manager is an optional feature you can configure.
Click Next to save your changes and move to the next section.
-
(Optional) The Workspace ONE Unified Endpoint Management (UEM) is an optional feature that Auto-enroll and manage newly provisioned VMs in UEM.
Click Save to save your changes and exit out of the Editing a Pool workflow.
Was this page helpful?