Effectively managing power options for your pools and pool groups is crucial for optimizing resource utilization and ensuring consistent user experience. Horizon Cloud offers flexible Capacity Management through various power management, auto scaling options:
- Autonomous Mode
- Auto Scaling Mode & Schedule
- Timeout Options
- Hibernation for both pools and virtual machines (VMs)
Note: For Microsoft Azure Edge deployments, you can track the cost savings achieved through your power management policies and receive optimization recommendations using the Cost Insights page in the Horizon Universal Console. For more information, see Managing Costs for Microsoft Azure Provider Deployments.
Autonomous Mode
Autonomous mode allows Horizon Cloud to automatically manage your virtual machines (VMs) availability based on past workload demands, statistics will be collected from your workload demand over the last 14 days.
Available for Single-Session Floating and Multi-Session Pool Groups, this feature overrides any previously configured settings and schedules to optimize scaling for busy periods and quiet hours alike. Your users won’t be interrupted; if a reduction lowers the limit below the number of active sessions, the system keeps those sessions running.
If your pool group has less than 14 days of usage data, you will need to choose a Auto Scaling mode and those Settings and Schedules will control availability until the 14 days have passed. Once 14 days of data is collected, Autonomous mode will fully take over to manage your resources automatically. There is no Artificial intelligence (AI) involved.
If you were to disable Autonomous mode, the configuration will return to your previously configured Auto Scaling mode settings and schedules.
Procedure to Enable Autonomous mode
-
Log in to the Horizon Cloud console and from the left menu, select Pool Groups.
-
Select the pool group you want to manage and click Edit. Important: Currently only floating and multi-session pool groups are supported.
-
The Pools section will be displayed. Click Next to continue.
-
The Policies section will be displayed. Click Next to continue.
-
The Auto Scaling section will be displayed. Under the Capacity Management subsection, activate the Autonomous mode toggle.
-
Scroll to the bottom of the Auto Scaling section and click Save & Close or Next.
Note: This feature is not supported on dedicated desktop pools or Horizon 8 pools.
Auto Scaling Mode
Auto Scaling mode allows you to control how your virtual machine resources are utilized and optimized to balance performance and cost.
Spare VMs (previously called "Unused VMs") are virtual machines that have been provisioned and powered on, but don't have any users logged in. Think of them as ready-to-use capacity waiting for the next user. This setting applies to each pool group in the entitlement unless a Auto Scaling schedule is specified. Rather than power off the VMs in a single-session dedicated pool for Microsoft Azure and/or Amazon WorkSpaces Core, you can choose to hibernate them.
Only floating and multi-session pool groups are supported for Auto Scaling mode, however when working with a Dedicated Pool Group, you can set the minimum number of Spare VMs (previously unused) to keep powered on at all times, relative to your total pool size. This ensures you always have capacity ready when users need it.
For Floating and Multi-Session Pool Groups, choose between four power management approaches:
-
Prioritise Availability – Spins up new VMs when occupancy hits 50%, ensuring users always have optimal performance and minimal wait times. (previously called Optimized for Performance).
-
Balanced – A middle ground between performance and cost, spinning up capacity at 66% occupancy.
-
Prioritize Cost Savings – Maximizes VM utilization before adding new capacity, spinning up at 80% occupancy to minimize operational costs. (previously called Optimized for Cost).
-
Fixed - Manually specify the minimum number of spare VMs to maintain, regardless of actual usage patterns (previously called Non-Occupancy-Based).
Auto Scaling Schedule
An Admin can configure Auto Scaling Schedules for Microsoft Azure and Amazon WorkSpace Core desktop pool groups for all types of pools (dedicated, floating, and multi-session). Follow the procedure below to create or alter existing schedules as needed.
Procedure
-
Log in to the Horizon Cloud console and from the left menu, select Pool Groups.
-
Select the pool group you want to manage and click Edit.
-
The Pools section will be displayed. Click Next to continue.
-
The Policies section will be displayed. Click Next to continue.
-
Under the Auto Scaling Schedule subsection, you have the option to Add or make changes to existing schedules.
-
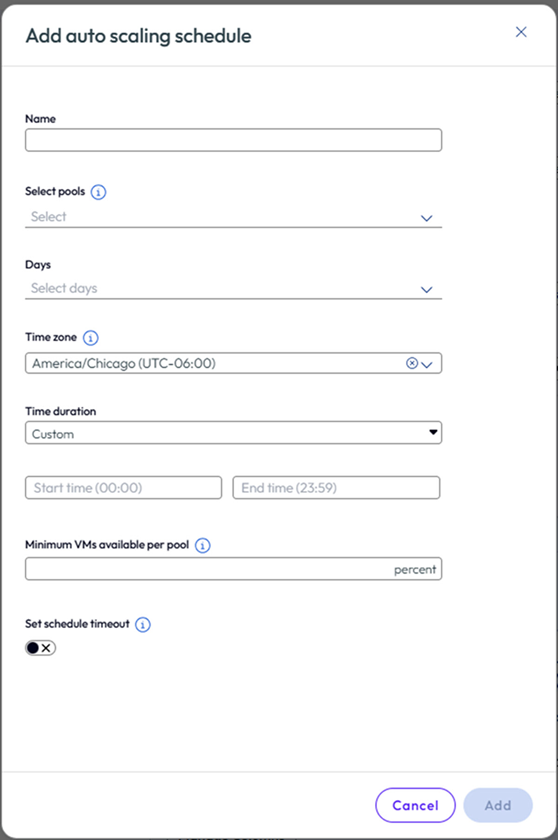
To make changes to existing schedules select the Name in the table and then click either: Enable, Disable, Edit, or Delete. Then update the schedules as needed. To Add a new Auto Scaling schedule, Click Add. The following submenu will open.
-
Name the Schedule.
-
From the Select pools drop down, select the pools you would like in this new group or select All Pools in the list. You may select multiple pool names if needed.
-
Set the Days, Time zone, Time Duration, and set the Minimum VMs available per pool (percentage of Unused VMs) to meet your needs.
-
To Set schedule timeout, activate the toggle and fill in the additional options. Once this is enabled, it will allow Admins to control the behavior of Disconnected sessions.
-
When finished, select Add to finalize the schedule and return to the Auto Scaling Schedule subsection.
-
-
Repeat Step 6 as needed. Once completed, you will see that all the schedules you added are now in the Auto Scaling Schedule table. By default, all schedules are enabled, if you want to disable any of them, select their name and click Disable.
-
Click Save & Close, or Next to continue setting up your pool group.
Timeout Handling of Pool Groups
All types of pools are designed with a Default Timeout Value of 10080 minutes for both the maximum session lifetime, and the Idle session timeout. The Power Off protect time is set to a default time of 30 minutes so a VM is protected from powering off after powering on due to a headroom error. To better manage your Power policies, we recommend that you enable Autonomous Mode to automatically manage your virtual machines (VMs) availability based on past workload demands.
For Pool Groups that are Mixed with Hibernate and Non-hibernated Pools your power options are limited to:
- Log Off (When a disconnected session is logged off, the session is lost.)
- No Action
For Pool Groups with Only Hibernate-Enabled Pools your power options can extend to:
- Log Off (When a disconnected session is logged off, the session is lost.)
- Hibernate
- No Action
If you select Log Off or Hibernate, you can specify a disconnect timeout duration or set it to immediate.
Important: If you choose to hibernate a single-session dedicated pool group, disconnected VMs are deallocated during inactivity. You are billed only for storage while the VM is hibernated. Users can resume their disconnected sessions from where they left off. App Volumes applications will be detached for the pool group when hibernate is enabled.
For Multi-Session pool types of Published application and Published desktop and application, you can set the Empty application session timeout to either Never or Timeout After a number of minutes. The default is Never. If a user is running an application session and there are no applications running in that session, then that session is considered empty. Then set When timeout occurs to either Log Off or Disconnect. The default is Log Off.
Hibernate Pools and Virtual Machines
When you hibernate a virtual machine (VM), the operating system will run a suspend-to-disk action. The memory content is stored in the OS disk and then the VM is deallocated. Hibernating VMs reduce computing costs by deallocating VMs during periods of inactivity, billing only for storage while hibernating. Users can later resume their hibernated disconnected session where they left off without reopening applications or files.
Important: Once the pool is enabled for hibernation, you will not be able to remove that ability from VMs as well. Validate the configuration on a test VM or a small pilot pool before enabling it broadly.
Note: Hibernation is only supported on Windows desktop pools. Linux desktop pools are not supported.
Enable Hibernate on Previously Provisioned Virtual Machine
When Hibernate is enabled, Horizon Cloud saves the VM’s memory state to disk and de-allocates computer resources. Hibernating VMs incur storage-only charges and resume user sessions from the last state without requiring applications or files to be reopened. Note: Hibernation is only supported on Windows desktop pools. Linux desktop pools are not supported.
Prerequisites
Before enabling Hibernate, verify the following requirements:
- Important: Once the pool is enabled for hibernation, you will not be able to remove that ability from VMs as well. Validate the configuration on a test VM or a small pilot pool before enabling it broadly.
- Operating System: The VM must run a Windows operating system that supports hibernate. For more information, see Microsoft Azure documentation on supported OS versions.
- Page File: The Windows page file must reside on the C: drive. Move the page file to the C:\ drive before enabling Hibernation. If your Edge type is Microsoft Azure, refer to Hibernate or resume Microsoft Windows VMs to ensure all prerequisites and configuration limitations are met.
- VM SKU: The VM SKU or instance type must support hibernation.
Procedure to Enable Hibernate on Previously Provisioned VM
-
From Horizon Universal Console, select Pools from the left menu.
-
Click on the name of the pool to view the pool details.
-
Select the VMs tab.
-
Select the VM listed in the table and under the three-dot button (...) Select Power Off.
-
Once the Status in the table shows that the VM was Powered Off, Select the VM and then click the Edit button.
-
Select a Hibernate-capable VM model. NOTE: Use the Hibernate-capable toggle to reduce the number of options to only Hibernate-capable models.
-
Wait for the VM resize operation to complete and the VM to Restart.
Now that you have enabled hibernate on a previously provisioned VM, you can also set hibernate as the Timeout Handling Option following the procedure below.
Procedure to Enable Hibernate on a Previously Provisioned Pool
Note: Verify the Prerequisites listed above have been met.
-
Confirm that you have enabled Hibernate on the previously provisioned VM of the pool from the procedure above.
-
From Horizon Universal Console, select Pools from the left menu.
-
Select the name of the pool you want to Hibernate and click Edit.
-
Under Desktops, in the Destination subsection, activate the toggle to turn ON Enable Hibernate.
-
Select the Hibernate Enabled Image and VM model.
-
Confirm the pool's base image meets the prerequisite requirements (Page File on C:, Supported OS, etc. that are listed above in the Prerequisites section).
-
Save and Exit the Edit a Pool workflow. All new VMs that are provisioned by this pool will be hibernate-enabled going forward.
Now that you have enabled hibernate on a previously provisioned VM, you can set Hibernate as an option for the Timeout Handling settings following the procedure below.
Procedure to Set Hibernate as the Timeout Handling Option
Note: Verify the Prerequisites listed above have been met.
-
From Horizon Universal Console, select Pool Groups from the left menu.
-
Select the name of the Pool Group which has the Pool for which you enabled Hibernate on above and click Edit.
-
In the Pools section, ensure that all the selected Pools in the Pool Group are Hibernate-enabled. Click Next.
-
Under the Policies > Timeout Handling section, select Hibernate as the option for Disconnected session. You can choose the action to be immediate or after a specified timeout.
-
Click Save & Close for the settings to take effect.
Your Timeout Handling settings for this pool group are now scheduled.
Was this page helpful?