You can view and verify the details of one or more pools on the Pool summary page in Horizon Cloud.
Updating, Editing, and Reviewing Pool Details
From the Horizon Universal Console under the Pools tile, select Pools. You should now be to review a list of pools and their status. If any pools display an error, click the Error link to view and address the issue.
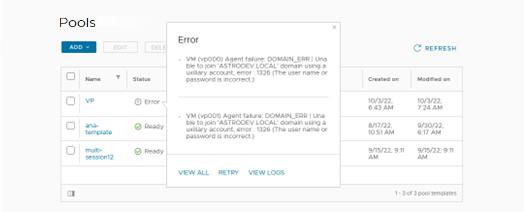
If you see an error starting with Anomaly detected for template, delete unwanted resources, and click Retry. See KB 90261 for related information. When a retry attempt is successful, the VM changes to an Expanding, Shrinking, or Ready state. For more information about pool provisioning, see Retry Pool Provisioning.
Moving Pool(s) Online and/or Offline
You can take a pool offline when urgent maintenance is required, and you do not want any new connections or reconnections to any of the VMs in the pool. To do this, select the specific pool(s) then from the menu select Take Offline. Use the Bring Online menu option to bring the pool(s) back online, making them available for new connections and reconnections again.
Editing Specific Pool Overview Details and/or Deleting the Pool
From the Pools tile, select the Pool Name you need. Click Overview to view Capacity, Sessions, General Settings, and Provisioning. From here, you can view the Maximum Session Capacity of what is Provisioned and In-Use. You can also view In-Use Sessions details to see what has been Connected and/or Disconnected. You have the ability to Edit or Delete the Pools from the Pool Details page.
Managing Pool Columns
Your pool may have columns displayed on tabs. You can manage what columns you would like to be visible by clicking on the tab (such as VMs, Sessions, and/or Admin Activity) and then selecting Manage Columns. This will allow you to select any columns that do not appear in the table by default, such as the Availability Zone id column and the IPv6 Address column and make them visible.
For example, in the VMs tab, use the Manage Columns option and select Availability Zone id to add that column to the VM list. The Availability Zone id column lists the Azure availability zone for each VM in the list. You can then see how the VMs in a pool are distributed across Azure availability zones.
You can also use the filtering drop-down menu in the various columns to control VM display.
For information about limitations of Azure availability zone support, see Microsoft documentation.
Viewing and Performing Operations on VMs in a Pool
To view your VMs in a pool click the VMs tab to see a list.
To view and perform operations on a specific VM in a pool, select the VMs tab and click the name of the VM, which displays the card for that VM. You can also access the VM card using the VM card search feature. For details about what you can view and do in a VM card, see Using the Horizon Cloud VM Card Search Feature.
You can use the filtering drop-down menu in the various columns to control VM display.
Note: Do not power off or power on a VM outside of the Horizon Universal Console, either through the Microsoft Azure portal or through Guest OS shutdown. If you do, the internal status is updated to reflect the latest status of VM as seen on the Microsoft Azure portal. This update may take anywhere between 10-15 mins. Also if a VM is shut down externally but not deallocated, the system deallocates the VM to reduce costs. Sync actions are visible in Activity Logs as a System Activity.
Login Mode
From the VMs Tab for a Multi-Session Pool, select one or more VMs and click Login Mode to set the desired login mode. The four login mode states are explained below.
- Allow logins (Available)
- Allows new connections to the VM.
- Allows reconnections to the VM.
- Prevent new logins only (Drain)
- Does not send new connection requests to the VM.
- Routes new connections to other available VMs in the pool.
- Allows reconnections to the VM.
- Prevent new logins (Drain) until restart
- Does not send new connection requests to the VM until the VM is restarted.
- Routes new connections to other available VMs in the pool until the VM is restarted.
- Allows reconnections to the VM.
- Reverts to Allow Logins setting after VM restart.
- Prevent new logins and reconnections (Disabled)
- Does not send new connection requests to the VM.
- Routes new connections to other available VMs in the pool.
- Denies reconnections to the VM.
Click the drop-down to select a pool. The dropdown lists the main pool and all the expansion pools of the main pool.
Click Sessions to view a list of sessions. In the Sessions tab, select the checkboxes you need. To end the sessions, click LogOff. To close your connection without ending the sessions, click Disconnect.
Click Admin Activity to view details about activities initiated by administrators on the selected pool. On the Admin Activity tab, click Export to export a log of activity initiated by administrators on the selected pool. The log includes admin activity for a period of time that you specify, from 1 to 90 days. The log provides details about each admin-activity event, such as who initiated the event and when.
Exporting a List of VMs
You can sort and then export a list of select VMs that are members of a specific pool. You can use filtering and sorting options to easily locate and select VMs to export to a CSV list file. For example, you might want a list of all the VMs in a particular pool that are currently powered off.
Filtering options include Name, Status, vNet/Subnet, VM Model, Lifecycle Status, Agent Version, and so on.
- From Horizon Universal Console, select Pools and select a pool from the Pools page.
- Click the VMs tab on the pool details page.
- Select a meaningful filter from the drop down filtering menu for each applicable column to control VM display and simplify VM selection for list export.
- Select the VM or VMs to export to a CSV file list and click Export.
- As prompted, enter a CSV file name on the Exports VMs page and then click Export.
- When the export process has completed creating the list of VMs, download the CSV file as prompted.
Was this page helpful?