Before importing or creating a Windows image into Amazon Web Services (AWS), you must complete a set of common preparation steps. These steps apply to all supported image import methods and ensure that your environment, permissions, and source image are ready for use with AWS EC2 Image Builder.
This topic provides a high-level overview of what the preparation involves and points you to the detailed topics for each task.
What This Preparation Covers
The common preparation steps help you ensure that:
- You are using a supported Windows ISO image
- The ISO is available to AWS services during the image build process
- Required permissions are in place for EC2 Image Builder
- The infrastructure used during image builds is properly defined
Completing these steps upfront helps avoid failures later in the image import and build process in AWS.
Preparation Tasks
Complete the following preparation tasks in order before proceeding with any image import method:
- Obtain a supported Windows ISO for Horizon on AWS
- Upload a Windows ISO to an Amazon S3 bucket
- Create an IAM role for EC2 Image Builder
- Create an EC2 Image Builder Infrastructure configuration
1- Obtain the Windows ISO
To import and prepare a Windows desktop image for use with Horizon Cloud and AWS image workflows, you must first obtain a supported Windows ISO (International Organization for Standardization) image. This ISO serves as the installation media used during the image creation and import process.
Ensure that the Windows ISO you download matches the versions supported by your AWS and Horizon Cloud environment.
Supported Windows versions
AWS defines and maintains the supported Windows versions for bring-your-own-license (BYOL) images, including both Windows desktop and Windows Server versions. Before proceeding, confirm that your ISO matches a version currently supported by AWS. For the current list, refer to AWS's Prerequisites for using Windows BYOL with Amazon WorkSpaces.
Procedure
Use the following steps to obtain the Windows ISO file.
- Download the Windows ISO directly from the official Microsoft website to ensure authenticity and integrity of the installation media.
- Verify the supported Windows version. Confirm that the ISO corresponds to a Windows version currently supported by AWS, as described above, before proceeding.
2- Upload the Windows ISO to an Amazon Simple Storage Service (S3) Bucket
After obtaining a supported Windows ISO, you must upload the ISO file to an Amazon S3 bucket. The S3 bucket acts as a secure and accessible location for the ISO during the AWS image import and image creation workflows.
AWS Image Builder uses the ISO stored in the S3 bucket as installation media when creating the custom Windows image.
Procedure
Use the following steps to upload the Windows ISO file to an Amazon S3 bucket.
-
Create or select an Amazon S3 bucket. From the AWS Management Console, create a new Amazon S3 bucket or use an existing bucket that is accessible to AWS Image Builder. For detailed instructions, refer to the AWS documentation: Creating a general purpose bucket.
-
Upload the Windows ISO file to the S3 bucket. Upload the Windows ISO file to the selected S3 bucket. For detailed instructions, refer to the AWS documentation: Upload folders and files to an S3 bucket.
3- Create an IAM Role for EC2 Image Builder
To allow EC2 Image Builder to access required AWS resources during the image creation process, you must create an IAM (Identity and Access Management) role. This role is associated with the instance profile used by Image Builder during build and test phases.
Procedure
Use the following steps to create an IAM role for EC2 Image Builder.
-
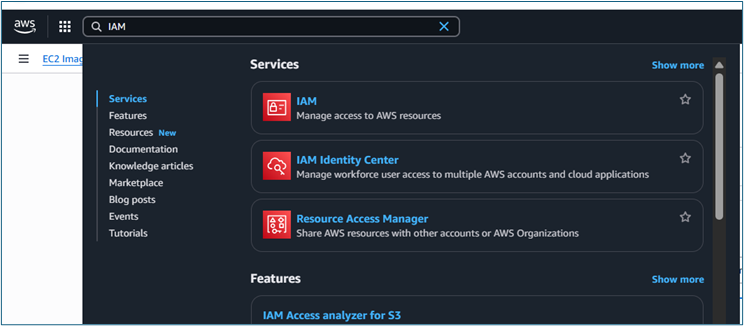
Sign in to the AWS Management Console.
-
Navigate to IAM > Roles, and click Create role.
-
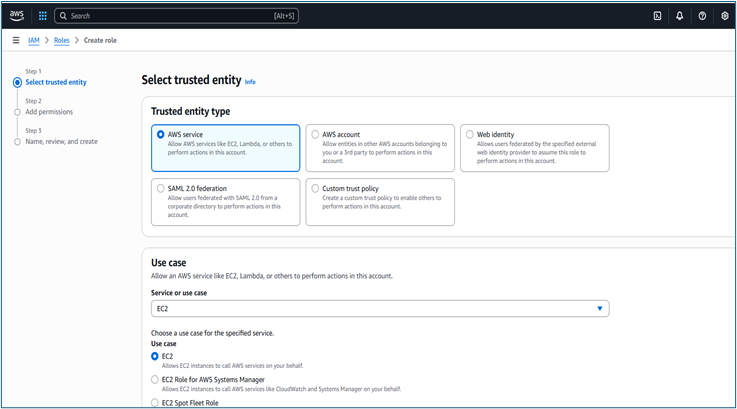
On the Selected trusted entity page, select AWS service as the trusted entity type, choose EC2 as the use case, and click Next.
-
On the Add permissions page, attach the following permission policies:
-
AmazonSSMManagedInstanceCore
Allows Image Builder to communicate with and run automation on instances using AWS Systems Manager.
-
EC2InstanceProfileForImageBuilder
Allows build instances to access required AWS resources, manage EC2 actions, and write logs during the image build process.
-
EC2InstanceProfileForImageBuilderECRContainerBuilds
Required when Image Builder workflows include building or uploading container images to Amazon ECR.
-
-
Click Next.
-
On the Name, review, and create page, enter the following details:
- Role Name – Enter a unique name for the IAM role.
- Description – (Optional) Enter a description.
-
Click Create role.
4- Create an EC2 Image Builder Infrastructure Configuration
This section describes how to create an Amazon EC2 Image Builder infrastructure configuration. The infrastructure configuration defines the AWS resources that EC2 Image Builder uses during the image build and test process, including compute, networking, and notification settings.
Procedure
Use the following steps to create an EC2 Image Builder infrastructure configuration that defines the compute, networking, and notification settings used during image build and test operations.
-
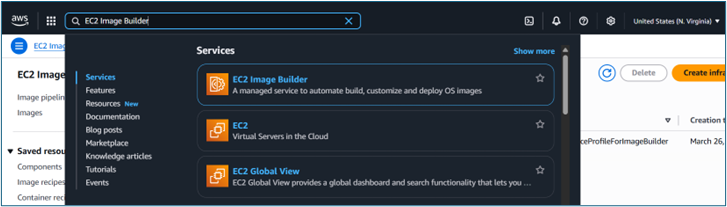
Sign in to the AWS Management Console and navigate to EC2 Image Builder.
-
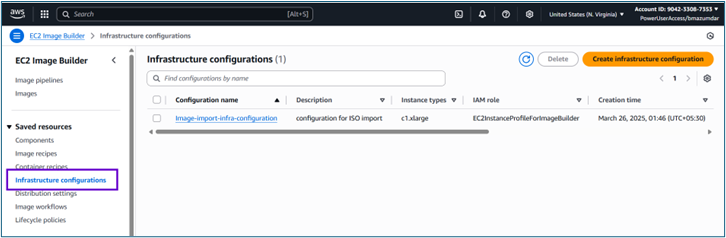
In the navigation pane, under Saved resources, select Infrastructure configurations, and then click Create infrastructure configuration.
-
In the General section, provide the following information:
-
Name - Enter a unique name for the infrastructure configuration.
-
IAM role - Select the IAM role to associate with the instance profile for component permissions on the build and test instances. For more information, refer to Create IAM Policy and Roles.
EC2 Image Builder uses these permissions to download and run components, upload logs to Amazon CloudWatch, and perform any additional actions specified in the image recipe.
-
-
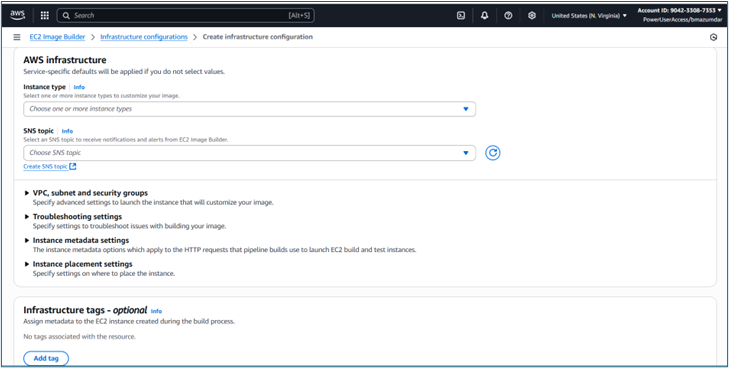
In the AWS infrastructure section, configure the following settings:
-
Instance type - Specify one or more instance types to use for the image build. EC2 Image Builder selects one based on availability.
-
SNS topic - (Optional) Select an Amazon SNS topic to receive notifications and alerts them EC2 Image Builder.
For example:
- Instance type: c1.xlarge
- SNS topic: aws-controltower-SecurityNotifications
-
-
Configure VPC, subnet, and security group settings. Image Builder uses your default VPC and subnet. For more information about configuring VPC interface endpoints, refer to Image Builder and AWS PrivateLink interface VPC endpoints.
-
VPC – Select your VPC.
-
Subnet ID
- If using a public subnet, ensure that Auto-assign public IPv4 is enabled.
- If using a private subnet, configure NAT Gateway and Internet Gateway.
- Security groups – Select a security group that meets networking requirements.
Ensure networking allows:
- Outbound port 443
- Network ACL:
- Inbound: 1024-65535
- Outbound: 443
For detailed information, refer to Amazon documentation on IP address and port requirements for WorkSpaces Personal.
-
-
In other settings, leave Troubleshooting, Metadata, and Placement at their default values. Optionally, add Tags.
-
Click Create infrastructure configuration.
Was this page helpful?