You can add and deploy a Horizon Edge for vSphere.
Prerequisites
-
Review and fulfill the requirements in the Requirements Checklist for Deploying a vSphere Edge and Port and Protocol Requirements for Deploying a vSphere Edge.
-
Review and complete the preparatory items described in the linked pages within the page vSphere Edge Deployments.
-
Determine the fully-qualified domain name (FQDN) that you will use for the deployed Horizon Edge Gateway appliance. The UI wizard asks you to input that FQDN.
-
Review and configure network settings. See Configure Network Settings for vSphere Edge Deployments.
-
Review the Omnissa Community forum article Understanding Omnissa Horizon Edge Gateway: Purpose, Architecture & Best Practices.
Creating a vSphere Edge Partition For Management By a Partner Organization
Some Horizon Cloud customer organization are using the Horizon Partner Admin Console, available in Limited Availability (LA) mode, to manage the Horizon Cloud resources of tenant organizations. If you are such a tenant organization and want to create or use a Horizon Cloud on vSphere Edge deployment by using a partition, see Tenant Admin - Deploy a Tenant Horizon Edge to a Partition in the Partner Organization in the Horizon Partner Admin Console product documentation.
Procedure for Creating the Edge Deployment
The Horizon Universal Console in Horizon Cloud makes the Add Horizon Edge UI page available from various entry points. Your starting point in the console for this step typically depends on whether your environment is greenfield or it has existing Horizon Edge deployments.
-
No Horizon Edges yet - If there are no Horizon Edges deployed in the environment yet, you usually start the process by clicking Start Deployment. The console then displays the Add Horizon Edge UI stepper page. Alternatively, you can start by clicking Capacity > Add > vSphere. The console then displays the Add Horizon Edge UI stepper page.
-
At least one Horizon Edge - If there is at least one Horizon Edge that has already been created and deployed in your Horizon Cloud environment, click Capacity > Horizon Edges > Add > Horizon Cloud > vSphere from the Horizon Universal Console to open the Add Horizon Edge stepper page.
-
Log in to the Horizon Universal Console. See Log in to Horizon Cloud.
-
From the Horizon Universal Console UI, click Capacity > Horizon Edges in the left pane navigation.
-
From the Horizon Edges tab, click Add and from the drop-down menu, select Horizon Cloud > vSphere.
-
Respond to all subsequent UI stepper pages as described below.
Requirements
Review the requirements as shown, confirm that you have met the requirements, and then click Next.
General Information
On the General Information page, enter a Horizon Edge name and description (optional) and then click Next.
Capacity Provider
On the Capacity Provider page, enter the following information and then click Next.
-
For Capacity type, select the cloud capacity type that your Edge Gateway will be deployed into.
-
For Location, start typing a city name where the vSphere SDDC is located and select from the list of populated names.
-
For Create provider method, select Credentials or Partition ID.
-
If you select Partition ID, select a partition from the drop-down menu.
-
If you select Credentials, specify the vCenter URL for the FQDN or IP of the vCenter that the Edge will connect to, your admin user name and password, and the SSL thumbprint (SHA1 or SHA-256) for the vCenter URL. To obtain a vCenter thumbprint, do the following:
- Log in to the vCenter Web Client using the FQDN or IP of the vCenter.
- Click the 3 horizontal lines icon in the top bar and then click Administration.
- In the left pane navigation, click Certificate Management (under Certificates).
- In the Machine SSL tab, click the >> icon. In the _Machine_Cert details section, copy the value of the thumbprint.
-
Site
On the Site page, enter the following information and then click Next.
-
For Site, click Add New or select an existing site from the drop-down menu.
-
For Site name and Description, if you are specifying a new site, enter a new site name and description.
Connectivity
Specify the Horizon Edge Gateway connection mode to use for this network connection.
-
The available Desktop connection type is Internet.
-
For the Desktop connection mode, choose either Individual or Aggregated as described in onscreen help and in the Using an MQTT Bridge section of Configure Network and Load Balancer Settings for vSphere Edge Deployments.
- Individual - Agent communication connects directly to the internet.
- Aggregated - Agent communication is consolidated through the Horizon Edge Gateway Appliance.
Consider failover scenarios when determining which method to select.
When you define or edit the vSphere Edge to use the Aggregated option, the Horizon agents will make TCP calls to the Edge Gateway Appliance on port 443.
Note that after you define the Edge, you can change the desktop connection mode from Individual to Aggregated, but not from Aggregated to Individual.
- Click Next.
Horizon Edge Gateway
On the Horizon Edge Gateway page, enter the following information and then click Next.
-
For FQDN, enter an FQDN for the Horizon Edge Gateway. The FQDN must be resolvable from VDI desktops.
-
For Agent Monitoring, leave the option enabled.
-
For Use SSO, toggle the option on if you have created an SSO configuration that you want to associate with this Edge. Toggle the option off if you haven’t created an SSO configuration.
-
For SSO Configurations, select an available SSO configuration from the drop-down menu. Start typing to begin auto-populating the list.
App Volumes Application Storage
For vSphere deployments, customers must provide and register existing SMB file shares from their environment and register them for App Volumes application storage.
Unlike Azure and AWS deployments, Horizon Cloud does not provision file shares for vSphere environments. Customers bring their own file shares and register them with Horizon Cloud.
Before configuring App Volumes application storage, ensure that:
- The required SMB file shares alreay exist in your environment.
- You have the UNC file share path for each file share. Example:
\smbfileserver.example.com\share - A service account from the domain to which the SMB file shares are joined is available.
On the App Volumes Application Storage page, configure the service account and file share information used for App Volumes application storage.
-
To enable App Volumes application storage configuration, turn on Configure App Volumes application storage.
-
Under Service account details, provide the credentials for the service account used by App Volumes:
- Domain name - Enter the Active Directory domain name associated with the service account.
- Service Account username - Enter the username for the service account.
- Service Account password - Enter the password for the service account.
-
Under File share registration details, click Add to register a file share.
-
In the Add fileshare dialog box, provide the following information:
- Fileshare path - Enter the UNC path for the SMB file share.
- Category - Select Staging or Delivery.
-
Click Add to register the file share. Verify that the registered file shares appear in the list.
-
Repeat the registration process as needed.
-
Click Save & Close to save the App Volumes application storage configuration, or click Next to continue to the next section.
Notes:
- You must register a Staging file share before you can register Delivery file shares.
- Until a Staging file share is registered, the Delivery option is disabled.
- Only one Staging file share can be configured. After Staging is configured, you can register one or more Delivery file shares.
- Registered file shares appear in the File share registration details list. From the action menu, you can Edit or Unregister a file share.
- If a Delivery file share is unregistered, application delivery continues using the remaining registered Delivery file shares. Application delivery stops only when all registered file shares are unregistered.
- Unregistering the Staging file share removes application information and related inventory entries from Horizon Cloud. Application packages remain in the customer SMB file share and are not deleted.
- A Staging file share cannot be unregistered while Delivery file shares are still registered. To unregister a Staging file share, first unregister all Delivery file shares.
- Turning off Configure App Volumes application storage removes the App Volumes application storage configuration from Horizon Cloud. You can then configure and register file shares again.
- These behaviors apply only to vSphere deployments. In Azure and AWS deployments, Horizon Cloud provisions and manages file shares, and customers do not provide or register their own file shares.
OVA Appliance
On the OVA Appliance page, click the Download link to download the OVA appliance file or to copy the link to use while deploying the Edge OVA on vCenter, and then click Next.
Deploy and Pair Horizon Edge Gateway
On the Deploy and Pair Horizon Edge Gateway page, copy and save the pairing code (you will need it later), and then click Finish.
Procedure For Deploying the Edge VM OVA
You log in to the vCenter to deploy the Edge VM OVA. You will deploy either a single NIC or a dual NIC Edge VM. You will have downloaded the OVA when you created the Edge in the previous procedure.
Note:
-
The standard deployment configuration for an Edge VM is 8 vCPUs and 16 GB of RAM. However, if your goal is to support more than 5,000 sessions (the limit is 20,000) with this Edge deployment, it is advisable to adjust the configuration to 12 vCPUs and 24 GB of RAM during the Edge VM deployment process.
-
When using the MQTT bridge option to use aggregated agent communication between the Horizon Edge Gateway Appliance and the Horizon Control Plane rather than having each agent make its own outbound internet call to the Horizon Control Plane you need a minimum of 12 VCPUs and 24 GB of RAM.
Deploy a Single NIC Edge VM with the Edge Gateway OVA
-
Use the link provided by Omnissa Customer Connect for the OVA to deploy.
Note: Either use the supplied link or else select the downloaded OVA appliance to deploy.
-
Log in to the vCenter that you used when you created the Edge deployment using your administrator credentials.
-
Select the cluster, right click to deploy the OVF template, and provide the URL obtained above.
-
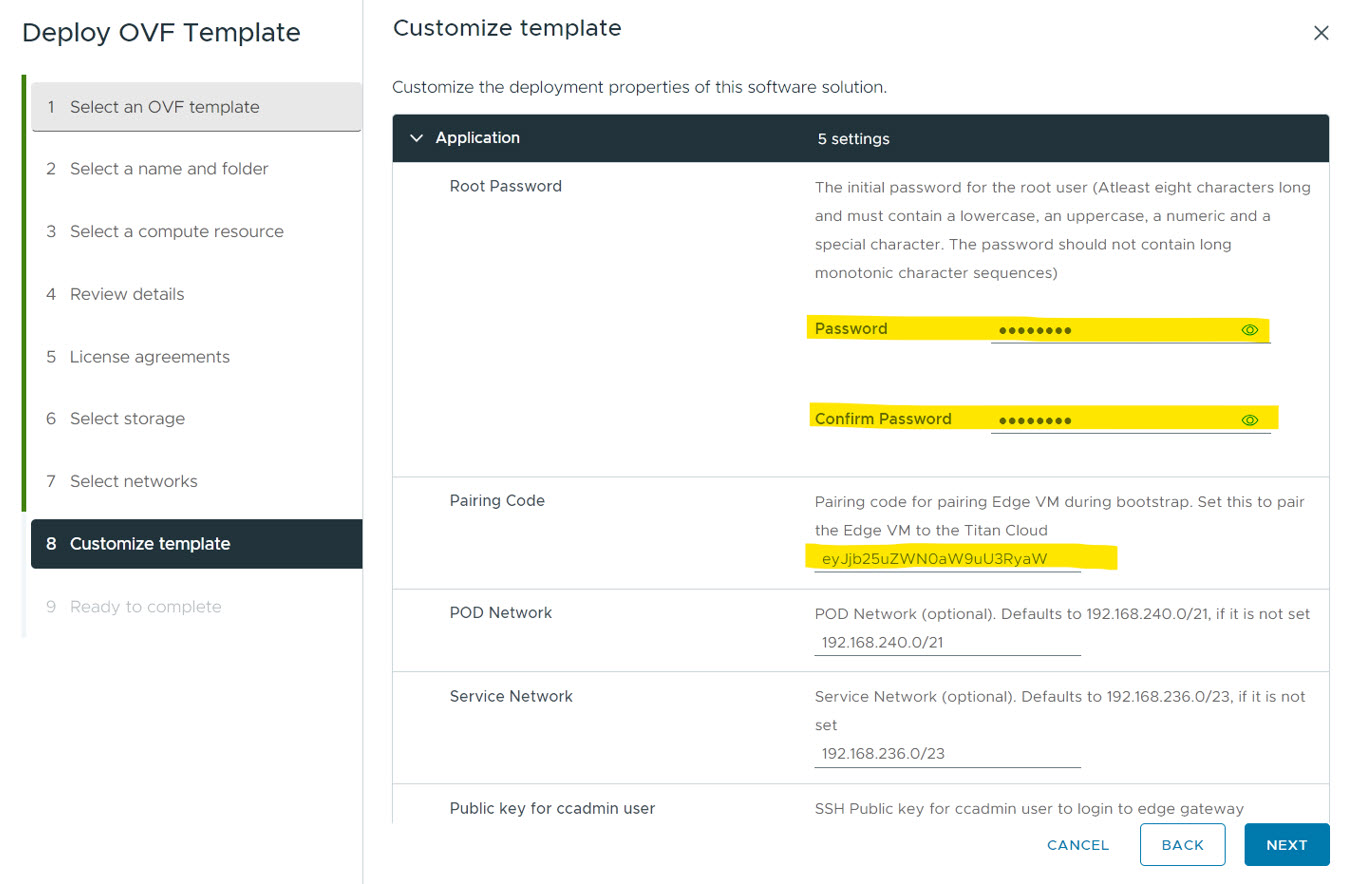
Follow the OVF deployment wizard as prompted on-screen and provide the needed values. When you reach the final screen in the OVF deployment wizard, enter the root password for the appliance as prompted.
a. For the Pairing Code value, enter the pairing code obtained from the Procedure for Creating the Edge Deployment procedure.
b. Scroll to the Network section and enter a DNS server IP. Separate multiple IDs by using a comma.
c. Enter the static IP address and the netmask for the DNS A record entry for the Edge VM FQDN.
-
Allow the OVF deployment process to finish running.
-
Power on the appliance.
-
After the Edge VM is powered on, wait for the Edge deployment to display a Ready status. This takes approximately 10 minutes. Do not proceed until the Ready status appears.
Use the following sample screen as reference.
Deploy a Dual NIC Edge VM with the Edge Gateway OVA
Dual NIC Edge VM deployment is supported as a Partner/MSP use case only.
-
Log in to the vCenter that you used when you created the Edge deployment using your administrator credentials.
-
Select the cluster, right click to deploy the OVF template, and provide the URL obtained above.
Note: Omnissa does not publish the Dual NIC OVA link in the UI. To obtain the dual NIC OVA, contact your Omnissa Partner.
-
Follow the OVF deployment wizard as prompted on-screen and provide the needed values. When you reach the final screen in the OVF deployment wizard, enter the root password for the appliance as prompted.
a. On the Configuration page, select Single NIC or Two NIC.
b. On the Storage page, select the storage.
c. On the Select networks page, select the appropriate Destination Network portGroup for the Consumer Network and Partner Network. For a Single NIC, select the same Destination Network for both options.
d. For the Pairing Code value, enter the pairing code obtained from the Procedure for Creating the Edge Deployment procedure.
e. Scroll to the Networking Properties section and enter NIC 1 and NIC 2 information as prompted. Note: Create a DNS A record entry for the Edge VM FQDN pointing to the static IP provided.
f. If needed, specify the custom route for NIC 1 and NIC 2.
-
Allow the OVF deployment process to finish running.
-
Power on the appliance.
-
After the Edge VM is powered on, wait for the Edge deployment to display a Ready status. This takes approximately 10 minutes. Do not proceed until the Ready status appears.
Optional: Validate that the Gateway VM Components Are Powered On
After the Edge VM is powered on, you can verify the Edge deployment status as Ready.
-
Log in to vCenter.
-
Select the Edge VM and click Launch Web Console.
-
Log in using the root credentials, as prompted.
-
Enable SSH.
-
Launch the Web Console to the VM and log in. You might need to wait a moment until you see the prompt.
/opt/horizon/bin/configure-adapter.py --sshEnable -
Wait for a few minutes for the command to enable SSH and then wait for the command to complete.
-
Edit the
/etc/ssh/sshd_configfile to do the following:-
Enable the setting
'PermitRootLogin yes'for all the instances in the file. -
Comment out the line starting with
'Match addresses'. -
Replace
'Restart sshd'with'systemctl restart sshd'for all the instances in the file.
-
-
SSH into the Edge VM and enter the password that you provided during the OVF deployment.
ssh root@<ip_address> -
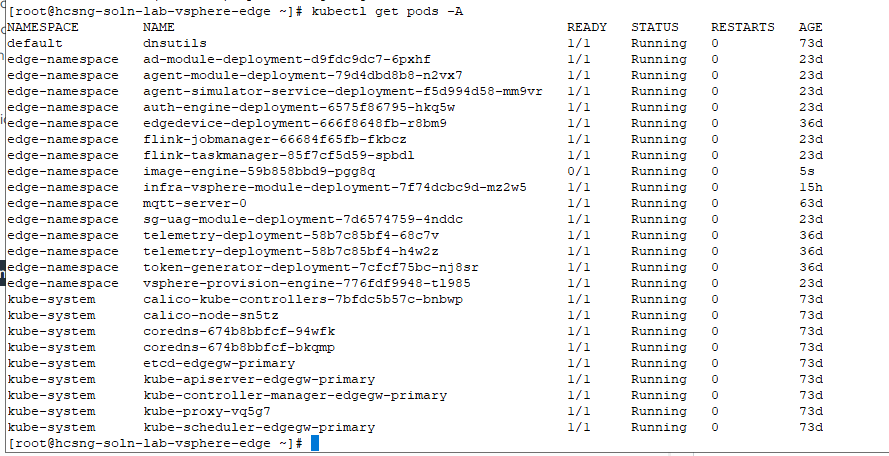
Run the following command to validate that the following pods are running:
edgedevice-deployment, infra-vsphere-module, vsphere-provision-engine
Sample output is shown below.
What to do next
After you add and deploy a Horizon Edge for vSphere, you can configure the Unified Access Gateway (UAG) settings for that Edge. You cannot configure UAG settings when you create the vSphere Edge, only after the Edge has been created. See Create a UAG Deployment for a vSphere Edge.
Was this page helpful?