You create pools, add pools to pool groups, and entitle users to pools and pool groups after you create an image for the vSphere Edge provider type.
For general information about pools and pool groups in Horizon Cloud, see Creating or Editing a Pool and Creating or Editing a Pool Group.
Note that the term base VM may also be referred to as Golden image in this and related documentation.
Prerequisites
To create a pool for a vSphere provider type, you need a Horizon Edge and image and a configured Universal Access Gateway (UAG).
- Create a vSphere Edge and configure the UAG. See Add and Deploy a Horizon Edge for vSphere.
- Create or register an image for use with a vSphere Edge. See Add an Image with vSphere Edge.
Create a Pool
Create a pool for use with a vSphere Edge by using the following procedure. For related information, see the on-screen help and the general information in the Creating or Editing a Pool section of this Horizon Cloud documentation.
-
From the Horizon Universal Console, click Pools and then click Add.
-
From the drop-down menu, click Horizon Cloud > vSphere to open the Add Pool stepper UI for a vSphere provider-type pool.
-
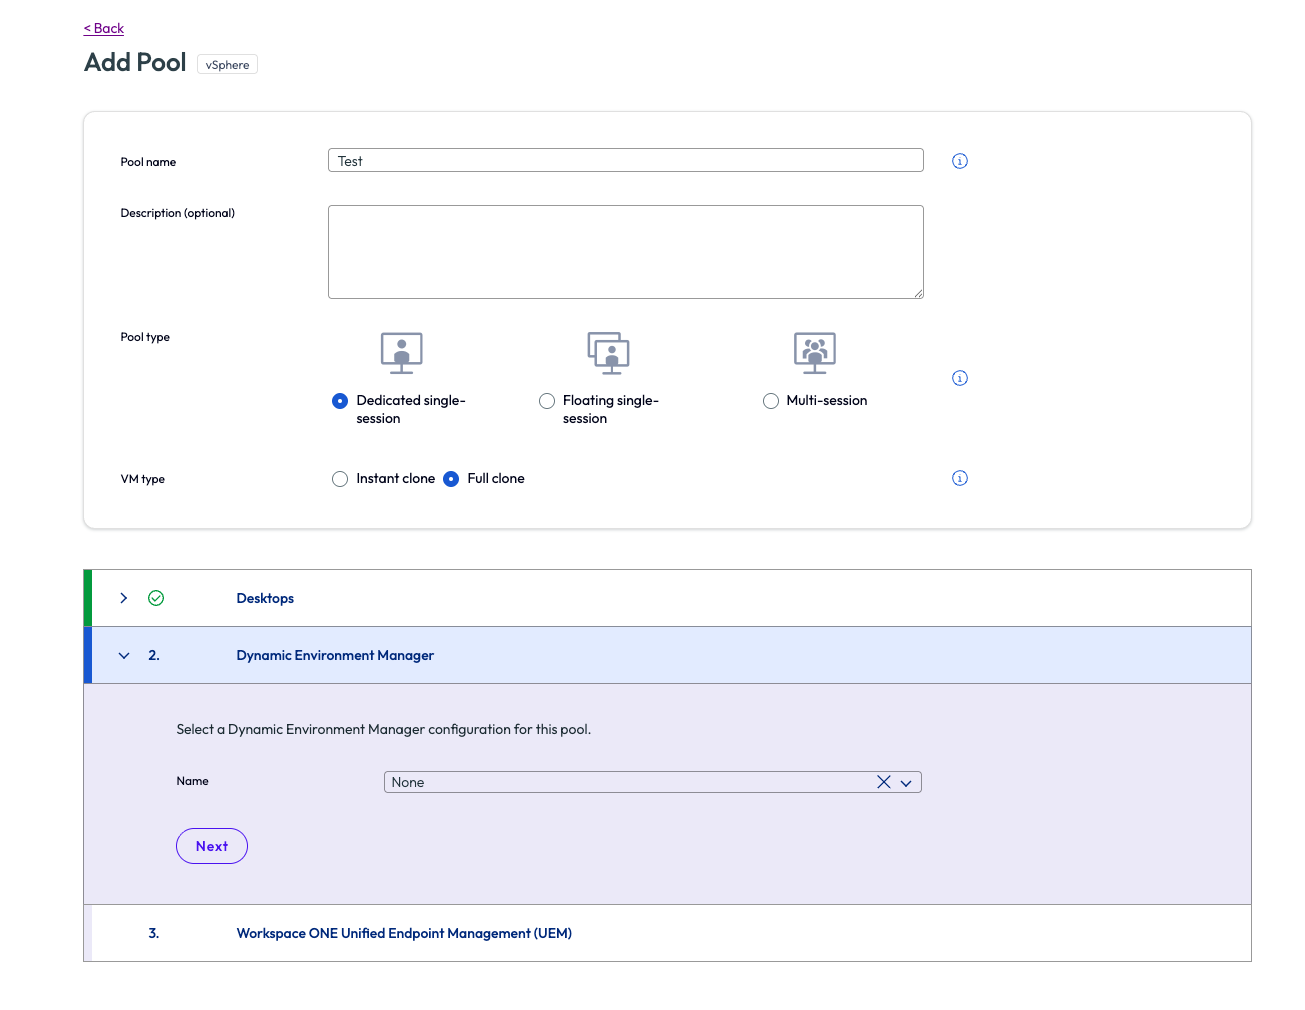
Enter a unique name for the pool in the Pool name field and optionally add a Description, and select a Pool type.
- Dedicated single-session - Use for the persistent VDI desktop experience where each desktop is mapped to a single user.
- Floating single-session - Use for the non-persistent VDI desktop experience where multiple users can use the desktop at different times and the desktop resets after each user session.
- Multi-session - Use for session-based published desktops and applications.
-
Select a VM type.
- Instant Clone - This option is available for Floating single-session and Multi-session pools.
- Full Clone - This option is available for Dedicated single-session and Multi-session pools.
-
In the Desktops - Destination section, complete the following entries:
- Select a Site from the drop-down menu.
- Select the Horizon Edge from the drop-down menu.
- Select the Provider from the drop-down.
-
In the Desktops - Image page, complete the following entries depending on whether the image source is from a vCenter or an image catalog:
- Source vCenter - This option allows you to create a pool directly using the base VM that you have prepared on the vCenter without registering it as an image.
- For an Instant Clone pool, select the VM in vCenter to use as the base VM, select the required Snapshot, and confirm that you have a valid license for the Windows OS. For a Full Clone pool, select the Template in the vCenter to use as the base VM.
- Source Image Catalog - This option allows you to create a pool by using a previously registered image.
- Select the Image, select the Version of the image, and confirm that you have a valid license for the Windows OS.
-
In the Desktops - Provisioning section, complete the following entries depending on the provisioning method:
-
Provision VMs - On Demand - Using this option, VMs are created as needed.
-
For Minimum Spare VMs, specify the number of VMs that should always be available.
-
For Maximum Spare VMs, specify the maximum number of available VMs.
-
For Maximum VMs, specify the maximum number of VMs that the pool can have. The pool will never have more than this number of provisioned VMs.
-
Provision VMs - All at once - Using this option, all VMs are created immediately. For Maximum VMs, specify the maximum number of VMs that the pool can have.
-
-
In the vCenter Settings section, complete the following entries:
- Datacenter - Select the vCenter datacenter from the drop-down menu.
- VM Folder – Select the VM folder from the drop-down menu and then click Save. You can also filter on the folder name by using the search option.
- Cluster – Select the cluster from the drop-down menu then click Save. You can also filter on the cluster name by using the search option.
- Resource Pool – Select the resource pool from the drop-down menu. You can also filter for the pool name by using the search option
- Datastores – Select the available datastores to use for the pool and then click Save. The list is populated based on the datastores that have been selected. This provides guidance on whether enough capacity is being provided for all the pool VMs.
- Networks - Optionally choose to use the same portGroup as the image by selecting the Use network settings from the selected image checkbox. When not selected, the table lists all available networks. Select one or more networks and then click Save.
-
In the Desktops - VM Details section, complete the following entries:
- CPU - Enter the number of vCPUs.
- RAM – Enter the amount of memory in GB to use.
-
In the Desktops - Machine Identity section, complete the following entries. This section pertains to the Active Directory domain to which the pool VMs will be joined.
- Machine Identity – Select the registered domain from the drop-down menu.
- Computer OU – If you do not want to use the default OU specified in the domain, you can instead specify the full OU path to a different OU.
- Domain preference - Specify the Preferred domain site or Preferred domain controller to create the machine accounts for instant clone VMs. This option applies to instant clone pools only.
- Preferred domain site - Specify the FQDN of the domain site or controller. This option applies to instant clone pools only.
Note: For information about Entra ID hybrid join support, see Support for Microsoft Entra ID Hybrid Joined Desktops.
-
In the Desktops - Properties section, complete the following entries:
- VM name prefix – Enter up to 11 characters for the VM name prefix.
- Desktop admin username – Enter the username for an account on the image VM that has administrator privileges assigned to it. Ensure that the local account you provide is different from the administrator account.
- Desktop admin password – Enter the password for the above admin account.
- Confirm Desktop admin password – Repeat the password entered above.
-
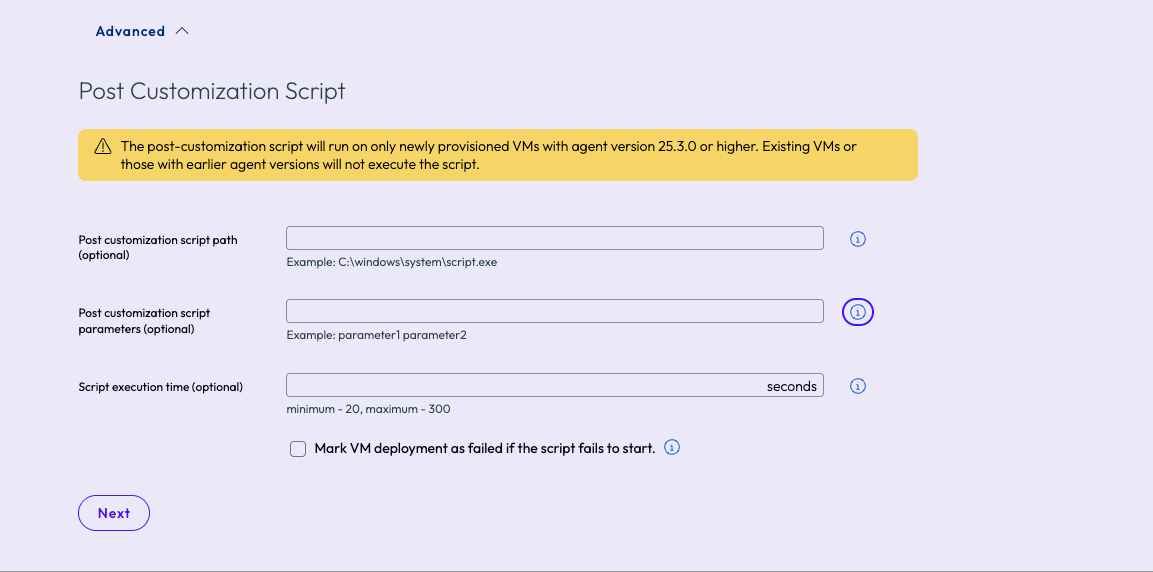
If you click the Advanced option, specify customization script entries as prompted and then click Next.
-
On the Dynamic Environment Manager page, specify the name of the DEM manager configuration file as prompted and then click Next.
-
On the Workspace ONE Unified Endpoint Management (UEM) page, add the required information as prompted and then click Add.
Create a Pool Group and Entitle Users
-
Create a pool group for use with a vSphere Edge pool and entitle users for that pool group by using one of the following procedures:
-
Perform a Direct Connect configuration as described in Configure a Pool Group Client as Direct Connect for Internal User Access.
For related information, see the on-screen help and general information in the Creating or Editing a Pool Group section of this Horizon Cloud documentation.
What to do next
Connect to a Desktop and Configure SSO for vSphere Edge Users.
Was this page helpful?