From the Horizon Universal Console, you can use the Add Horizon Edge UI to add and deploy a Horizon 8 Edge.
Introduction
Use the Horizon Universal Console Add Horizon Edge workflow to create a Horizon Edge in Horizon Cloud that uses a Horizon 8 pod as its resource provider and where that pod is in a vSphere environment (an on-premises or All-in-SDDC deployment). You can also configure different capacity types for a federated deployment to the desired virtualization platform. Only one Horizon Connection Server pod is supported on a Horizon Edge.
Note: As a Limited Availability (LA) option, you can select Private data center (Nutanix) as the Horizon Edge capacity type. To enable this Limited Availability (LA) option, contact Omnissa Customer Connect.
Deploying a Horizon Edge involves deploying a Horizon Edge Gateway appliance into a vSphere infrastructure, pairing that appliance with the Horizon Control Plane, and configuring details of the Horizon 8 pod’s Horizon Connection Server for your Horizon Edge.
Note: When deploying a Horizon Edge Gateway appliance into a vSphere infrastructure, you must deploy it using a vSphere client or vSphere web client. Do not deploy the appliance directly into an ESXi host.
Note: The Horizon Edge Gateway is a cloud-managed component, with its internal services and functionality continuously updated and maintained by Horizon Cloud. Customers automatically receive component-level updates and enhancements without any manual intervention required on their end. Even if the customer does not perform a version upgrade, the Edge Gateway will continue to function as expected and receive critical updates from the cloud. The only part of the Edge Gateway that is not cloud-managed is the virtual appliance operating system and the underlying Kubernetes platform. In the rare event that critical security patches for the virtual appliance operating system are released, customers must deploy a new Edge Gateway appliance with the updated OS version. If no such patches are released, there is no need to upgrade the virtual appliance. For the Kubernetes platform, Omnissa periodically updates the Kubernetes version to ensure the platform is running on a supported Kubernetes version and to take advantage of the latest functionality. However, it is recommended to move to the latest version of the Edge Gateway to ensure a secure experience and take advantage of the latest OS patches and functionality. Running on an older version of the Edge Gateway (older than 1 year) inherently assumes the associated security risk. For current Edge Gateway version information, the Horizon Cloud Release Notes.
For current version information, see the Omnissa Product Interoperability Matrix and the Horizon Cloud Release Notes.
Note: After you deploy an edge VM, you cannot change its IP address. Attempting to do so causes edge gateway downtime as the Kubernetes cluster stops working and must be reinitialized. Changing the IP address of a deployed edge VM is not supported.
This end-to-end process has multiple steps. The general workflow is shown below, with the specific steps more fully described later in this topic.
-
Start this process using the Horizon Universal Console. On the Get Started page, select Horizon 8 to open the Deploy and Configure page. To connect Horizon 8 to the Horizon Universal Console, deploy your first Horizon Edge and connect your identity provider to enable Horizon 8 user card, user search, and help desk functionality. If you choose not to connect your identity provider, the Search user field in the console will be deactivated.
-
Deploy an OVA appliance into your vSphere environment. You must use the pairing code information that the system creates in the first part of the process in the Deploy OVF Template UI fields as you are deploying the OVA.
Note: A Horizon Edge Gateway OVA/OVF deployment is only available for Horizon 8 providers with an All-in-SDDC architecture or a capacity type of Private Data Center. For Horizon 8 providers with a federated architecture, see the procedure for your specific capacity type described in Configuring Horizon 8 Federated Deployments.
-
Return to the Horizon Universal Console to verify that the pairing status is successful and you complete the remaining steps in this console to add details of the Horizon 8 pod.
Note: The term Horizon 8 pod refers to a pod running a Horizon Connection Server software version that is one of the versions supported for use with Horizon Cloud. For example, if Horizon 8 2312 is one of the supported versions, then the phrase also applies to a pod running that version. For product version interoperability of Horizon versions and Horizon Cloud, see the Interoperability Matrix. Only one Horizon 8 is supported per Horizon Edge.
The Horizon Edge is a thin-edge cloud infrastructure. For Horizon 8 deployments, the Horizon 8 pod is the capacity provider to the Horizon Edge.
After your environment is configured with at least one Active Directory domain and an identity provider, the console makes this Add Horizon Edge workflow available.
Prerequisites
-
Review and fulfill the requirements in the Requirements Checklist for Deploying a Horizon 8 Edge.
-
Review and complete the preparatory items described in the linked pages within the page Horizon 8 Edge Deployments.
-
Determine the fully-qualified domain name (FQDN) that you will use for the deployed Horizon Edge Gateway appliance. The UI wizard asks you to input that FQDN.
-
If the Horizon Connection Server involved in this Horizon Edge has a self-signed certificate, ensure that you know the certificate fingerprint for the wizard's verification step.
-
The outbound TLS connections from Horizon Edge Gateway to Horizon Cloud might fail if the default certificate rendered by Horizon Cloud is replaced with a custom certificate using a proxy or any other means. Replacing the default certificate with a custom certificate is not supported.
-
Note: A Horizon Edge Gateway OVA/OVF deployment is only available for Horizon 8 providers with an All-in-SDDC architecture or a capacity type of Private Data Center. For Horizon 8 providers with a federated architecture, see the procedure for your specific capacity type described in Configuring Horizon 8 Federated Deployments.
-
Reference the following TechZone videos:
Procedure
-
From the Horizon Universal Console, click Capacity > Horizon Edges in the left pane navigation and then click Add on the Capacity page. From the resultant drop-down menu, select Horizon 8.
Note: The console makes the Add Horizon Edge UI stepper available from various entry points. Your starting point typically depends on whether your environment is greenfield or it has existing deployments of Horizon Edges.
-
No Horizon Edges yet - start from the console's Horizon Edge card
If your environment has no Horizon Edges, you can start the wizard by clicking START DEPLOYMENT.
-
No Horizon Edges - alternatively, start from the console's Capacity page
If there are no Horizon Edges deployed in the environment yet, the Capacity page contains text and a Start menu. In this scenario, you can start the wizard by navigating to Capacity and clicking Start > Horizon 8. Otherwise, click Capacity from the Horizon Universal Console and then click Add from the Horizon Edges tab on the Capacity page.
-
At least one Horizon Edge - start from the console's Capacity page
If there is at least one Horizon Edge for Horizon 8 that has already been created and deployed in your Horizon Cloud environment, click Capacity > Horizon Edges > Add > Horizon 8 from the Horizon Universal Console to open the Add Horizon Edge stepper page.
-
-
Review and confirm that you meet the requirements and then click Next.
-
On the General Information page, enter a unique Horizon Edge Name and an optional description and then click Next.
-
On the Capacity Provider page, select the cloud capacity type that your Horizon Edge Gateway will be deployed into and enter a location for this Horizon Edge. The following capacity types are available:
- Private data center (vSphere)
- Private data center (Nutanix) - Limited Availability (LA)
- Microsoft Azure
- Amazon Web Services (AWS)
- Google Cloud
- Oracle Cloud
- Alibaba Cloud
- Dell EMC Cloud
If the selected capacity type supports federation, you may also be prompted to specify an architecture type. Depending on the capacity type that you select, one of the following three options are subsequently available.
-
If the capacity type is a private data center, no architecture type setting is shown in the UI.
-
If the capacity type does not support federated architecture, the architecture type setting is shown in the UI with a default and non-selectable value of All-in-SDDC.
-
If the capacity type supports federated architecture, the architecture type setting is shown in the UI with a selectable option of Federated or All-in-SDDC.
You then select the appropriate appliance type. The available appliance types shown are dependent on whether you select the Federated or All-in-SDDC architecture option.
If you select Federated as the architecture type, and depending on the capacity type that you specify, different edge appliance files are available from the Download Horizon Edge Gateway Appliance section of the page.
For related information about specifying Horizon Edges for federation, see Configuring Horizon 8 Federated Deployments.
-
On the Capacity Provider page, select, specify a Location for this deployment, typically the geographic location closest to the capacity provider's location.
-
On the Site page, select the site from the drop-down menu. For more information about sites, use the Sites tab on the Capacity page.
-
On the Horizon Edge Gateway FQDN page, select the deployment type, enter the FQDN to use for the Horizon Edge Gateway Appliance, enable the Agent Monitoring option, and then click Next to continue to the Download Horizon Edge Gateway Appliance page.
Note: The Singe Virtual Machine deployment type is the default for all capacity provider types. The Cluster Mode deployment type is only supported for the vSphere capacity provider type.
Note: As soon as you have the IP address for the appliance when it is deployed in your environment, you must register a DNS record in your DNS server to map the IP address to this Horizon Edge Gateway FQDN that you input here.
For Horizon 8 Edges that are configured with federated architecture, you cannot configure the CIDR ranges for Kubernetes clusters in the Horizon 8 Edge Appliance by default. To reconfigure and restart the k8s cluster for your desired CIDR configurations, contact Support at Omnissa Customer Connect.
After you input the FQDN, the system begins saving the information that you entered in the UI stepper pages up to this point. The system registers a Horizon Edge record in the system's records.
Note: An on-screen message appears stating that the creation process has been initiated. The message refers to creation of the system record for this Horizon Edge. The end-to-end deployment is still incomplete until you download the Horizon Edge Gateway appliance binary, use that binary to deploy the Horizon Edge Gateway appliance into your private data center environment, complete pairing of that appliance with the Horizon Cloud control plane, and provide details of the Horizon Connection Server.
Note: Agent monitoring is applicable for the View Edge type. CS monitoring and all other data will continue to be sent to Workspace ONE regardless of your agent monitoring selection. Agent monitoring enables Horizon agents to send data such as VM utilization and error information to Workspace ONE Intelligent Hub. It is recommended to keep this option enabled for your Edge. Deactivating agent monitoring data will have impact on Horizon Cloud features and serviceability and is not recommended.
-
On the Download Horizon Edge Gateway Appliance page, reviw the information and click Download to obtain the Horizon Edge Gateway Appliance binary and then click Next. Review and perform the instructions displayed in the resultant UI page and then click Save & Close.
Note: Download the latest version of the Horizon Edge Gateway disk image. We recommend that you use the latest version of the Edge Gateway appliance. For version information, see the Omnissa Product Interoperability Matrix.
Save the downloaded binary to a location from which you will deploy it into the desired virtualization platform. For information about deploying your federated edges, see Configuring Horizon 8 Federated Deployments.
Note: The binary size is approximately 3.2 GB.
If you are deploying the Horizon Edge Gateway Appliance in a federated mode, see Configuring Horizon 8 Federated Deployments relative to your specified capacity type.
-
On the Deploy and Pair Horizon Edge Gateway page, follow the onscreen guidance. If so prompted, copy the system-generated pairing code in the UI and save it to a location where you can copy and paste it as you will need it when deploying the appliance with the Deploy OVF Template UI.
Use the provided copy icon to copy the pairing code because the console does not display the full pairing code string. The code string is longer than what the console displays. The pairing code is required for a successful end-to-end process. You must use this pairing code within the Deploy OVF Template UI when you deploy the appliance.
-
This step is only applicable if you are deploying to a private data center environment, based on your All-in-SDDC architecture selection. If instead, you are using a federated architecture for deployment, see Configuring Horizon 8 Federated Deployments relative to your specified capacity type and then return to the next step in this process.
Read the on-screen guidance about deploying the appliance into your private data center environment, and then take the specified steps. Keep this Add Horizon Edge UI stepper page open in your browser while you complete those steps because you will return to this page to check if the pairing is successful.
For the step-by-step illustration of deploying the Horizon Edge Gateway appliance using the Deploy OVF Template UI, see the Tech Zone video Deploy Horizon Edge Appliance from OVA.
Note: In the Pairing Code field, you must enter the Pairing Code string that you copied above. Entering in the correct pairing code in the Pairing Code field is required for a successful Horizon Edge Gateway appliance deployment.
This following image illustrates the location of the Pairing Code field into which to paste the Pairing Code string that you copied from the Horizon Universal Console Add Horizon Edge wizard.
The OVF tool's UI Ready to complete step will display the properties that you entered into the Customize template step.
Verify that the full pairing code string that you copied from the Horizon Universal Console is reflected in this set of properties.
Note: POD Network and Service Network are internal values used by the appliance's internal Kubernetes cluster. Leave those values at their defaults.
-
After the OVF is deployed, power on the appliance.
When you see the appliance powered up and running, return to the Add Horizon Edge UIand click Refresh to update the Pairing Status value.
Note: It might take several minutes for the system to communicate the status from the deployed appliance to the cloud control plane.
If you entered the correct copied pairing code into the OVA deployment UI, powered up the appliance, fulfilled the DNS record requirements and all of the prerequisites stated at the top of this documentation page, the system should reflect a successful pairing. On refresh, the displayed Pairing Status would change to Pairing Successful.
If the pairing is not successful, see KB article Troubleshooting Horizon 8 Edge Connectivity Issues for information about running a diagnostic tool and troubleshooting why the Edge is not in a Pairing Successful state.
-
Click Next to advance to the Connection Server page.
-
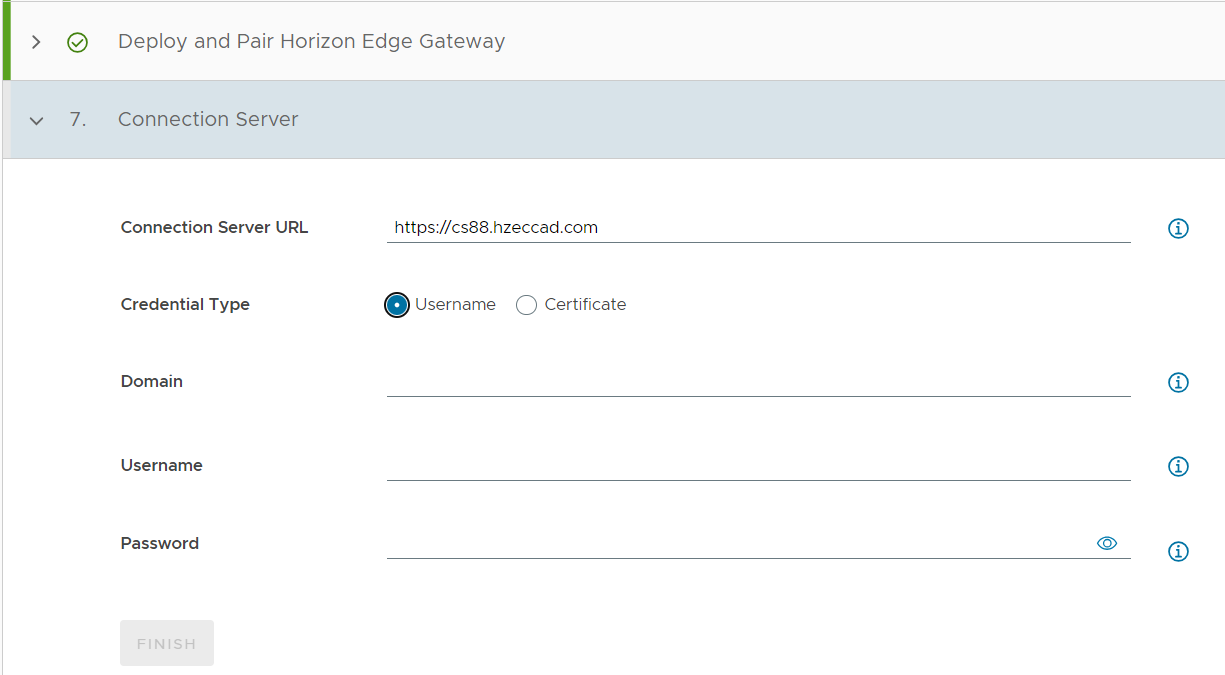
Complete the fields for the Horizon Connection Server as described in the UI helper text and below.
The page prompts you for the Connection Server URL and Credential Type for authentication.
-
For the Horizon 8 Edge Domain value, specify the DNS Domain name of where the user account is located. Do not use the NetBIOS name.
-
If you select the Username credential type, enter the Domain, Username, and Password for the Horizon 8 account to be used to connect to the Horizon Connection Server.
Note: Load balancer FQDN is not supported for the Connection Server URL. Provide the FQDN of an individual connection server only. Pairing a Horizon Edge Gateway appliance with a load balancer FQDN is unsupported.
The table below describes the supported roles for this account and the cloud capabilities that are available depending on the roles assigned to the account. For more information on these roles, see the appropriate product version of the Predefined Administrator Roles topic in Horizon product documentation.
Roles Horizon Cloud Capabilities Administrator Allows all Horizon Cloud capabilities. Horizon Cloud Allows subscription licenses to be applied and managed. -
If you select the Certificate credential type, upload the certificate in PKCS12 or PFX format and enter the password if the certificate is password protected.
Note: To use this authentication method, certificate authentication must be enabled on the Horizon Connection Server. For related information, see Security-Related Global Settings for Horizon Console in the Horizon Security publication in Horizon product documentation.
-
-
Click Finish.
If the system detects that the Horizon Connection Server has a self-signed certificate, a prompt appears asking you to confirm the certificate details. If the input Horizon Connection Server URL does not match any of the hostnames in the certificate on the Connection Server, you will see a message to acknowledge this. Review and confirm as needed.
If all is successful, the console closes the wizard UI and displays the details page for this newly added Horizon Edge.
Note: Depending on network traffic, the system might take a minute to complete updating the connectivity status indicators in the details page.
What to do next
Ensure that you have registered a DNS record in your DNS server to map the deployed appliance's IP address to the Horizon Edge Gateway FQDN that you specified in this procedure.
To avoid down time due to expired Horizon Connection Server certificate credentials for your Horizon 8 Edges, look for and take action on notifications regarding upcoming expiry of the Horizon Connection Server certificate for Horizon 8 Edges. Horizon Cloud displays this type of notification in the Horizon Universal Console and, if you are an administrator registered with the Cloud services, also known as Cloud Services Platform (CSP), the system also sends this information to you by email.
The action to take when you receive these notifications is to renew or update the certificate before expiration. If you do not renew the certificate prior to expiration you will experience interruptions in end-user access and administrative operations.
For information about monitoring your deployment, see Monitoring Your Environment
Was this page helpful?