You can use the notification builder in the Hub Services console to create a notification, select the target audience and create either an actionable notification or an informational notification.
Procedure
-
Navigate to the Hub Services Notifications & Banners > Overview page, click New in the Notifications section, and then click Create Notification.
-
In the Definition page, define who receives the notification. Enter the name of the notification.
-
Select the target audience.
- You can target customized notifications to specific audiences or send them to all employees in your organization. If you are authorized to send notifications to specific target audiences, the notification builder only displays those audience types for you to choose from.
- You can select multiple groups within a single audience type. For example, you can select several Organization Groups or several Smart Groups in a single notification.
- You can also combine Organization Group, Smart Group, and Platform audience types together in the same notification. For example, you can target specific Organization Groups, Smart Groups, and a Platform all in one notification. The notification is sent to all selected groups and platforms in one action, and all selected audience types and groups are listed together in the Target Audience Types column for that notification in the Notifications list.
- All Employees and Users Group are user-level audience types and cannot be combined with the device-level audience types All Devices, Organization Group, Smart Group, or Platform in the same notification.
- The following are the available audience types that can be selected.
Audience Types Description All Employees Notifications can be sent to all employees listed as users in the Omnissa Access service. All Devices Notifications can be sent to all devices configured in your Workspace ONE UEM environment, regardless of organization groups. Organization Group Organization groups (OG) in the Workspace ONE UEM console are created to group individual organizations in your corporate structure, geographical location, business unit, or department. You can select one or more organization groups in Workspace ONE UEM in which to send the notification. Smart Group Smart groups are customizable groups within Workspace ONE UEM that determine which platforms, devices, and users receive an assigned application, book, compliance policy, device profile, or provision. You can select one or more smart groups in Workspace ONE UEM in which to send the notification. Platform You can select one or more platform types to send a notification. The platforms are iOS, Android, macOS, and Windows. Users Group Groups in the Omnissa Access service are imported from your Active Directory or are created as local groups in the Omnissa Access console. You can select one or more Omnissa Access User groups to which to send a notification. Email Recipients Designate email addresses of specific users to receive the notification. Copy and paste or manually enter email addresses into the text box that appears below the drop-down.
When the Email Recipients audience type is selected, an Email Notification toggle appears in the Notification Builder and is enabled by default.
If SMTP is configured in Hub Services, notifications are delivered to both the user's device (push) and the user's email inbox. If the user's email address exists in Workspace ONE UEM or Omnissa Access, the notification is sent to both the device and the corresponding inbox. If the email address is not found in UEM or Access, neither the device notification nor the email is delivered.
If SMTP is not configured, the notification is delivered to the user's device only. To send email notifications to users' inboxes, you must configure SMTP. See Configure SMTP Settings for Hub Services.
-
If your organization implements the pre-hire onboarding process, to send the notification to the users in the pre-hire groups, select Include Pre-hires.
-
Select the priority of the notification.
- Standard. Notifications are sent as standard by default.
- High-priority. Notifications that are sent high-priority are displayed at the top of the For You notifications page within the Priority section.
- Urgent. Notifications that are sent as urgent are considered extremely important notifications that proactively alert users and require immediate attention or response.
-
Click NEXT to go to the Content page.
-
For Type, select the type of message you are creating, either Actionable or Informational.
- Select Actionable to send a notification that requires your users to respond in the notification
- Select Informational to send a notification that does not require the reader to take action on the notification.
-
In the Content section, complete the notification details.
Notification Labels Description Icon Use the default image, Intelligent Hub or add your company logo.
The Image URL link can be to a JPG, PNG, or GIF file that is 96px by 96px. The file size cannot exceed 30 KB.
If the URL link does not display, see How to Set Up Your Web URL to Display in an iFrame in the Workspace ONE Intelligent Hub Custom Tab on the Web PortalTitle Enter the title that describe the notification topic The title displays in the notification heading. Subtitle (optional) The subtitle appears above the title. Media Type (optional) You can add either a video or an image to the notification card. To allow images and videos to display correctly in the notification banner, you must configure the web portal to permit cross-origin access to image or video files. The image or video HTML must provide a crossorigin attribute that in combination with an appropriate cross-origin resource sharing (CORs) header, allows images to display in the notification banner correctly. For more information about CORS, see the Cross-Origin Resources Sharing web site.
To display images or videos correctly in the web portal, define the following CORs request headers on your website.
Access-Control-Allow-Origin:Access-Control-Allow-Method: GET
To display an image in the notification banner, enter the full URL address that includesHTTPS. Example of a full image URL address,https://www.mozilla.org/media/img/firefox/new/desktop/hero-mr1.c078ff206641.png. The image must be either a JPG or PNG file and the aspect ratio of the image is 4:3.
To display a video in the notification banner, enter the full URL address that includesHTTPSthat is displayed in the embedded code as thesrcvalue. For example,src="https://mozzila/media/videos/abcvideo.mp4".Description Type the notification message in the Description box.
Toggle on Use Rich Text Formatting to emphasize parts of the notification Description using character formatting, such as bold, underline, italics, colors, bulleted lists, and numbered lists.
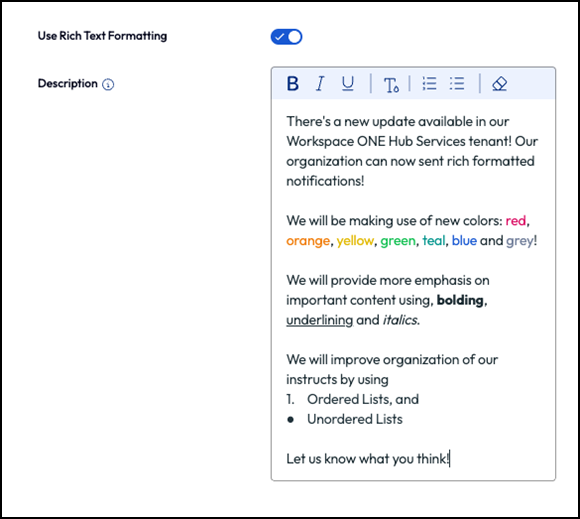
Additional Details (optional) Click Add Details to add a feature, fact, or other item that you want to call out in the message. Enter as a label and the description. Links (optional) To add links to the notification, you add the link title that displays in the notification and then the complete link URL. Your notification can include up to 10 links. Attachments You can upload up to 10 files to attach with the notification. The individual file size cannot exceed 5 MB. Users can download or preview the attachments through a web browser. -
If you selected Actionable, configure the Actions section with the user's action and response flow.
Action and Response Description Action Button Text Enter the text of the button that appears in the notification Completed Action Button Text (optional) Enter the text for the button that appears in the notification after the Completed action button is clicked. Action Button Behavior Three action types can be selected. - Open In. When you select the Open In action, you then enter the URL that opens when the button is clicked. You can also add a Hub deep link in your action notification to navigate users to a specific page in the app.
In the Link text box, enter the URL. - API. When you select API, you then select the method to use to interact with the data being addressed in the notification.
- API with User Input. When you select API with Parameters, in addition to selecting the method and API endpoint, you can add specific parameters and a value for the parameters.
For more information about parameters, go to the Workspace ONE Notification service API page. The Service reference guide is available from the Documentation tab.
Make Action Repeatable You can deactivate this option. Primary Enable Primary if you want Primary to be the first button in the For You notification bar. You can create up to three actions in the notification. For a list of URLs that you can use to deep link to Workspace ONE Intelligent Hub app pages for iOS devices, see Deep Links to Workspace ONE Intelligent Hub Pages Supported on iOS and Android Devices.
- Open In. When you select the Open In action, you then enter the URL that opens when the button is clicked. You can also add a Hub deep link in your action notification to navigate users to a specific page in the app.
-
Click NEXT to go to the Scheduling page to enable Set Due Date and set a date, time, and time zone by which the notification must be acted on. Setting a due date is optional. You can also configure a custom expiration date for the notification that the user will see. For an example of how to create a custom notification in Workspace ONE Hub Services, see Example of How to Create Notifications in Workspace ONE Hub Services That Require Action.
-
Click NEXT and in the Summary page review the notification details.
-
Click PUBLISH to create and send the notification.
Results
The notifications you create are available from the Notifications & Banners page.
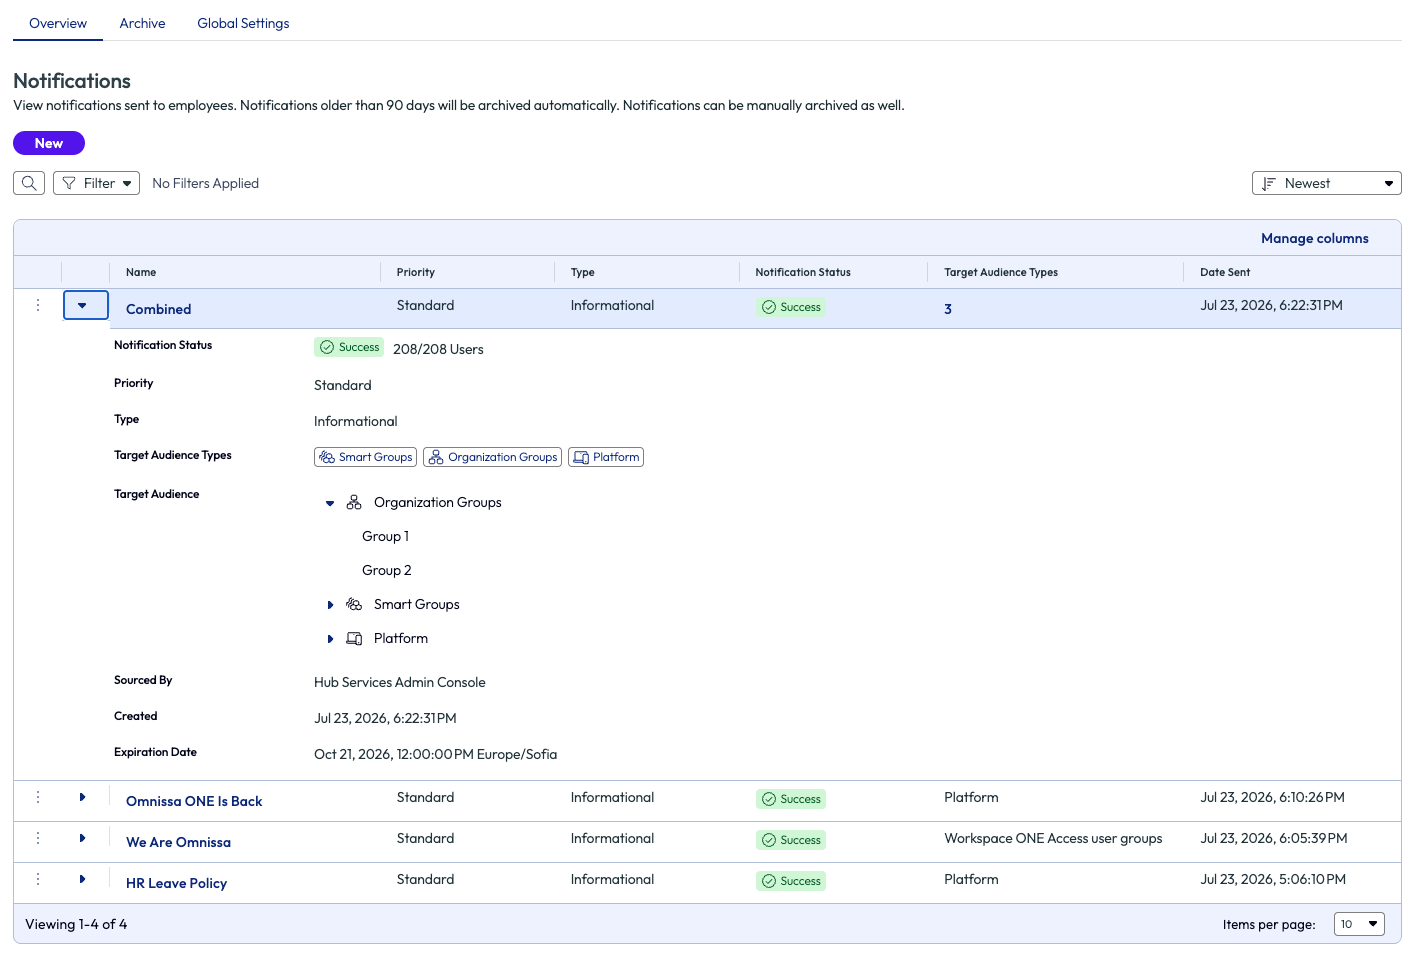
When a notification is sent to multiples audience types, all selected audience types are listed together in the Target Audience Types column for that notification entry.
Also, a three-dot menu is available for each notification. When the notification status is Success, the three-dot menu allows you to archive, resend, and delete the notification and to turn the notification into a notification template.
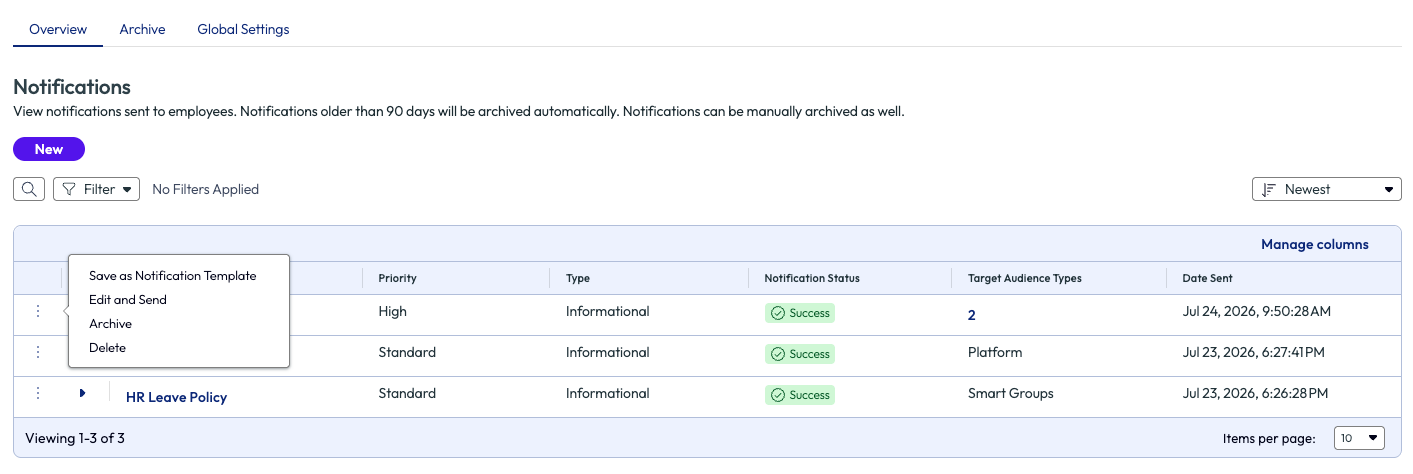
When a notification is sent to multiple groups, you can expand the name of that notification entry to see detailed information about the target audience.
Was this page helpful?