You can create notification templates that you can use to create custom notifications quickly. Using a notification template let you standardize the message format for notifications. Notification templates that you save are listed on the Notification template page. You can edit and delete notification templates.
When you select a notification template to use, you can customize the content, select the target audience, and set the notification priority. When you send the notification, the customized notification is added to the list of notifications sent on the Notifications page. The template is not changed.
For more information about notifications, see Using Hub Notifications Service in Workspace ONE Hub Services.
Create a Notification Template
You can create a new notification template or you can save an existing notification as a notification template.
-
To create a notification template, navigate to the Hub Services Notifications & Banners page, click New and then click Create Template.
-
Enter the name and a description of the template. Click NEXT.
-
In the Content page, select the type of notification, Actionable or Informational and set up the content of the notification.
-
Select Actionable to send a notification that requires your users to respond in the notification
-
Select Informational to send a notification that does not require the reader to take action on the notification. If you selected to save a notification as a template, the Content page is configured. You can edit the page.
- Configure the content of the message.
Option Description Icon By default, the Workspace ONE Intelligent Hub icon default image displays in the notification. You can upload an image file or enter a URL link to the image. Upload JPG, PNG, or GIF file that is 40px by 40px for best results. The file size cannot exceed 30 KB. The Image URL link can be to a JPG, PNG, or GIF file that is 96px by 96px. The file size cannot exceed 30 KB. If the URL link does not display, see How to Set Up Your Web URL to Display in an iFrame in the Workspace ONE Intelligent Hub Custom Tab on the Web Portal Title Enter a title that describes the notification topic Subtitle Optional. The subtitle appears above the title. Media Type (optional) You can add either a video or an image to the notification card.
To allow images and videos to display correctly in the notification banner, you must configure the web portal to permit cross-origin access to image or video files. The HTML must provide a crossorigin attribute that in combination with an appropriate cross-origin resource sharing (CORs) header, allows images to display in the notification banner correctly. For more information about CORS, see the Cross-Origin Resources Sharing web site.
To display images or videos correctly in the web portal, define the following CORs request headers on your website.
To display an image in the notification banner, enter the full URL address that includesAccess-Control-Allow-Origin:Access-Control-Allow-Method: GET HTTPS. Example of a full image URL address,https://www.mozilla.org/media/img/firefox/new/desktop/hero-mr1.c078ff206641.png. The image must be either a JPG or PNG file and the aspect ratio of the image is 4:3.
To display a video in the notification banner, enter the full URL address that includesHTTPSthat is displayed in the embedded code as thesrcvalue. For example,src="https://mozzila/media/videos/abcvideo.mp4".Description Type the notification message in the Description box.
Toggle on Use Rich Text Formatting to emphasize parts of the notification Description using character formatting, such as bold, underline, italics, colors, bulleted lists, and numbered lists.
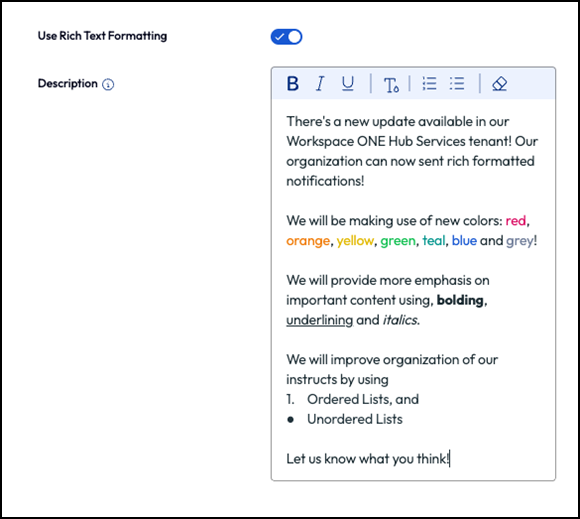
Additional Details Click Add Details to add a feature, fact, or other item that you want to call out in the message. Enter as a label and the description. Links (optional) Add the link title that displays in the notification and add the complete link URL. The notification can include up to 10 links. -
If you select Actionable, configure the Actions section with the user's action and response flow. Three action types can be selected.
- Open In. When you select the Open In action, you then enter the URL that opens when the button is clicked.
- API. When you select API, you then select the method to use to interact with the data being addressed in the notification.
- API with Parameters. When you select API with Parameters, in addition to selecting the method and API endpoint, you can add specific parameters and a value for the parameters.
For more information about parameters, go to the Workspace ONE Notification service API page. The Notifications Service reference guide is available from the Documentation tab.
Up to three actions can be created.
-
In the Attachments section, you can add up to 10 attachments to the notification template. The individual file size cannot exceed 5 MB.
-
Click NEXT.
-
-
Click SAVE.
The notification template is saved to the Notification Template list.
Use Notification Templates to Create and Send Notifications
-
Navigate to the Hub Services Notifications page, and click NEW to open the page to the Notification Template list.
-
In the Action column for the notification template to use, click USE.
-
In the Custom Notification Definition page, enter a name for the notification, select the target audience and set the priority.
For the target audience, you can select multiple groups within a single audience type, and you can also combine Organization Group, Smart Group, and Platform audience types together in the same notification. For example, you can select several Organization Groups, several Smart Groups, and a Platform all in one notification. The notification is sent to all selected groups and platforms in one action, and all selected audience types and groups are listed together in the Target Audience Types column for that notification in the Notifications list. All Employees and Users Group cannot be combined with the device-level audience types All Devices, Organization Group, Smart Group, or Platform in the same notification.
-
Click NEXT.
-
Review the configuration in the Content page and make required changes.
-
Click NEXT to see a summary of the notification information.
Note: Changes you make to the Content page do not change the notification template.
- Click Publish.
The notification is sent and it is added to the Notification List on the Notifications & Banners page.
Was this page helpful?