Data Access Policies (DAP) in Omnissa Intelligence control what data certain users see in dashboards and reports. DAP requires the use of organization groups configured in Omnissa Workspace ONE UEM.
How does DAP work?
Configure a DAP in Intelligence to either allow users assigned to it to see everything or only the data managed within a specified UEM organization group. For details on organization groups in Workspace ONE UEM, access the topic Organization Groups.
Which roles can you restrict with DAP?
The RBAC roles that you can assign DAP to are Analysts and users assigned to DAP compliant custom roles.
Navigation
Find Data Access Policies in the console at Accounts > Data Access Policy.

Considerations
Before you configure DAP and assign it to Analysts or users with DAP compliant custom roles, review the considerations.
- Only the Analyst role - Users you want to assign to Data Access Policies must have the RBAC Analyst permission and only that permission. These users cannot have other RBAC permissions.
- Activation is immediate - After you activate your first Data Access Policy, users that have only Analyst permissions and who are not assigned to Data Access Policies cannot see Workspace ONE UEM data in Intelligence. To ensure your Analysts continue to view data, assign them to a policy.
- Control access by organization group or allow all access
- You can restrict an Analyst user's access to Workspace ONE UEM data by assigning them to a restrictive Data Access Policy. Intelligence controls data by using Workspace ONE UEM organization groups. To restrict an Analyst user's data set, assign them to the Data Access Policy configured with the applicable organization group.
- If you do not want to restrict an Analyst user's access to Workspace ONE UEM data, assign them to the Data Access Policy configured to allow all access.
- Assign to a single policy - To avoid accidentally restricting or allowing access to data, assign an Analyst user to a single policy. Do not assign an Analyst user to multiple Data Access Policies.
- Sharing objects and object previews - Data Access Policies apply to queries in objects and when you share objects, you share these queries.
- Consider this behavior when you share objects.
- You might share an object with a user who is assigned a Data Access Policy that restricts them from seeing all the data in a dashboard or report preview.
- This behavior applies to previews and not to the actual generation of the user's access to data.
- Data Access Policies require integration with Workspace ONE UEM - You use the Workspace ONE UEM organization group hierarchy to configure Data Access Policies and to control data access.
- Limited set of UEM data - Data Access Policies apply to a limited set of data and do not apply to all data sets in Workspace ONE UEM.
- Dashboards and Reports - Data Access Policies control data displayed in Dashboards and in Reports.
- RBAC Administrators create and manage - You must have RBAC Administrator permissions to create and assign Data Access Policies.
- Prevent access to a data set - To prevent Analysts or those with DAP compliant custom roles from seeing specific data managed in a specific UEM organization group, assign them to a group below the applicable organization group in the UEM organization group hierarchy.
How do you create your first Data Access Policy?
To get started with Data Access Policies, use the Accounts area.
- In Intelligence, go to Accounts > Data Access Policy > Add. You must add at least one policy to begin using the feature.
- In the Add Data Access Policy window select a Data Category.
- All Access: Users assigned this policy can see all Workspace ONE UEM data.
- Workspace ONE UEM Organization Groups: Users assigned this policy can see data managed in Workspace ONE UEM at the selected organization group level.
- Select the group in the Organization Group Hierarchy menu item.
- Select users in the Users area. These users must have only the Analyst role so they can see the applicable data displayed in Dashboards and Reports.
- View the Summary and save your policy. Intelligence lists the policy in the Data Access Policy list view.
- Activate the policy when you are ready to control data access to assigned users.
How do you assign policies to unassigned analysts?
To ensure that your admins have continued access to data, you can filter users on the Administrators page by the Active Users filter and assign every admin with only Analyst permissions to a Data Access Policy.
- In Intelligence, go to Accounts > Administrators.
- Select the Active Users filter.
- Look for admins that have only the Analyst role and have no policy listed in the Data Access Policy column.
- Select the user and select Edit.
- Select Assign Data Access Policy.
- Select the Data Access Policy you want to assign to the Analyst and click Add.
DAP and scheduled reports
When your Intelligence environment uses DAP and you have reports that run on schedules, the report downloading mechanism adds certain steps to accommodate DAP. Consider this behavior for reports that run on schedules because the user won't receive this report until they manually generate it.
Note: If you own a report, you do not have to manually generate a report to download it in the tenant where DAP is activated. Also, users assigned the same DAP as the report owner do not need to generate the report.
- If a report runs on a schedule and you have activated DAP in Intelligence, all users, no matter their RBAC permissions, must generate scheduled reports before they can download them. You can generate reports in the console.
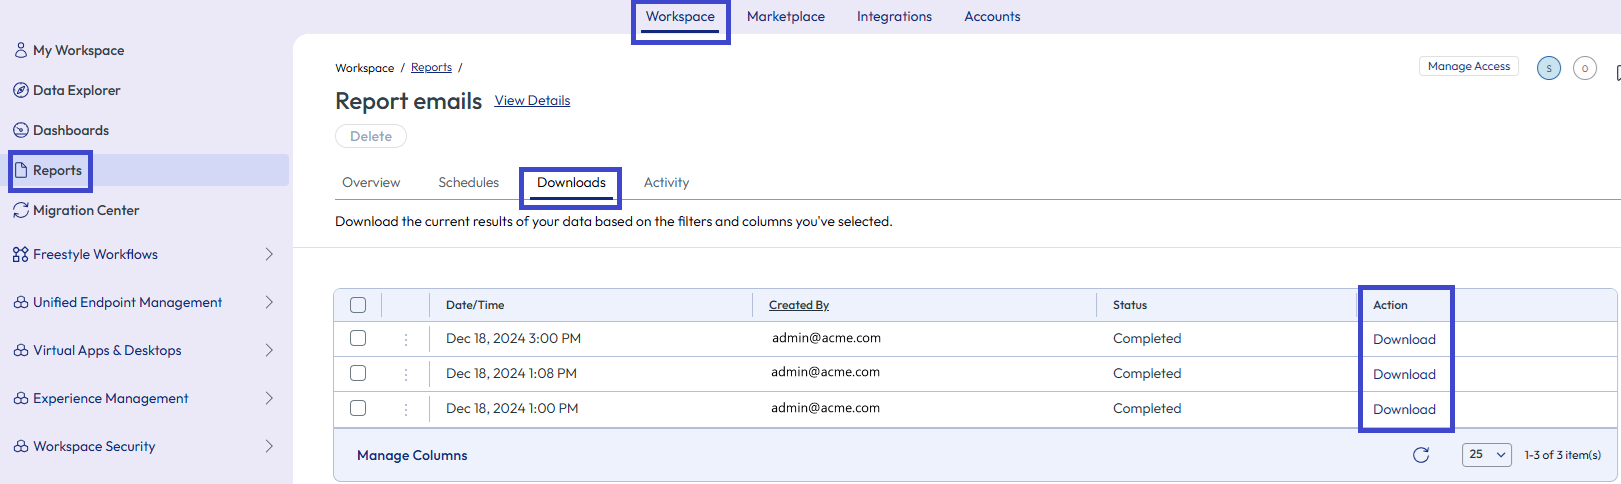
- In Intelligence, go to Workspace > Reports.
- Select the desired report and choose the Downloads tab.
- Find the desired date/time of the report, and select Generate in the Action column. Notice that this date/time version of the report has a Pending Completion in the Status column. The status changes to Completed after the generating action completes.
- After the report generates, select Download in the Action column for the desired date/time version of the report.
- When you share a report that runs on a schedule and you have activated DAP in Intelligence, the ones you shared the report with must generate the report before they can download it.
- After you configure sharing, the system sends an email to those with whom you've shared the report. The email has a link to download the report. However, when DAP is activated, users receive two emails.
- The first email asks users to Generate the report. Users must generate the report in the console before they can download it.
- The second email offers users to Download the report.
- If users that you share the report with are Analysts, these users, like other users, must generate the report before they can download it. When they download the report, they can view only the Workspace ONE UEM data allowed by DAP settings.
- After you configure sharing, the system sends an email to those with whom you've shared the report. The email has a link to download the report. However, when DAP is activated, users receive two emails.
DAP, scheduled reports, and the Download Report API
Intelligence environments that use DAP and use the Download Report API to pull scheduled report downloads must meet the listed requirements. Matching the listed requirements ensures that your Download Report API call runs successfully. These requirements are not necessary if reports do not run on schedules.
- Share the report with the service account that you use to run API calls. Service account roles are managed in Omnissa Connect. See Roles for details on roles in Connect.
- If the service account has only the Analyst permission, ensure to assign a DAP to the service account.
DAP and the Report Public Link Sharing feature
Intelligence environments that use DAP require you to generate the publicly shared report in the console before users can use the public link to download it. If you do not manually generate the report, the public link displays as N/A and not as Download.
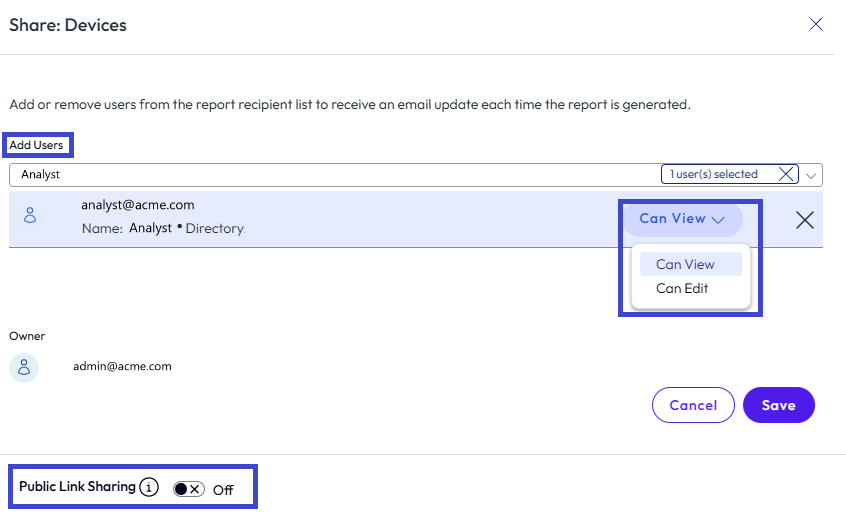
- In Intelligence, go to Workspace > Reports and open the report for which you want to share a public link.
- On the Overview tab, select Share.
- Activate the Public Link Sharing menu item and save the setting.
- Select the Downloads tab of the report.
- Find the desired date/time of the report, and select Generate in the Action column.
After the generate action completes, the public link displays as Download and not N/A.
Was this page helpful?