Add and use managed connectors and custom connectors in the Workflow Connectors area of Omnissa Intelligence. Workflow Connectors are built on our Connector Management System (CMS) that manages all managed connector configurations and actions for outbound Omnissa Workspace ONE services and for third-party integrations. It also manages all custom connector configurations and actions to expand upon the initial workflows architecture.
Managed Connectors
Managed connectors, native or third-party, are either pre-seeded or added so that you can use their actions in workflows. Some pre-seeded managed connector examples include Hub Services and Intelligence. Third-party managed connectors include Slack Web API and ServiceNow. Custom connectors are your own connections and actions that use REST APIs for communication.
If you are new to Intelligence, you must add your managed connectors by following that connector's set up process. See the applicable integration topic for details.
If you set up your connector prior to the release of the CMS, the 23.03.23 release, then no action is required.
Editing and deleting
You can edit or delete managed connectors in Intelligence. If you delete a managed connector, that connector is still available to select if you want to add it later.
- Delete - To delete a managed connector, you must remove all the actions used in the associated workflows. You can also delete the associated workflows, but delete with caution as this action cannot be undone.
- Edit - You can edit some managed connector details but you cannot edit the default values of the action fields.
Connector disconnect notifications
When Intelligence can no longer authenticate to a connector's endpoint, or is no longer authorized to call it, the connector becomes disconnected and all workflow executions tied to it stop running until it's reauthorized. You can configure whether you're notified when this happens and who receives the notification.
- Turn notifications on or off.
- Choose whether a connector sends disconnect notifications at all.
- Choose recipients.
- If notifications are on, choose up to 100 recipients from your organization's admin list.
- Each recipient gets both an in-app notification and an email.
- Existing connectors keep their current behavior by default.
- The connector's creator remains the sole recipient, so nothing changes unless you update the setting.
- New connectors have no default recipient — you must explicitly choose who's notified.
- Disconnect notifications are always Critical severity, since a disconnected connector stops all workflow executions tied to it until it's reauthorized.
Configure notifications
Work in the managed connector's tile in the Integrations area to activate and deactivate notifications.
- In Intelligence, go to Integrations > Workflow Connectors.
- Select the ellipsis on the managed connector's tile and then select Notification Settings.
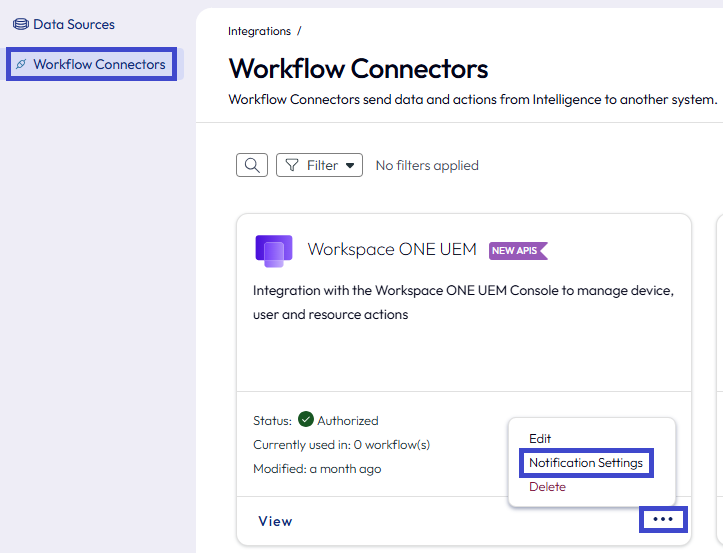
- Activate notifications using the Enable notifications menu option.
- Add emails for the notification recipients.
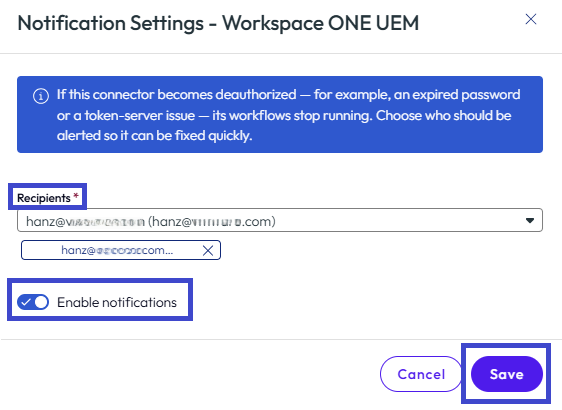
- Save your settings.
When does a connector get disconnected?
A connector is automatically disconnected when Intelligence can no longer authenticate or is no longer authorized to call its endpoint. For most connector types this includes both an HTTP 401 (authentication) and an HTTP 403 (authorization) response.
Custom Connectors
Add your own connections and actions to workflows with your existing enterprise systems and third-party services. Custom Connectors have multiple actions that are REST APIs. You can build and test actions using API development tools like Bruno to create an API collection, that you can then import into Intelligence.
Requirements
To add custom connectors, import an API collection in the Postman Collection format. After you import the collection, you can use the actions in workflows.
- Create collections in an API development tool like Bruno.
- Consider using Bruno as a tool to organize and test the REST APIs with your internal and third-party services.
- You can migrate your Postman collections to Bruno.
- For steps on how to migrate from Postman to Bruno, see the Bruno documentation site article Migrating from Postman.
- The service you intend to connect must support REST API and JSON content types.
- Intelligence needs access to API endpoints.
- If services are behind a firewall, use the Unified Access Gateway as a reverse proxy.
- For details, access Configure Reverse Proxy With Workspace ONE UEM API
- If you use OAuth2 for authentication, have the authorization details so Intelligence can retrieve, refresh, and access tokens for the service.
- OAuth2 Token URL
- Client Secret
- Client ID
- Grant Type (Client Credentials or Password)
Custom connector samples
For examples of custom connectors, refer to our GitHub repository, which includes some of the most popular request actions.
Steps to use custom connectors
- Create a collection with requests in an API development tool like Bruno and export it in the Postman Collection format.
- Add a custom connection in Intelligence and import the requests. These requests are now available as actions you can use in workflows.
- Configure an automation workflow with imported actions to automate a task using your custom connection in Intelligence.
Step 1: Creating API collections
Let's use Bruno to create REST API collections of requests. See the applicable Bruno documentation articles. Here are some suggested articles.
Required configurations
- The name and description provided in these requests are used in the workflow actions in Intelligence.
- You can change them later in Intelligence.
- Add headers as
Content-Type: application/json.- If you do not add headers as the content type JSON, the APIs can default to XML and XML does not work with custom connectors.
- Add any custom headers required by your API to all the requests in the collection.
- Examples of custom headers are unique, header-based authentication types like an API key or a token.
- Intelligence retains all headers except for authentication headers.
- It overrides authentication headers with your configurations for Auth Type in the custom collection.
- If Intelligence overrides the authentication header, the system still sends your unique, header-based authentication for use because you added it to the other requests in the collection.
- Send the request to validate it.
- Validation generates the response.
- Share the collection and export it using the Postman Collection format.
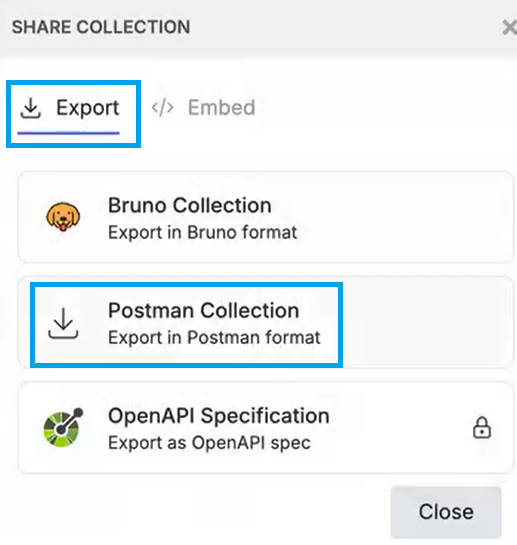
- After you export it, open the JSON file and add a unique ID to each action in the collection using a file editor.
- Add the ID after the
"name":entry in the JSON file. - For example, add
"id": "sendMessage",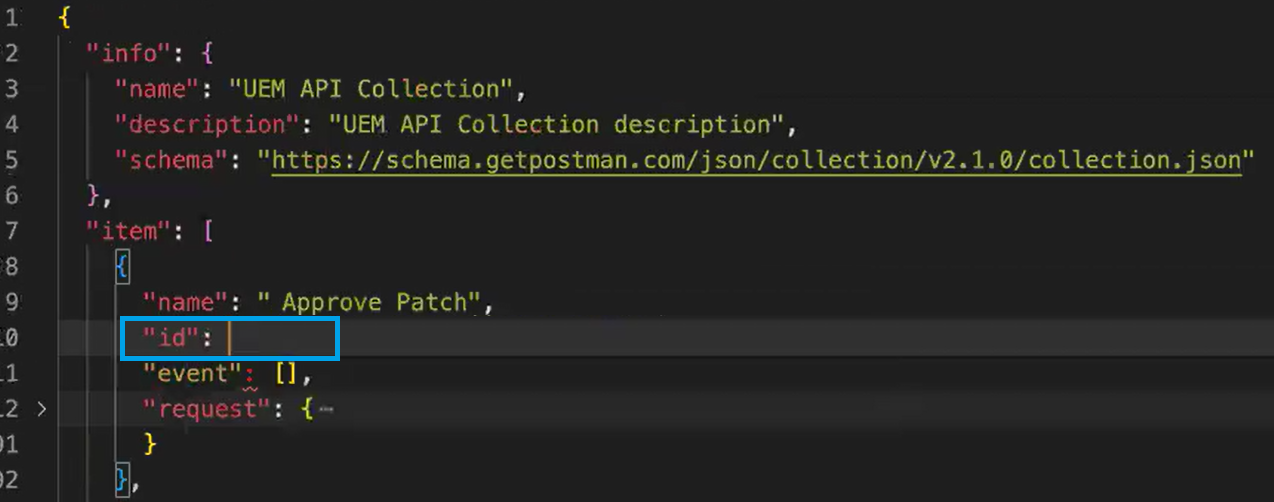
- Add the ID after the
Step 2: Adding the custom connector in Intelligence
Import your API collection JSON file into Intelligence when you add a custom connector.
- In Intelligence, go to Integrations > Workflow Connectors, and select Add.
- In the Add New Workflow Connector widget, select the Custom Connector tab.
- For Connector Name, enter an identifiable name for the connection.
- For Base URL, enter the URL for the service so Intelligence can authenticate.
- The URL for the service and the URL for the custom connection must match.
- For Auth Type, select the authentication type to use to access the service.
- Basic Authentication - Allows Intelligence access, enter the credentials.
- OAuth2 Authentication - Enter details so Intelligence can retrieve, refresh, and access tokens for the service.
- You need the Client ID, Client Authentication Location, Grant Type (credentials or password), Token URL, and the Client Secret.
- An optional setting is the Scope.
- No Authentication - If you do not want Intelligence to override authentication headers, select this menu item.
- To import your JSON file, use the select from your computer link in the middle of the UI. The UI displays the collection with its requests. These requests are now available as actions for workflows.
- From the list of imported actions you can test, edit, and delete the action.
Step 3: Adding a workflow
Follow the process outlined in the Freestyle Orchestrator topic to create workflows.
Editing, deleting, and testing
You can edit, delete, and test custom connectors in Intelligence. You can use actions in multiple connectors so consider the consequences of editing or deleting before you act.
- Delete - To delete a connector and associated actions, you need to first remove the actions from all workflows.
- After all of the actions are removed from workflows, then you can delete the connector.
- This action is not reversible.
- Edit - You can edit the connection name, description, and authentication types at any time.
- To edit the action request details, edit the API collection and then re-import it into your custom connection.
- If you edit authentication types and enter the credentials incorrectly, actions can fail to run.
- Edit with caution.
- Test - Test custom connectors in Intelligence to make sure Intelligence and your service can communicate.
Was this page helpful?