Roles Based Access Control (RBAC) in Omnissa Intelligence includes pre-defined roles that you can assign to admins so they can access applicable Omnissa resources. If you need permissions that are not covered in the predefined RBAC roles, you can create a custom role to cover your use case.
Where do admins come from?
Setting up RBAC involves assigning admins to their respective roles. You can assign admins from several places.
- Omnissa Workspace ONE UEM
- Azure Active Directory Groups
- Omnissa Connect
About Data Access Policies (DAP)
If you want to use a DAP (Data Access Policy) to restrict data an Analyst or a DAP-compliant custom role user sees, you can assign it during the RBAC process but you must configure the policy first. See the topic DAP for details.
Workspace ONE UEM
Intelligence can get user data from Workspace ONE UEM, both basic users and directory-based users.
- Basic users are individual accounts that are not managed through an identity service.
- They require no enterprise infrastructure.
- These credentials exist only in Workspace ONE UEM and have no federated security.
- Directory-based users are managed in an identity service and are pulled into Workspace ONE UEM.
- These users access resources with their directory credentials and any changes made to their accounts sync with Workspace ONE UEM.
Procedure
Working in UEM and in Intelligence, you'll first add an Intelligence admin role in UEM, then you assign that role to admins. Have the admin try to log into Intelligence to trigger the request access mechanism. The system sends you an email with the admins' requests so you can grant them permissions and configure RBAC accounts in Intelligence.
- In the Workspace ONE UEM console, add a role for admins to access Intelligence.
- Select the organization group.
- Go to Accounts > Administrators > Admin Roles > Add Role.
- Enter a name and a description so you can find the role in the list view.
Intelligence Admin - Grants admins access to the Intelligence console. - In the Search Resources text box, enter
Intelligenceto display the Intelligence role.- This role is in Categories > Monitor > Intelligence.
- Give admins Read and Edit permissions.
- The
Intelligence Adminrole is now available to assign to admins in Workspace ONE UEM.
- The
- In the Workspace ONE UEM console, add admins and assign them the Intelligence role.
- Go to Accounts > Administrators > Admins > Add > Add Admin.
- Select Basic or Directory.
- Basic - Enter required settings on the Basic tab, including user name, password, First Name, and Last Name.
- You can enable Two-Factor Authentication where you select between Email and SMS as a delivery method and the token expiration time in minutes.
- You can also select a Notification option, selecting between None, Email, and SMS.
- Admins receive an auto-generated response.
- Directory - Enter the Domain and Username for the admin's directory credentials.
- Basic - Enter required settings on the Basic tab, including user name, password, First Name, and Last Name.
- Select the Roles tab, select the Organization Group, and enter the role you previously added,
Intelligence Admin.
- Have admins log in to Intelligence and complete the Request Access process.
- By selecting the Request Access button on the Restricted Access page, the system sends an email notification to 10 admins who are active and have the Administrator role in the console to approve entry.
- If users have already requested access and select Request Access, the console prompts them about their previous request but lets them send another.
- Check your email for Admin Access Request notifications and approve entry.
- Add admins in Intelligence.
- In Intelligence, go to Accounts > Administrators.
- Select the Admin tab.
- Select Add to access the Roles based access for Intelligence widget.
- On the Find Admin tab enter the name of the admin in the text box.
- Select Next to move on.
- On the Role Assignment tab, select the applicable role and save the admin account.
- You can assign a DAP to an Analyst or to a DAP-compliant custom role user.
- Save the settings.
Microsoft Azure Active Directory
To add admins and admin groups from Azure Active Directory (AD) for Roles Based Access Control (RBAC) in Intelligence, you must authorize communication between Intelligence and your Azure environment. Then, you can add admins and admin groups from your AD environment to Intelligence.
Microsoft Graph API for communication
Intelligence uses the Microsoft Graph API to communicate with your Azure environment.
- Intelligence stores minimal information from Azure like the user's first and last name, their contact email, or their affiliated groups.
- The integration does not include a regular sync schedule or polling operation but rather validates information when the user accesses Intelligence.
Prerequisites
You must have the permissions to configure a public Azure AD account. Use your Azure AD admin account credentials for registration. If you do not have admin permissions to set up Azure AD, have an Azure AD admin register your environment with Intelligence.
Authorization procedure
- In Intelligence, go to Accounts > Administrators and select the User Identity Management tab.
- Select Set Up on the Microsoft Azure Active Directory card.
The system directs you to your organization's Microsoft area. If you have Azure AD admin permissions, the system prompts you to enter your Azure AD credentials. - Select Accept in the Microsoft window to give Intelligence permissions to access data in Azure. If the system accepts the permissions, the Microsoft Azure Active Directory integration displays as Status: Authorized.
- Give permission to sign in and read user profiles in Azure.
- Give permission to read all groups in Azure.
- Give permission to read the full profiles of all users in Azure.
Add admins and admin groups
- In Intelligence, go to Accounts > Administrators.
- Select Add to access the Roles based access for Intelligence widget.
- If you have not authorized communication between the two systems, you cannot access the Add button.
- On the Find Admin tab enter the name of the admin or admin group in the text box.
- Select Next to move on.
- On the Role Assignment tab, select the applicable role and save the admin account.
- You can assign a DAP to an Analyst or to a DAP-compliant custom role user.
- Save the settings.
- Have admins log in to Intelligence.
- The Accounts > Administrators page in Intelligence, displays these admins as Unknown (Not logged in) because the system is not pulling this data from Azure.
- After the admin logs in to Intelligence, the status resolves.
Omnissa Connect
Omnissa Connect is a web-based service that provides a centralized access point to all Omnissa services and solutions. It is designed to provide a set of common features to allow secured and enhanced experiences with Omnissa products and platforms.
Note: If you add admins using Omnissa Connect, you cannot edit admin records in Intelligence. You must go to Omnissa Connect to make edits. For details, see Administrators.
RBAC role descriptions
Roles based access control (RBAC) includes the administrator titles of Analyst, Auditor, Administrator, and Automator. Each role has specific permissions to offer quick assignment with appropriate access to Intelligence features.
To create a super admin, assign all roles to the admin account. Intelligence does not have a separate, single role for the super admin.
- Administrator - The administrator can create identity and access management, admins, and integrations.
- Insights permission - Read
- Settings permissions - Create, update, and delete
- Analyst - An analyst can create, work, and delete their own objects and can work in other objects depending on their permissions. They cannot work in settings or workflows.
- Dashboards permissions - Create, update, and delete
- Reporting permissions - Create, update, and delete
- Auditor - The auditor can see what other admins are creating for auditing purposes. They have read access to everything and everything that gets created. If you have an auditor that also edits objects, add one of the other roles to the account.
- Insights permission - Read
- Dashboards permission - Read
- Reporting permission - Read
- Workflows permission - Read
- Settings permission - Read
- Automator - The automator can create, work, and delete automations. They can also configure integrations in Settings that are used in automations. Restricting other admins from creating automations helps control the large impact automations have on endpoints. It also helps with reduced creation of automatons that overlap or conflict.
- Insights permission - Read
- Workflows permissions - Create, update, and delete
- Integrations permissions - Create, update, and delete
Custom Roles
Custom roles offer an alternative to RBAC roles because custom roles let you assign granular permissions for those instances when the pre-defined RBAC roles do not include or restrict permissions needed for special or occasional users. Add custom roles on the Roles tab where you can find a list of roles, their assigned users, role types (system or custom), and if the role is Data Access Policy (DAP) compliant.
Note: Custom roles cannot use Data Access Policies (DAP) if they are not DAP compliant.
Required entitlements
To use custom roles, you must have one of the listed Omnissa entitlements.
- Mobile Analytics Add-on
- Experience Management Add-on
- Risk Analytics Add-on
- Intelligence Add-on or Workspace ONE Enterprise
Add a custom role
Add a custom role so you can assign it to users.
- In Intelligence, go to Accounts > Administrators and select the Roles tab.
- Select Add and then configure the permissions for the custom role.
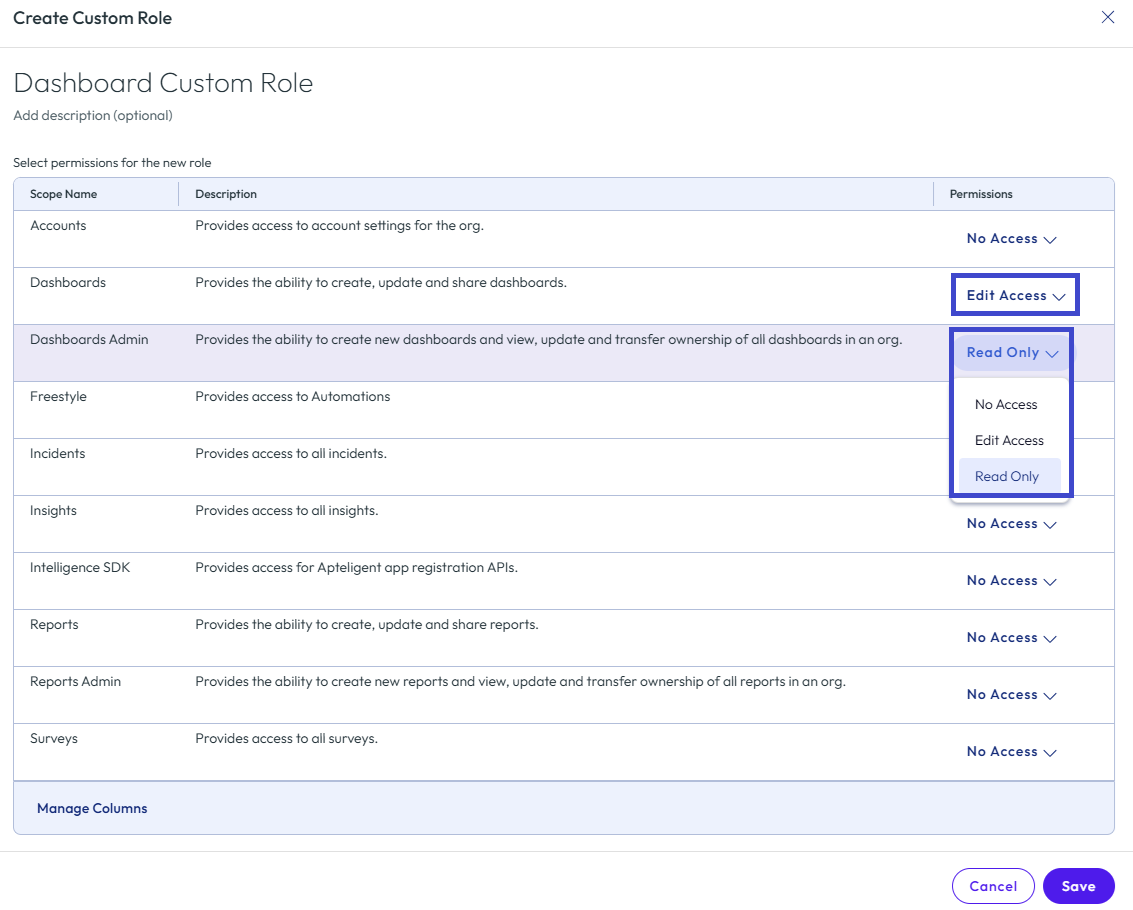
You can configure multiple permissions. - Save the custom role. The role is now available to assign to users.
Assign, unassign, edit, or delete a custom role
- In Intelligence, go to Accounts > Administrators and select the Roles tab.
- Select the custom role from the list.
- Select the Users tab and use the widget to assign, unassign, edit, or delete the custom role. You can edit and delete the role if you select the Role Permissions tab, too.
- Assign the role to users.
- Select Assign Users.
- Select users from the list. You can search for a user in the search field using their email, first name, or last name.
- Select Assign Users again to complete the process.
- Unassign a role from users. If there is no list of users, then the custom role has not been assigned to a user at this time.
- Select a single user or multiple users that no longer require the custom role.
- Select Unassign Users and confirm your selection.
- Edit roles.
- Select Edit Role.
- Make changes to the custom role's name, description, or its permissions and save your changes.
- Delete roles.
- Select Delete Role.
- The system cannot retrieve a deleted custom role, so confirm that you want to delete the role to complete the process.
- Assign the role to users.
- Select the Role Permissions tab to view the current scope of the selected custom role. From here, you can select to edit or delete the role or leave it as is.
Editing RBAC permissions
When you modify RBAC permissions in Intelligence, the system sends an Account Role Modified email to the RBAC user. The notification lists who changed the permissions and which permissions changed.
Transferring ownership of dashboards and reports
You can share dashboards and reports with other Intelligence users. The owner of the object (dashboard or report) is designated with full access, while the users who share the object are designated with Can View (read only) or Can Edit access (read and write).
As an extension of the sharing functionality, admins who have the Administrator role can also transfer the ownership of dashboards and reports. This feature is helpful after admins leave your organization because their Intelligence objects no longer have an active admin to manage them. To assign these objects to an active admin, admins can find unowned objects and reassign them.
- For details on how to transfer ownership of dashboards, access Transferring ownership of dashboards.
- For details on how to transfer ownership of Reports, access Transferring ownership of reports.
Was this page helpful?