You can use Omnissa Workspace ONE Experience Management to collect data on web apps using the Omnissa Experience Management browser extension and using an Omnissa Workspace ONE UEM device profile.
Overview
As an IT administrator, you can use this Experience Management browser extension to monitor web application performance, including page load speeds, network connectivity bottlenecks, and app and browser errors. This extension works with the Experience Management solution to proactively identify issues and to predict them before users notice. You can also troubleshoot with in-context dashboards and reports to efficiently find the root cause.
Requirements
You must meet the listed requirements for web app monitoring to work.
- Use macOS or Windows devices with Experience Management activated.
- Use one of the specified browsers depending on the platform.
- For the Google Chrome browser, you can use macOS and Windows.
- For the Microsoft Edge browser, you can use only Windows.
- See the article ControlDefaultStateOfAllowExtensionFromOtherStoresSettingEnabled for details about how to configure the Allow extensions from other stores setting because the extension is published in the Chrome Web Store and not in the Edge store.
- You must configure the Allow extensions from other stores setting or the feature does not work for the Edge browser.
- Use the separate Experience Management Agent 25.03 or later.
- Omnissa Workspace ONE Experience Management agent is available as a resource on Customer Connect.
- For macOS, see How do you install the Experience Management for macOS agent? for details.
- For Windows, use the command line to install the separate agent. See Installing the Experience Management agent (Windows) for details.
- Important: Do not use the Add or Remove Programs feature or the Windows Settings menu to install or uninstall the separate Experience Management agent.
- Here are two example command line parameters to install the separate Experience Management for Windows agent.
- Regular:
Omnissa-Telemetry-Agent-x86_64-z.z.z-xxxx.exe /v INTEGRATION=Hub MANAGEMENT_MODE=UEM - Silent mode:
Omnissa-Telemetry-Agent-x86_64-z.z.z-xxxx.exe /silent /v INTEGRATION=Hub MANAGEMENT_MODE=UEM REBOOT=ReallySuppress
- Regular:
Data definitions
See the table Web apps.
How do you collect web app metrics?
Complete two tasks to use the web app monitoring feature.
- Install and deploy the browser extension on devices.
- You can install the browser extension manually, but automatic installation is easier.
- If you must install the extension manually, find instructions for manual installation later in this topic.
- Configure browser settings to control the collection of web app metrics on target URLs. Use the supported URL pattern so that the feature can match sites.
- Access metrics in dashboards in Omnissa Intelligence.
Automatic deployment on Windows
Work in Workspace ONE UEM and use the Custom Settings of a Device Profile to retrieve, install, and deploy the browser extension. You can automatically deploy the a Chrome extension or an Edge extension. Select the method of deployment depending on the browser you use.
UEM documentation
If you do not know how to work with smart groups or profiles in Workspace ONE UEM, familiarize yourself with these features so that you can push device profile settings to Windows devices. For the most current information on these features, see the listed Workspace ONE UEM topics.
- For information on UEM Smart Groups, see Smart Groups.
- For information on Windows profiles and Custom Settings, see Custom Settings Profile.
- For information on adding a Device Profile, see Add a Device Profile.
Device profile settings for Chrome
Use the listed settings when you configure and publish the device profile that retrieves, installs, and deploys the Chrome browser extension.
- Use a Device Profile and not a User Profile.
- On the General page of the device profile, complete these settings. - Consider naming your profile Web App Monitoring to help you find it in the UEM console. - Select and assign the applicable Smart Groups that include the Windows devices on which you want to collect web app metrics.
- On the Custom Settings page of the device profile, complete these settings. - Select Workspace ONE Intelligent Hub for the Target. - Activate the Make Commands Atomic checkbox. - Add code in the Install Settings and Remove Settings text fields. You can use the offered examples, but be sure to define your browser settings within these examples.
- Ensure to save and publish the device profile to managed devices to activate the browser settings on Windows devices.
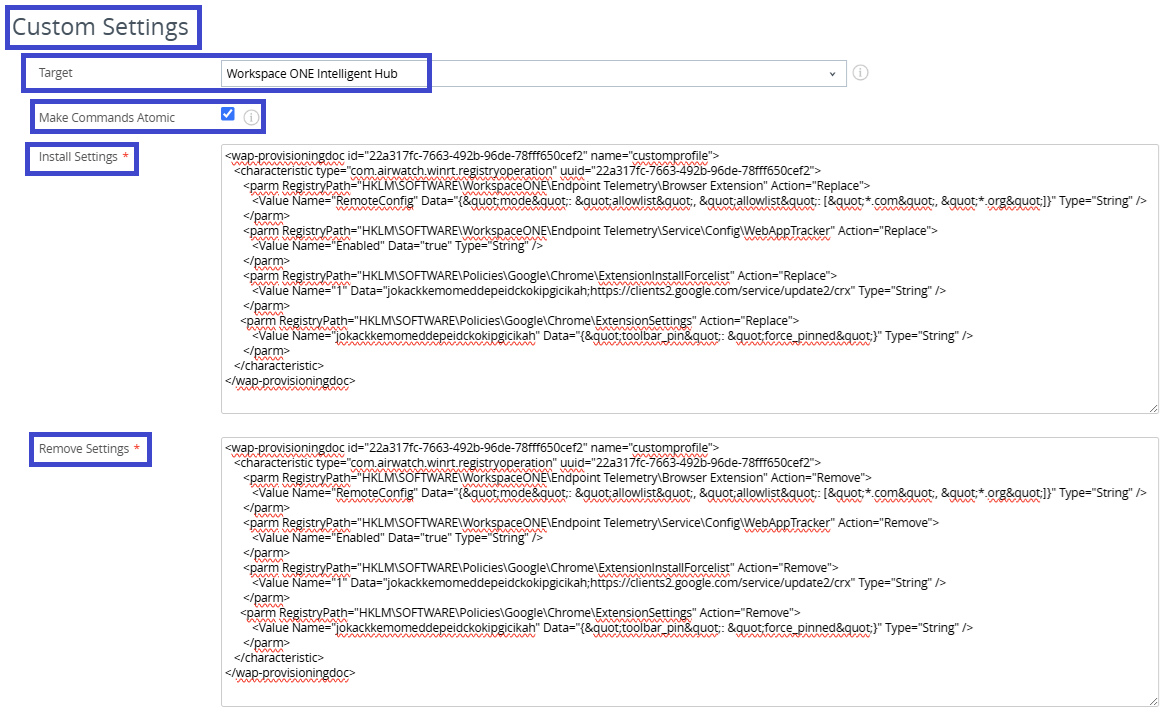
Install Settings code for Chrome
Use this template code in the Install Settings text field on the Custom Settings page of the device profile.
Note: Define your allowlist by updating this template with your own values in the line <Value Name="RemoteConfig" Data='{"mode": "allowlist", "allowlist": ["*.com", "*.org"]}' Type="String" />.
<wap-provisioningdoc id="22a317fc-7663-492b-96de-78fff650cef2" name="customprofile">
<characteristic type="com.airwatch.winrt.registryoperation" uuid="22a317fc-7663-492b-96de-78fff650cef2">
<parm RegistryPath="HKLM\SOFTWARE\WorkspaceONE\Endpoint Telemetry\Browser Extension" Action="Replace">
<Value Name="RemoteConfig" Data="{"mode": "allowlist", "allowlist": ["*.com", "*.org"]}" Type="String" />
</parm>
<parm RegistryPath="HKLM\SOFTWARE\WorkspaceONE\Endpoint Telemetry\Service\Config\WebAppTracker" Action="Replace">
<Value Name="Enabled" Data="true" Type="String" />
</parm>
<parm RegistryPath="HKLM\SOFTWARE\Policies\Google\Chrome\ExtensionInstallForcelist" Action="Replace">
<Value Name="1" Data="jokackkemomeddepeidckokipgicikah;https://clients2.google.com/service/update2/crx" Type="String" />
</parm>
<parm RegistryPath="HKLM\SOFTWARE\Policies\Google\Chrome\ExtensionSettings" Action="Replace">
<Value Name="jokackkemomeddepeidckokipgicikah" Data="{"toolbar_pin": "force_pinned"}" Type="String" />
</parm>
</characteristic>
</wap-provisioningdoc>
Remove Settings code for Chrome
Use this template code code in the Remove Settings text field on the Custom Settings page of the device profile.
Note: Define your allowlist by updating this template with your values in the line <Value Name="RemoteConfig" Data='{"mode": "allowlist", "allowlist": ["*.com", "*.org"]}' Type="String" />.
<wap-provisioningdoc id="22a317fc-7663-492b-96de-78fff650cef2" name="customprofile">
<characteristic type="com.airwatch.winrt.registryoperation" uuid="22a317fc-7663-492b-96de-78fff650cef2">
<parm RegistryPath="HKLM\SOFTWARE\WorkspaceONE\Endpoint Telemetry\Browser Extension" Action="Remove">
<Value Name="RemoteConfig" Data="{"mode": "allowlist", "allowlist": ["*.com", "*.org"]}" Type="String" />
</parm>
<parm RegistryPath="HKLM\SOFTWARE\WorkspaceONE\Endpoint Telemetry\Service\Config\WebAppTracker" Action="Remove">
<Value Name="Enabled" Data="true" Type="String" />
</parm>
<parm RegistryPath="HKLM\SOFTWARE\Policies\Google\Chrome\ExtensionInstallForcelist" Action="Remove">
<Value Name="1" Data="jokackkemomeddepeidckokipgicikah;https://clients2.google.com/service/update2/crx" Type="String" />
</parm>
<parm RegistryPath="HKLM\SOFTWARE\Policies\Google\Chrome\ExtensionSettings" Action="Remove">
<Value Name="jokackkemomeddepeidckokipgicikah" Data="{"toolbar_pin": "force_pinned"}" Type="String" />
</parm>
</characteristic>
</wap-provisioningdoc>
Device profile settings for Edge
Use the listed settings when you configure and publish the device profile that retrieves, installs, and deploys the Edge browser extension.
- Use a Device Profile and not a User Profile.
- On the General page of the device profile, complete these settings. - Consider naming your profile Web App Monitoring to help you find it in the UEM console. - Select and assign the applicable Smart Groups that include the Windows devices on which you want to collect web app metrics.
- On the Custom Settings page of the device profile, complete these settings. - Select Workspace ONE Intelligent Hub for the Target. - Activate the Make Commands Atomic checkbox. - Add code in the Install Settings and Remove Settings text fields. You can use the offered examples, but be sure to define your browser settings within these examples.
- Ensure to save and publish the device profile to managed devices to activate the browser settings on Windows devices.
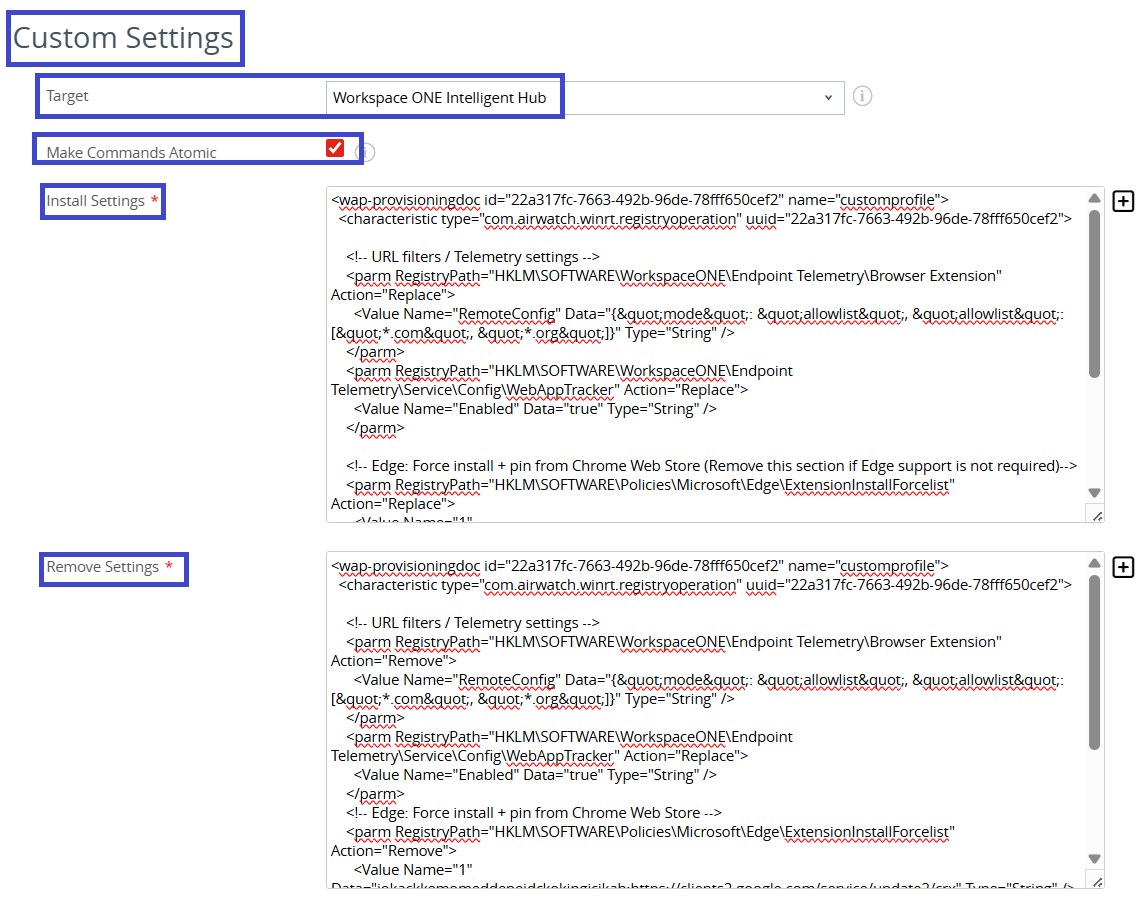
Install Settings code for Edge
Use this template code in the Install Settings text field on the Custom Settings page of the device profile.
Note: Define your allowlist by updating this template with your own values in the line <Value Name="RemoteConfig" Data='{"mode": "allowlist", "allowlist": ["*.com", "*.org"]}' Type="String" />.
<wap-provisioningdoc id="22a317fc-7663-492b-96de-78fff650cef2" name="customprofile">
<characteristic type="com.airwatch.winrt.registryoperation" uuid="22a317fc-7663-492b-96de-78fff650cef2">
<!-- URL filters / Telemetry settings -->
<parm RegistryPath="HKLM\SOFTWARE\WorkspaceONE\Endpoint Telemetry\Browser Extension" Action="Replace">
<Value Name="RemoteConfig" Data="{"mode": "allowlist", "allowlist": ["*.com", "*.org"]}" Type="String" />
</parm>
<parm RegistryPath="HKLM\SOFTWARE\WorkspaceONE\Endpoint Telemetry\Service\Config\WebAppTracker" Action="Replace">
<Value Name="Enabled" Data="true" Type="String" />
</parm>
<!-- Edge: Force install + pin from Chrome Web Store (Remove this section if Edge support is not required)-->
<parm RegistryPath="HKLM\SOFTWARE\Policies\Microsoft\Edge\ExtensionInstallForcelist" Action="Replace">
<Value Name="1" Data="jokackkemomeddepeidckokipgicikah;https://clients2.google.com/service/update2/crx" Type="String" />
</parm>
<parm RegistryPath="HKLM\SOFTWARE\Policies\Microsoft\Edge\ExtensionSettings" Action="Replace">
<Value Name="jokackkemomeddepeidckokipgicikah" Data="{"installation_mode": "force_installed", "update_url": "https://clients2.google.com/service/update2/crx", "toolbar_state": "force_shown"}" Type="String" />
</parm>
</characteristic>
</wap-provisioningdoc>
Remove Settings code for Edge
Use this template code code in the Remove Settings text field on the Custom Settings page of the device profile.
Note: Define your allowlist by updating this template with your values in the line <Value Name="RemoteConfig" Data='{"mode": "allowlist", "allowlist": ["*.com", "*.org"]}' Type="String" />.
<wap-provisioningdoc id="22a317fc-7663-492b-96de-78fff650cef2" name="customprofile">
<characteristic type="com.airwatch.winrt.registryoperation" uuid="22a317fc-7663-492b-96de-78fff650cef2">
<!-- URL filters / Telemetry settings -->
<parm RegistryPath="HKLM\SOFTWARE\WorkspaceONE\Endpoint Telemetry\Browser Extension" Action="Remove">
<Value Name="RemoteConfig" Data="{"mode": "allowlist", "allowlist": ["*.com", "*.org"]}" Type="String" />
</parm>
<parm RegistryPath="HKLM\SOFTWARE\WorkspaceONE\Endpoint Telemetry\Service\Config\WebAppTracker" Action="Replace">
<Value Name="Enabled" Data="true" Type="String" />
</parm>
<!-- Edge: Force install + pin from Chrome Web Store -->
<parm RegistryPath="HKLM\SOFTWARE\Policies\Microsoft\Edge\ExtensionInstallForcelist" Action="Remove">
<Value Name="1" Data="jokackkemomeddepeidckokipgicikah;https://clients2.google.com/service/update2/crx" Type="String" />
</parm>
<parm RegistryPath="HKLM\SOFTWARE\Policies\Microsoft\Edge\ExtensionSettings" Action="Remove">
<Value Name="jokackkemomeddepeidckokipgicikah" Data="{"installation_mode": "force_installed", "update_url": "https://clients2.google.com/service/update2/crx", "toolbar_state": "force_shown"}" Type="String" />
</parm>
</characteristic>
</wap-provisioningdoc>
Automatic deployment on macOS - Omnissa managed
Work in Workspace ONE UEM and use the Custom Settings of a Device Profile to retrieve, install, and deploy the browser extension.
UEM documentation
If you do not know how to work with smart groups or profiles in Workspace ONE UEM, familiarize yourself with these features so that you can push device profile settings to macOS devices. For the most current information on these features, see the listed Workspace ONE UEM topics.
- For information on UEM Smart Groups, see Smart Groups.
- For information on macOS profiles and Custom Settings, see Custom Settings Profile.
- For information on adding a Device Profile, see Add a Device Profile.
Device profile settings
Use the listed settings when you configure and publish the device profile that deploys the browser settings to devices.
- Use a Device Profile and not a User Profile.
- Consider naming your profile Web App Monitoring to help you find it in the UEM console.
- Select and assign the applicable Smart Groups that include the macOS devices on which you want to collect web app metrics. The UEM widget displays this step after you have entered your custom settings code. See the most current UEM documentation for how to complete macOS profiles.
- Add two Custom Settings entries to the device profile.
Custom Settings 1
Deploy Browser Extension: Enter this template code in the first Custom Settings entry.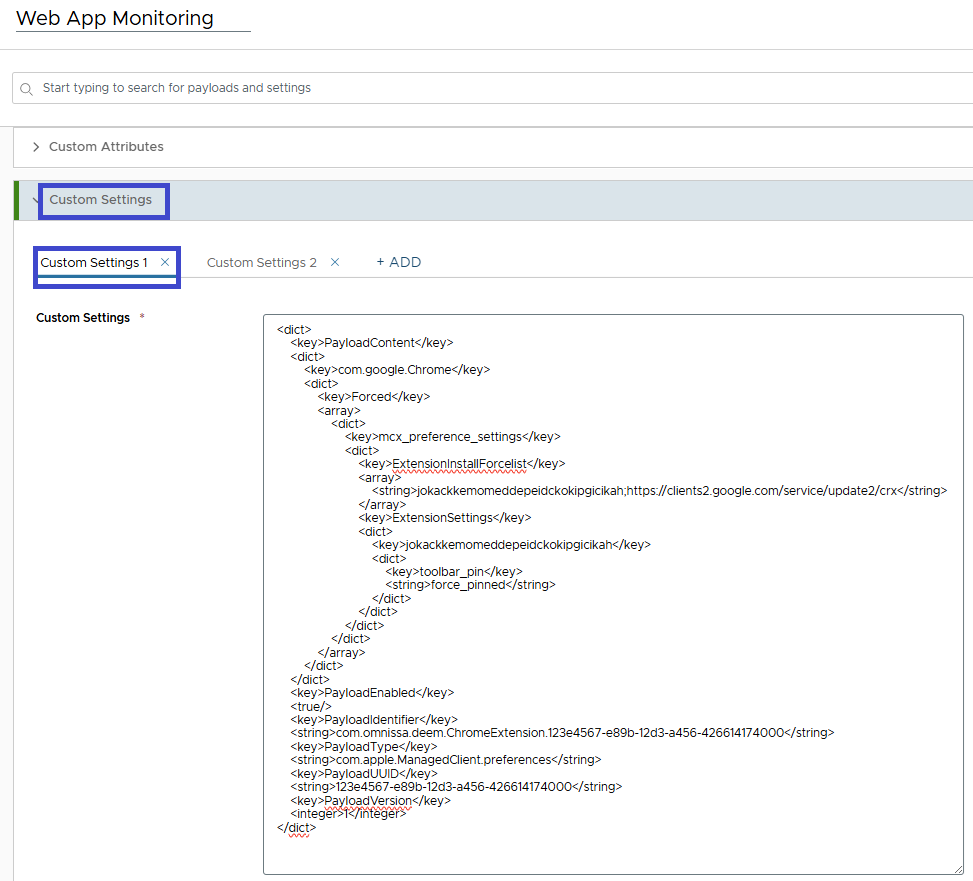
<dict>
    <key>PayloadContent</key>
    <dict>
        <key>com.google.Chrome</key>
        <dict>
            <key>Forced</key>
            <array>
                <dict>
                    <key>mcx_preference_settings</key>
                    <dict>
                        <key>ExtensionInstallForcelist</key>
                        <array>
                            <string>jokackkemomeddepeidckokipgicikah;https://clients2.google.com/service/update2/crx</string>
                        </array>
                        <key>ExtensionSettings</key>
                        <dict>
                            <key>jokackkemomeddepeidckokipgicikah</key>
                            <dict>
                                <key>toolbar_pin</key>
                                <string>force_pinned</string>
                            </dict>
                        </dict>
                    </dict>
                </dict>
            </array>
        </dict>
    </dict>
    <key>PayloadEnabled</key>
    <true/>
    <key>PayloadIdentifier</key>
    <string>com.omnissa.deem.ChromeExtension.123e4567-e89b-12d3-a456-426614174000</string>
    <key>PayloadType</key>
    <string>com.apple.ManagedClient.preferences</string>
    <key>PayloadUUID</key>
    <string>123e4567-e89b-12d3-a456-426614174000</string>
    <key>PayloadVersion</key>
    <integer>1</integer>
</dict>
Custom Settings 2
Configure URL Allowlist Payload: Enter this template code in the second Custom Settings entry.
Note: Define your allowlist by updating this template with your values in the line <key>RemoteConfig</key> <string>{"mode": "allowlist", "allowlist": ["*.com", "*.org"]}</string>.
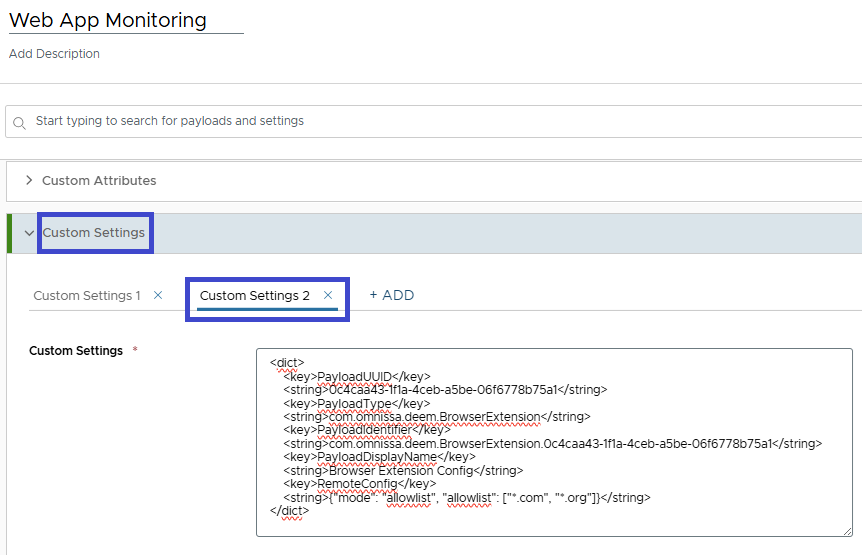
<dict>
    <key>PayloadUUID</key>
    <string>0c4caa43-1f1a-4ceb-a5be-06f6778b75a1</string>
    <key>PayloadType</key>
    <string>com.omnissa.deem.BrowserExtension</string>
    <key>PayloadIdentifier</key>
    <string>com.omnissa.deem.BrowserExtension.0c4caa43-1f1a-4ceb-a5be-06f6778b75a1</string>
    <key>PayloadDisplayName</key>
    <string>Browser Extension Config</string>
    <key>RemoteConfig</key>
    <string>{"mode": "allowlist", "allowlist": ["*.com", "*.org"]}</string>
</dict>
Automatic deployment on macOS - Third-party managed
Work in your solution that manages your macOS devices to add a custom profile to retrieve the browser extension and have it display in Chrome browsers on macOS devices.
Note: We tested this feature for third-party managed, macOS devices using the Chrome browser. It was not tested with the Edge browser.
Device profile settings for your management solution
Use the listed settings when you configure and publish the device profile in your management solution.
- Copy and save the listed code as an XML file somewhere on your local machine so you can upload it to your management solution.
<plist version="1.0"> <dict> <key>PayloadContent</key> <array> <dict> <key>PayloadContent</key> <dict> <key>com.google.Chrome</key> <dict> <key>Forced</key> <array> <dict> <key>mcx_preference_settings</key> <dict> <key>ExtensionInstallForcelist</key> <array> <string>jokackkemomeddepeidckokipgicikah;https://clients2.google.com/service/update2/crx</string> </array> <key>ExtensionSettings</key> <dict> <key>jokackkemomeddepeidckokipgicikah</key> <dict> <key>toolbar_pin</key> <string>force_pinned</string> </dict> </dict> </dict> </dict> </array> </dict> </dict> <key>PayloadEnabled</key> <true /> <key>PayloadIdentifier</key> <string>com.omnissa.deem.ChromeExtension.123e4567-e89b-12d3-a456-426614174000</string> <key>PayloadType</key> <string>com.apple.ManagedClient.preferences</string> <key>PayloadUUID</key> <string>123e4567-e89b-12d3-a456-426614174000</string> <key>PayloadVersion</key> <integer>1</integer> </dict> <dict> <key>PayloadUUID</key> <string>0c4caa43-1f1a-4ceb-a5be-06f6778b75a1</string> <key>PayloadType</key> <string>com.omnissa.deem.BrowserExtension</string> <key>PayloadIdentifier</key> <string>com.omnissa.deem.BrowserExtension.0c4caa43-1f1a-4ceb-a5be-06f6778b75a1</string> <key>PayloadDisplayName</key> <string>Browser Extension Config</string> <key>RemoteConfig</key> <string>{"mode": "allowlist", "allowlist": ["*.com", "*.org"]}</string> </dict> </array> <key>PayloadDescription</key> <string></string> <key>PayloadDisplayName</key> <string>web_app_monitoring_macos/V_1</string> <key>PayloadIdentifier</key> <string>663d201b-800b-4e05-a844-ccb3ff816076</string> <key>PayloadOrganization</key> <string></string> <key>PayloadRemovalDisallowed</key> <false /> <key>PayloadType</key> <string>Configuration</string> <key>PayloadUUID</key> <string>82bb8bd4-ba4f-49ef-90ee-7361cceb4bd2_1</string> <key>PayloadVersion</key> <integer>1</integer> <key>PayloadScope</key> <string>System</string> </dict> </plist> - In your management system, create a custom, device profile.
- The profile you create depends on your management system.
- Some systems use Templates as the profile type.
- Upload your XML file you created to the configurations of your custom profile in the management system.
- Assign and push the profile to the applicable macOS devices in your management system.
Manual deployment
To install the Omnissa Experience Management browser extension, use the process outlined for the platform.
- On Windows devices, you can manually install the extension or you can use a group policy object (GPO). These methods work for the Chrome and Edge browsers.
- On macOS devices, you can manually install the extension or you can update the Chrome configuration profile and the extension ID.
Getting the browser extension
Get the Omnissa Experience Management browser extension at the Chrome Web Store, Omnissa Experience Management.
Chrome extension ID
To find the Chrome extension ID, look in the Chrome Web Store URL.
For example, if the extension ID is jokackkemomeddepeidckokipgicikah, you can find this value at the end of the extension's URL when you visit the Chrome Web Store. 
Windows options - Chrome
- Manage extensions: Go to the Chrome documentation, Install and manage extensions, for information on installing or uninstalling a browser extension.
- GPO: If you want to install the Omnissa Experience Management browser extension on Windows devices, use a group policy object (GPO) that pushes the applicable registry value.
- Chrome: Set Chrome app and extension policies (Windows)
- Chrome: ExtensionInstallForcelist
- Here is a registry example for using a GPO to install the extension.
- You need the browser extension ID and you can find the extension ID in the Chrome Web Store URL.
- To install the extension in Chrome with a GPO, push the listed registry with the extension ID.
HKEY_LOCAL_MACHINE\SOFTWARE\Policies\Google\Chrome\ExtensionInstallForcelist\1 = <extension ID>;https://clients2.google.com/service/update2/crx
Windows options - Edge
- Manage extensions: Go to the article, Add, turn off, or remove extensions in the Microsoft Edge learning center for information on adding, turning off, or removing browser extensions.
- GPO: If you want to install the Omnissa Experience Management browser extension on Windows devices, use a group policy object (GPO) that pushes the applicable registry value.
- Edge: Use group policies to manage Microsoft Edge extensions
- Edge: ExtensionInstallForcelist
- Here is a registry example for using a GPO to install the extension.
- You need the browser extension ID and you can find the extension ID in the Chrome Web Store URL. This extension is not published in the Microsoft Edge store.
- To install the extension in Edge with a GPO, push the listed registry with the extension ID.
HKLM\SOFTWARE\Policies\Microsoft\Edge\ExtensionInstallForcelist\1 = <extension ID>;https://clients2.google.com/service/update2/crx
macOS options
- Manage extensions: Go to the Chrome documentation, Install and manage extensions, for information on installing or uninstalling a browser extension.
- Configuration profile: Go to Chrome documentation for information on installing the browser extension using the configuration profile. You need the browser extension ID and you can find the extension ID in the Chrome Web Store URL.
- Chrome: Set Chrome app and extension policies (Mac)
- Chrome: ExtensionInstallForcelist
- The PLIST example includes the extension settings key for installing the Omnissa Experience Management browser extension. Add the
ExtensionSettingsto the Chrome configuration profile using the applicable PLIST,com.google.Chrome.plist.
<plist version="1.0">
  <dict>
    <key>ExtensionSettings</key>
    <dict>
     <key>jokackkemomeddepeidckokipgicikah</key>
     <dict>
      <key>installation_mode</key>
      <string>force_installed</string>
      <key>update_url</key>
      <string>https://clients2.google.com/service/update2/crx</string>
     </dict>
    </dict>
  </dict>
</plist>
Browser settings
Configure the browser to control the collection of web app metrics from target URLs.
Keys
Use the listed keys and values in your browser settings.
| Key | Type | Value Examples |
|---|---|---|
| mode | string | allowlist/denylistallowlist: The extension collects data from the URL-matched patterns in the allowlist.denylist: The extension does not collect data from the URL-matched patterns in the denylist. |
| allowlist | string array | ["*.com", "*.org"] |
| denylist | string array | ["www.example.com", "*.cn"] |
Example browser settings
An example browser setting is {"mode": "allowlist", "allowlist": ["*.com", "*.org"], "denylist": []}.
Considerations for target URLs
The web app monitoring feature uses a URL pattern to match URLs and to identify those sites from which to collect metrics.
The general format of a URL match pattern consists of the following parts, <scheme>://<host><path>.
Scheme
- If using a simplified format and the URL does not have the scheme, the system matches for both HTTP and HTTPS.
- If the scheme is present in a URL and it uses the wildcard
*, the system matches for both HTTP and HTTPS.
Host
- The host cannot contain a port number.
- The host format can be
<FQDN>or<local hostname>. - The host format that uses a wildcard
*can be*.<FQDN>or*.<FQDN segment>. - The wildcard with a dot*.can match as empty or as part of the host that ends with the dot. - An<FQDN segment>cannot be empty.
Path
- If there is no path, the system can match anything.
- The path cannot contain a query
?or fragmented#parts. - The path cannot contain more than a single wildcard
*. - If the path contains a wildcard
*, it must end with the wildcard character*. - The wildcard can match anything. - The pattern can match any path beginning with the path prefix (which removes the wildcard). - If the path does not contain a wildcard
*, it can match any URL path that starts with the pattern.
Invalid URL pattern examples
| Category | Invalid URL Pattern | Notes |
|---|---|---|
| Invalid Scheme | http://www.example.com/ ftp://www.example.com/ | If the scheme exists, use a wildcard *. |
| Invalid Host | www.example.com:443/ | The host cannot contain a port number. |
*://*./* | The <FQDN segment> in the host cannot be empty. | |
| Invalid Path | www.example.com/path?key=value | The path cannot contain a query. |
www.example.com/path#fragment | The path cannot contain a fragment. | |
www.example.com/path/*/to/* | The path cannot contain more than one wildcard *. | |
www.example.com/path/*/to | If the path contains one wildcard *, it must end with the wildcard *. |
Matched URL pattern examples
| URL Pattern | Matched URLs |
|---|---|
*://www.example.com/* | http://www.example.com/ |
*://localhost/* | http://localhost/start.php http://localhost:8080/start.php |
*://*.example.com/* | http://example.com/http://www.example.com/http://www.support.example.com/ |
www.example.com | http://www.example.com/http://www.example.com/path/ |
www.example.com/path/* | https://www.example.com/path/https://www.example.com/path/to/page/ |
www.example.com/path | https://www.example.com/path?key=value https://www.example.com/path/to/page/ |
Unmatched URL pattern examples
| URL Pattern | Unmatched URLs | Note |
|---|---|---|
*://www.example.com/ | ftp://www.example.com/ | The scheme must use HTTP or HTTPS. |
www.*.com/* www.example.*/* *.example.*/ | https://www.example.com/ | Only the wildcard *. at the beginning of the host pattern works. |
*.example.com | https://www.support-example.com/ | *. cannot match www.support-. |
example.com/* | https://www.example.com/ | URL host www.example.com cannot match the pattern host example.com. |
*://*/* *example.com/* | https://www.example.com/ | The wildcard * or *example.com cannot match www.example.com. |
Access metrics in dashboards
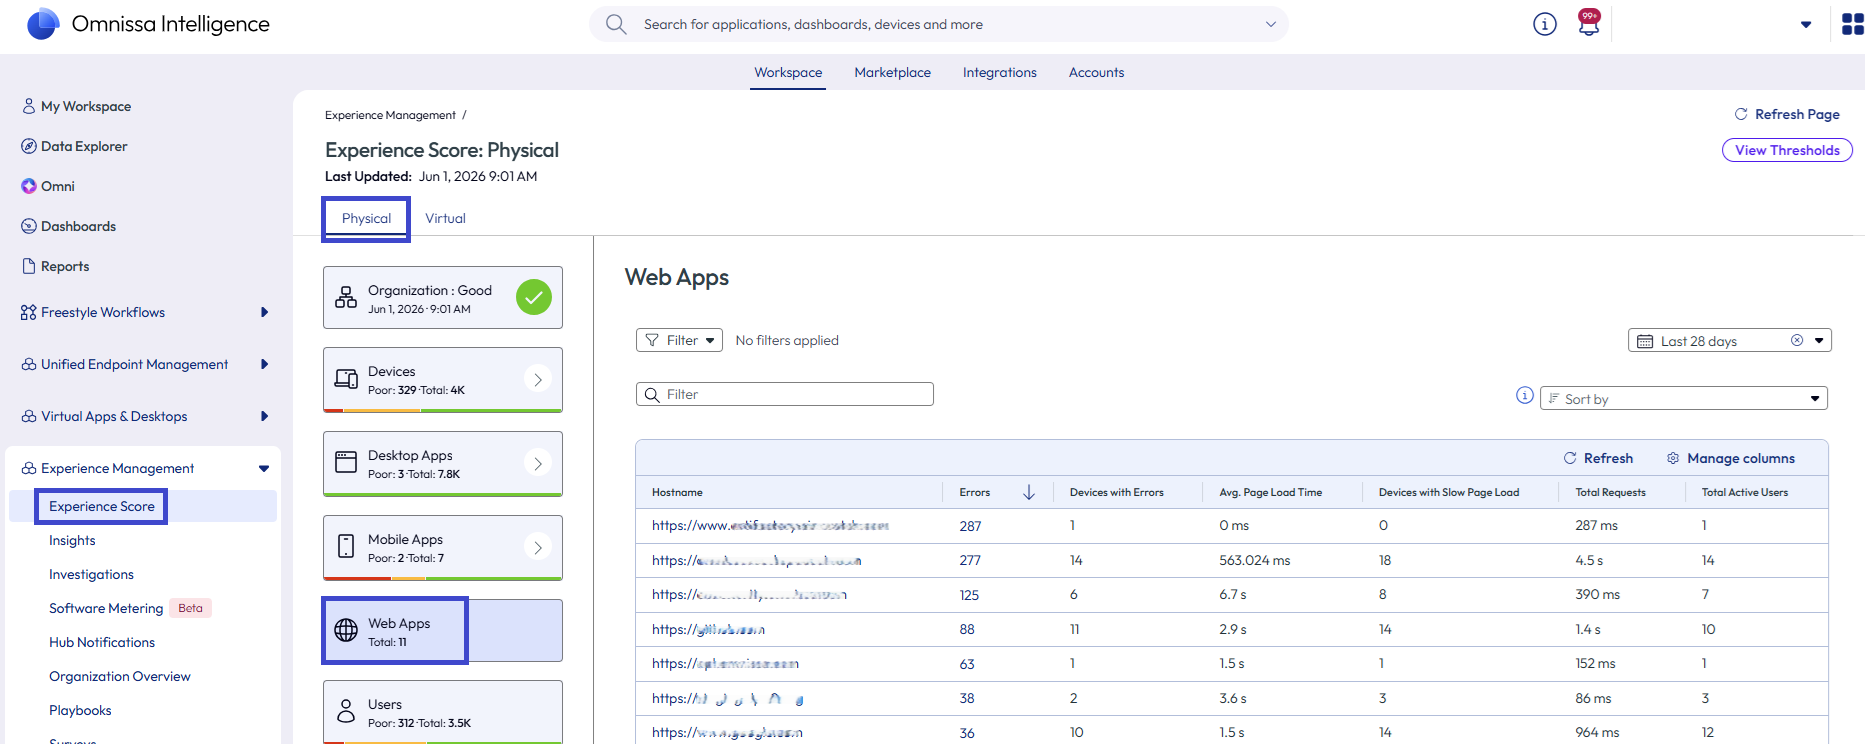
After you set up and collect metrics for web apps, access URL performance and error metrics in the Intelligence console at Experience Management > Experience Score. Then, select the Physical and the Web Apps tile to find a list of your web app URLs.
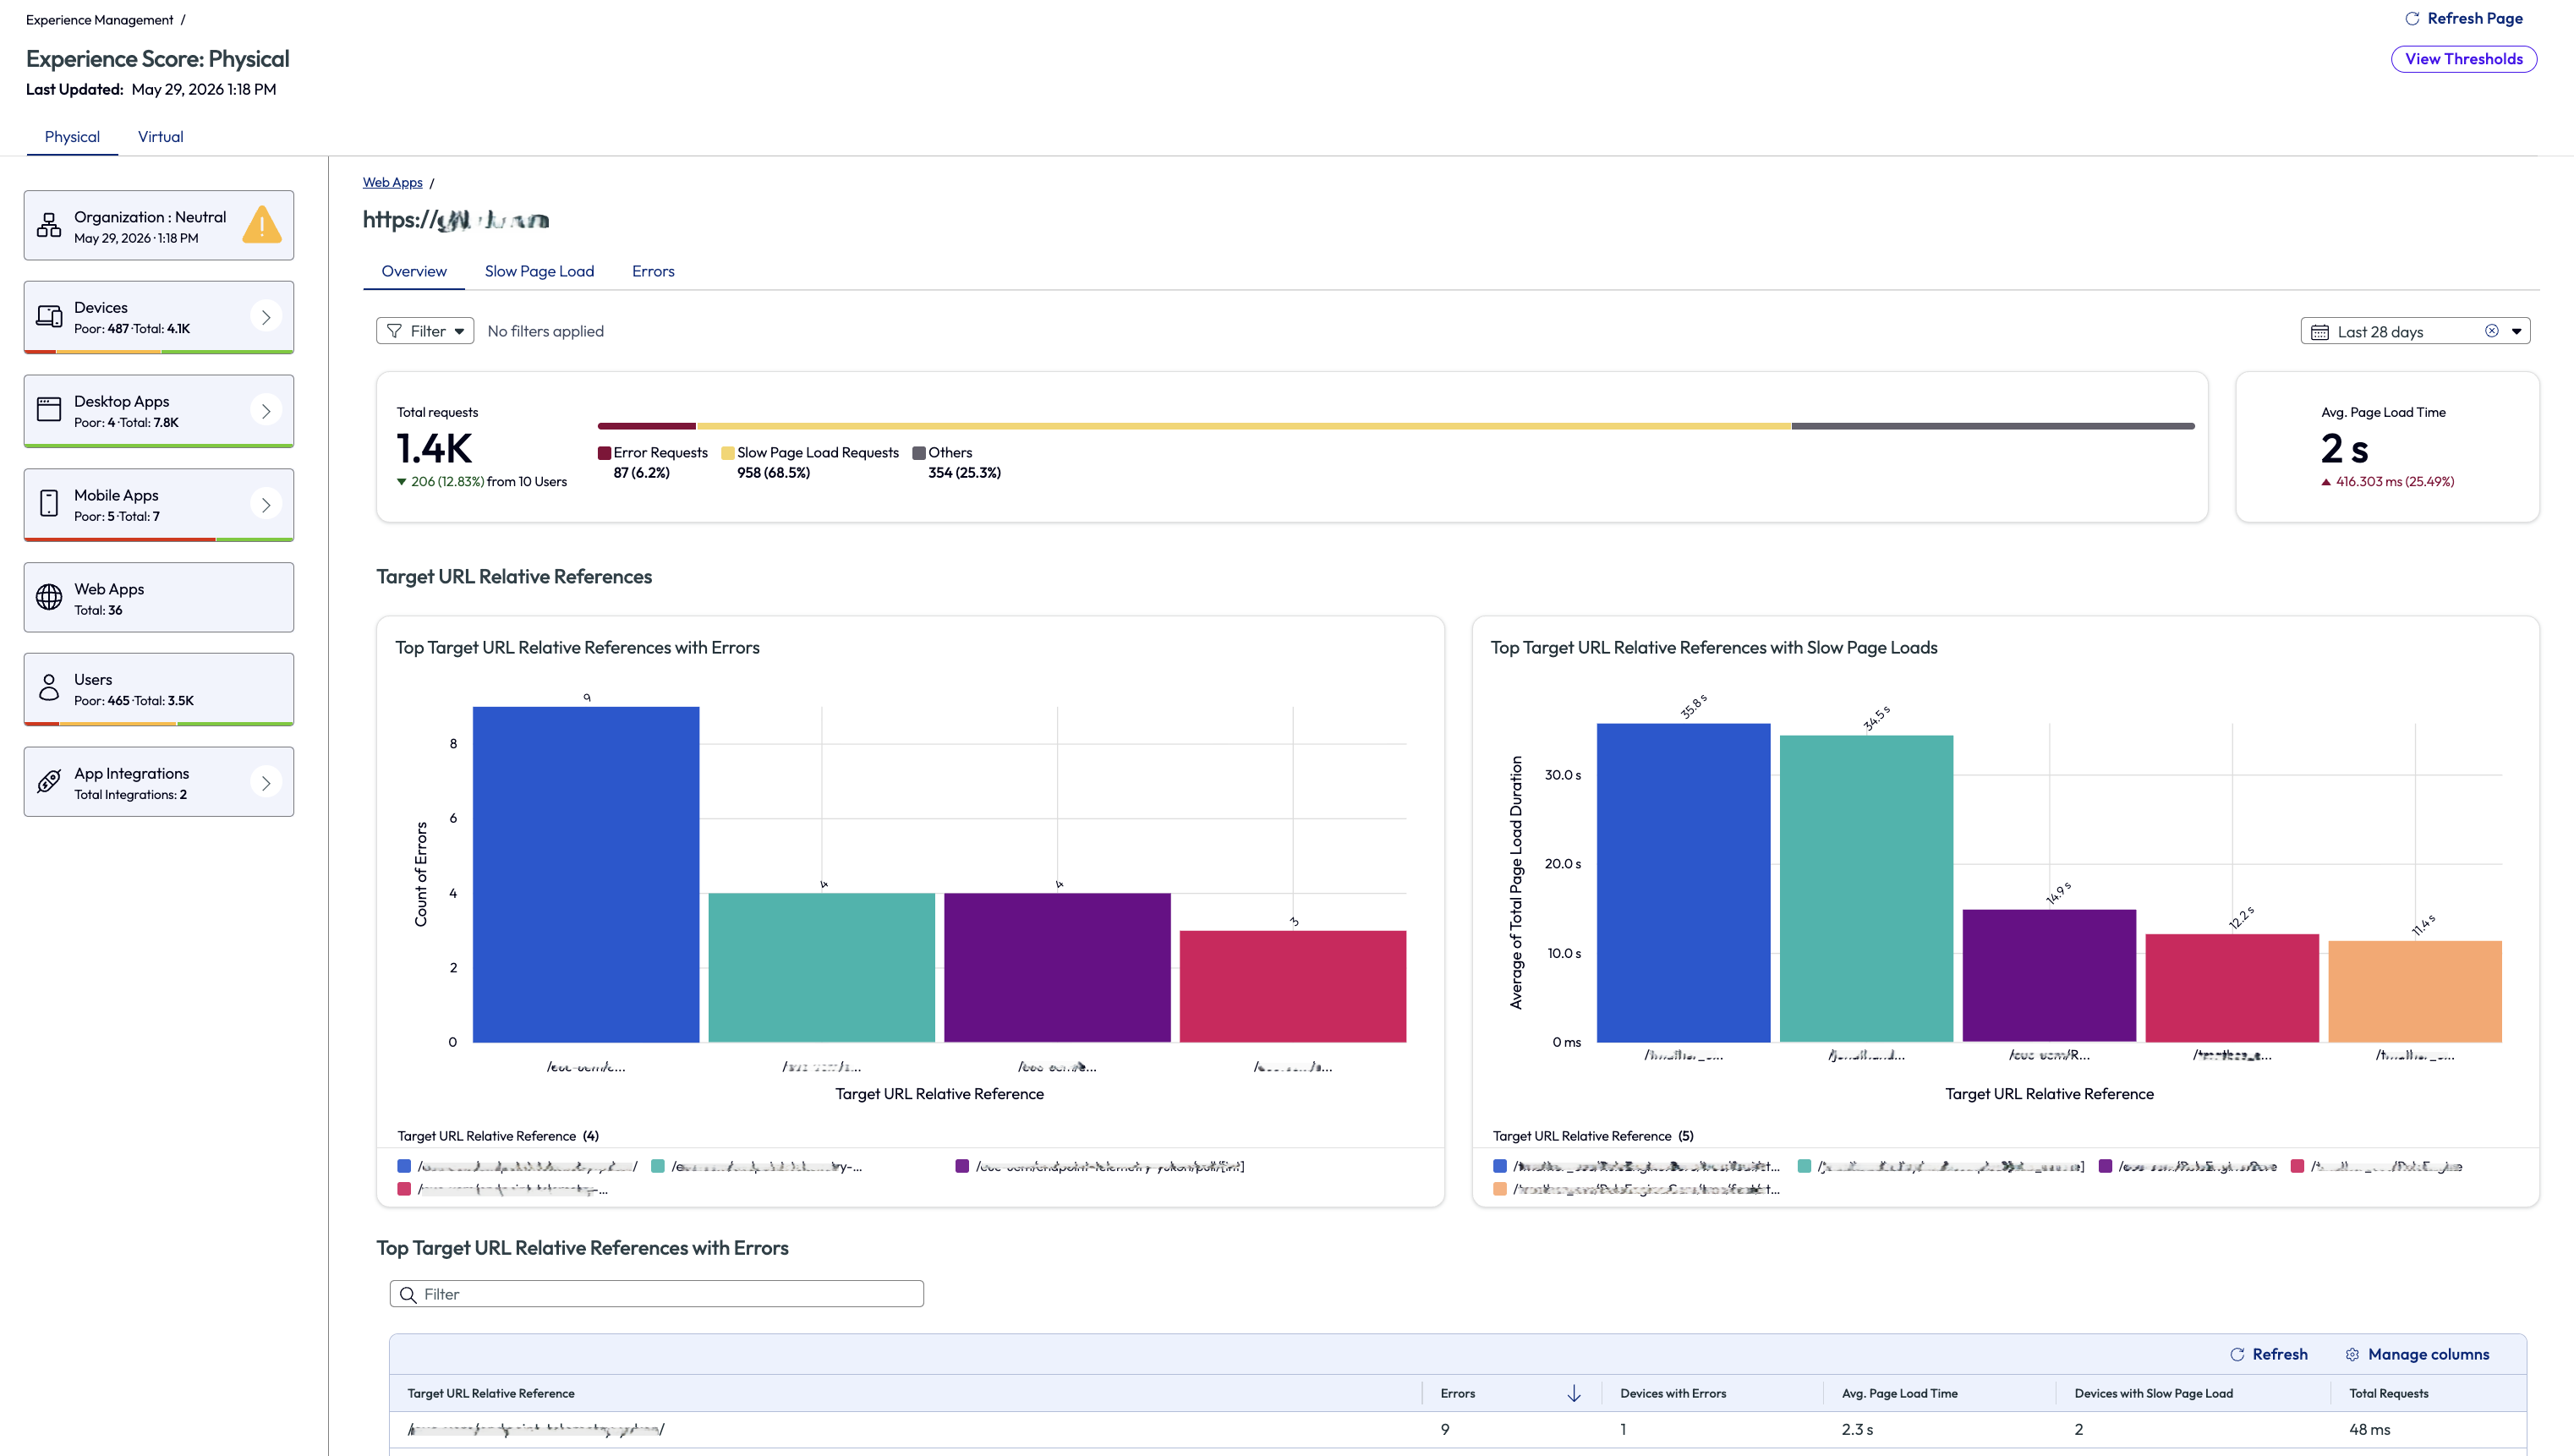
Select a URL to find metrics for that web app like total requests, average page load time, and slow page load requests.
Uninstall by deleting the UEM device profile
Deleting the UEM device profile removes the extension from the browser on macOS and Windows devices and stops the collection of web app metrics. For information on deleting a Device Profile, see Manage Resources.
Was this page helpful?