Experience Management works on your Windows devices to provide you insights into your network health. The Experience Management Agent for Windows is embedded in the Workspace ONE Intelligent Hub for Windows app and it is available as a stand alone agent. Use the agent to collect and report Experience Management for Windows telemetry in your Omnissa Intelligence dashboards and reports.
Installing the Experience Management agent
Install the Experience Management for Windows agent as an independent file.
The Experience Management agent (Omnissa Telemetry Agent) is not dependent on the Intelligent Hub for Windows, and it facilitates upgrade scenarios because of its independence.
Do you need to uninstall your current agent?
If you are using Experience Management for Windows using the agent that comes with the Intelligent Hub, you do not need to uninstall that agent. You can use the separate agent for upgrades.
Authenticated proxies not supported
Experience Management for Windows currently does not support the use of authenticated proxies. Using an authenticated proxy will prevent the Experience Management agent from sending data to Intelligence, causing your Experience Management dashboards and reports to not populate data correctly.
Installing the agent
Omnissa Workspace ONE Experience Management for Windows is available as a resource on Customer Connect.
Install the agent using command line or using the software distribution (SFD) feature in Omnissa Workspace ONE UEM.
Installing by command line
Install or upgrade the Experience Management agent using command line by typing the installer filename Omnissa-Telemetry-Agent-x86_64-z.z.z-xxxx.exe and specifying the INTEGRATION property.
This example silently installs the agent on Windows devices managed by Workspace ONE UEM, and it prevents reboot during or immediately after installation, Omnissa-Telemetry-Agent-x86_64-z.z.z-xxxx.exe /silent /v INTEGRATION=Hub REBOOT=ReallySuppress.
With silent installation, you do not have to respond to wizard prompts, which is beneficial in large enterprise deployments.
Use these commands in a terminal when working with the Experience Management agent.
| Command | Description |
|---|---|
/? | Lists the Experience Management installation commands and properties. |
/install | Installs the Experience Management agent. |
/l | Specifies a folder and a name for the installation log files. If the log file directory or name contains spaces, you must enclose it with double quotes. If you do not specify a /l parameter, the installation log files are created in the %TEMP% directory by default. |
/repair | Repairs Experience Management. |
/silent | Installs Experience Management silently without the display of interactive dialogs. |
/uninstall | Uninstalls the agent. |
/v MSI command line properties | Instructs the installer to pass a string that you enter at the command line as a set of properties for MSI to interpret. Use the listed example to install the Experience Management agent on Windows devices managed by Workspace ONE UEM. Omnissa-Telemetry-Agent-x86_64-z.z.z-xxxx.exe /v INTEGRATION=Hub MANAGEMENT_MODE=UEMUse the listed example to install the Experience Management agent in silent mode and to prevent system reboots during or after the silent installation of the agent. Omnissa-Telemetry-Agent-x86_64-z.z.z-xxxx.exe /silent /v INTEGRATION=Hub REBOOT=ReallySuppress |
/x | Extracts the installer packages into the %TEMP% directory. |
Use these MSI properties when installing the Experience Management agent.
| MSI Property | Description |
|---|---|
| INTEGRATION | Specifies which product Experience Management is integrated with. The valid value is Hub.The value for Horizon environments is HorizonAgent.This MSI property is mandatory. If you do not specify this property, another product can unexpectedly uninstall Experience Management in the future. |
| MANAGEMENT_MODE | During installation, specifies that Workspace ONE UEM manages the Experience Management feature. The valid value is UEM.Another value for Horizon environments includes Horizon.This MSI property is optional. Example: Omnissa-Telemetry-Agent-x86_64-z.z.z-xxxx.exe /v INTEGRATION=Hub MANAGEMENT_MODE=UEM |
| REBOOT | You can use the REBOOT=ReallySuppress property to prevent a system reboot during or immediately after an installation. This property is especially helpful when installing the agent in silent mode. |
Installing with SFD
Add the Experience Management agent using the Software Distribution (SFD) feature in Workspace ONE UEM. Upload the file using the appropriate method for your SFD deployment.
- Add Windows applications from the Enterprise Application Repository
- Upload and Configure Win32 Files for Software Distribution.
When you upload and configure the agent in Workspace ONE UEM, ensure to complete the listed SFD settings.
| SFD Setting | Entry |
|---|---|
| Files tab > App Uninstall Process | - Custom Script Type: Select Input. - Uninstall Command: Enter a command that uninstalls the agent. The listed example command silently uninstalls the agent on Windows devices that run the Intelligent Hub for Windows. This example prevents a system reboot during or immediately after the silent uninstallation of the agent. Omnissa-Telemetry-Agent-x86_64-z.z.z-xxxx.exe /silent /uninstall /v INTEGRATION=Hub REBOOT=ReallySuppress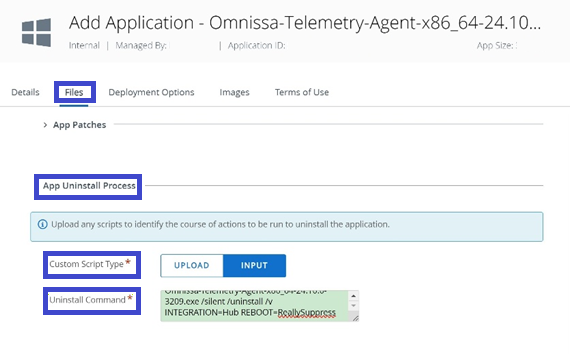 |
| Deployment Options tab > How To Install | - Install Command: Enter a command that installs the agent. The listed example command silently installs the agent on Windows devices that run the Intelligent Hub for Windows. This example prevents a system reboot during or immediately after the silent installation of the agent.Omnissa-Telemetry-Agent-x86_64-z.z.z-xxxx.exe /silent /v INTEGRATION=Hub REBOOT=ReallySuppress- Device Restart: Select from two menu options, User-engaged restart or Do not restart. 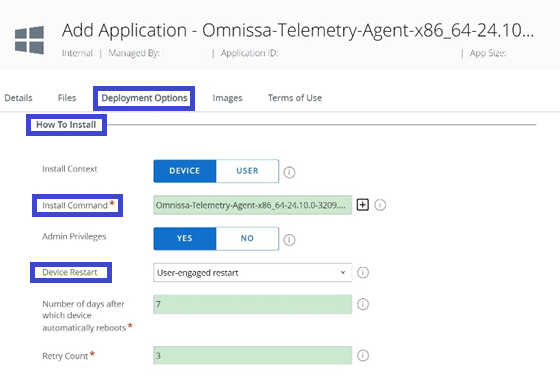 If you select Do not restart, the agent might not work after installation so configure the Installer Reboot Exit Code setting with the exit code 3010. 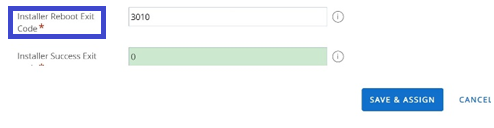 |
| Deployment Options tab > When To Call Install Complete | Identify Application By: The SFD system uses this field to identity if the installation or uninstallation was successful. Select the Edit (pencil) icon to enter criteria. The Experience Management agent works with many systems, like Intelligent Hub for Windows, Horizon Clients, or the Horizon Agent, so define strict criteria so that the SFD system can determine the success or failure of installation or uninstallation. - Example 1: Define where the system finds the file. Criteria Type: File exists Path: C:\Program Files\WorkspaceONE\Endpoint Telemetry Service\ws1etlm.exeVersion: Any Modified On: Select a date and time that identifies the installation date. - Example 2: Define where the system finds the registry in the Intelligent Hub. Criteria Type: Registry exists Path: HKLM\SOFTWARE\WorkspaceONE\Endpoint Telemetry\Installer\Integration Value Name: Hub Value Type: Version Configure Registry Data: Activate checkbox Version: Greater than or equal 24.10.0.3209 |
How do you check that the agent is running?
One way to troubleshoot issues with sending data to Omnissa Intelligence is to ensure the Experience Management Agent for Windows is running on the Windows device. The Experience Management Agent includes the ws1etlm service.
Start Command Prompt as an administrator and run sc query ws1etlm. This command displays the status of the agent service as ws1etlm.
Working with the agent using the utility tool
Use the utility tool (tlmtool) to interact with the agent.
What are the registry settings Experience Management uses?
Experience Management creates registry entries under HKEY_LOCAL_MACHINE\SYSTEM\CurrentControlSet\Services\ws1etlm on the Windows device.
Utility tool (tlmtool) for troubleshooting
To make troubleshooting easier, use the tlmtool utility tool to set log levels, collect log files, and package log files.
The utility tool is installed on the device in the same directory as the Experience Management agent at C:\Program Files\WorkspaceONE\Endpoint Telemetry Service\Tools. The installation path can be retrieved with a registry key at HKEY_LOCAL_MACHINE\SYSTEM\CurrentControlSet\Services\ws1etlm\ImagePath.
How do you run the utility tool?
Run tlmtool as an administrator and use an execution policy with a PowerShell script. The PowerShell command is Set-ExecutionPolicy.
- Run the Command Prompt app as an administrator.
- Go to the installation path C:\Program Files\WorkspaceONE\Endpoint Telemetry Service\Tools.
- Run
tlmtool <options> [arguments].
An example of what to enter in Command Prompt istlmtool -setLogLevel Trace. - To view supported command options in the
tlmtool, entertlmtool -helpin Command Prompt.
Command line options for the utility tool
| Option | Usage | Description |
|---|---|---|
| collectLog | -collectLog | Collects and packages the log files, and stores them in C:\Windows\Temp\Diagnostic by default. |
| getDEEMDisabled | -getDEEMDisabled | Gets the status of the collecting and sending of Experience Management data as set by the utility tool. - false: Experience Management is collecting and sending data.- true: Experience Management is not collecting and sending data. |
| getDEEMManagementMode | -getDEEMManagementMode | Retrieves which system manages the Experience Management system, Workspace ONE UEM or Horizon. |
| getHealthStatus | -getHealthStatus | Reports the Experience Management agent's activation status, if the agent is connected, and if it is collecting telemetry. |
| help | -help | Displays the help information for the tool. |
| resetAllLogSettings | -resetAllLogSettings | Resets all the log settings to default, including log level and configurations. |
| resetLogConfiguration | -resetLogConfiguration maxLogSize | Resets the maximum size of the log file to the default 1MB. |
-resetLogConfiguration maxTraceLogSize | Resets the maximum size of the trace log file to the default 10MB. | |
-resetLogConfiguration maxLogFiles | Resets the maximum number of historical log files kept to the default 10. | |
| resetLogLevel | -resetLogLevel | Resets the log level to default settings. |
| setDEEMDisabled | -setDEEMDisabled false | Sets Experience Management to continue to collect and send data. |
-setDEEMDisabled true | Stops Experience Management from collecting and sending data. An administrative policy can nullify this command. See the section Using group policy objects to configure Experience Management for Windows. | |
| setDEEMManagementMode | -setDEEMManagementMode <uem> | Sets Workspace ONE UEM to manage the Experience Management service. |
-setDEEMManagementMode <horizon> | Sets Horizon to manage the Experience Management service. | |
| setLogConfiguration | -setLogConfiguration maxLogSize <1..50> | Sets the maximum size of a log file in MB, and the range is 1-50. |
-setLogConfiguration maxTraceLogSize <1..50> | Sets the maximum size of a trace log file in MB, and the range is 1-50. | |
-setLogConfiguration maxLogFiles <1..30> | Sets the maximum number of historical log files kept, and the range is 1-30. | |
| setLogLevel | -setLogLevel <Error\Info\Debug\Trace> | Sets the log level to <Error\Info\Debug\Trace>. |
How do you activate logging for the Experience Management Telemetry Agent on the device?
- Activate logging for Experience Management by running the
tlmtoolcommandtlmtool -setLogLevel Tracewithout restarting the service. - For the ws1etlm service, activate logging by updating the listed registry without restarting the service.
HKEY_LOCAL_MACHINE\SOFTWARE\WorkspaceONE\Endpoint Telemetry\Service\Config\Log\LogLevel="Trace"- The system writes the logs to the folder C:\ProgramData\WorkspaceONE\ws1etlm\logs.
Activate additional logon event reporting for Experience Management (optional)
Experience Management 24.04 for Windows and later
If you use a version of Experience Management for Windows released before 24.04, you can continue to activate additional logon event reporting.
However, you do not need to activate additional logon event reporting if you update to Experience Management 24.04 for Windows and later. We have integrated the UserAction Tracker for Windows so that Experience Management captures logon events for display in dashboards, reports, and workflows.
For Experience Management 24.04 for Windows and later, you must activate the Audit Other Logon/Logoff Events for the Screen Saver event.
Audit policies
To feed additional Experience Management metrics around the Windows logon/logoff experience into the User Experience Score, activate the listed advanced audit policies on the applicable Windows devices.
- Audit Logoff
- Audit Logon
- Audit Other Logon/Logoff Events
- Audit Special Logon
On the machine
You can activate these policies on the Windows machine using the listed process.
- Open the Group Policy Editor (Gpedit.msc).
- Go to Computer Configuration > Windows Settings > Security Settings > Advanced Audit Policy Configuration > System Audit Policies – Local Group Policy Object > Logon/Logoff.
- Activate and configure each of the above policies for Success and Failure reporting.
With a CMD file
If you want to use a CMD file (batch file) to activate advanced audit policies, the listed code updates the applicable GPOs.
@echo off
echo "Machine Name,Policy Target,Subcategory,Subcategory GUID,Inclusion Setting,Exclusion Setting,Setting Value" >audit_policy.csv
echo ",System,Audit Logoff,{0cce9216-69ae-11d9-bed3-505054503030},Success and Failure,,3" >>audit_policy.csv
echo ",System,Audit Logon,{0cce9215-69ae-11d9-bed3-505054503030},Success and Failure,,3" >>audit_policy.csv
echo ",System,Audit Other Logon/Logoff Events,{0cce921c-69ae-11d9-bed3-505054503030},Success and Failure,,3" >>audit_policy.csv

auditpol.exe /restore /file:audit_policy.csv
del /f audit_policy.csv
With Baselines
Another way to activate the advanced audit policies is using Baselines. Baselines are curated settings grouped together to streamline Windows configurations. The listed process outlines the general steps to activate the advanced audit policies. For details about Baselines, access Using Baselines.
- In Workspace ONE UEM, select the organization group.
- Create a Baseline using a template in the console at Resources > Profiles & Baselines > Baselines.
- Use the Windows Security Baseline template.
- On the Customize tab, find the policies in Computer Configuration > Windows Settings > Security Settings > Advanced Audit Policy Configuration > System Audit Policies – Local Group Policy Object > Logon/Logoff.
- Activate the settings for Success and Failure.
- Save and assign the Baseline to applicable smart groups.
- Restart devices to deploy Baselines.
With PowerShell
If you don't want to use GPOs, a CMD file, or Baselines, you can also use PowerShell commands to activate audit policies for Windows logon/logoff experience data.
- Turn off the echo.
$host.UI.RawUI.BufferSize = New-Object Management.Automation.Host.Size (500, $host.UI.RawUI.BufferSize.Height) $ProgressPreference = 'SilentlyContinue' - Define the CSV content.
$csvContent = @" "Machine Name,Policy Target,Subcategory,Subcategory GUID,Inclusion Setting,Exclusion Setting,Setting Value" ",System,Audit Logoff,{0cce9216-69ae-11d9-bed3-505054503030},Success and Failure,,3" ",System,Audit Logon,{0cce9215-69ae-11d9-bed3-505054503030},Success and Failure,,3" ",System,Audit Other Logon/Logoff Events,{0cce921c-69ae-11d9-bed3-505054503030},Success and Failure,,3" "@` - Write the content to an audit_policy.csv.
$csvContent | Out-File -FilePath "audit_policy.csv" -Encoding ASCII - Run the auditpol.exe command.
& auditpol.exe /restore /file:audit_policy.csv - Delete the CSV file.
Remove-Item -Path "audit_policy.csv" -Force
Using group policy objects to configure Experience Management for Windows
Use group policy objects to configure the Experience Management Agent. For example, you can use group policy objects to configure the Experience Management Agent when you do not want to collect telemetry from your users’ devices.
To control the collection of Experience Management telemetry on local Windows machines, use custom group policy objects (GPOs) included in the Experience Management for Windows ADMX template file, etlm_extra_bundle. Ensure you are using the most current version of the Experience Management for Windows ADMX template file, which is entitled wsone_etlm.admx/adml.
Find and download the template file as part of the separate agent ZIP file on Customer Connect. You must copy the file to your Active Directory server and use the Group Policy Management Editor to add the administrative templates.
Available GPOs
| GPO Setting | Template Location | Description |
|---|---|---|
| Allow Local Disablement General template | Computer Configuration > Administrative Templates > Omnissa Endpoint Telemetry > DEEM | Determines if local deactivation using the tlmtool utility tool on the user's device is allowed. When set to Enabled, local deactivation using the tlmtool utility tool is allowed. When set to Disabled, deactivation by the utility tool has no effect. If you do not configure this policy, local deactivation is allowed. |
| Configure Interval of LAN Latency Collection LAN Latency template | Computer Configuration > Administrative Templates > Omnissa Endpoint Telemetry > DEEM > LAN Latency | Configures the interval of collecting a device's LAN latency. If you deactivate or do not configure this policy, by default the Experience Management service collects LAN latency every 600 seconds. |
| Configure Interval of Internet Latency Collection Internet Latency template | Computer Configuration > Administrative Templates > Omnissa Endpoint Telemetry > DEEM > Internet Latency | Configures the interval of collecting a device's internet latency. If you deactivate or do not configure this policy, by default the Experience Management service collects internet latency every 600 seconds. |
| Disable DEEM General template | Computer Configuration > Administrative Templates > Omnissa Endpoint Telemetry > DEEM | Determines if Experience Management can be deactivated by administrative policy (GPOs). When set to Enabled, Experience Management stops collecting and sending telemetry data from the user's device. If you set this policy setting to Disabled or if you do not configure this policy setting, someone can still deactivate Experience Management locally, depending on the Allow Local Disablement policy setting. |
| Enable IPv4 Internet Latency Collection Internet Latency template | Computer Configuration > Administrative Templates > Omnissa Endpoint Telemetry > DEEM > Internet Latency | Configures whether Experience Management collects IPv4 internet latency on a device. If you do not configure this policy, by default the Experience Management service collects internet latency every 600 seconds. You can change the interval using the Configure Interval of Internet Latency Collection policy. |
| Enable IPv6 Internet Latency Collection Internet Latency template | Computer Configuration > Administrative Templates > Omnissa Endpoint Telemetry > DEEM > Internet Latency | Configures whether Experience Management collects IPv6 internet latency on a device. If you do not configure this policy, by default the Experience Management service collects internet latency every 600 seconds. You can change the interval using the Configure Interval of Internet Latency Collection policy. |
| Enable IPv4 LAN Latency Collection LAN Latency template | Computer Configuration > Administrative Templates > Omnissa Endpoint Telemetry > DEEM > LAN Latency | Configures whether Experience Management collects IPv4 LAN latency data on the device. If you do not configure this policy, the service collects LAN latency every 600 seconds. You can change the interval using the Configure Interval of LAN Latency Collection policy. |
| Enable IPv6 LAN Latency Collection LAN Latency template | Computer Configuration > Administrative Templates > Omnissa Endpoint Telemetry > DEEM > LAN Latency | Configures whether Experience Management collects IPv6 LAN latency data on the device. If you do not configure this policy, the service collects LAN latency every 600 seconds. You can change the interval using the Configure Interval of LAN Latency Collection policy. |
| Management Mode General template | Computer Configuration > Administrative Templates > Omnissa Endpoint Telemetry > DEEM | Determines the solution that manages the Experience Management integration, Workspace ONE UEM or Horizon. The default manager is Workspace ONE UEM. Use the GPO to override the default. |
| Maximum disk space (in megabytes) allowed to store unsent Historical data UEM template | Computer Configuration > Administrative Templates > Omnissa Endpoint Telemetry > DEEM > UEM > Network | Configures the maximum amount of disk space that can be used to store unsent Historical data when disconnected from the network or otherwise unable to reach the Intelligence service. If deactivated or not configured, the default is 500 MB. |
| Maximum disk space (in megabytes) allowed to store unsent Historical data in Windows Multi Session Host - RDSH Horizon template | Computer Configuration > Administrative Templates > Omnissa Endpoint Telemetry > DEEM > Horizon > Data | Configures the maximum amount of disk space that can be used to store unsent Historical data in Windows Multi Session Host when disconnected from the network or otherwise unable to reach the Intelligence service. If deactivated or not configured, the default is 10 GB. The registry value is MultiSessionHistoricalDataMaxSizeMb. |
| Maximum disk space (in megabytes) allowed to store unsent Historical data - VDI Horizon template | Computer Configuration > Administrative Templates > Omnissa Endpoint Telemetry > DEEM > Horizon > Data | Configures the maximum amount of disk space that can be used to store unsent Historical data when disconnected from the network or otherwise unable to reach the Intelligence service. If deactivated or not configured, the default is 100 MB. The registry value is HistoricalDataMaxSizeMb. |
| Number of days to keep unsent Historical data Horizon template | Computer Configuration > Administrative Templates > Omnissa Endpoint Telemetry > DEEM > Horizon > Data | Configures the number of days to keep unsent Historical data when disconnected from the network or otherwise unable to reach the Intelligence service. If you deactivate or do not configure this policy, the default is 7 days. |
| Number of days to keep unsent Historical data UEM template | Computer Configuration > Administrative Templates > Omnissa Endpoint Telemetry > DEEM > UEM > Data | Configures the number of days to keep unsent Historical data when disconnected from the network or otherwise unable to reach the Intelligence service. If you deactivate or do not configure this policy, the default is 30 days. |
| Proxy Configuration Horizon template | Computer Configuration > Administrative Templates > Omnissa Endpoint Telemetry > DEEM > Horizon > Network | Configures the proxy server configuration used by Horizon Desktops when sending data to Intelligence. If you activate this setting with the Proxy Type as Auto, then the system and the per-user proxy settings determine the proxy used. If you activate this setting with the Proxy Type as Script, the Script Address retrieves a proxy configuration script. The Script Address can be a URL or a standard URN location. For example, the Script Address can be a file on local or on a remote disk, \server\share\script.pac.If you activate this setting with the Proxy Type as Static, then the Static Proxy URL specifies the proxy used. Optionally, the URL can include a port. If you deactivate this setting or do not configure it, then the system and the per-user proxy settings determine the proxy used. |
| Proxy Configuration UEM template | Computer Configuration > Administrative Templates > Omnissa Endpoint Telemetry > DEEM > UEM > Network | Configures the proxy server configuration used by UEM Desktops when sending data to Intelligence. If you activate this setting with the Proxy Type as Auto, then the system and the per-user proxy settings determine the proxy used. If you activate this setting with the Proxy Type as Script, the Script Address retrieves a proxy configuration script. The Script Address can be a URL or a standard URN location. For example, the Script Address can be a file on local or on a remote disk, \server\share\script.pac.If you activate this setting with the Proxy Type as Static, then the Static Proxy URL specifies the proxy used. Optionally, the URL can include a port. If you deactivate this setting or do not configure it, then the system and the per-user proxy settings determine the proxy used. |
Location services required for some Network events
If your deployment deactivates location services by policy on Windows devices, then the Experience Management solution cannot collect and display Experience Management data such as network speed or Wifi details in your Intelligence dashboards, reports, and workflows.
See the table for a list of the network events and their corresponding attributes Experience Management cannot collect and display in your dashboards, reports, and workflows if you deactivate location services on Windows devices.
To use these events and their attributes in your Experience Management deployment, you must activate location services on Windows devices.
| Missing Events | Missing Attributes |
|---|---|
| net_event_l2_connected | dot11_auth_type |
| dot11_bss_available_modes | |
| dot11_bss_wifi_generation | |
| dot11_bss_wps_enabled | |
| dot11_bssid | |
| dot11_encryption | |
| dot11_frequency | |
| dot11_mode | |
| dot11_security_standard | |
| dot11_signal_quality | |
| dot11_ssid | |
| net_event_l2_reconfigured | dot11_auth_type |
| dot11_bss_available_modes | |
| dot11_bss_wifi_generation | |
| dot11_bss_wps_enabled | |
| dot11_bssid | |
| dot11_encryption | |
| dot11_frequency | |
| dot11_mode | |
| dot11_security_standard | |
| dot11_signal_quality | |
| dot11_ssid | |
| net_event_l2_statistics | dot11_signal_quality |
| dot11_ssid | |
| l2_rx_link_speed_bits_ps | |
| l2_tx_link_speed_bits_ps |
Public IP event in Network data needs domain access
To use the Public IP address feature in the Network category, ensure devices have access to the listed domains.
ts.awmdm.comts4.awmdm.comts6.awmdm.com
Was this page helpful?