Omnissa Intelligence ofrece Condiciones que se utilizan en Freestyle Orchestrator para que pueda definir secuencias de acción a mitad del flujo de trabajo sin crear flujos de trabajo independientes.
Beneficios
Las condiciones reducen la sobrecarga asociada al mantenimiento de flujos de trabajo independientes para cada escenario específico. Con las condiciones, puede utilizar una regla del activador común para crear rutas de ejecución alternativas para cada escenario diferente dentro de un flujo de trabajo. Por ejemplo, sin condiciones, era necesario crear flujos de trabajo independientes para cada acción necesaria para cada escenario de cumplimiento. Ahora, puede agregar condiciones para varios escenarios de cumplimiento con muchas acciones en un solo flujo de trabajo.
Crear un flujo de trabajo con una condición
Busque el elemento de menú Condición como opción de arrastrar y soltar en el lienzo de flujo de trabajo.
Importante: Para garantizar que las acciones del flujo de trabajo se comporten como desea, compruebe el panel Impacto potencial de los flujos de trabajo y pruebe los flujos de trabajo en un número reducido de destinos especificando filtros más restrictivos.
- En Intelligence, vaya a Área de trabajo > Freestyle > Agregar flujo de trabajo.
- Introduzca un nombre para el flujo de trabajo .
- Configure el activador con el origen de datos deseado.
- Seleccione Ajustes del activador.
- Trabaje con los resultados de Impacto potencial correspondientes a los Ajustes del activador Manual o Programación en el área Ajustes del flujo de trabajo.
- Seleccione Evaluar impacto potencial.
- Seleccione Ver detalles para acceder al panel Impacto potencial.
- Utilice Agrupar por para agrupar los datos por atributos de datos. Por ejemplo, puede agrupar los datos por datos del dispositivo o de la aplicación.
- Utilice la flecha para cerrar el panel Impacto potencial.
- Acceda al panel en cualquier momento durante la creación del flujo de trabajo para ajustar los filtros.
- Configure la Regla del activador.
- Para agregar una condición, arrastre y suelte el icono Condición de los componentes de la izquierda o utilice el icono + Agregar paso en el lienzo.
- Debe agregar una acción a la rama Entonces o a la rama Si no.
- Puede anidar condiciones y debe agregar una acción al menos a una condición en el grupo de condiciones anidadas.
- Asigne un nombre a la condición que mejore la legibilidad.
- Configure los filtros para esta condición en la ventana Condición.
- Configure la instrucción Si para la condición.
- Configure la instrucción Entonces para la condición.
- Si anida las condiciones, debe agregar una Acción a una de las condiciones del grupo anidado.
- Configure la instrucción Si no para la condición.
- Puede dejar la instrucción Si no en blanco, detener el flujo de trabajo, continuar con otras acciones o agregar más condiciones.
- Guarde el flujo de trabajo. Puede activar el flujo de trabajo en cualquier momento.
Condición de ejemplo
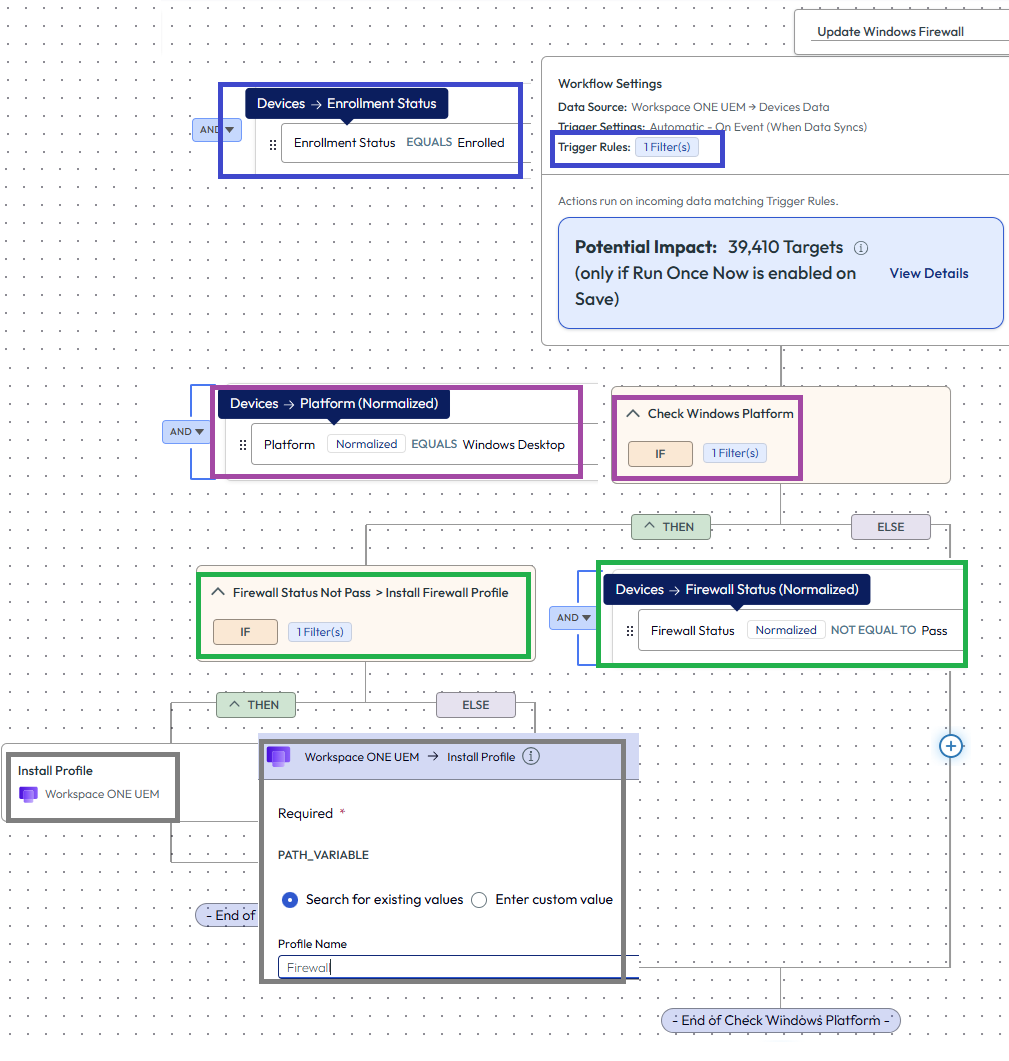
Busque los dispositivos Windows inscritos, compruebe el estado del firewall del dispositivo y, si el estado no es igual a Correcto, instale un perfil de firewall de Workspace ONE UEM para actualizar el firewall.
- En Intelligence, vaya a Área de trabajo > Freestyle > Agregar flujo de trabajo.
- Introduzca un nombre para el flujo de trabajo .
- En nuestro ejemplo, podemos utilizar Actualizar firewall de Windows.
- Configure el activador con el origen de datos deseado.
- Para nuestro escenario, utilice Workspace ONE UEM > Dispositivos como origen de datos.
- Seleccione Ajustes del activador.
- Configure el activador en Automático.
- Configure la Regla del activador.
- En este escenario, la regla del activador es Dispositivos > Estado de inscripción > Es igual a > Inscrito.
- Para agregar una condición, arrastre y suelte el icono Condición de los componentes de la izquierda o utilice el icono + Agregar paso en el lienzo.
- Asigne un nombre a la condición que mejore la legibilidad. En este escenario, introduzca Comprobar plataforma de Windows.
- Configure la instrucción Si para la condición.
- Para este escenario, configure Dispositivos > Plataforma > Es igual a > Escritorio de Windows.
- Se utilizan los mismos atributos en la condición que en la regla del activador.
- Configure la instrucción Entonces para la condición.
- Para este escenario, vamos a anidar otra condición para poder comprobar el estado del firewall.
- Asigne este nombre a la segunda condición: Estado del firewall incorrecto > Instalar perfil de firewall.
- Seleccione Dispositivos > Estado del firewall > No igual a > Correcto.
- Configure la instrucción Entonces para la segunda condición anidada.
- Agregue una Acción como Workspace ONE UEM > Instalar perfil.
- El motor de flujos de trabajo instala el perfil de firewall de UEM para actualizar el firewall cuando identifica que el estado del firewall no es Correcto.
- Una de nuestras condiciones en un grupo anidado tiene una acción asignada.
- Para el nombre del ID de perfil, busque y seleccione su perfil de firewall de UEM.
- Agregue una Acción como Workspace ONE UEM > Instalar perfil.
- Deje las instrucciones Si no en blanco para la primera y la segunda condición.
- Guarde el flujo de trabajo. Puede activar el flujo de trabajo en cualquier momento.
Escenarios de configuración
Debe configurar todos los datos necesarios para un flujo de trabajo dentro de la regla del activador. Si utiliza condiciones, debe utilizar una configuración específica (mismas entidades o relaciones 1:1) o debe hacer referencia a la entidad de condición en la regla del activador (relación 1:N).
¿Qué son las entidades y los atributos?
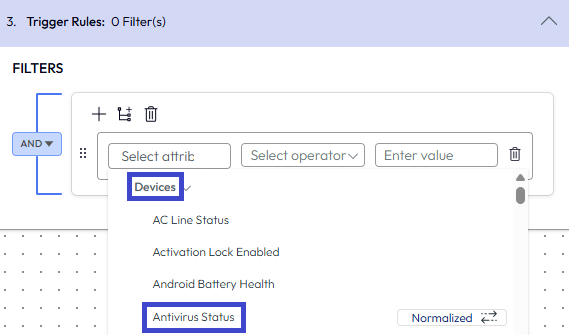
Las reglas y las condiciones del activador se componen de filtros de activador que incluyen una entidad y un atributo. En la captura de pantalla, Dispositivos es la entidad y Estado del antivirus es el atributo.
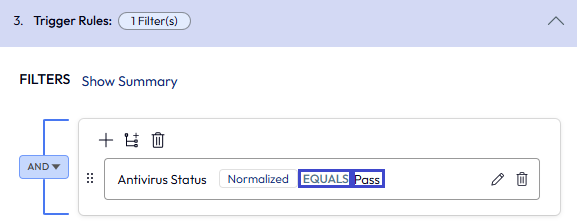
Es igual a y Correcto son los calificadores del par entidad-atributo Dispositivos > Estado del antivirus.
Escenarios
Para que las condiciones funcionen sin errores, configúrelas utilizando uno de los métodos indicados en la lista Escenarios.
Estos escenarios son ejemplos de la relación entre la entidad de la regla del activador y la entidad de la condición.
Escenario 1: mismas entidades
- Explicación
- La regla del activador y la condición utilizan la misma entidad.
- Ejemplo
- El origen de datos y la regla del activador utilizan la entidad Encuesta para hacer referencia a una
Apps Survey, y la condición también contiene una entidad Encuesta para evaluar. - El flujo de trabajo puede tener varias condiciones, pero todas deben utilizar la entidad Encuesta.
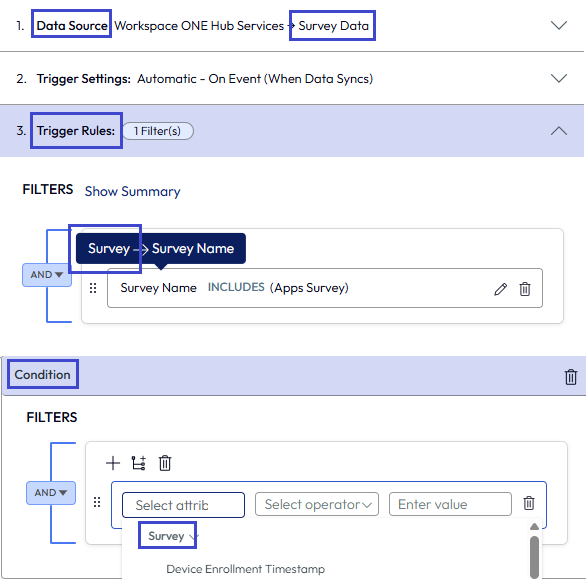
- El origen de datos y la regla del activador utilizan la entidad Encuesta para hacer referencia a una
Escenario 2: relaciones de uno a uno (1:1)
- Explicación
- La regla del activador utiliza una entidad y la condición utiliza una entidad diferente. pero las entidades de la regla del activador y de la condición tienen una relación de uno a uno.
- Por ejemplo, cuando se utiliza una entidad Dispositivos en la regla del activador, el motor de flujos de trabajo puede identificar una entidad única Usuarios en la condición.
- Otro ejemplo es que cuando se utiliza una entidad Dispositivos en la regla del activador, el motor de flujos de trabajo puede identificar el valor de una entidad Sensores específica, como
device_manufacturer_name, en la condición.
- Ejemplo
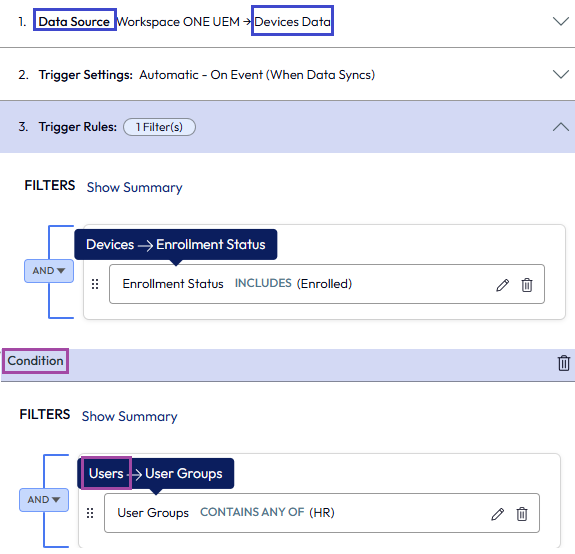
- El origen de datos y la regla del activador utilizan la entidad Dispositivos para ver si el dispositivo está inscrito y la condición utiliza una entidad Usuarios para comprobar que el usuario del dispositivo está en el grupo de usuarios de RR. HH.
- La regla del activador y la condición utilizan una relación de entidad 1:1, ya que el motor de flujos de trabajo identifica un dispositivo específico inscrito en un grupo de usuarios específico.
- Estos flujos de trabajo pueden tener más de una condición siempre que cada entidad de condición tenga una relación 1:1 con la entidad de regla del activador.
Escenario 3: relaciones de uno a muchos (1:N)
- Explicación
- La regla del activador utiliza una entidad y la condición utiliza una entidad diferente. Sin embargo, las entidades de la regla del activador y de la condición tienen una relación 1:N.
- Por ejemplo, un único dispositivo tiene muchas aplicaciones asignadas o instaladas en él. En este escenario, la regla del activador tiene un atributo de dispositivo y la condición incluye atributos de aplicación.
- Un ejemplo similar es la relación entre las entidades Dispositivos y las entidades Perfiles, Productos o Actualizaciones del SO.
- Esta relación 1:N puede impedir que el sistema utilice la entidad de la regla del activador para identificar de forma exclusiva una instancia de la entidad de la condición.
- Esta configuración puede ser complicada y requiere configuraciones adicionales.
- Ejemplo
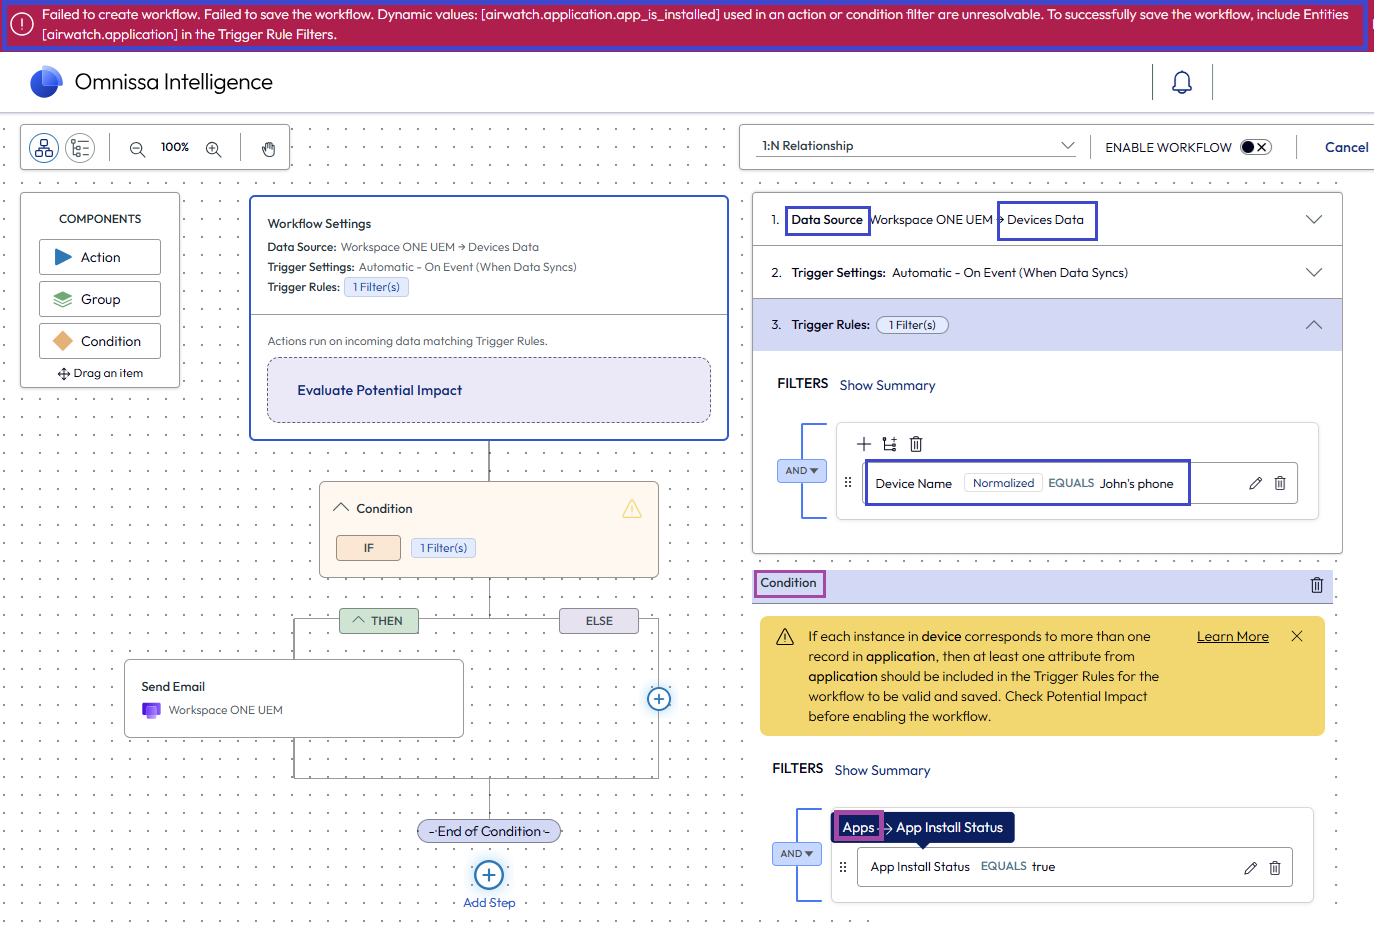
- La entidad Dispositivos de la regla del activador busca el nombre de un dispositivo, pero la entidad Aplicaciones de la condición comprueba Aplicaciones > Estado de instalación de la aplicación, y este dispositivo tiene muchas aplicaciones instaladas.
- El sistema no le permite guardar este flujo de trabajo.
- Consulte la sección Configuraciones adicionales: relaciones 1:N para las acciones que puede realizar si desea utilizar esta relación, pero aparece este error de interfaz de usuario.
Configuraciones adicionales: relaciones 1:N
Cuando se utilizan relaciones 1:N entre las reglas del activador y las condiciones, debe agregar otra regla del activador que haga referencia a la entidad de condición. Cuando se ejecuta, el flujo de trabajo se dirige a los registros que coinciden con los de la regla del activador (la entidad original) y la entidad que hace referencia a la condición.
La adición de la regla del activador que hace referencia a la entidad de condición aumenta la posibilidad de que el motor de flujos de trabajo se ejecute en un gran número de iteraciones a medida que compara los registros. La posibilidad de ejecutar iteraciones aumenta aún más cuando un flujo de trabajo se configura para ejecutarse según una programación. Los destinos del flujo de trabajo con una relación 1:N pueden ser excesivos, por lo que debe comprobar el Impacto potencial.
Acciones
- Si utiliza una entidad diferente en la condición, debe incluir una regla del activador que haga referencia a la entidad introducida en la condición.
Nota: Si utiliza una relación 1:1, no es necesario incluir la regla del activador adicional.- El sistema necesita esta regla del activador que hace referencia a la entidad de condición porque necesita unir los datos de las diferentes entidades para encontrar registros coincidentes y mostrar resultados.
- Si revisamos el ejemplo de relaciones 1:N en la lista Escenarios, puede agregar una regla del activador como Nombre de aplicación > Es igual a > Intelligent Hub.
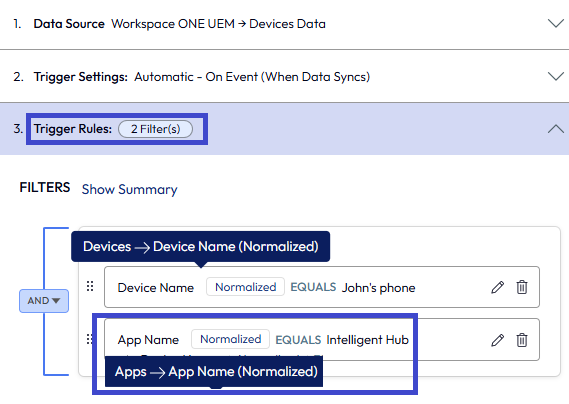
- Este filtro hace referencia a la entidad Aplicaciones que se introdujo en la condición (Aplicaciones > Estado de instalación de la aplicación) y completa la unión de las entidades Dispositivos y Aplicaciones.
- Las entidades de la regla del activador son más restrictivas y tienen más posibilidades de minimizar los pares de dispositivos y aplicaciones coincidentes en los que el flujo de trabajo puede iterar (también conocido como Impacto potencial).
- Si no agrega la regla del activador que hace referencia a la entidad de condición, no podrá guardar el flujo de trabajo y la interfaz de usuario mostrará un error.
- Compruebe el Impacto potencial.
- Pruebe el flujo de trabajo en un número reducido de destinos para comprobar que se ejecuta como desea añadiendo un filtro más restrictivo. Por ejemplo, los atributos del filtro GUID de dispositivo > Es igual > el GUID del dispositivo de prueba restringe la iteración a la búsqueda de un GUID de dispositivo específico.
- Utilice el ajuste de activador Automático cuando corresponda.
- Considere la posibilidad de crear un flujo de trabajo independiente.
Configuraciones adicionales: cambios de estado
Los flujos de trabajo adquieren datos que se utilizan para evaluar las condiciones al principio de la ejecución del flujo de trabajo y no en el momento de la evaluación.
Si el estado de un atributo cambia (por ejemplo, de true a false) debido a una acción anterior a la condición (por ejemplo, eliminar una aplicación o actualizar un dispositivo), el flujo de trabajo no tendrá este cambio de estado al principio y el sistema no informará de los cambios de estado en los resultados.
Acciones
- En las condiciones, utilice atributos que no cambiarán de estado durante la ejecución del flujo de trabajo. Un ejemplo de cambio de estado de atributo se debe a la acción que elimina una aplicación comprada, por lo que el estado de instalación de una aplicación cambia de true a false.
- Utilice un flujo de trabajo independiente para realizar las acciones que se habrían producido después del cambio de estado.
¿Le resultó útil esta página?